
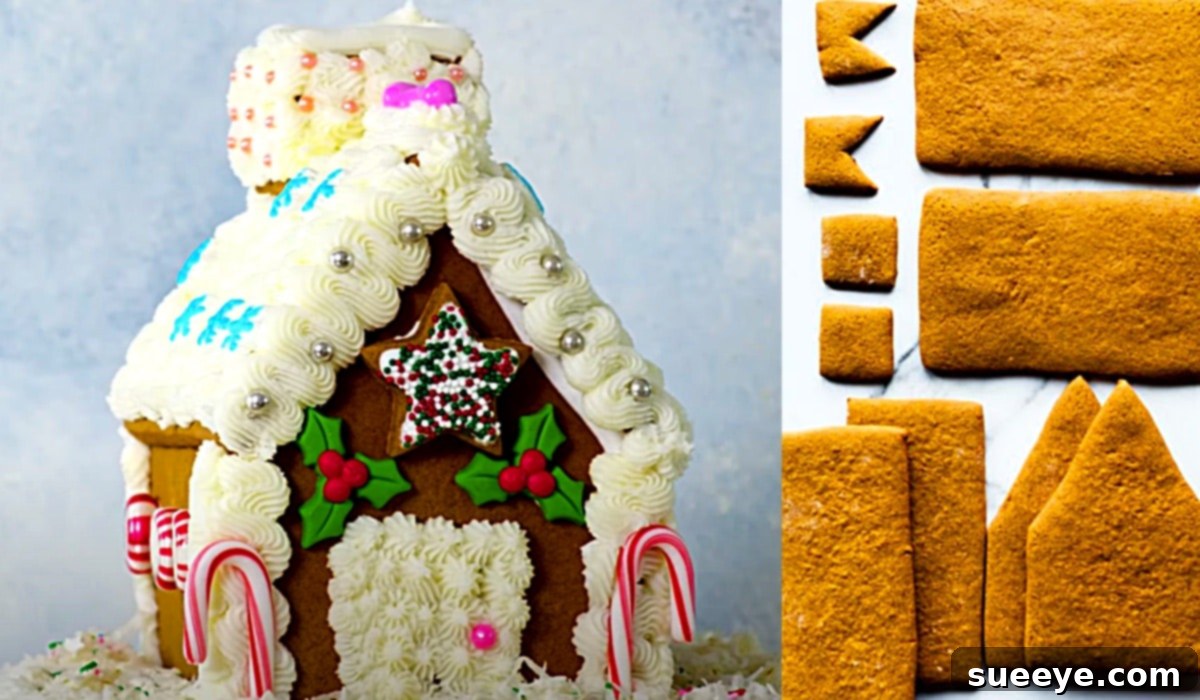
Mastering the Art of Gingerbread House Making: A Comprehensive Guide
For many, the idea of constructing a magnificent gingerbread house during the Christmas season is a cherished dream, yet often perceived as an intricate and daunting task. Images of perfectly crafted walls, sugary snowdrifts, and delicate candy adornments can make the project seem reserved for professional bakers or those with endless hours to spare. I, too, harbored this belief, often admiring these edible architectural marvels from afar, convinced that such a grand and beautiful endeavor would be beyond my skill set.
However, my perspective entirely shifted when I discovered an exceptional gingerbread house recipe and decorating tutorial by the acclaimed Sally’s Baking Addiction on YouTube. The clear, concise instructions and surprisingly simple decorating techniques presented in the video completely demystified the process. It immediately made the creation of a gingerbread house seem not only achievable but also incredibly fun and rewarding. I knew then that this was the year I would finally build my own festive masterpiece.
This comprehensive guide is designed to empower you to embark on your own gingerbread house journey, breaking down each step into manageable, enjoyable tasks. We’ll delve into crafting the ideal gingerbread dough that bakes up firm enough to hold its structure, mixing the perfect royal icing that acts as an unshakeable glue, and finally, unleashing your creativity with an array of delightful candies and frostings. Prepare to transform simple ingredients into a stunning holiday centerpiece that will delight family and friends alike. Let’s make this Christmas truly special with a handmade gingerbread house!
The Essential Ingredients for Your Festive Gingerbread House
The success of your gingerbread house hinges on the quality and precision of your ingredients. Each component plays a vital role, contributing to both the delicious flavor and the structural integrity required for an enduring edible dwelling. Here’s a detailed list of what you’ll need to assemble:
For the Perfect Structural Gingerbread Dough:
- 3 cups of all-purpose flour: This forms the primary structure of your gingerbread. Ensure it’s fresh and properly measured for consistent results.
- 1/4 teaspoon of baking soda: While gingerbread houses are sturdy, a touch of baking soda provides a slight lift, resulting in a more tender crumb without compromising structural integrity.
- 2 teaspoons of ground ginger: The quintessential spice for gingerbread, delivering its characteristic warm, slightly spicy, and aromatic flavor.
- 2 teaspoons of ground cinnamon: A sweet and warming spice that beautifully complements the ginger, adding depth to the overall flavor profile.
- 1/2 teaspoon of ground all-spice: This complex spice, reminiscent of cloves, nutmeg, and cinnamon, enriches the gingerbread with a truly traditional holiday aroma.
- 1/4 teaspoon of salt: Crucial for balancing the sweetness of the molasses and sugar, and enhancing the vibrant flavors of the spices.
- 6 tablespoons of unsalted butter (softened): Creaming softened butter with sugar creates a light and airy base for the dough. Room temperature butter is key for smooth, lump-free mixing.
- 3/4 cups of packed brown sugar: Contributes moisture, a tender texture, and a rich, caramel-like sweetness that is synonymous with authentic gingerbread.
- 1 large egg: Acts as an essential binding agent, helping to hold the dough together and adding a desirable richness.
- 1/2 cup of dark molasses: Indispensable for the gingerbread’s signature dark color, deep, robust flavor, and slightly chewy texture. Dark molasses provides a stronger, more traditional taste than lighter varieties.
- 2 tablespoons of water: Used to achieve the ideal dough consistency, ensuring it’s pliable enough to roll out but firm enough to hold its shape.
For the Super Strong Royal Icing (The Ultimate Gingerbread Glue):
Royal icing is the secret to a durable, long-lasting gingerbread house. It dries hard and provides unparalleled structural support for assembly and detailed decorations. While the original content mentioned royal icing without specific quantities, here’s a reliable recipe:
- 3 large egg whites (or 4 tablespoons meringue powder + 6 tablespoons warm water): Egg whites are traditional, but meringue powder is a safer, more stable, and equally effective alternative.
- 4 cups (approximately 1 pound) powdered sugar (confectioners’ sugar), sifted: The main component, providing structure and sweetness. Sifting is crucial to prevent lumps.
- 1/2 teaspoon vanilla extract (optional): Adds a touch of flavor, though some prefer pure white icing for specific decorative effects.
- 1/4 teaspoon cream of tartar (optional, if using egg whites): Helps stabilize the egg whites, resulting in a stronger and faster-setting icing.
For the Creamy Buttercream Frosting (For Optional Decoration or Indulgence):
While royal icing is essential for construction, a batch of classic buttercream frosting can be used for softer decorative elements, such as snowy drifts, or simply for those who love to taste their creations!
- 1/2 cup of shortening: Contributes to a whiter, more stable, and smoother buttercream, especially useful for piping.
- 1/2 cup of unsalted butter (softened): Provides the rich, classic buttery flavor. Ensure it’s at room temperature for optimal creaming.
- 4 cups of powdered sugar, sifted: Forms the bulk of the frosting; sift to avoid a gritty texture.
- 2 tablespoons of milk: Used to adjust the frosting’s consistency to your desired piping or spreading thickness.
- 1/4 teaspoon of vanilla extract: A timeless flavor enhancer for sweet frostings.
- 1/8 teaspoon of salt: A small amount is added to balance the sweetness and bring out the other flavors.
Assorted Candies for Decoration:
This is where your gingerbread house truly comes to life! Stock up on a variety of colorful and textured candies to create a magical scene:
- Gummy bears and worms: Great for adding playful characters or whimsical roof tiles.
- M&M’s and Skittles: Perfect for vibrant roof shingles, pathway stones, or window details.
- Gumdrops and spice drops: Excellent for festive lights, bushes, or ornamental accents.
- Peppermints and candy canes: Ideal for pathways, fences, or charming decorative elements.
- Sprinkles (various shapes and colors): Add sparkle and fine detail to any surface.
- Pretzels: Can be used to create fences, logs, or other rustic features.
- Shredded coconut: Fantastic for creating realistic snow around the base of your house.
Comprehensive Directions: Building and Decorating Your Dream Gingerbread House
Creating a gingerbread house is a delightful, multi-stage process that beautifully combines baking, structural engineering, and artistic expression. By following these detailed steps, inspired by the clear and approachable techniques demonstrated by Sally’s Baking Addiction on YouTube, you’ll be able to construct a charming and delicious holiday display with confidence.
Part 1: Baking the Sturdy Gingerbread Components
The foundation of a successful gingerbread house lies in perfectly baked pieces. Follow these steps to ensure your gingerbread is firm, flavorful, and ready for assembly.
- Prepare Dry Ingredients: In a medium bowl, thoroughly whisk together the all-purpose flour, baking soda, ground ginger, ground cinnamon, ground all-spice, and salt. This ensures all spices and leavening agents are evenly distributed, leading to consistent flavor and texture. Set this mixture aside.
- Cream Wet Ingredients: In a separate, larger mixing bowl (or the bowl of a stand mixer fitted with the paddle attachment), beat the softened unsalted butter and packed brown sugar together on medium speed until the mixture becomes light, fluffy, and noticeably paler in color. This typically takes about 2 to 3 minutes, scraping down the sides of the bowl as needed.
- Incorporate Egg and Molasses: Beat in the large egg until it is fully incorporated into the butter-sugar mixture. Next, slowly pour in the dark molasses and water, mixing on low speed until just combined. Be careful not to overmix at this stage. Again, scrape down the sides of the bowl to ensure everything is thoroughly integrated.
- Form the Dough: Gradually add the whisked dry ingredient mixture to the wet ingredients. Mix on low speed until a thick, cohesive dough forms. Stop mixing as soon as no dry streaks of flour are visible to avoid overworking the dough, which can result in tough gingerbread. The dough will be quite stiff.
- Chill the Dough (Crucial Step): Divide the stiff dough into two or three equal portions. Flatten each portion into a disk, wrap it tightly in plastic wrap, and refriger refrigerate for a minimum of 3-4 hours, or ideally overnight. Chilling is absolutely crucial as it makes the dough much easier to roll out and significantly prevents spreading during baking, ensuring your house pieces maintain their shape.
- Prepare Templates: While your dough is chilling, gather or create your gingerbread house templates. You can find numerous free printable templates online, or you can design your own. Essential pieces usually include: two side walls, two roof pieces, one front wall, and one back wall. Ensure all templates have clean, sharp edges for precise cuts.
- Roll and Cut Dough: Preheat your oven to 350°F (175°C). Line several large baking sheets with parchment paper. On a lightly floured surface or, even better, between two sheets of parchment paper (this prevents sticking and makes transfer easier), roll out one portion of chilled gingerbread dough to an even thickness of about 1/4 inch. Place your paper templates on the rolled dough and use a sharp knife or a pizza cutter to carefully cut out the house pieces. Re-roll any dough scraps as needed, but try to handle the dough as little as possible.
- Bake the Pieces: Gently transfer the cut gingerbread pieces to the prepared baking sheets, leaving a little space between each piece to allow for even baking. Bake for 12-15 minutes, or until the edges are firm and lightly golden brown. Baking time will vary based on the size and thickness of your pieces, so keep a close eye on them.
- Trim and Cool: This step is vital for a house that fits together perfectly. Immediately after removing the gingerbread from the oven, if any pieces have spread or distorted slightly, carefully place your templates back over them and use a sharp knife or pizza cutter to trim the edges back to their original shape while the gingerbread is still warm and pliable. Let the pieces cool completely on the baking sheets. They will firm up considerably as they cool, becoming strong and ready for assembly.
Part 2: Crafting the Royal Icing (The Ultimate Gingerbread Glue)
Royal icing is not just for decoration; it’s the structural adhesive that will hold your entire gingerbread house together. Its ability to dry hard and strong is unparalleled.
- Prepare Ingredients: If you are using fresh egg whites, ensure they are at room temperature. If opting for meringue powder, combine it with the warm water in a large mixing bowl and whisk until it becomes foamy.
- Whip Egg Whites (or Meringue Powder Mixture): In a large bowl (preferably a stand mixer with a whisk attachment), beat the egg whites (or the meringue powder mixture) on medium speed until soft peaks begin to form. If using, add the cream of tartar at this stage to help stabilize the egg whites.
- Gradually Add Sugar: With the mixer running on low speed, slowly and gradually add the sifted powdered sugar, approximately 1/2 cup at a time, allowing each addition to fully incorporate before adding more.
- Whip to Stiff Peaks: Increase the mixer speed to medium-high and continue to beat for 5-7 minutes, or until the icing becomes very thick, glossy, and holds stiff, upright peaks when the whisk is lifted. If desired, beat in the vanilla extract during the last minute of mixing. The final consistency should be robust enough to hold its shape when piped. If the icing is too thick, add a tiny amount of water (1/4 teaspoon at a time) to thin it; if it’s too thin, incorporate a bit more sifted powdered sugar.
- Store Properly: Royal icing dries quickly when exposed to air. Always keep any unused icing covered with a damp cloth or plastic wrap pressed directly onto its surface to prevent crusting. Transfer a portion to a piping bag fitted with a medium round tip for immediate use in assembly.
Part 3: Assembling Your Gingerbread House Structure
This is where your house begins to take physical form. Patience and a steady hand are your best tools during this crucial stage.
- Prepare Your Base: Select a sturdy, flat base for your gingerbread house. A large piece of cardboard covered in aluminum foil or parchment paper, a thick cake board, or a decorative serving tray works perfectly.
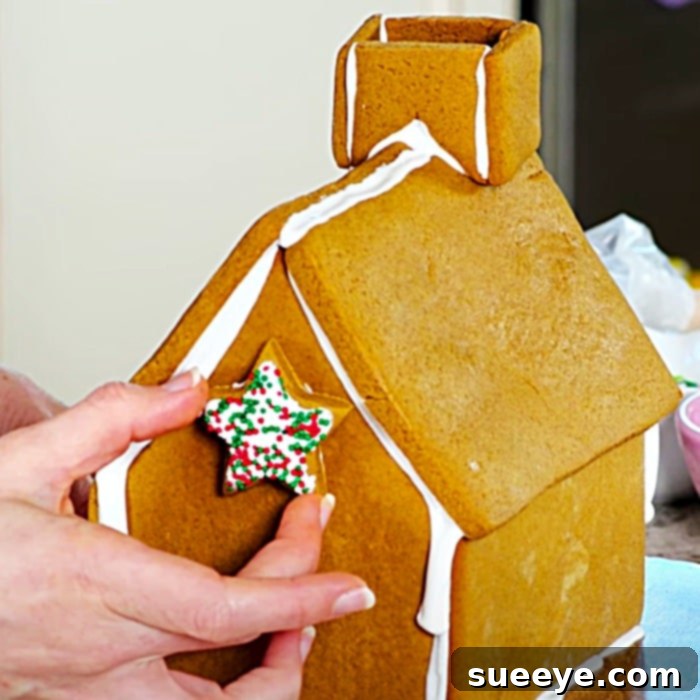
- Assemble the Walls: Using your royal icing (now in a piping bag), pipe a thick, generous line of icing along the bottom edge of one side wall and along one of its short, vertical edges. Carefully press this side wall onto your chosen base. Immediately attach the back wall to it, aligning the iced vertical edge of the side wall with the edge of the back wall to create a strong corner. Hold both pieces firmly in place for a minute or two until the icing begins to set and they can stand independently.
- Build the Remaining Structure: Continue to attach the remaining walls in a similar fashion, applying generous amounts of royal icing to all joining seams (bottom and vertical edges). You may find it helpful to use cans, heavy glasses, or small blocks to prop up the walls as they dry, preventing them from shifting. Allow the entire wall structure to dry and set for at least 1-2 hours, or ideally overnight, before attempting to add the roof. This waiting period is critical for achieving maximum stability.
- Attach the Roof: Once the wall structure is completely stable and dry, pipe a thick, continuous line of royal icing along the top edges of the front and back walls, as well as along the slanted peaks where the two roof pieces will meet. Carefully position the first roof piece, pressing it firmly into the icing. Hold it in place for several minutes. Repeat with the second roof piece. For added strength and a decorative touch, pipe a line of icing along the ridge where the two roof pieces meet. Allow the entire house, especially the roof, to dry and set completely for several hours (or preferably overnight) before moving on to decoration.
Part 4: Decorating Your Gingerbread Masterpiece
Now for the most exciting and creative phase – transforming your sturdy gingerbread structure into a whimsical, edible wonderland with an array of colorful candies and frosting!
- Prepare Buttercream (Optional): If you plan to incorporate buttercream for softer decorative effects (like fluffy snow or specific fillings), prepare it now according to the recipe provided earlier. Remember, buttercream is softer and won’t harden like royal icing, making it unsuitable for structural support but excellent for textural elements.
- Outline and Detail with Royal Icing: Using royal icing in piping bags fitted with various tips (small round tips for fine lines, star tips for borders), begin to create windows, doors, icicles cascading from the roofline, delicate snow drifts, and intricate patterns on the walls. This is your opportunity to truly personalize your house and add architectural details.
- Attach Candies: While the royal icing is still wet (it dries quickly!), carefully press your assorted candies onto the house. Use larger candies like gumdrops or peppermints to line the roof, create charming pathways, or frame windows. Smaller candies such as sprinkles, M&M’s, silver dragees, or tiny gumdrops can add sparkle, texture, and fine details to any surface. Arrange them creatively to form patterns, simulate garlands, or create festive scenes.
- Create a Snowy Landscape: Pipe generous amounts of royal icing or buttercream around the base of your house on the display board to create a realistic snowy landscape. For an extra touch of realism, gently sprinkle shredded coconut over this “snow” to mimic freshly fallen powder.
- Add Finishing Touches: Let your imagination soar! Consider adding small gingerbread people, candy cane fences, pretzel log piles, or edible glitter for a truly magical effect. Arrange miniature trees made from ice cream cones frosted with green buttercream or royal icing around your house. Allow all decorations to set completely before moving or displaying your gingerbread house.

Final Thoughts on Your Gingerbread House Adventure
Embarking on the creation of a gingerbread house is a truly rewarding holiday tradition that yields both a stunning edible centerpiece and a treasure trove of cherished memories. What once seemed like an overwhelmingly complex endeavor is, in reality, entirely accessible with the right recipe, a dash of patience, and a sprinkle of creative spirit. The process of baking, assembling, and decorating your gingerbread house is not just about making a festive treat; it’s about engaging in a delightful craft, fostering family togetherness, and creating a tangible symbol of holiday joy.
Whether you are a seasoned baker eager to hone your skills or a curious beginner taking your first steps into edible architecture, the satisfaction of seeing your own gingerbread house take shape is unparalleled. The comforting aroma of warm spices filling your kitchen, the focused calm of designing intricate details, and the sheer delight on the faces of those who behold your finished creation make every moment spent worthwhile. So, gather your ingredients, set aside some dedicated time, and allow your holiday spirit to guide your hands. You’ll discover that crafting this amazing gingerbread house is not only simple and immensely fun but also results in a breathtaking, edible display that will undoubtedly become a highlight of your Christmas celebrations for years to come.