
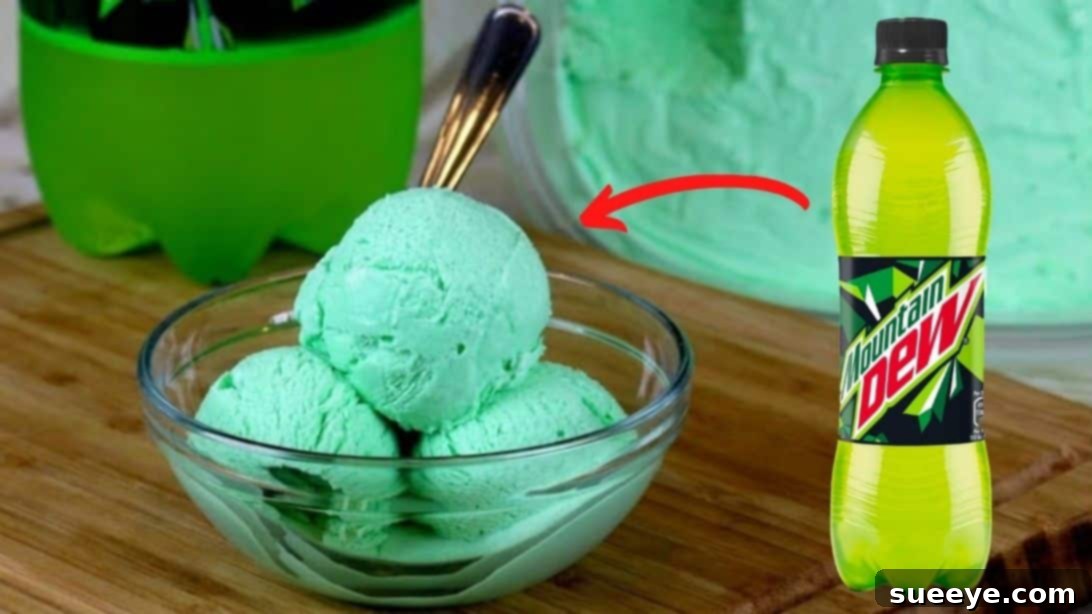
Ultimate No-Churn Mountain Dew Ice Cream: Your New Favorite Homemade Treat!
Are you ready to embark on a culinary adventure that promises both fun and an incredibly delicious outcome? Prepare to be amazed by a unique and exciting way to create homemade ice cream that requires absolutely no special equipment! Forget about bulky ice cream makers; this recipe for Mountain Dew ice cream is a no-churn marvel, designed for simplicity and guaranteed success. All you need is a little enthusiasm and a desire for a truly unforgettable dessert experience. This method is so straightforward and foolproof that even kitchen novices will feel like seasoned pros. We’ve personally tested this recipe with family, and it’s always a huge hit, especially with younger crowds who adore the vibrant flavor of Mountain Dew transformed into a creamy, frozen delight. They consistently ask for more, making it a go-to treat for any gathering. This brilliant recipe tutorial comes courtesy of FunFoods via YouTube, a fantastic resource for innovative and enjoyable cooking ideas. While we focus on the zesty goodness of Mountain Dew here, remember that this versatile no-churn technique opens up a world of possibilities for other soft drink flavors too!
Why No-Churn Ice Cream is a Game-Changer
For many years, making homemade ice cream seemed like a daunting task, reserved for those with expensive, single-use gadgets. Enter the “no-churn” method, a revolutionary approach that has democratized the art of ice cream making. But what makes it so special? The secret lies in a clever combination of two key ingredients: heavy cream and sweetened condensed milk. When whipped to stiff peaks, heavy cream incorporates a significant amount of air, providing the light, airy texture that’s characteristic of good ice cream. Sweetened condensed milk, on the other hand, does more than just add sweetness; its high sugar and fat content helps to prevent ice crystals from forming, ensuring a silky-smooth, creamy consistency without the need for constant churning. This ingenious method means you can enjoy rich, velvety homemade ice cream with minimal effort, transforming your kitchen into a personal ice cream parlor without the fuss.
Essential Ingredients for Your Mountain Dew Ice Cream
Creating this unique Mountain Dew ice cream requires just a handful of readily available ingredients. The quality of these components plays a crucial role in the final texture and flavor, so choose wisely!
- 2 cups (approx. 480ml) Heavy Cream: Often labeled “whipping cream,” this is the foundation of our creamy dessert. Ensure it’s very cold for optimal whipping.
- 1 can (14 ounces / approx. 396g) Sweetened Condensed Milk: This provides the necessary sweetness and creamy texture, acting as the stabilizer that keeps your ice cream smooth and crystal-free.
- 1 cup (approx. 240ml) Mountain Dew Soft Drink: The star ingredient! Its distinctive citrusy, zesty flavor is what makes this ice cream truly unique.
- Green Food Coloring (optional): A few drops can enhance the visual appeal, giving your ice cream that signature Mountain Dew hue. Totally optional, but fun for presentation!
Equipment You’ll Need:
- A large mixing bowl (preferably chilled)
- An electric mixer (handheld or stand mixer) with a whisk attachment, or a sturdy hand whisk
- A spatula for folding
- A freezer-safe container with a lid (e.g., a loaf pan, an airtight plastic container, or a specialized ice cream container)
- Plastic wrap
Step-by-Step Directions to Zesty Perfection
Follow these simple steps to create your delightful Mountain Dew ice cream. Precision and patience are key for the best results!
Step 1: Prepare and Whip the Heavy Cream
Begin by preparing your mixing environment. Place your large mixing bowl in the freezer for at least 30 minutes to an hour. A very cold bowl will significantly aid the whipping process, helping the heavy cream reach stiff peaks more quickly and efficiently. Once chilled, retrieve the bowl and pour in your 2 cups of heavy cream. Using an electric mixer (or a whisk and some elbow grease), start whipping the cream on a low speed, gradually increasing to medium-high. Watch closely as the cream transforms from a liquid into a fluffy, voluminous cloud. You’re looking for “stiff peaks” – this means when you lift the whisk, the cream should hold its shape firmly, with a peak that stands upright without drooping. Be careful not to over-whip, as this can turn it into butter! The goal is a light, airy, and stable base for your ice cream.
Step 2: Gently Fold in the Sweetened Condensed Milk
With your perfectly whipped heavy cream ready, it’s time to incorporate the sweetened condensed milk. Pour the entire can (14 ounces) of condensed milk directly into the whipped cream. Now, the key here is to “fold” rather than stir. Folding is a gentle technique that combines ingredients while preserving the air you’ve just whipped into the cream. Use a spatula to scoop from the bottom of the bowl, bringing it up over the top of the mixture, then turn the bowl and repeat. Continue this motion until the condensed milk is thoroughly combined with the heavy cream, creating a smooth, homogenous base. This careful folding ensures your ice cream maintains its light and airy texture.
Step 3: Introduce the Mountain Dew Flavor
Next, slowly pour in your 1 cup of Mountain Dew soft drink into the mixture. Just like with the condensed milk, gently fold the Mountain Dew into the cream base. The carbonation from the soda might cause the mixture to slightly deflate, so be as gentle as possible to retain as much air as you can. Continue folding until the Mountain Dew is evenly distributed and the mixture is uniformly combined. You’ll notice a delightful, subtle citrus aroma beginning to emerge, promising the unique flavor of your homemade treat. Avoid overmixing at this stage to prevent deflating the cream further.
Step 4: Add Optional Food Coloring and Prepare for Freezing
This is where you can add a vibrant visual touch! If desired, add a few drops of green food coloring to the mixture. Start with 1-2 drops and fold gently, then add more if you want a more intense color, matching the iconic hue of the Mountain Dew. Once you’ve achieved your desired shade, give it a final gentle fold to ensure uniform color distribution. Now, retrieve your chosen freezer-safe container. Carefully pour the Mountain Dew ice cream mixture into the container, smoothing the top with your spatula if needed. To prevent ice crystals from forming on the surface and to maintain that coveted creamy texture, press a piece of plastic wrap directly onto the surface of the ice cream base, ensuring no air pockets remain between the plastic and the mixture. Finally, secure the lid on your container.
Step 5: Freeze to Perfection and Serve
Place your covered container into the freezer. For optimal results and a firm, scoopable consistency, freeze for a minimum of 6 hours. However, for the best texture and full flavor development, freezing overnight (12-24 hours) is highly recommended. When you’re ready to enjoy your homemade masterpiece, remove it from the freezer and let it sit at room temperature for about 5-10 minutes. This brief softening period will make scooping much easier and enhance the creamy mouthfeel. Scoop generous portions of your zesty Mountain Dew ice cream into bowls or cones, and prepare to delight your taste buds! Get ready for compliments, as this unique flavor profile is sure to be a conversation starter.
Pro Tips for Homemade Ice Cream Success
While this recipe is incredibly forgiving, a few expert tips can elevate your no-churn ice cream from great to absolutely extraordinary:
- Chill Everything: Ensure your heavy cream, mixing bowl, and even the whisk attachment are thoroughly chilled. This creates a colder environment that helps the cream whip faster and achieve maximum volume.
- Don’t Over-Whip: While stiff peaks are essential, be mindful not to over-whip the heavy cream into butter. Stop as soon as the peaks hold their shape.
- Fold Gently: The key to a light, airy texture is to preserve the air incorporated into the whipped cream. Always use a gentle folding motion when adding the condensed milk and Mountain Dew.
- Quality Ingredients Matter: While simple, using good quality heavy cream and sweetened condensed milk will yield the best flavor and texture.
- Proper Freezing: The direct plastic wrap contact and airtight lid are crucial for preventing ice crystals. Freeze for at least 6 hours, but overnight for optimal firmness.
- Allow to Soften: Don’t try to scoop rock-hard ice cream straight from the freezer. A few minutes at room temperature will make it much more manageable and enjoyable.
Unleash Your Creativity: Flavor Variations and Add-Ins
The beauty of no-churn ice cream lies in its adaptability. Once you master the basic Mountain Dew recipe, the possibilities for customization are endless!
Experiment with Other Sodas:
- Sprite or 7UP: For a similar citrusy but perhaps less intense lime-lemon flavor.
- Fanta Orange: To create a vibrant, creamsicle-like orange ice cream.
- Root Beer: Perfect for a classic root beer float experience in ice cream form.
- Coca-Cola or Pepsi: Offers a unique, sweet cola flavor that might surprise you.
- Grape Soda: For a fun, fruity, and purple-hued dessert.
Fantastic Add-Ins:
- Citrus Zest: A little extra lime or lemon zest can amplify the freshness of the Mountain Dew.
- Candies: Crushed hard candies, gummy bears (add just before freezing), or even Pop Rocks for a fizzy surprise.
- Fruits: Fold in finely chopped fruits like pineapple, mango, or berries for added texture and natural sweetness (ensure fruits are well-drained to avoid excess moisture).
- Chocolate Chips: While not traditional for Mountain Dew, mini white chocolate chips could add a delightful contrast.
- Extracts: A few drops of vanilla extract or lemon extract can deepen the flavor profile.
Remember to fold in any solid add-ins during Step 4, just before pouring the mixture into the freezer-safe container, to ensure even distribution.
Serving Suggestions and Perfect Pairings
Your homemade Mountain Dew ice cream is a star on its own, but here are a few ideas to make it even more special:
- Classic Scoop: Simply serve it in a bowl or a crispy waffle cone for a refreshing treat.
- Ice Cream Float Reinvented: Add a scoop or two to a glass of chilled Mountain Dew (or even Sprite!) for an ultimate soda float experience.
- Garnish Galore: Top with whipped cream, a maraschino cherry, rainbow sprinkles, or even a sprinkle of lime zest for an extra pop of color and flavor.
- Dessert Sandwich: Sandwich a scoop between two sugar cookies or soft lemon cookies for a zesty ice cream sandwich.
- With Cake or Brownies: A scoop of this vibrant ice cream can cut through the richness of a chocolate brownie or complement a lemon pound cake beautifully.
Storing Your Homemade Ice Cream
To enjoy your Mountain Dew ice cream for days to come, proper storage is essential. Always keep it in an airtight freezer-safe container. This prevents freezer burn, which can lead to ice crystals and a loss of creamy texture. If you’ve used plastic wrap directly on the surface, keep it there. Your homemade ice cream typically stays fresh and delicious in the freezer for up to 2-3 weeks. Beyond that, while still safe to eat, its texture and flavor might start to degrade slightly. When ready to serve again, follow the softening tip mentioned earlier for the best experience.
The Joy of DIY Ice Cream
Beyond the unique flavor and simple process, making your own ice cream at home offers a multitude of benefits. You have complete control over the ingredients, allowing you to avoid artificial flavors, colors, and excessive preservatives often found in store-bought varieties. It’s a wonderful activity to share with family and friends, transforming a simple dessert into a memorable bonding experience. The satisfaction of creating something so delicious from scratch is truly rewarding, and the ability to customize flavors endlessly means you’ll never run out of new treats to try. This Mountain Dew ice cream isn’t just a recipe; it’s an invitation to explore, create, and savor the simple pleasures of homemade goodness.
We hope you thoroughly enjoy creating and indulging in this delightfully zesty, creamy, and undeniably fun Mountain Dew ice cream. It’s a testament to how simple ingredients can come together to form something truly extraordinary. A huge thank you once again to FunFoods via YouTube for sharing this brilliant and innovative recipe. We highly encourage you to visit their channel, subscribe, and explore their array of other creative and inspiring culinary adventures. Happy scooping!