
Craft Your Own Charming DIY Fall Owl Wreath: An Easy & Budget-Friendly Guide
As the leaves begin to turn vibrant shades of red, orange, and gold, and a crisp, cool breeze fills the air, the Fall season ushers in a wonderful opportunity for creativity. This time of year is perfect for engaging in heartwarming craft projects and savoring delicious seasonal foods. Among the most cherished autumn decorations, a beautifully crafted wreath stands out as a welcoming symbol for any home. While countless ideas and inspirations for Fall-themed wreaths abound online, sometimes simplicity and charm are all you need.
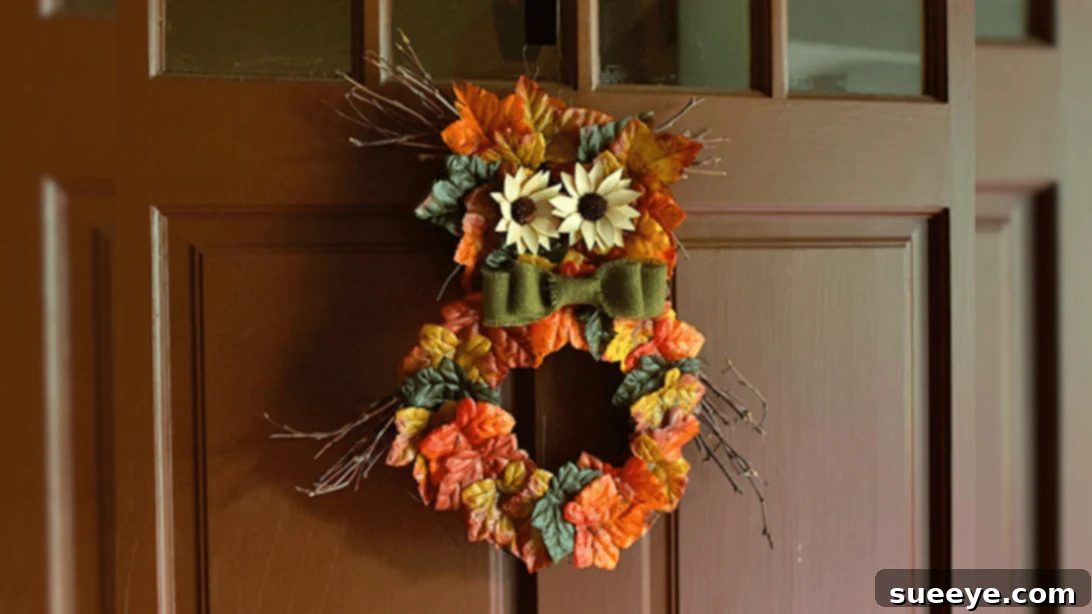
If you’re seeking a unique, simple, and incredibly easy-to-make decoration that captures the spirit of autumn, then you’ll absolutely adore this captivating owl-shaped wreath. Inspired by the brilliant creators at Factory Direct Craft on YouTube, this DIY project is perfect for crafters of all skill levels, offering a delightful way to personalize your Fall decor.
What makes this DIY Fall owl wreath particularly appealing is its accessibility and speed. Designed with beginners in mind, you can realistically complete this charming craft in as little as 20 to 30 minutes, making it an ideal last-minute addition to your seasonal display. Furthermore, the materials required are incredibly budget-friendly, often found at your nearest Dollar Store. For an even more authentic touch, consider incorporating natural elements like freshly fallen leaves and twigs gathered from your own backyard. This project truly encourages you to unleash your creativity, allowing you to decorate your owl wreath however your heart desires. We’re confident you’ll find as much joy in making this DIY project as we did in sharing it!
Elevate Your Fall Decor: Explore More Wreath Ideas
Looking for additional inspiration to adorn your home this autumn? Don’t miss these other fantastic DIY wreath tutorials:
- How to Make a DIY Fall Scarecrow Wreath: Add a rustic, whimsical touch to your front door with an adorable scarecrow-themed wreath, perfect for welcoming guests throughout the harvest season.
- Easy DIY Dollar Tree Fall Wreath Tutorial: Discover how to create stunning Fall wreaths using only materials from the Dollar Tree, proving that beautiful decor doesn’t have to break the bank.
Gathering Your Supplies: What You’ll Need for Your Charming DIY Owl Wreath
One of the best aspects of this DIY owl wreath is its minimal material list, making it a truly accessible project for everyone. Most items can be sourced affordably, and many crafters might even have some already on hand. Here’s a detailed list of what you’ll need to create your own adorable Fall owl:
- Small Grapevine Wreath: This will form the head of your owl. Look for one approximately 8-10 inches in diameter. Grapevine wreaths offer a natural, rustic base that beautifully complements Fall aesthetics.
- Large Grapevine Wreath: This serves as the owl’s body. Choose one that’s about 12-18 inches in diameter to ensure a proportionate owl shape when paired with the smaller wreath.
- Assorted Fall Leaves: You can use artificial Fall leaves from a craft store for durability and vibrant colors, or collect real, dried leaves for an organic, ephemeral look. Choose a variety of sizes and colors to add depth.
- Twig Bundle: A small bundle of thin, sturdy twigs will be used for the owl’s wings and ear tufts. You can purchase these at craft stores or easily collect them from your yard.
- Green Burlap Ribbon: A length of green burlap ribbon (or any Fall-colored ribbon like orange, brown, or deep red) will be used to create a charming bow for the owl’s neck.
- Sola Flowers: These beautiful, natural wood flowers make perfect owl eyes. You can find them in various sizes and colors, or opt for other creative eye alternatives like large buttons, pinecones, or even painted wooden discs.
- Hot Glue Gun and Glue Sticks: An essential tool for securely attaching all your elements. Always use caution when operating a hot glue gun.
- Scissors: For cutting ribbon and trimming any excess materials.
- Floral Wire: Thin, flexible wire used for connecting the wreaths and creating a hanger. Green floral wire blends in well.
- Wire Cutters: Necessary for cutting floral wire safely and precisely.
Step-by-Step Guide: How to Craft Your Adorable Fall Owl Wreath
Creating your Fall owl wreath is a straightforward and enjoyable process. Follow these detailed steps to bring your charming avian friend to life, adding a touch of rustic elegance to your autumn home decor.
Step 1: Assembling the Owl’s Body and Head
Begin by laying your large grapevine wreath flat on your work surface. This will serve as the main body of your owl. Next, carefully position the smaller grapevine wreath directly above the large wreath, slightly overlapping it. This smaller wreath forms the owl’s head, creating the foundational silhouette of your design. Once you’re satisfied with the positioning and the owl shape is clearly visible, secure the two wreaths together. Take a piece of floral wire, approximately 6-8 inches long, and tightly wrap it around the overlapping sections where the two wreaths meet. Twist the ends of the wire together at the back to ensure a firm connection, then trim any excess with your wire cutters. This ensures your owl remains sturdy. Finally, create a hanger for your wreath. Loop another 6-inch piece of floral wire, threading it through the top of the smaller wreath (the owl’s head) and twisting the ends securely to form a loop. This loop will allow you to easily hang your finished owl wreath on a door, wall, or mantelpiece.
Step 2: Attaching the Wings and Ear Tuft Details
Now, let’s give your owl its distinctive features. Carefully snap off two bundles of twigs from your twig bundle. These bundles should be roughly equal in size and length, mimicking the appearance of wings. Position one bundle on each side of the owl’s body (the large grapevine wreath), allowing them to extend slightly outwards to give the impression of outstretched wings. Use hot glue to firmly attach these twig bundles to the sides of the large wreath. Hold each bundle in place for a few seconds until the glue sets. Next, to create the owl’s characteristic ear tufts, snap off two smaller bundles of twigs. These should be shorter and perhaps a bit thinner than the wing bundles. Hot glue one small twig bundle to each side of the owl’s head (the small grapevine wreath), positioning them near the top to resemble ears. These details truly begin to give your wreath its charming owl personality.
Step 3: Bringing Your Owl to Life with Embellishments
This is where your owl truly comes to life with vibrant Fall colors and unique details. Begin by hot gluing the assorted Fall leaves around the edges of the entire owl wreath, both the head and the body. Overlap the leaves slightly to create a fuller, richer look. For a cohesive flow, ensure that the majority of your leaves are facing downwards, mimicking the natural drape of foliage. Once the leaves are in place, it’s time for the eyes. Adhere two sola flowers to the small wreath (the owl’s head) using hot glue. Position them symmetrically to form the owl’s eyes. Feel free to choose flowers of different sizes or colors for a more expressive look. Finally, add a touch of elegance and charm by creating a small bow from your green burlap ribbon. Once tied, hot glue this bow to the “neck” area where the small and large wreaths connect. This adds a lovely finishing touch and further defines the owl’s shape.
Once all your elements are securely attached and the glue has dried, step back and admire your beautiful, handmade DIY Fall owl wreath. It’s now ready to bring a touch of autumn whimsy to your home!
Personalize Your Owl: Creative Customization Ideas
While the basic design for this DIY Fall owl wreath is incredibly charming, don’t hesitate to infuse it with your own personal style! Here are a few ideas to inspire your creativity and make your owl truly unique:
- Vary the Eyes: Instead of sola flowers, consider large wooden buttons, sliced pinecones, or even googly eyes for a more playful look. You could also paint two small wooden discs black and add a tiny white dot for a reflective sparkle.
- Add More Texture: Incorporate small pinecones, acorns, dried berries (real or artificial), small gourds, or even a few feathers (ethically sourced) among the leaves for added texture and natural appeal.
- Color Palette Exploration: While traditional Fall colors are beautiful, experiment with different ribbon colors or painted leaves. A deep plum or a rustic blue could add an unexpected twist to your autumn decor.
- Lighting Elements: For an enchanting evening glow, weave a string of battery-operated fairy lights through the grapevine wreaths and among the leaves. This will make your owl sparkle after dark.
- Scented Touches: Attach small bundles of dried cinnamon sticks, star anise, or miniature potpourri sachets to the back of the wreath for a delightful autumn aroma.
- Message or Monogram: Hot glue a small wooden letter for your family initial or a tiny chalkboard sign with a Fall message like “Welcome” or “Happy Fall” onto the owl’s body.
Caring for Your Handmade Fall Wreath
To ensure your beautiful DIY Fall owl wreath lasts throughout the season and potentially for years to come, consider these simple care tips:
- Indoor/Outdoor Placement: If using real leaves and twigs, it’s best to display your wreath indoors or in a sheltered outdoor area (like a covered porch) to protect it from harsh weather. Artificial elements are more durable for exposed outdoor use.
- Protect from Direct Sun: Prolonged exposure to direct sunlight can fade colors, especially for artificial leaves and ribbons.
- Storage: When the season ends, gently wrap your wreath in tissue paper and store it in a sturdy box in a cool, dry place. This prevents dust accumulation and protects delicate elements from getting crushed.
- Gentle Cleaning: If your wreath gathers dust, gently blow it off with a hairdryer on a cool setting or use a soft, dry paintbrush to dust between the elements.
Conclusion: Embrace the Spirit of Fall with Your Own DIY Masterpiece
This easy DIY Fall owl wreath project offers a wonderful opportunity to connect with the beauty of autumn through crafting. It’s a testament to how simple materials, a little creativity, and a short amount of time can result in a truly charming and personalized piece of home decor. Whether you’re a seasoned crafter or just starting your DIY journey, this project promises satisfaction and a beautiful addition to your seasonal display.
We encourage you to gather your materials, follow these steps, and let your imagination soar. Your handmade owl wreath will not only be a delightful visual accent but also a warm reflection of your efforts and the cozy spirit of Fall. Happy crafting!
*All these amazing images are thanks to Factory Direct Craft via YouTube. Do visit their channel to see more inspiring videos like this!