
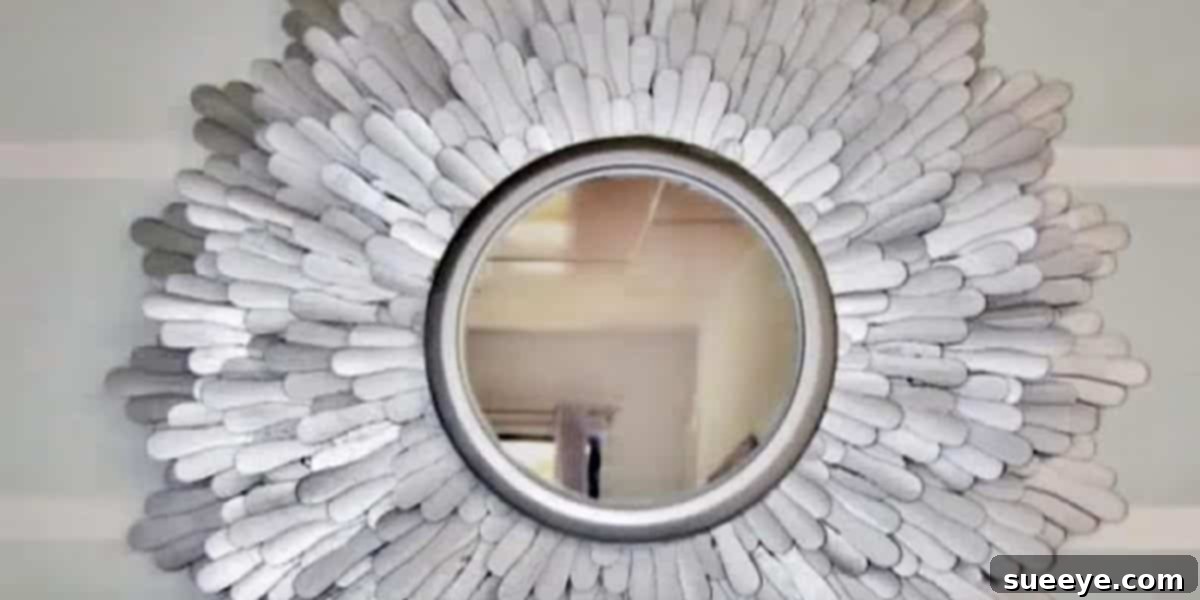
The Ultimate Guide to Crafting Your Own Stunning DIY Starburst Mirror
Starburst mirrors have unequivocally become a quintessential element in contemporary home decor, captivating interior design enthusiasts with their dynamic appeal and ability to infuse any space with a touch of elegance and artistic flair. These radiant mirrors, often reminiscent of a sunburst, offer a captivating focal point that can elevate the aesthetic of various rooms, from a cozy living area to a sophisticated entryway. Their intricate designs and reflective surfaces not only add visual interest but also help to amplify natural light, making smaller rooms feel more open and inviting. However, the allure of these decorative masterpieces often comes with a substantial price tag, making them an aspirational item for many budget-conscious decorators. This is precisely where the empowering world of DIY comes into play, offering a brilliant solution for those who desire the beauty of a starburst mirror without the exorbitant cost. By embarking on a DIY starburst mirror project, you unlock the creative freedom to design a piece that perfectly resonates with your personal style and the existing decor of your home, transforming an otherwise expensive item into an achievable and deeply satisfying craft. This comprehensive guide will walk you through the journey of creating your very own starburst mirror, demonstrating how a handful of inexpensive materials and a dash of creativity can result in a truly magnificent and personalized home accessory.
Why DIY Your Starburst Mirror? Unlocking Style on a Budget
The decision to craft your own starburst mirror is often driven by a blend of practical and creative motivations. Beyond the sheer enjoyment of a hands-on project, there are several compelling reasons why the DIY approach stands out as a superior choice for bringing this iconic decor item into your home.
-
Cost-Effectiveness: Achieving Luxury for Less
One of the most significant advantages of making your own starburst mirror is the remarkable cost savings. High-end starburst mirrors sold in retail stores can easily fetch hundreds, if not thousands, of dollars, putting them out of reach for many. These commercial versions often factor in design fees, brand prestige, and intricate manufacturing processes into their pricing. In stark contrast, a DIY starburst mirror can be assembled for a fraction of that cost, often utilizing materials sourced from dollar stores, craft shops, or even items you might already have around your home. Imagine transforming simple wooden spoons, paint stir sticks, or even repurposed twigs into a dazzling piece of wall art for less than the price of a takeout meal. This budget-friendly aspect makes high-impact decor accessible to everyone, proving that exquisite style doesn’t have to come with a hefty price tag.
-
Personalization and Unique Style: A Reflection of You
When you purchase a mass-produced starburst mirror, you’re limited to the designs, colors, and sizes available on the market. While these might be beautiful, they rarely offer the opportunity for true personalization. DIY, however, opens up an endless realm of possibilities for customization. You are the designer, the artist, and the creator. You can choose the exact size of your mirror, the length and arrangement of the “rays,” the specific colors and finishes that perfectly complement your interior palette, and even the type of materials that best reflect your aesthetic. Do you envision a rustic charm with natural wood elements, a glamorous look with metallic gold spray paint, or a chic minimalist statement with crisp white rays? With DIY, your imagination is the only limit, ensuring that your finished mirror is a unique piece of art that truly embodies your personality and seamlessly integrates with your home’s existing decor.
-
The Joy of Creation: A Rewarding Craft Project
Beyond the tangible benefits of saving money and achieving a custom look, there’s immense satisfaction in creating something beautiful with your own hands. The process of transforming humble materials into a stunning decorative piece is incredibly rewarding. From selecting your supplies to meticulously arranging each ray and finally stepping back to admire your finished work, every stage of the DIY process is an opportunity for creative expression and a sense of accomplishment. It’s an engaging craft project that allows you to de-stress, focus your mind, and channel your inner artist. Moreover, a handmade starburst mirror carries a story and a personal touch that no store-bought item can replicate, making it a conversation starter and a cherished addition to your home for years to come.
Choosing Your Materials: The Creative Heart of Your Sunburst Mirror
The magic of a DIY starburst mirror lies in its incredible versatility, particularly when it comes to material selection. Almost any elongated, thin object can be transformed into the radiant “rays” of your mirror, allowing for endless creative interpretations. Your choice of materials will largely dictate the overall aesthetic and texture of your finished piece, so consider what look you’re aiming for – be it rustic, modern, minimalist, or glamorous. Here are some of the most popular and innovative materials used by DIY enthusiasts:
-
Wooden Spoons: A Classic and Accessible Choice
Wooden spoons are arguably one of the most popular and ingenious materials for crafting starburst mirrors. Their natural, slightly curved shape and uniform size, especially the smaller dessert or tea spoons, make them ideal for creating a wonderfully textured and multi-dimensional sunburst effect. Readily available and incredibly inexpensive at dollar stores or discount retailers, wooden spoons offer a smooth surface that takes paint beautifully. When arranged with their handles pointing outwards, they create a distinctive, layered look that adds depth and visual interest. Their inherent warmth and organic feel make them perfect for adding a touch of rustic charm or Scandinavian-inspired simplicity to your decor, especially if left unpainted or stained in natural wood tones. If painted, they can easily mimic a high-end metallic finish or a vibrant, bold color.
-
Paint Stir Sticks: Versatile and Readily Available
Another fantastic and incredibly budget-friendly option is paint stir sticks. Often available for free or for a minimal cost at hardware stores, these thin, flat pieces of wood are perfect for achieving a sleek, modern, or even geometric starburst design. Their uniform straight edges lend themselves to precise arrangements, allowing for clean lines and a more structured look. They are easy to cut to various lengths, providing flexibility in creating different ray patterns and sizes. Paint stir sticks are also an excellent canvas for paint, whether you opt for a bold, solid color, a distressed finish, or a metallic sheen. Their flat profile makes them simple to attach, and their availability in different widths means you can experiment with varying textures within your design.
-
Wooden Skewers and Dowels: For Fine Radiance
For those seeking a more delicate and intricate starburst effect, wooden skewers or thin dowels are an excellent choice. Their slender profile allows for a denser arrangement of “rays,” creating a finely detailed and almost ethereal sunburst. Available in various lengths and thicknesses at craft stores, skewers and dowels can be trimmed to size and arranged in multiple layers to add depth. They are particularly effective when aiming for a sophisticated, minimalist design or when you want to achieve a very defined, sharp radiating pattern. Like other wooden options, they are highly paintable, making it easy to integrate them into any color scheme, from shimmering golds to soft pastels.
-
Twigs and Branches: Embracing Natural Elegance
For a truly organic, rustic, or bohemian starburst mirror, look no further than natural twigs and small branches. Collecting these from your backyard or a local park is not only free but also a delightful way to incorporate natural elements into your home decor. The unique shapes, textures, and variations in thickness of natural wood create an authentically charming and one-of-a-kind mirror. They can be left in their natural state for an earthy, untouched look, or lightly sanded and painted for a more refined, yet still natural, finish. Creating a starburst with twigs connects your interior space with the outdoors, adding warmth and a sense of calm. Just ensure they are dry and free of insects before bringing them inside.
-
Craft Sticks and Popsicle Sticks: Simple and Accessible
Often overlooked, craft sticks (also known as popsicle sticks) are surprisingly versatile for DIY starburst mirrors, especially for smaller projects or those with intricate details. Their uniform size and availability in various dimensions make them easy to work with for both children and adults. They can be layered, cut, and painted to create a multitude of patterns, from tightly packed symmetrical designs to more abstract arrangements. Their affordability and ease of manipulation make them an excellent starting point for beginners or for experimenting with different design concepts before committing to larger, more complex materials.
-
Other Innovative Materials: Expanding Your Horizons
The beauty of DIY lies in pushing boundaries. Don’t limit yourself to just wood! Consider unexpected materials like:
- Plastic Cutlery: For a modern, perhaps slightly whimsical look.
- Cardboard Tubes: Cut into rings and glued for a geometric, textured effect.
- Old Magazines/Newspapers: Rolled tightly into thin tubes for an eco-friendly, textured look.
- Metal Washers or Rings: Stacked and arranged for an industrial or steampunk vibe.
The key is to think creatively about how everyday objects can be repurposed and arranged to form a radial pattern around your central mirror.
Designing Your Starburst: Color, Finish, and Size Considerations
Once you’ve settled on your materials, the next exciting phase is designing the aesthetic of your starburst mirror. This involves making crucial decisions about the mirror base, the color palette, the finish, and the overall size and scale of your piece. These elements will collectively determine how your DIY mirror integrates into and enhances your chosen space.
-
Selecting Your Mirror Base
The central mirror is, naturally, the heart of your starburst. Circular mirrors are the most common choice, creating a classic sunburst effect. You can find inexpensive circular mirrors at dollar stores, craft supply stores, or even by repurposing old compact mirrors or small wall mirrors. Consider the diameter of your mirror – this will dictate the overall size of your finished starburst and the length of the radiating elements needed. For a grand statement, a larger mirror base is ideal, while a smaller one can create a charming accent piece or be part of a larger gallery wall.
-
Color Palette: Matching Your Home Decor
The color you choose for your starburst’s “rays” will significantly impact its visual presence. This is where personalization truly shines. Consider the existing color scheme of the room where the mirror will reside. Do you want it to blend in seamlessly, offering a subtle texture, or do you want it to be a bold, eye-catching focal point?
- Metallic Tones: Gold, silver, bronze, and copper are timeless choices that exude glamour and sophistication. They catch and reflect light beautifully, adding a luxurious touch.
- Neutral Shades: White, black, gray, or natural wood tones offer versatility and can complement almost any decor style, from minimalist to bohemian.
- Vibrant Hues: A pop of blue, green, yellow, or even a multi-color design can inject personality and energy into a space, especially if it ties into other accent colors in the room.
- Ombre or Gradient: For an artistic touch, consider painting the rays in a gradient from a darker shade near the mirror to a lighter one at the tips, or vice versa.
Don’t be afraid to experiment with paint samples on a few of your chosen materials before committing to the full project.
-
Finishes: Matte, Gloss, Metallic, or Distressed
Beyond color, the finish you apply adds another layer of character to your starburst mirror.
- Matte Finish: Provides a soft, understated look that absorbs light, perfect for a modern or minimalist aesthetic.
- Gloss Finish: Creates a sleek, reflective surface that enhances vibrancy and adds a touch of contemporary flair.
- Metallic Finish: Often achieved with spray paint, metallic finishes (gold, silver, copper) are classic for starburst mirrors, adding shimmer and elegance. Look for paints specifically designed to mimic real metal.
- Distressed or Aged Finish: Achieve a vintage or antique look by lightly sanding painted rays, applying a dark wax, or using a crackle medium. This is particularly effective with natural wood materials like twigs for a rustic appeal.
- Textured Finishes: Beyond paint, consider adding texture with glitter, fine sand mixed into paint, or even wrapping elements with twine for a tactile dimension.
-
Size and Scale: Making a Statement
The overall size of your finished starburst mirror is crucial for its impact within a room. Consider the wall space you have available and the role you want the mirror to play.
- Focal Point: For a grand statement, create a large starburst mirror (24 inches or more in diameter) to hang above a mantelpiece, a sofa, or in a large entryway.
- Accent Piece: Smaller starburst mirrors (12-18 inches) work wonderfully as accents on a gallery wall, in a bedroom, or in a powder room.
- Layered Effect: Consider creating a set of two or three starburst mirrors of varying sizes to group together, adding depth and visual interest to a larger wall.
Remember that the “rays” should extend far enough from the central mirror to create a noticeable starburst effect without overwhelming the space.
The Crafting Process: A Step-by-Step Overview for Your DIY Project
While specific tutorials might vary based on your chosen materials, the general steps for creating a DIY starburst mirror follow a consistent and straightforward process. This overview will provide you with a foundational understanding, empowering you to tackle your own unique project with confidence.
-
Step 1: Gather Your Tools and Materials
Before you begin, ensure you have all your necessary items at hand. This typically includes: your circular mirror, your chosen radiating elements (wooden spoons, stir sticks, skewers, etc.), a strong adhesive (hot glue gun and glue sticks are popular for quick bonding, but super glue or E6000 may offer stronger, more permanent bonds for heavier materials), a cutting tool if needed (scissors, craft knife, or small saw), spray paint or acrylic paints and brushes, protective newspaper or drop cloth, and optionally a ruler and pencil for marking.
-
Step 2: Prepare Your Radiating Elements
Depending on your chosen material, this step might involve some preparation. If using wooden spoons, you might want to trim the handles to a uniform length if you desire a very symmetrical look, or leave them varied for a more organic feel. Paint stir sticks and skewers can be cut to different lengths to create a multi-layered starburst. Twigs might need to be cleaned, dried, and possibly trimmed. This is also the stage where you can pre-paint or pre-stain your elements if you find it easier than painting them after assembly, especially if you want to achieve different colors or effects on individual rays.
-
Step 3: Layout and Arrangement
This is where your design vision comes to life. Lay your mirror face down on your protected work surface. Begin arranging your radiating elements around the perimeter of the mirror. Start by placing four elements at the 12, 3, 6, and 9 o’clock positions to establish your main quadrants. Then, fill in the spaces between them, aiming for an even distribution. Experiment with different densities and layering techniques. You can have a single layer of rays, or create multiple layers for added depth, with shorter rays closer to the mirror and longer ones extending further out. Take your time with this step, adjusting until you are completely satisfied with the pattern before applying any adhesive. Consider taking a photo to reference if you need to move elements temporarily.
-
Step 4: Secure with Adhesive
Once your layout is perfect, it’s time to secure the elements. Working methodically, apply your chosen adhesive to the part of each element that will touch the back of the mirror or the previously glued elements. Press firmly and hold in place until the glue sets. Hot glue is fast and convenient, but for heavier materials or a more durable bond, E6000 or a strong construction adhesive might be preferable. Work in sections, rotating the mirror as you go, ensuring each ray is firmly attached and aligned according to your design. Allow ample time for the adhesive to fully cure before moving to the next step, especially if using a slower-drying glue.
-
Step 5: Paint and Finish
If you haven’t already pre-painted your elements, or if you want a uniform finish over the entire assembled piece, now is the time to paint. If using spray paint, work in a well-ventilated area, preferably outdoors, and protect the mirror surface with painter’s tape and paper. Apply thin, even coats to avoid drips, allowing each coat to dry thoroughly before applying the next. For a truly professional finish, multiple light coats are always better than one thick one. If using brush-on acrylics, ensure even coverage. Once the paint is dry, you can add any desired finishes, such as a clear sealant for protection, a glossy topcoat for shine, or a distressing technique for an aged look. Remember to remove any protective tape from the mirror face carefully.
-
Step 6: Final Touches and Hanging
After your paint and finishes are completely dry and cured, inspect your starburst mirror for any imperfections. You might want to touch up any missed spots or carefully clean the mirror surface. For hanging, you have several options. For lighter mirrors, a strong picture hanging strip or a D-ring hanger attached to the back of one of the sturdier rays (or to a piece of cardboard/wood reinforcement glued to the back) can work. For heavier mirrors, consider a wire hanging kit or two D-rings for better stability. Always ensure your chosen hanging mechanism is securely attached and appropriate for the weight of your finished mirror and the wall it will be hung on.
Styling Your Starburst Mirror: Perfect Placement for Every Room
A DIY starburst mirror is more than just a craft project; it’s a versatile decor piece that can dramatically enhance the ambiance and aesthetic of almost any room in your home. Its dynamic shape and reflective qualities make it an excellent choice for adding visual interest, creating focal points, and even manipulating the perception of space and light. Here’s how to best style your newly crafted sunburst mirror in various settings:
-
Living Room Focal Point
In the living room, a starburst mirror excels as a statement piece, particularly when placed above a fireplace mantel, a sofa, or a console table. Its radiating design naturally draws the eye, making it an instant focal point. For a cohesive look, ensure the size of the mirror is proportionate to the furniture it’s above – it shouldn’t look too small or overwhelmingly large. If your living room has a more traditional or classic decor, opt for a metallic gold or silver finish. For contemporary or bohemian spaces, natural wood or a vibrant color can add an eclectic touch. Grouping it with other smaller mirrors or framed artwork can create a captivating gallery wall arrangement.
-
Elegant Bedroom Accent
A starburst mirror can bring a sense of luxury and serenity to a bedroom. Hung above the headboard, it creates a romantic and dreamy atmosphere, especially if you choose a softer color palette or a metallic finish that catches the morning light. It can also be placed on a wall opposite a window to maximize natural light and make the room feel more expansive. Consider a smaller, more delicate starburst mirror for a vanity area, where its sparkle can add a touch of glamour to your daily routine.
-
Inviting Entryway Statement
The entryway is the first impression guests have of your home, and a starburst mirror can make it truly memorable. Placed above a small console table or bench, it serves both a functional purpose (a quick glance before heading out) and a decorative one. It instantly adds warmth and brightness, making the space feel more welcoming. The mirror’s ability to reflect light is particularly beneficial in entryways that might lack natural illumination, helping to brighten the area and make it feel more open.
-
Dining Room Sophistication
Introduce an element of sophisticated charm to your dining room by incorporating a starburst mirror. Hung on a prominent wall, it can reflect the glow of chandeliers or candlelight, creating a wonderful ambiance for dinner parties. The dynamic design can break up large expanses of wall space, adding visual texture and depth. A larger, more ornate starburst mirror can truly elevate the dining experience, serving as a captivating backdrop for meals and conversations.
-
Gallery Wall Enhancement
Starburst mirrors are fantastic additions to gallery walls, offering a unique shape and reflective quality that breaks up the monotony of rectangular frames. Whether it’s the central piece or an intriguing accent among photographs and artworks, its radial design adds an energetic burst. When incorporating it into a gallery wall, consider varying the sizes and finishes of your starburst mirrors if you have more than one, to create a curated and dynamic display.
Beyond the Basics: Tips for Advanced Starburst Mirror Designs
Once you’ve mastered the basic starburst mirror, don’t hesitate to explore more advanced techniques and design concepts. Consider incorporating multiple layers of rays using different materials or lengths for an incredibly textured effect. Experiment with ombre painting, where the color gradually changes along the length of the rays, or combine different metallic finishes for a multi-toned sheen. You could also try adding small embellishments like beads, sequins, or even tiny faux flowers to the tips of your rays for extra sparkle or a whimsical touch. For an asymmetrical yet balanced look, play with varying ray lengths more deliberately, creating a unique, artistic flow. Remember, the true beauty of DIY lies in continuous experimentation and allowing your personal style to evolve with each project you undertake.
Your journey into crafting a DIY starburst mirror is an exciting opportunity to infuse your home with personalized style, all while staying well within your budget. From selecting the perfect materials that resonate with your aesthetic to meticulously arranging and finishing each ray, every step is a testament to your creativity and ingenuity. The satisfaction of gazing upon a stunning piece of wall art that you created with your own hands is truly unparalleled. So, gather your supplies, unleash your imagination, and prepare to transform an ordinary mirror into an extraordinary statement piece that will captivate and inspire. Your personalized starburst mirror awaits!