
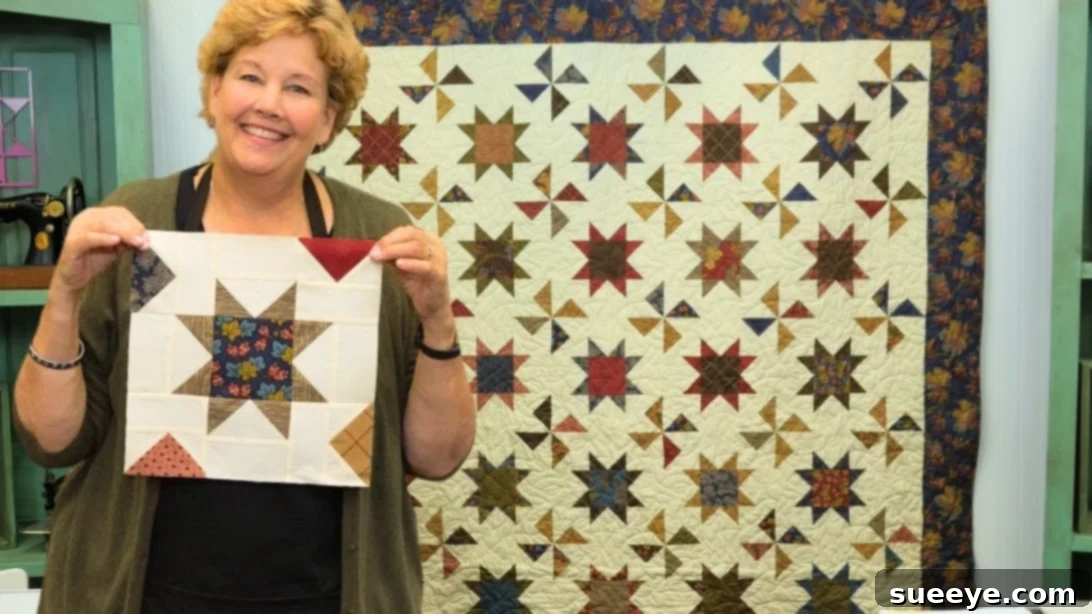
Embark on a captivating quilting adventure and unveil the secrets to crafting a truly magnificent quilt that harmoniously blends two timeless patterns: the classic star and the playful pinwheel. This ingenious design, brought to life by the esteemed quilting experts at Missouri Star Quilt Company and expertly guided by the beloved Jenny Doan, allows you to feature a bold, radiant star at the heart of each individual block. Simultaneously, the cleverly placed triangles in the block’s corners magically converge to form vibrant, spinning pinwheels as the blocks are meticulously sewn together. It’s a brilliant design concept that introduces depth, intricate movement, and an undeniable charm to any finished quilt, making it a standout piece in your collection. Are you ready to dive into the detailed instructions and unlock the potential of your fabric stash? Immerse yourself in our comprehensive tutorial below, inspired by Jenny’s clear, encouraging instructions, and prepare to create a cherished masterpiece that will bring warmth and beauty to your home for years to come. This project promises a rewarding experience with spectacular results, whether you’re honing your skills or just starting your journey into the wonderful world of quilting.
The Stars and Pinwheel Quilt: Unveiling the Design Magic
The allure of the Stars and Pinwheel Quilt lies deeply in its ingenious construction. Each individual block is a work of art, designed to showcase a striking star motif. However, the true magic unfolds when these blocks are thoughtfully arranged and joined. The corner triangles from adjacent blocks are strategically positioned to unite, forming dynamic pinwheel patterns that seem to spin across your quilt top. This creates a secondary layer of visual interest, adding a captivating dimension that evolves as you view the quilt from different angles. Our tutorial is meticulously designed to guide you through every essential stage, from the initial selection of your fabrics to the precise assembly of your final quilt top. We place strong emphasis on accurate cutting and meticulous pressing techniques, which are the cornerstones of a truly flawless and professional-looking quilt. This project is more than just a creative endeavor; it’s a fantastic opportunity to refine your quilting skills and achieve a finished piece that radiates craftsmanship and beauty.
Essential Materials for Your Stars and Pinwheel Quilt Success
Thorough preparation is paramount for any successful quilting project. Before you even make your first cut, ensure you have all the necessary supplies within reach. For this particular Stars and Pinwheel Quilt, the following materials are specified to help you create a quilt of generous proportions. However, remember that your choice of fabrics can dramatically influence the overall aesthetic and feel of your finished project. We highly recommend pre-washing your fabrics to prevent potential shrinkage and color bleeding, especially if you’re combining fabrics with varying fiber contents or saturated dyes. Always opt for high-quality 100% cotton quilting fabric, as it offers superior ease in cutting, sewing, and pressing, contributing significantly to a smoother quilting experience and a more durable end product.
- 1 package of 10″ print squares (Layer Cake): Often referred to as a “Layer Cake,” these convenient pre-cut squares are a quilter’s best friend. They significantly reduce cutting time and effort, providing a beautifully curated selection of coordinating prints. These prints will form the vibrant focal points and patterned components of your dazzling stars and charming pinwheels.
- 5 1/2 yards of background fabric: This substantial amount of fabric is crucial for creating the essential contrast that makes your star and pinwheel motifs truly pop. A solid, a tone-on-tone texture, or a subtly patterned print in a neutral hue (such as crisp white, creamy ivory, soft grey, or a serene light blue) will perfectly set off your vibrant patterned fabrics. Ensure you have ample yardage to accommodate all the background pieces, including the flying geese units and various rectangles, without compromising on fabric grain.
- 2 yards of the outer border fabric: The outer border serves as a beautiful frame for your quilt top, imparting a polished and complete appearance. Select a fabric that either elegantly complements your overall color scheme, perhaps echoing a subtle shade from your print squares, or introduces a bolder contrast to distinctly define the edges of your exquisite quilt.
- 3/4 yard of binding fabric: The binding is the critical final touch that encases and protects the raw edges of your quilt, ensuring its longevity and providing a professional, clean finish. Choose a fabric that harmonizes with your quilt’s aesthetic or, alternatively, opt for a delightful pop of contrasting color to add an unexpected flair.
- 7 1/2 yards of backing fabric: The quilt’s backing is just as integral as its front! This generous amount of fabric is specified to comfortably accommodate the quilting process and allow for any slight shifting or discrepancies during assembly. You have the option of using a single wide-back fabric for a seamless look or carefully piecing together standard-width fabrics to achieve the required dimensions. This also presents an excellent opportunity to introduce another layer of visual interest with a coordinating or unexpected print.
- Essential Quilting Tools: Beyond fabrics, ensure you have your indispensable quilting toolkit: a sharp rotary cutter with a fresh blade, a durable self-healing cutting mat, precise quilting rulers (a 2.5-inch and a 4.5-inch ruler will be particularly invaluable), high-quality 100% cotton thread, a reliable sewing machine in good working order, a steam iron, and a sturdy ironing board. Remember, precision in both cutting and pressing are the twin pillars of a beautifully executed quilt!
Step-by-Step Instructions: Crafting Your Stars and Pinwheel Quilt
Follow these meticulously detailed steps to construct your stunning Stars and Pinwheel Quilt. Adhering to precision at every stage, especially when cutting and consistently sewing your accurate quarter-inch seam allowances, will ensure that your blocks fit together flawlessly, culminating in a beautiful and flat quilt top that will be a source of immense pride and joy.
Step 1: Preparing Your Printed Fabric Squares with Precision
Initiate the cutting process by selecting one of your vibrant 10-inch print squares. From this single square, you will carefully extract several crucial pieces. First, measure and cut two strips, each precisely 2 1/2 inches wide. Once these two strips are cut, proceed to sub-cut them into smaller 2 1/2-inch squares. This meticulous process should yield a total of eight perfect 2 1/2-inch squares from the initial two strips. These smaller squares are pivotal, as they will form the distinct points of your stars and integral elements of your emerging pinwheels. Next, from the remaining, larger portion of your 10-inch square, precisely cut one 4 1/2-inch square. Finally, utilizing any leftover pieces, cut two rectangles, each measuring 2 1/2 inches by 4 1/2 inches. Always remember that accurate, clean cuts form the fundamental bedrock of a successful and beautifully aligned quilt. Take your time, use a sharp rotary cutter, and ensure your ruler is consistently aligned for every cut.
Step 2: Cutting Your Background Fabric Components
Now, direct your attention to preparing your background fabric. From your chosen background material, you will need to cut specific pieces designed to provide a striking contrast against your printed fabrics, allowing your patterns to truly stand out. Carefully cut eight individual 2 1/2-inch squares. These will frequently be paired with your smaller printed squares. In addition, cut twelve pieces that measure 4 1/2 inches by 2 1/2 inches. These rectangles are indispensable for constructing the elegant flying geese units and for framing various sections of your quilt blocks, contributing to the overall structure and design. As with the print fabric, it is critical to ensure all cuts are precise, straight, and consistent in size. Uniformity across all your cut pieces is key to achieving perfectly aligned blocks and a smooth, impeccably flat quilt top.
Step 3: Constructing the Star Legs (Flying Geese Units)
This pivotal step involves the construction of the “flying geese” units, which will gracefully form the distinctive legs or radiant points of your stars. Begin by taking one of your 4 1/2-inch by 2 1/2-inch background rectangles. Now, select one of your 2 1/2-inch printed squares and carefully place it right side down onto one corner of the background rectangle, ensuring the edges are perfectly aligned. Using a fine pencil or a fabric marker, draw a precise diagonal line from one corner to the opposite corner across the smaller printed square. Stitch directly and accurately along this drawn line. Once sewn, meticulously trim the excess fabric, leaving a consistent 1/4-inch seam allowance beyond your stitched line. Carefully press the seam open, or for a neater finish and to prevent “shadows” from showing through lighter fabrics, press the seam towards the darker fabric (typically the printed square). This action will reveal a perfectly formed triangle in the corner. Repeat this entire process on the opposite corner of the same background rectangle, utilizing another 2 1/2-inch printed square. When both corners are complete, you should clearly observe a distinct “V” shape formed by the two printed triangles on your background rectangle. This completed unit is recognized as a “flying geese” block. You will need to repeat this entire sequence three more times to create a total of four identical flying geese units, which are essential for forming the four graceful legs of your central star.
Step 4: Shaping the Star Points with Background Rectangles
With your four foundational flying geese units now expertly completed, the next phase involves preparing them to become the prominent, radiant points of your star block. Take four additional pieces of your 4 1/2-inch by 2 1/2-inch background rectangles. You will now carefully sew one of these background rectangles onto the bottom edge of each of your flying geese units. As you sew, maintain your consistent 1/4-inch seam allowance, as precision here directly impacts the final appearance of your star points. After all four units are sewn, it is crucial to press them open with care. Correct pressing is absolutely vital for achieving a wonderfully flat quilt top. A widely accepted practice is to press seams towards the darker fabric to minimize “shadowing” on lighter components, or to press seams open to significantly reduce bulk at the seam intersections. These newly assembled units, featuring the flying geese with an attached background rectangle, now represent the distinct and ready-to-assemble legs or points of your star block. You should have four such units prepared for the subsequent stage of block assembly.
Step 5: Assembling the Central Star Block Foundation
With all your star components meticulously prepared, it’s now time to bring them together to form the radiant heart of your quilt block. Locate the single 4 1/2-inch printed square that you cut in Step 1 – this piece will serve as the absolute center of your star. Carefully arrange the four star leg units, which you precisely created in Step 4, around this central square. Position each leg unit so that its distinctive flying geese “point” faces outwards, radiating away from the central square. You will then sew one star leg unit onto each of the four sides of the 4 1/2-inch central printed square. Ensure you maintain a consistent 1/4-inch seam allowance for all these connections. Once all four legs are securely attached, press your seams with diligence. You have the option to press the seams towards the center square for added stability or to press them open to effectively reduce bulk at the intersections, leading to a flatter overall block. At this juncture, you should have a complete and visually striking star block, proudly showcasing a beautiful printed star against your chosen background fabric. This completed unit forms the foundational, central element of your magnificent Stars and Pinwheel Quilt.
Step 6: Crafting Additional Flying Geese Units for the Pinwheels
Beyond the primary star motifs, this quilt design also elegantly features enchanting pinwheels that creatively emerge from the negative space between the star blocks. To achieve this delightful effect, you will need to construct another set of specialized flying geese units. Begin by taking one of your 4 1/2-inch by 2 1/2-inch printed rectangles. Following a similar technique to Step 3, you will attach two 2 1/2-inch background squares to its corners using the diagonal sewing method. Place a 2 1/2-inch background square onto one corner of the printed rectangle, ensuring right sides are together. Sew diagonally from corner to corner, then carefully trim the excess fabric, and press the seam open. Repeat this precise action on the opposite corner with another 2 1/2-inch background square. After completing this, you will attach a 4 1/2-inch by 2 1/2-inch background rectangle to the top (along the long edge) of this newly formed flying geese unit. This sequence creates a unique, longer, and more rectangular unit that incorporates a distinct flying geese component. You must repeat this entire process three more times, ensuring you have a total of four identical units. These specifically constructed flying geese units, enhanced with the additional background rectangle, are ingeniously designed to create the beautiful illusion of a spinning pinwheel when multiple blocks are sewn together, thereby adding a dynamic sense of movement and visual interest to your quilt’s overall design.
Step 7: Arranging and Assembling Your Quilt Top with Care
This is the moment where your individual blocks truly coalesce into a cohesive and stunning quilt top! Begin by carefully laying out all your meticulously constructed star blocks and the additional flying geese units (from Step 6) on a design wall or a generously sized flat surface. Refer closely to the provided photo below for the precise and correct arrangement of blocks – this visual guide is indispensable. The secret to the captivating pinwheel effect lies in the thoughtful interaction of these blocks: the flying geese units from Step 6 are typically positioned in the “spaces” between the star blocks, with their points directed towards the corners where four blocks converge. Take your time with this crucial layout stage; it is the most effective way to visualize your entire quilt and ensure that all the patterns and alignments are flawless before you commit to sewing. Once you are thoroughly satisfied with your arrangement, proceed to sew your blocks together, forming distinct rows. When joining these rows, a highly recommended pressing technique is to press the seams of the top and bottom rows *outwards* (away from the center of the block) and the seams of the middle rows *inwards* (towards the center of the block). This critical pressing method allows your seams to “nest” together perfectly when you sew the rows to each other, resulting in impeccably precise intersections and a wonderfully flat quilt top with minimal bulk. After all the rows are sewn and meticulously pressed, carefully sew the completed rows together to finish your quilt top. For the generous size demonstrated in this tutorial, you will need approximately 30 blocks. If you desire to adjust the overall size of your quilt, simply add or subtract blocks in a consistent grid pattern (e.g., 5×6 or 6×5 blocks). To further enhance the pinwheel motif and seamlessly integrate them into the border, Jenny Doan brilliantly suggests incorporating two of your flying geese blocks (from Step 6) with a solid background block placed precisely between them, then skillfully integrating these into your outer border design. This clever and professional trick extends the dynamic pinwheel motif gracefully to the very edges of your quilt, providing a cohesive, polished, and truly stunning finish.
Your Beautiful Stars and Pinwheel Quilt with Jenny Doan: A Masterpiece Completed
Congratulations! You have successfully completed the intricate and rewarding journey of crafting your exquisite Stars and Pinwheel Quilt top. This entire project, meticulously guided by the inspiring Jenny Doan from the revered Missouri Star Quilt Company, stands as a vibrant testament to the enduring beauty and endless possibilities of combining traditional quilting elements in fresh, innovative, and visually thrilling ways. The captivating interplay of the central stars, elegantly complemented by the dynamic, emerging pinwheels, culminates in a design that is both timeless and deeply engaging. It will undoubtedly add a profound sense of warmth, bespoke personality, and artistic flair to any space it graces. Take a moment to truly admire your meticulous handiwork – from the precision of your initial cuts to the perfectly nested seams, every single effort and careful stitch contributes to the stunning, cohesive, and remarkably professional final product that you have created.
Beyond the Quilt Top: Completing Your Quilted Masterpiece
While the construction of the quilt top forms the primary focus of this detailed tutorial, remember that the quilting journey gracefully continues beyond this stage. The next crucial steps involve thoughtfully layering your quilt, the artistic process of quilting itself, and the essential binding to finish it all. Begin by selecting a batting that provides your desired level of loft, warmth, and drape – options range from thin cotton to fluffy wool. Then, choose a backing fabric that not only provides structural integrity but also harmonizes beautifully with your completed quilt top, perhaps extending the theme or offering a delightful surprise. Whether you opt for the subtle elegance of stitch-in-the-ditch quilting, embark on the creative freedom of intricate free-motion designs, or entrust your precious quilt to the skilled hands of a professional long-armer, the quilting process adds crucial texture, dimension, and stability to your project. Finally, the binding serves to protect the raw edges of your quilt, ensuring its durability and providing a clean, polished, and truly professional frame. Consider the meditative art of hand-stitching your binding for a truly artisanal touch, or machine-stitch it for a quicker, equally effective finish.
Advanced Quilting Tips for Continued Success and Perfection
- Mastering the Consistent Seam Allowance: The hallmark of a professional quilt is a consistently perfect 1/4-inch seam. Invest time in practicing on scrap fabrics to ensure your sewing machine’s settings are impeccably accurate and that you maintain this precision throughout your entire project.
- The Art of Pressing, Not Ironing: In quilting, we press, we do not iron. This means lifting your iron, placing it firmly onto the fabric, and holding it to set the seams flat and crisp, rather than sliding it across, which can stretch and distort your carefully sewn pieces. Pressing towards the darker fabric or pressing seams open are both invaluable techniques for achieving minimal bulk and a smooth surface.
- Strategic Organization: Maintain an organized workspace. Label all your precisely cut pieces, especially when dealing with multiple sizes and fabrics, and always lay out your blocks on a design wall or a large, clear surface before you begin sewing. This crucial step allows you to visualize the entire quilt, verify the correct arrangement, and catch any potential errors in layout before they become permanent.
- Sharp Tools Are Your Best Friends: Always utilize a sharp rotary blade and replace your sewing machine needle frequently. Dull tools can lead to frayed edges, inaccurate cuts, stretched fabrics, and skipped stitches, all of which can compromise the quality of your finished quilt.
- Embrace the Joy of the Process: Remember that quilting is a profoundly personal journey of creativity, relaxation, and self-expression. Do not be afraid to experiment with your fabric choices, to deviate slightly from the pattern to add your unique flair, and to allow the quilt to become a truly personal reflection of your artistic vision. Most importantly, savor every moment of the crafting process!
We sincerely hope that you have thoroughly enjoyed the enriching experience of creating this stunning Stars and Pinwheel Quilt. It is a timeless pattern that beautifully showcases the inherent magic and limitless possibilities of thoughtful quilt design. We warmly encourage you to share your finished projects with the vibrant global quilting community – your unique fabric selections, personal touches, and exceptional craftsmanship are sure to inspire countless fellow quilters! Happy quilting and may your stitches always be true!