
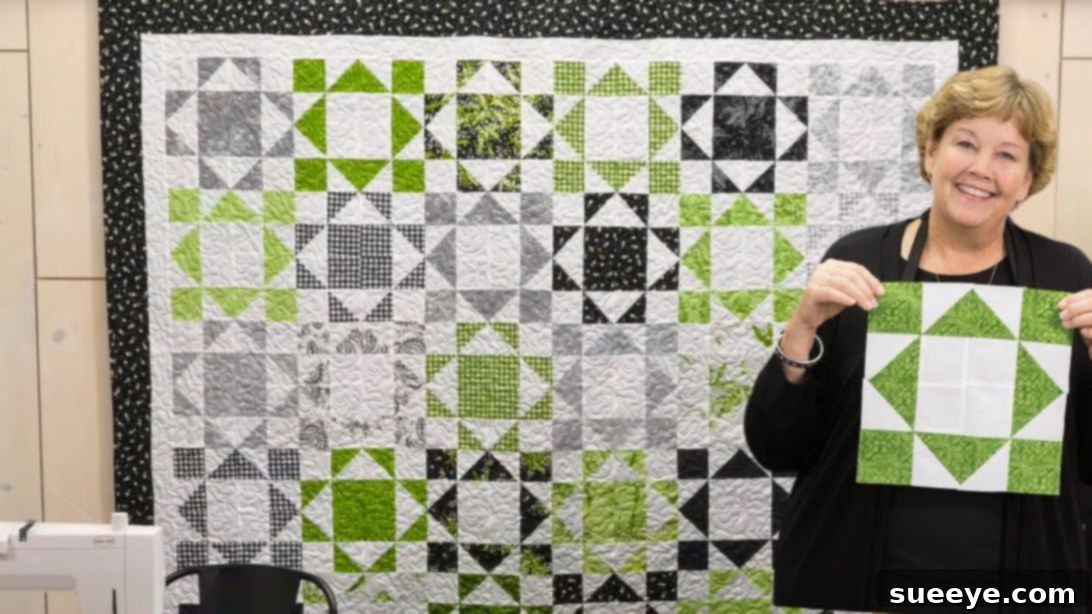
Embarking on a quilting journey can be incredibly rewarding, and finding the perfect beginner-friendly project is key to building confidence and skill. The Half and Half Quilt, a delightful design popularized by the renowned Jenny Doan of Missouri Star Quilt Company, stands out as an exceptional choice for quilters of all levels, especially those just starting out. This pattern is celebrated for its simplicity, elegance, and the magical way it comes together, primarily relying on the versatile half-square triangle (HST) block.
I distinctly remember making this Half and Half Quilt as one of my very first projects, and the process was nothing short of enjoyable. It’s an ideal way to practice foundational quilting techniques, from precise cutting and accurate seam allowances to careful pressing. The visual impact of the finished quilt is striking, featuring a dynamic interplay of colors and patterns that belies its straightforward construction. Whether you’re looking for a quick weekend project or a stepping stone to more complex designs, this tutorial will guide you through every step to create your own beautiful Half and Half Quilt. So, gather your fabrics, prepare your sewing machine, and let’s dive into the world of creative quilting!
Unveiling the Half and Half Quilt: A Timeless Design for Every Quilter
The Half and Half Quilt is a testament to the beauty of simplicity in quilting. Its charm lies in the clever arrangement of fabric units, creating an optical illusion of depth and movement. This particular pattern, brilliantly demonstrated by Jenny Doan, transforms basic half-square triangles into intricate-looking blocks that form a cohesive and stunning quilt top. It’s an excellent project for utilizing pre-cut fabric squares, such as 10-inch layer cake squares, which simplify the cutting process and get you straight to the fun part: sewing! Beyond its ease, the Half and Half Quilt is incredibly versatile. You can choose vibrant, contrasting fabrics for a bold statement or opt for subtle, harmonious tones for a more serene aesthetic. No matter your style, this quilt promises a gratifying experience and a cherished finished product.
Materials and Supplies: What You’ll Need to Get Started
Before you begin sewing, gathering all your materials is crucial for a smooth and enjoyable quilting experience. The quantities listed below are typically for a generously sized throw quilt, perfect for snuggling on the sofa or gifting to a loved one. Always feel free to adjust these amounts if you plan to make a larger or smaller quilt, ensuring you have enough fabric for your specific vision.
- 1 Package of 10-inch Print Squares: Often referred to as a “Layer Cake,” this package contains approximately 42 pre-cut 10×10 inch fabric squares. Opt for a variety of prints within a cohesive color palette that appeals to you. These will form the patterned sections of your half-square triangles.
- 1 Package of 10-inch Background Squares: Another package of 10×10 inch squares, ideally in a solid or subtle blender fabric. White, cream, or a light neutral color works wonderfully as a background, allowing your print fabrics to truly pop. Ensure this fabric contrasts well with your print squares for a clear visual distinction in your blocks.
- 3/4 Yard of Inner Border Fabric: The inner border provides a lovely frame for your pieced quilt top, helping to define its edges and add a touch of refinement. Choose a color that complements both your print and background fabrics, perhaps picking up one of the accent colors from your print squares.
- 1 Yard of Outer Border Fabric: The outer border offers a more substantial frame, often increasing the overall size of the quilt and providing a visual break before the binding. This can be a continuation of your inner border fabric for a consistent look, or a contrasting fabric to add another layer of design interest.
- 3/4 Yard of Binding Fabric: The binding is the final edge finish of your quilt, encasing all the raw edges and adding durability. It’s usually cut into narrow strips and sewn around the perimeter. You can choose a fabric that matches your outer border, or a bold contrasting fabric for a striking finish.
- 4 3/4 Yards of Backing Fabric: The backing forms the underside of your quilt. While you can piece together smaller cuts, having a single piece of fabric or two large pieces sewn together lengthwise provides a clean, seamless look. Choose a comfortable, soft fabric that complements your quilt top’s aesthetic, as this will be the part that touches you directly.
Essential Tools for Quilting Success
Having the right tools can make all the difference in achieving precise cuts and seams, which are fundamental to a beautiful quilt. Here are the essential items you’ll want to have on hand:
- Sewing Machine: A reliable sewing machine with a 1/4-inch quilting foot is ideal for maintaining consistent seam allowances.
- Rotary Cutter: A sharp rotary cutter (45mm or 60mm) is indispensable for precise, straight cuts through multiple layers of fabric.
- Self-Healing Cutting Mat: Protect your work surface and your rotary cutter blade with a good quality self-healing mat.
- Quilting Rulers: A variety of acrylic rulers (e.g., 6.5″ square, 12.5″ square, and a long straight ruler) will aid in accurate cutting and trimming.
- Iron and Ironing Board: Proper pressing at each stage is crucial for flat, accurate blocks and seams.
- Pins or Fabric Clips: To hold fabric pieces together securely before sewing.
- Thread: High-quality 100% cotton thread that blends with your fabrics, or a neutral color like white or gray.
- Seam Ripper: For those inevitable moments when a seam needs to be undone (every quilter has one!).
Step-by-Step Instructions: Creating Your Half and Half Quilt
With your materials and tools ready, let’s begin the exciting process of bringing your Half and Half Quilt to life. Accuracy is paramount in quilting, so take your time with each step, especially with cutting and pressing.
Step 1: Mastering Half-Square Triangles (HSTs)
The foundation of this quilt lies in perfectly executed Half-Square Triangles. To start, take one 10-inch print square and one 10-inch background square. Place them right sides together, aligning all edges perfectly. Using a pencil or fabric marker, draw a diagonal line from one corner to the opposite corner on the back (wrong) side of one of the squares. This line will serve as your cutting guide. Next, sew a 1/4-inch seam around all four edges of the combined squares. Ensure your stitches are consistent and straight. Once sewn, cut the block diagonally from corner to corner in both directions. This will yield four unpressed HST units. Carefully press each unit open, making sure to press towards the darker fabric to prevent shadowing through the lighter fabric. Finally, using your quilting ruler and rotary cutter, trim each HST into a precise 6 1/2-inch square. This trimming step is critical for ensuring your blocks will fit together perfectly later on. Repeat this process with all your print and background squares until you have a stack of accurate 6 1/2-inch HSTs.
Step 2: Constructing Your Unique Four-Patch Units
This step introduces the clever design element that gives the Half and Half Quilt its distinctive look. Take one of your freshly trimmed 6 1/2-inch half-square triangles. Carefully cut this HST in half, both horizontally and vertically. This action will result in four smaller squares. Now, identify the two solid-colored squares that are in opposite corners. These are the squares you will swap. Carefully exchange their positions with the other two squares, ensuring the patterned fabrics remain in their original spots but the solid corners are now diagonally opposite to each other. This creates a visually dynamic four-patch unit. Sew these four smaller pieces together into a four-patch block, using a precise 1/4-inch seam allowance. Pay close attention to lining up your seams to avoid bulky spots and ensure a flat block. Press the seams flat, preferably pressing them open or towards the darker fabric to minimize bulk. Repeat this process for all of your remaining 6 1/2-inch HSTs, creating a series of these unique four-patch units.
Step 3: Assembling the Half and Half Quilt Blocks
Now we begin to form the larger blocks that define the quilt’s pattern. Gather four of the four-patch units you created in Step 2. Arrange these four units into a larger four-patch configuration. For half of your blocks, you will arrange them so that all the white (background) squares meet precisely in the middle of the block. This creates a central light square surrounded by the patterned fabric. For the other half of your blocks, you will arrange them so that all the solid color (print fabric from the corner swaps) squares meet in the middle. This creates a central dark or colored square, surrounded by the patterned fabric. This intentional variation is what gives the “Half and Half” quilt its name and dynamic visual appeal. Once you are satisfied with the arrangement, sew the units together with a 1/4-inch seam allowance. Carefully press your seams flat, ensuring each block lies perfectly smooth. Repeat this process until you have an equal number of both types of large blocks (white-centered and colored-centered).
Step 4: Constructing the Quilt Top Rows
With all your individual blocks constructed, it’s time to assemble them into rows and then join the rows to form the complete quilt top. For each row of your quilt, you will need a specific arrangement of your two types of blocks. A common layout for this design requires three blocks with a white center and three blocks with a colored center per row, arranged alternately. For example, your first row might be: White Center, Colored Center, White Center, Colored Center, White Center, Colored Center. The key to the “Half and Half” effect is how the rows interact. For the second row, you will alternate the first block compared to the first row. So, if your first row started with a White Center block, your second row should start with a Colored Center block, creating a staggered, checkerboard-like pattern. Continue this alternating pattern for all six rows. Once you have arranged the blocks for a single row, sew them together end-to-end with a 1/4-inch seam allowance. Press the seams in alternating directions for adjacent rows (e.g., press left for row 1, press right for row 2) to help the seams nest, reducing bulk. Finally, sew these six completed rows together, carefully aligning all your seams. This step forms your finished quilt top, ready for the next stages of quilting.
Finishing Your Half and Half Quilt: Adding Borders, Backing, and Binding
Completing the quilt top is a significant milestone, but the journey isn’t over yet! The next steps involve adding borders, preparing the backing, quilting, and finally, binding your beautiful creation. These finishing touches transform your pieced top into a durable, functional, and aesthetically pleasing quilt.
Adding the Inner and Outer Borders
Borders frame your quilt top, providing a polished look and often helping to square up the quilt. First, attach the inner border. Measure the length and width of your quilt top in several places and take an average. Cut your inner border fabric strips to these average lengths, then sew them to the sides of your quilt top, pressing seams towards the border. Repeat for the top and bottom. Next, follow the same process for your outer border. Accurate measurement and careful attachment of borders are essential to keep your quilt square and prevent waviness.
Quilting Your Masterpiece
Quilting is the process of stitching through all three layers of the quilt – the top, the batting (the middle insulating layer, not listed in original ingredients but essential), and the backing – to hold them together and add texture. You can choose to machine quilt with simple straight lines, a meandering design, or more intricate free-motion quilting patterns. Alternatively, you might opt for hand quilting for a traditional, cozy feel, or even tie your quilt for a quick finish. Select a quilting design that complements your Half and Half pattern without overwhelming it. Ensure your quilt sandwich (backing, batting, top) is smooth and free of wrinkles before you begin quilting.
Preparing the Backing
If your backing fabric is not wide enough for your quilt, you will need to piece it together. Cut your backing fabric into two equal lengths, then sew them together along the longest edge with a 1/2-inch seam allowance. Press the seam open to reduce bulk. Make sure your backing fabric is at least 4-6 inches larger than your quilt top on all sides to allow for shifting during the quilting process.
Attaching the Binding
The binding is the final edge treatment that protects the raw edges of your quilt and provides a clean, professional finish. Cut your binding fabric into 2 1/2-inch wide strips. Sew these strips together end-to-end at a diagonal to create one continuous long strip. Press the seams open, then fold the entire strip in half lengthwise and press, creating a double-fold binding. Attach the raw edges of the binding to the raw edges of the quilt top, sewing with a 1/4-inch seam allowance. Miter the corners for a crisp finish. Once sewn to the front, flip the binding to the back of the quilt and hand-stitch or machine-stitch it in place. This final step completes your Half and Half Quilt, making it ready for use or display.
Tips for Quilting Success
Creating a quilt is a journey of precision and patience. Here are a few invaluable tips to help ensure your Half and Half Quilt project is a resounding success:
- Accuracy is Key: In quilting, small inconsistencies multiply. Take extra time to measure and cut precisely, and maintain a consistent 1/4-inch seam allowance. Investing in a good quality quilting ruler and rotary cutter will pay off immensely.
- Pressing Matters: Pressing is not ironing. Always press your seams, don’t iron them back and forth. Pressing seams open can reduce bulk, while pressing to the side (usually towards the darker fabric) can help with nesting seams. Proper pressing ensures your blocks lie flat and square.
- Chain Piecing: To save time and thread when making multiple identical units (like HSTs), try chain piecing. Sew one unit, then feed the next unit under the needle without cutting the thread. Continue until all units are sewn, then clip them apart.
- Stay Organized: Keep your cut pieces organized by step or block type. Labeling fabric piles can prevent confusion, especially with repetitive units.
- Enjoy the Process: Quilting is a creative art. Don’t stress over perfection; embrace the learning curve and enjoy the journey of bringing your fabric vision to life. Each stitch is a part of your unique story.
Conclusion: Your Beautiful Half and Half Quilt Awaits
Congratulations! By following these comprehensive steps, you are now well-equipped to create your very own Half and Half Quilt. This classic design, made popular by Jenny Doan of Missouri Star, is not only a fantastic beginner project but also a truly satisfying make for experienced quilters looking for a quick yet impactful pattern. From mastering half-square triangles to assembling the dynamic blocks and finally adding those essential finishing touches, you’ve learned foundational quilting skills that will serve you well in future projects. We hope you’ve enjoyed the process of watching your fabric squares transform into a stunning, unique quilt that will be cherished for years to come. Your beautiful, handmade Half and Half Quilt is a testament to your creativity and dedication – enjoy wrapping yourself in its warmth and the satisfaction of a job well done!
Watch the Full Tutorial with Jenny Doan
For a visual demonstration of each step and Jenny Doan’s expert tips, be sure to watch the original tutorial that inspired this guide:
Half and Half Quilt Tutorial by Missouri Star with Jenny Doan