
Mastering Your Sewing Machine: Clever Safety Pin Hacks for Precision and Creativity
Are you looking to elevate your sewing projects, make intricate tasks simpler, and boost your overall efficiency at the sewing machine? Whether you’re a beginner just starting your journey into the world of fabric and thread or an experienced crafter seeking smart shortcuts, mastering certain techniques can dramatically transform your creative process. Sewing, at its heart, is a blend of artistry and precision, and sometimes the simplest tools can unlock the most profound improvements.
Today, we’re diving into a collection of ingenious hacks that leverage an everyday item – the humble safety pin – to revolutionize the way you use your sewing machine. These tips, inspired by the brilliant insights of Trefa Craft on YouTube, are surprisingly simple yet incredibly effective. You’ll discover how a small safety pin can become an indispensable helper, guiding your stitches, creating beautiful embellishments, and ensuring professional-quality finishes on all your garments and crafts. Get ready to experience sewing with newfound ease and precision!
Why These Sewing Hacks Are a Game-Changer
In the bustling world of DIY and crafting, efficiency and precision are highly prized. Many sewing tasks, while rewarding, can often be time-consuming or prone to inconsistencies, especially for those who are still building their skills. Attaching elastic evenly, creating uniform ruffles, achieving perfectly straight seams, or adding unique embellishments often requires specialized tools or a steady hand that takes years to develop. This is where these safety pin hacks truly shine.
- Simplicity: They utilize common household items, meaning no expensive gadgets or complex setups are required.
- Effectiveness: Despite their simplicity, these methods yield professional-looking results, enhancing the quality of your finished projects.
- Time-Saving: By simplifying otherwise tricky steps, these hacks cut down on frustration and allow you to complete projects more quickly.
- Versatility: A single safety pin can be adapted for multiple uses, making it a powerful addition to your sewing toolkit.
- Beginner-Friendly: They demystify advanced techniques, making them accessible to sewers of all skill levels.
Prepare to transform your sewing experience from challenging to effortlessly enjoyable as we explore these clever tricks!
Essential Materials for Your Sewing Hacks
One of the best aspects of these smart sewing tips is how readily available the necessary materials are. You likely have most, if not all, of these items already in your craft box or around your home. Gather these simple tools to embark on your journey to more efficient and precise sewing:
- Safety Pin: The star of our show! Opt for a medium to large size, sturdy enough to hold its shape when attached to your machine.
- Screwdriver: Essential for adjusting the presser foot screw on your sewing machine to secure the safety pin.
- Elastic: Both standard sewing elastic and a broader “rubber elastic” (like a strong rubber band) are needed. Standard elastic will be used for gathering, while the rubber elastic helps create a custom seam guide.
- Yarn: For decorative stitching and embroidery experiments. Choose a yarn that complements your fabric and desired aesthetic.
- Needle and Thread: Always indispensable for any sewing project, particularly for securing decorative stitches.
- Scissors: For cutting fabric, thread, elastic, and yarn with ease.
Having these fundamental supplies at hand will ensure a smooth and successful implementation of each hack.
Ingenious Safety Pin Sewing Tricks: Detailed Directions
Tip #1: Transforming Your Sewing Machine into an Embroidery Powerhouse – The Yarn Guide Hack
Adding decorative yarn details to your projects can create unique textures and eye-catching designs, but guiding yarn neatly through a sewing machine can be a challenge. This clever hack turns your ordinary presser foot into an effective yarn guide, allowing you to “embroider” with ease and precision.
How It Works:
- Prepare Your Machine: Begin by slightly loosening the screw that holds your presser foot in place. You don’t need to remove it entirely, just enough to create a small gap.
- Position the Safety Pin: Take your chosen safety pin and insert it around the presser foot. The key is to position it vertically, so the closed end of the pin is pointing upwards, and the open end (where the yarn will pass through) is pointing downwards, aligned with your stitching path.
- Secure the Pin: Carefully slide the safety pin between the presser foot and the screw. Once it’s in the desired vertical position, tighten the screw firmly to secure the safety pin in place. It should be stable and not wobble.
- Thread the Yarn: Take your chosen yarn and feed it through the gap created by the safety pin. The yarn should come from above and pass underneath, in between the prongs of the presser foot, similar to how your main sewing thread would. This creates a neat channel for the yarn.
- Ready to Stitch: Now, load your machine with a regular sewing thread in the needle (and bobbin) that either matches or contrasts with your yarn, depending on your desired effect. This thread will secure the yarn to your fabric.
- Sew Your Design: Place your fabric under the presser foot. As you stitch, the safety pin will guide the yarn precisely, laying it down on the fabric. You can create straight lines, curves, or freehand designs. The needle and thread will stitch over the yarn, attaching it securely to the fabric. Experiment with different stitch lengths and widths to achieve varied textures.
Benefits and Applications:
- Unique Embellishments: Add raised, textural designs to clothing, bags, quilts, and home decor items.
- Quick & Easy: Much faster than traditional hand embroidery for certain effects, perfect for adding borders or bold patterns.
- Customization: Personalize items with names, initials, or abstract designs using different colors and types of yarn.
- Accessible Embroidery: Makes machine embroidery more accessible even without a specialized embroidery machine.
This hack opens up a world of creative possibilities, allowing you to infuse your projects with rich texture and personalized flair.
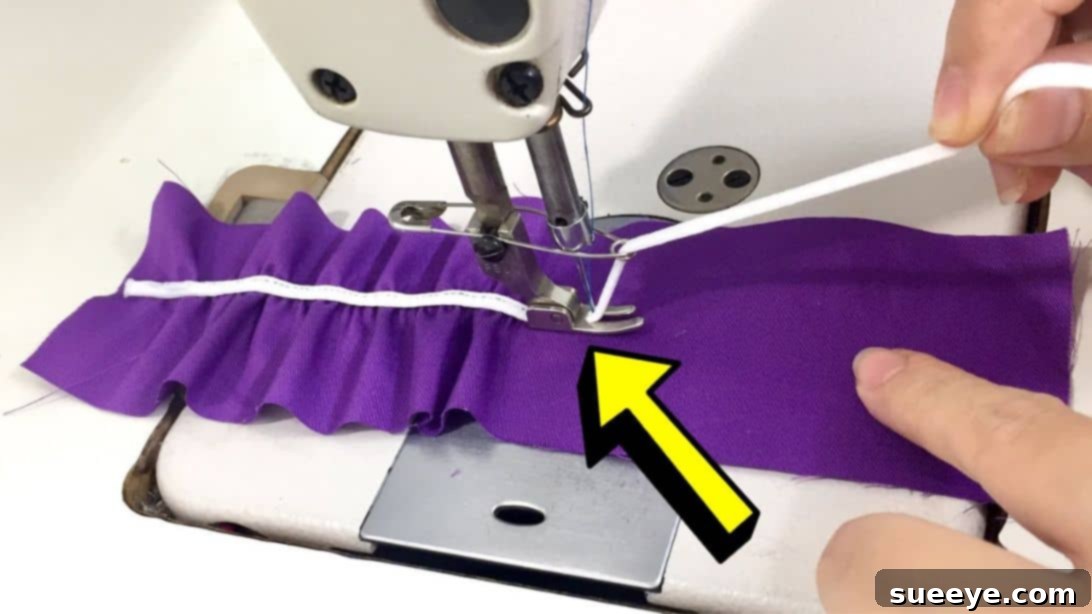
Tip #2: Achieve Perfect Ruffles and Elasticized Fabrics with This Simple Trick
Adding elastic to fabric for waistbands, cuffs, or shirring, or creating beautiful, evenly spaced ruffles, can often be a source of frustration. Maintaining consistent tension and even distribution is key. This brilliant hack adapts the previous technique to streamline both elastic application and ruffle creation, ensuring professional results every time.
How It Works:
- Safety Pin Setup: Follow the exact same initial steps as Tip #1 to secure the safety pin vertically around your presser foot, ensuring it’s firmly tightened with the screw. The safety pin will act as a channel for your elastic.
- Feed the Elastic: Instead of yarn, gently feed your chosen elastic through the gap created by the safety pin. The elastic should pass from above and emerge underneath the presser foot, ready to be sewn.
- Preparing Your Fabric: Place your fabric under the presser foot, aligning the edge where you want to attach the elastic or create ruffles.
- Sewing for Elastic Application: If you’re attaching elastic, gently pull the elastic taut as you sew, allowing the machine to stitch it onto the fabric. The safety pin guides the elastic, keeping it straight and evenly tensioned. This results in a smooth, consistently elasticized edge.
- Sewing for Ruffles/Gathering: For ruffles, you’ll need to use a slightly different approach. While the safety pin guides the elastic, you’ll want to stitch *over* the elastic as it’s fed through, potentially with a zigzag stitch. The elastic itself, when stretched and sewn, will pull the fabric into gathers as it retracts, creating natural, even ruffles. You can also sew a line parallel to the elastic, using the elastic as a guide for a shirring effect.
Benefits and Applications:
- Even Elastic Distribution: Say goodbye to uneven or lumpy elasticized edges. This hack ensures smooth, consistent stretch.
- Effortless Ruffles: Create beautifully gathered ruffles without the need for complex gathering stitches or basting.
- Time-Efficient: Significantly speeds up the process of adding elastic or ruffles compared to traditional methods.
- Professional Finish: Achieve the neat, tailored look often seen in ready-to-wear garments.
- Versatile Use: Perfect for waistbands, sleeve cuffs, necklines, decorative accents on skirts, dresses, and home linens.
This simple modification transforms a tricky task into an enjoyable and successful part of your sewing process, making it ideal for both functional additions and decorative flounces.
Tip #3: Mastering Precision – The DIY Seam Allowance Guide Using a Safety Pin
Consistent seam allowance is the cornerstone of professional-looking sewing projects, especially in garment construction and quilting. An uneven seam can lead to ill-fitting clothes or distorted quilt blocks. While many machines have seam guides, creating a customizable and highly visible guide with a safety pin is a brilliant, low-cost alternative for unparalleled accuracy.
How It Works:
- Prepare the Safety Pin: Take your safety pin and wrap a rubber elastic (a sturdy rubber band works perfectly) around its bottom part. This creates a soft, grippy surface and slightly increases its thickness, making it more effective as a guide.
- Position the Guide: Unlike the previous hacks, this time the safety pin will be placed horizontally. Open the safety pin and position it directly above your presser foot.
- Set Your Seam Allowance: Align the edge of the rubber-wrapped safety pin with the desired seam allowance marking on your needle plate, or measure the distance from your needle to where you want your seam edge to be. For example, if you need a 5/8″ seam allowance, position the safety pin so its outer edge is 5/8″ from the needle.
- Secure the Pin: Once perfectly positioned, close the safety pin securely. It should rest firmly against the body of your sewing machine, acting as a fence or barrier.
- Sew with Confidence: As you feed your fabric through the machine, simply keep the raw edge of your fabric aligned flush against the rubber-wrapped safety pin. The pin will prevent your fabric from drifting, ensuring every stitch is precisely the same distance from the edge.
Benefits and Applications:
- Unrivaled Accuracy: Achieve perfectly straight and consistent seam allowances every time, crucial for garment fit and quilt block matching.
- Customizable: Easily adjust the safety pin’s position to any desired seam allowance, adapting to various patterns and projects.
- Cost-Effective: A free or very low-cost alternative to specialized magnetic seam guides or expensive presser feet.
- Beginner-Friendly: Provides tangible physical guidance, making it easier for new sewers to maintain accuracy and build confidence.
- Versatile Use: Indispensable for quilting, apparel construction, bag making, and any project where seam precision is paramount.
This ingenious hack transforms a common problem into a simple solution, allowing you to focus on the creative aspects of your sewing without worrying about uneven seams.
Beyond the Hacks: Elevating Your Sewing Journey
While these safety pin tricks are undoubtedly powerful, they are just a starting point for a more enjoyable and productive sewing experience. To truly master your craft and produce consistently high-quality results, consider integrating these general best practices into your routine:
- Choose the Right Needle: Matching your needle type and size to your fabric (e.g., ballpoint for knits, sharp for wovens, denim needle for heavy fabrics) prevents skipped stitches and fabric damage.
- Adjust Thread Tension: Incorrect thread tension is a common culprit for messy stitches. Always test on a scrap fabric before starting your project.
- Press as You Go: Pressing seams open or to one side after each step makes a huge difference in the crispness and professional appearance of your finished project.
- Use Quality Thread: Cheap thread can break easily and leave lint in your machine. Invest in good quality thread for smoother sewing and stronger seams.
- Clean Your Machine Regularly: Lint and dust can build up, affecting your machine’s performance. Regular cleaning and oiling (as per your manual) will keep it running smoothly.
- Practice Makes Perfect: Don’t be afraid to experiment on scrap fabric. The more you sew, the more intuitive the process becomes.
By combining these fundamental practices with the clever safety pin hacks, you’ll not only improve your technical skills but also gain confidence and enjoyment in every stitch.
Final Thoughts and Where to Find More Inspiration
We’ve explored how a simple, inexpensive safety pin can be transformed into an incredibly versatile tool, capable of solving common sewing dilemmas and unlocking new creative possibilities. From guiding yarn for decorative embroidery to ensuring perfectly even ruffles and maintaining impeccable seam allowances, these hacks demonstrate that innovation often lies in repurposing the ordinary.
These brilliant sewing tips and hacks come courtesy of Trefa Craft via YouTube, whose video tutorials continue to inspire countless sewers around the globe. If you’ve found these insights valuable, we highly recommend visiting her channel for more ingenious sewing solutions and creative inspiration. Subscribing to her channel ensures you won’t miss out on future tips that can further enhance your sewing journey.
Embrace these smart tricks, experiment with them, and watch as your sewing projects become more precise, more beautiful, and more enjoyable to create. Happy sewing!
Special thanks to Trefa Craft via YouTube for all the images and inspiration shared here.