
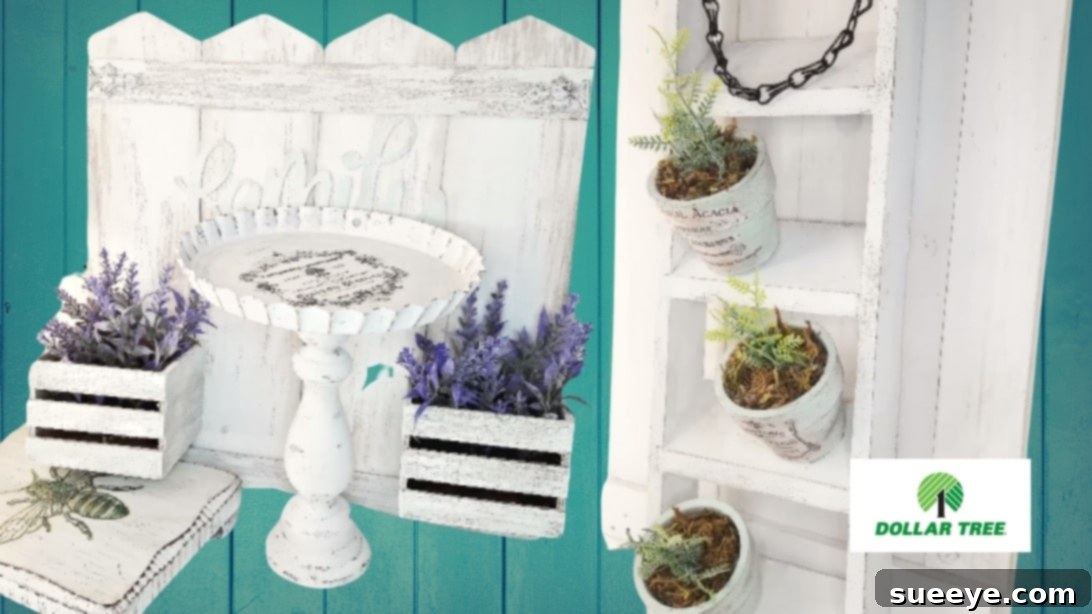
Dreaming of a charming farmhouse aesthetic for your home but worried about the cost? You’re in luck! Achieving that cozy, rustic look doesn’t have to strain your wallet. With a dash of creativity and a savvy eye for budget-friendly finds, you can transform your living space into a farmhouse haven. This article unveils a collection of simple yet stunning craft projects, drawing inspiration from the ingenious ideas shared by Unicorn Dust Designs on YouTube. Get ready to dive into the world of Dollar Tree DIY farmhouse decor, where affordability meets beautiful design.
The beauty of these projects lies in their accessibility. Most of the materials can be sourced from your local Dollar Tree, dollar stores, or even thrift shops. It’s truly amazing what hidden gems you can uncover in thrift stores – forgotten treasures just waiting to be upcycled into something spectacular. Before you head out, take a moment to look around your own home or neighborhood. Old pieces can be given a new lease on life with a little paint and imagination. Embrace resourcefulness, unleash your creativity, and watch as ordinary items become extraordinary decor. These projects are not only easy and fun to recreate but also incredibly rewarding, allowing you to infuse your personality into every corner of your home.
Unlock Rustic Charm: Inspiring Dollar Tree DIY Farmhouse Decor Projects
Let’s explore some fantastic projects that will help you craft that sought-after farmhouse feel on a budget. Each idea offers a unique way to add character and warmth to your home, proving that stylish decor doesn’t require a hefty price tag.
1. Eye-Catching Wall Art with Rustic Crates
Elevate your walls with a piece of art that combines rustic charm with personalized touches. This project transforms simple Dollar Tree items into a captivating display, perfect for adding a focal point to any room.
Materials:
- Wood sign from Dollar Tree (ensure it has a flat, smooth backing)
- Two small wooden crate boxes from Dollar Tree
- White acrylic or chalk paint
- Anti-wax or clear wax (for distressing)
- Two painter sticks (from Dollar Tree or hardware store)
- Any preferred word sign (e.g., “Home,” “Love,” or a family name)
- Antique-style stickers or decals from Dollar Tree
- Mod Podge (matte or satin finish)
Instructions:
Begin with your Dollar Tree wood sign. Many of these signs come with pre-printed designs or stickers. Gently remove any hangers and peel off the existing image. Most of these come off quite easily, leaving you with a clean wooden backing, which is exactly what you’ll need. Apply a single coat of white paint to the entire wood backing. The goal isn’t perfect coverage; rather, you want it to have a slightly distressed, aged look, reminiscent of an old wooden fence post. Once the paint is dry, use a ruler and pencil to lightly draw horizontal lines across the sign, mimicking individual wood planks. Dampen a small piece of paper towel and gently rub along these pencil lines to subtly distress them, creating a weathered appearance.
Next, take your two small wooden crates. Apply a thin layer of anti-wax or clear wax to both crates. This step is crucial for achieving an antique, distressed finish later. Once the wax is dry, apply a coat of white paint over them. After the paint dries, use sandpaper or a damp cloth to gently distress the crates, allowing some of the natural wood or the waxed underlayer to show through, enhancing their rustic appeal.
Now, turn your attention to the two painter sticks. Measure and cut them to the exact length of the top and bottom edges of your wood sign. Paint these sticks with anti-wax, then follow up with white paint, just like you did with the crates. Distress them once dry to match the overall aesthetic. If you have a separate word sign, consider painting it a soft, light green or another color that complements your decor. Similarly, gently distress your antique stickers to give them an aged, integrated look.
Finally, it’s time for assembly. Using strong craft glue or hot glue, attach the distressed painter sticks to the top and bottom edges of your ‘fence’ sign. Position the two small crates just above the bottom stick and securely glue them into place. For a final touch, adhere your word sign and distressed stickers to complete your unique piece of farmhouse wall art. This beautiful creation will undoubtedly add a charming, custom touch to any room.
2. Rustic Farmhouse Coaster with Stand
Protect your surfaces with style! This functional yet decorative farmhouse coaster project is not only practical but also adds a delightful touch of rustic charm to your coffee table or nightstand. It’s a quick and easy way to use up small wood scraps and create something truly unique.
Materials:
- Small wood block scrap (can be found in craft sections, hardware stores, or upcycled from old projects)
- Black spray paint
- White acrylic or chalk paint
- Paintbrush
- Sandpaper (fine to medium grit)
- Printed photo or graphic with a farmhouse theme (e.g., a cow, a rustic quote, a floral design)
- Mod Podge
- Small wooden beads or decorative buttons for the stand (e.g., from a dollar store craft kit or an old game like a braid teaser)
Instructions:
Start by giving your small wood block scrap a base coat of black spray paint. Ensure even coverage and allow it to dry completely. Once dry, lightly brush some white paint over the black base. The idea here is not to completely cover the black but to create a layered effect that hints at age and wear. After the white paint has dried, grab your sandpaper. Gently distress the edges and surfaces of the wood block. This will allow some of the black base coat and the natural wood to peek through, giving your coaster a wonderfully rustic and aged appearance.
Next, prepare your printed photo or graphic. Carefully cut out the design you wish to use. Apply a layer of Mod Podge to the top surface of your distressed wood block, then carefully place your cut-out image on top. Smooth out any bubbles or wrinkles using your fingers or a craft tool. Once the image is in place, apply another thin layer of Mod Podge over the top of the image to seal it and provide a protective finish. Allow it to dry thoroughly.
For the stand, take your chosen beads or buttons. These will serve as small feet for your coaster, elevating it slightly and adding to its handcrafted appeal. Securely glue these beads to the bottom corners of your wood block. After the glue has set, you can optionally apply a final touch of distressing to the edges of the coaster or around the beads, further enhancing its rustic charm. This finished coaster will not only protect your furniture but also serve as a charming piece of farmhouse-inspired decor.
3. Charming Small Ladder with Plant Pots
Add vertical interest and a touch of greenery to your home with this adorable mini ladder adorned with small plant pots. This project is perfect for creating a cozy vignette on a shelf, mantelpiece, or even as a unique centerpiece. It embodies the farmhouse love for natural elements and rustic textures.
Materials:
- Small wood pieces (such as craft sticks, stir sticks, or thin balsa wood from Dollar Tree or a craft store)
- White acrylic or chalk paint
- Small terracotta pots or miniature craft pots (Dollar Tree often has these)
- Fake plants or succulents (for low maintenance)
- Printed images or labels with a farmhouse theme (e.g., “Herbs,” “Garden,” floral designs)
- Anti-wax or clear wax (for distressing)
- Hot glue gun and glue sticks
Instructions:
Begin by constructing your miniature ladder. You’ll need two longer pieces for the vertical sides and several shorter pieces for the rungs. Using a hot glue gun, carefully assemble the ladder, ensuring the rungs are evenly spaced. Once your ladder is complete and the glue has dried, paint it entirely with white paint. Don’t worry about achieving a perfectly smooth finish; a slightly rustic look is desirable here. While the ladder dries, paint your small pots white as well.
Next, prepare your printed images. Cut them to size so they fit nicely on the front of your small pots. Apply a layer of Mod Podge to the pots where the images will go, then carefully place the images on top, smoothing out any air bubbles. Once the images are in place, apply another thin setting coat of Mod Podge over them to seal and protect the designs. Allow these to dry completely.
Now, it’s time to add that signature distressed look. Apply anti-wax or clear wax to both the painted ladder and the painted pots (avoiding the printed images if you want them to remain crisp). Once the wax is dry, gently rub various spots with a damp cloth or fine sandpaper, allowing some of the underlying wood or original pot color to show through. This technique creates a beautifully aged and weathered appearance, quintessential to farmhouse style.
Finally, assemble your charming display. Securely attach the small pots to the rungs of the ladder using hot glue. You can position them on alternate rungs or stack them creatively. Once the pots are firmly in place, add your fake plants or succulents to each pot. Arrange your completed ladder on a shelf, windowsill, or as a centerpiece to instantly infuse your space with delightful farmhouse charm.
4. Elegant Farmhouse Table Decor Pedestal
Create a versatile and eye-catching centerpiece for your table, mantel, or shelf with this elegant farmhouse-inspired pedestal. This project cleverly reuses common Dollar Tree items, transforming them into a sophisticated piece that can hold small candles, decorative objects, or simply stand alone as a statement piece.
Materials:
- Wooden candle holders (Dollar Tree often has various shapes and sizes)
- Black acrylic or spray paint
- White acrylic or chalk paint
- Large metal bottle cap (these can often be found at Dollar Tree as part of larger craft items or purchased individually at craft stores)
- Sandpaper (fine to medium grit)
- Printed image or graphic with a farmhouse theme (e.g., a vintage advertisement, a floral motif, a farm animal silhouette)
- Strong craft glue or hot glue
Instructions:
Begin by preparing your wooden candle holders and the large metal bottle cap. Apply a base coat of black spray paint to both items, ensuring complete coverage. Allow them to dry thoroughly. Once dry, apply a clear sealant over the black paint. This layer will protect the black paint and provide a good surface for the next steps.
After the sealant has dried, brush a coat of white paint over both the candle holders and the metal bottle cap. Again, you can aim for a slightly uneven coverage to contribute to the rustic look. Once the white paint is dry, take your sandpaper and gently distress both pieces. Focus on the edges and raised areas, allowing some of the black paint and even the natural wood to show through. This technique creates a beautiful worn, vintage effect that is characteristic of farmhouse decor.
Next, prepare your chosen printed image. Cut it precisely to fit the center of your metal bottle cap. Apply a layer of Mod Podge to the back of the image and carefully adhere it to the inside of the bottle cap, smoothing out any wrinkles. Once the image is firmly in place, apply another thin layer of Mod Podge over the entire image to seal and protect it. This will give it a durable finish.
Finally, assemble your farmhouse pedestal. Apply a generous amount of strong craft glue or hot glue to the top of the distressed wooden candle holder. Carefully center and press the decorated metal bottle cap onto the candle holder, ensuring it is securely attached. Allow ample time for the glue to dry and set completely. Your finished farmhouse table decor pedestal is now ready to add a touch of handcrafted elegance to your home, perfect for showcasing a small candle, a mini plant, or simply admiring its rustic charm.
Transform Your Home with Budget-Friendly Farmhouse Style
As you can see, creating a beautifully decorated home doesn’t require a lavish budget. With a little imagination and a willingness to explore the treasures found at Dollar Tree and thrift stores, you can craft stunning pieces that reflect your personal style. These DIY farmhouse decor projects, inspired by Unicorn Dust Designs, are more than just crafts; they are opportunities to add warmth, character, and a touch of homemade charm to your living space. Each piece you create tells a story, making your home truly unique and inviting.
Embracing the DIY spirit allows you to personalize your decor to perfection, choosing colors, textures, and themes that resonate with you. It’s a fantastic way to save money, engage in a fulfilling creative process, and contribute to a more sustainable lifestyle by upcycling and repurposing items. So, gather your materials, clear your crafting space, and get ready to transform your home with these easy, affordable, and utterly charming Dollar Tree DIY farmhouse decor ideas. Happy crafting!