
Master the Art of Sealing Snack Bags Without a Clip: Keep Your Chips Fresh Longer
We’ve all been there: a half-eaten bag of your favorite potato chips, a craving to save them for later, and the frustrating realization that there’s no clip in sight. Stale chips are a culinary tragedy, and nobody wants to waste a delicious snack simply because it wasn’t sealed properly. The good news? You don’t need fancy gadgets or plastic clips to keep your chips perfectly fresh and crunchy. There’s a brilliant, simple, and incredibly effective technique that uses just the bag itself.
This ingenious method isn’t just a last-minute fix; it’s a game-changer that might make you ditch your bag clips for good. It’s surprisingly secure, creates an excellent air seal, and takes mere seconds to master. Imagine never having to hunt for a lost clip again or dealing with flimsy seals that let air in. This article will walk you through the precise steps to seal any snack bag like a pro, ensuring your treats remain as fresh as the moment you first opened them.
Why Proper Snack Bag Sealing is Crucial for Freshness
The science behind food spoilage is simple: exposure to air is the enemy of freshness, especially for crispy snacks like chips. When air, particularly oxygen, comes into contact with food, it accelerates oxidation, causing fats to go rancid and textures to become soft and unappetizing. Moisture in the air can also turn crunchy snacks soggy.
The Consequences of Poor Sealing:
- Stale Taste and Texture: The most obvious effect. Chips lose their satisfying crunch and develop an undesirable, often chewy, texture.
- Loss of Flavor: The delicate flavors of your snacks can diminish or change as they interact with oxygen and other airborne particles.
- Hygiene Concerns: An open bag is an open invitation for dust, crumbs, or even pests. A properly sealed bag maintains a cleaner environment for your food.
- Waste and Cost: Unsealed snacks often end up in the bin, leading to wasted food and money.
- Spills and Messes: An unsealed bag is a ticking time bomb, ready to spill its contents at the slightest bump, creating unnecessary clean-up.
By effectively sealing your snack bags, you create a barrier against these elements, preserving the original taste, texture, and quality of your food. This not only enhances your snacking experience but also contributes to less food waste and a tidier pantry.
The Advantages of the No-Clip Bag Sealing Method
While bag clips serve their purpose, the no-clip folding technique offers several distinct advantages that make it a superior choice for many snack enthusiasts:
1. Always Available, Always Free
The most compelling benefit is that you always have your sealing tool with you: the bag itself! There’s no need to search for a lost clip, buy new ones, or worry about them breaking. This method is entirely free and accessible anytime, anywhere.
2. Superior Air Tightness
When executed correctly, this folding technique creates a remarkably tight seal. The multiple folds and the tension of the bag material often provide a better barrier against air and moisture than many standard plastic clips, which can sometimes leave small gaps.
3. Eco-Friendly and Sustainable
By relying solely on the bag, you reduce your dependence on plastic clips, contributing to a more sustainable lifestyle. It’s a small step, but every little bit helps in minimizing plastic waste.
4. Neat and Compact Storage
A folded bag often takes up less space and sits more neatly in your pantry or cupboard compared to bags with bulky clips attached. This can help you maintain a more organized kitchen.
5. Versatility Across Bag Types
This method works effectively on a wide range of snack bags, from thin plastic chip bags to slightly thicker foil-lined pouches. As long as the bag has enough excess material at the top, you can typically apply this technique.
RELATED: If you’re eager to explore more clever ways to keep your snacks fresh, check out these 3 Genius Chip Bag Sealing Techniques for additional inspiration.
The Ultimate Guide: How to Seal a Snack Bag Without a Clip
Get ready to revolutionize your snack storage! This method is deceptively simple but incredibly effective. Follow these detailed steps, and you’ll be a pro in no time. For a visual demonstration, make sure to watch the helpful video tutorial by DIY Projects on YouTube.
Step-by-Step Instructions:
-
Step 1: Consolidate Contents and Prepare the Bag
Begin by holding the chip bag upright, ensuring that all the leftover chips or snacks settle neatly at the bottom. Gently shake the bag if necessary to encourage the contents to fall. This crucial first step creates an empty space at the top of the bag, providing ample material for the subsequent folds. Having a clear upper section is key to achieving a tight and secure seal. Make sure there are no crumbs or small pieces caught near the opening that could impede a clean fold.
-
Step 2: Expel Air and Flatten the Top Edge
With the contents at the bottom, carefully press out as much air as possible from the bag. You want the bag to be relatively flat above the chips. Once the air is expelled, begin folding the very top edge of the bag. Make your first fold about half an inch (approximately 1-1.5 cm) down from the opening. Ensure this fold is crisp and even across the entire width of the bag. This initial fold sets the foundation for a strong seal.
-
Step 3: Roll Down the Bag and Fold Side Edges
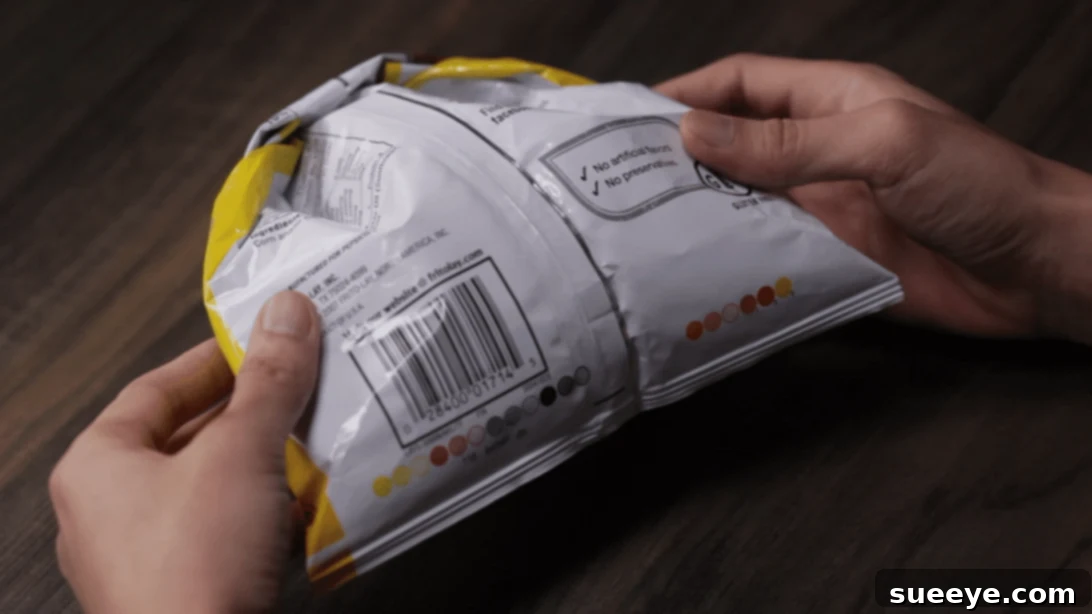
Continue folding the top edge over itself repeatedly, rolling the bag downwards in consistent half-inch increments. Maintain a firm and even pressure as you roll, ensuring each fold is flat against the previous one. Keep rolling until you are just above the level of the chips, leaving a small buffer zone. At this point, you should have a tightly rolled band at the top of the bag. Once rolled to the desired height, take both the left and right ends of this rolled section and fold them inwards towards the center. Aim to have them meet or slightly overlap, creating a neat, compact package at the top.
-
Step 4: Secure the Fold by Tucking and Locking
This is the locking mechanism of the seal. With the side ends folded towards the center, grasp the entire folded band (the part you’ve been rolling) firmly. Now, fold this entire rolled and side-folded section backward, tucking it snugly against the main body of the bag. The previously folded ends will now be securely held in place by the tension of the backward fold. Press firmly along the fold to create a strong crease. The natural tension of the plastic will help hold this fold in place, creating an exceptionally tight seal that prevents air from entering and keeps your snacks fresh.
Once you’ve completed these steps, your snack bag should be securely sealed, compact, and ready for storage. Give it a gentle squeeze to test the seal; you should feel minimal air escaping.
Tips for Perfecting Your No-Clip Bag Seal
While the basic steps are straightforward, a few additional tips can help you achieve a perfect seal every time, ensuring maximum freshness for your snacks:
- Practice Makes Perfect: Don’t get discouraged if your first few attempts aren’t flawless. With a little practice, the technique will become second nature, and you’ll be able to seal bags quickly and efficiently.
- Start with a Clean Top: Ensure the inside of the bag’s opening is free of crumbs or oil. These can hinder the folds from sticking tightly together.
- Even Folds Are Key: Consistency in your half-inch folds is crucial. Uneven folds can create gaps, compromising the airtight seal. Take your time to make each roll neat and tight.
- Expel All Air: Before you start folding, really push out as much air as possible. The less air trapped inside, the longer your chips will stay fresh.
- Crease Firmly: After each fold, especially the final backward tuck, press down firmly along the crease. This helps the plastic “remember” its shape and maintains the seal’s integrity.
- Consider Bag Material: This method works best on bags with a bit of flexibility. Very thick, rigid bags might be more challenging, while very thin, delicate bags might require a lighter touch to avoid tearing. Most standard chip bags are ideal.
- Leave Enough Empty Space: Make sure you have at least 2-3 inches of empty bag above your snacks. This provides enough material for the multiple folds needed for a secure seal.
- Store Upright: Once sealed, storing the bag upright in your pantry can further help maintain the integrity of the fold and prevent any accidental unfolding.
Common Mistakes to Avoid When Sealing Snack Bags
Even with a simple technique, there are common pitfalls that can lead to a less-than-perfect seal. Being aware of these can help you avoid stale snacks and ensure your efforts are effective:
- Not Expelling Enough Air: This is perhaps the most common mistake. Trapped air inside the bag will quickly lead to staleness, regardless of how well the bag is folded. Always press out as much air as you can before you start the rolling process.
- Making Folds Too Loose or Uneven: If your folds are not tight or vary significantly in width, the seal will be compromised. Loose folds create gaps, and uneven folds prevent the final tuck from locking properly.
- Folding Too Much or Too Little Material: If you don’t leave enough empty space at the top, you won’t have enough material to create the multiple folds required for a secure seal. Conversely, folding too much material can make the final tuck bulky and less secure. Aim for 2-3 inches of empty space.
- Not Tucking the Sides In: Skipping the step where you fold the side ends towards the center before the final backward tuck will result in a much weaker seal. These side folds are critical for creating the tension that holds everything in place.
- Rushing the Process: While the method is quick once mastered, rushing through the steps in the beginning can lead to sloppy folds and a poor seal. Take your time, especially when learning, to ensure each step is performed correctly.
- Overfilling the Bag: If the bag is still too full, it becomes difficult to push the contents down and create enough empty space for effective folding. Try to consume a bit more or transfer some contents if the bag is overflowing.
Beyond Chips: What Other Snack Bags Can You Seal?
This versatile no-clip sealing technique isn’t just for potato chips! It works wonders for a variety of other snack bags, extending the freshness of many pantry staples. Consider using it for:
- Pretzels and Crackers: Keep them crisp and crunchy.
- Cereal Bags: Ideal for inner cereal bags to maintain freshness after the box is opened.
- Candy Bags: Especially gummy candies that can dry out or hard candies that attract moisture.
- Dried Fruits and Nuts: Prevents them from becoming overly dry or absorbing moisture.
- Popcorn: Keeps popped corn from going stale quickly.
- Coffee Beans (small bags): While airtight containers are best, this is a great temporary solution for smaller bags.
- Pasta/Grain Bags: For bags of pasta, rice, or other grains that come in flexible packaging.
The key is that the bag needs to be flexible enough to fold and have sufficient excess material above the contents. Experiment with different types of packaging, and you’ll likely find this hack applicable to many items in your pantry.
Conclusion: A Simple Hack for Lasting Freshness
Say goodbye to stale snacks and the endless search for misplaced bag clips. This simple yet highly effective folding technique empowers you to preserve the freshness and crunch of your favorite chips and snacks using nothing but the bag itself. It’s a testament to how often the best solutions are the most straightforward ones.
By mastering these steps, you’re not just sealing a bag; you’re adopting a sustainable habit that reduces food waste, saves you money, and ensures that every snack experience is as enjoyable as the first. So, the next time you open a bag of chips, remember this ingenious hack, give it a try, and taste the difference. Your future self (and your taste buds) will thank you!
*A special thank you to DIY Projects via YouTube for providing the helpful visual aids that complement this guide. Their channel is a fantastic resource for practical tips and creative solutions. If you found this hack useful, we highly recommend visiting their channel and subscribing for more brilliant ideas!