
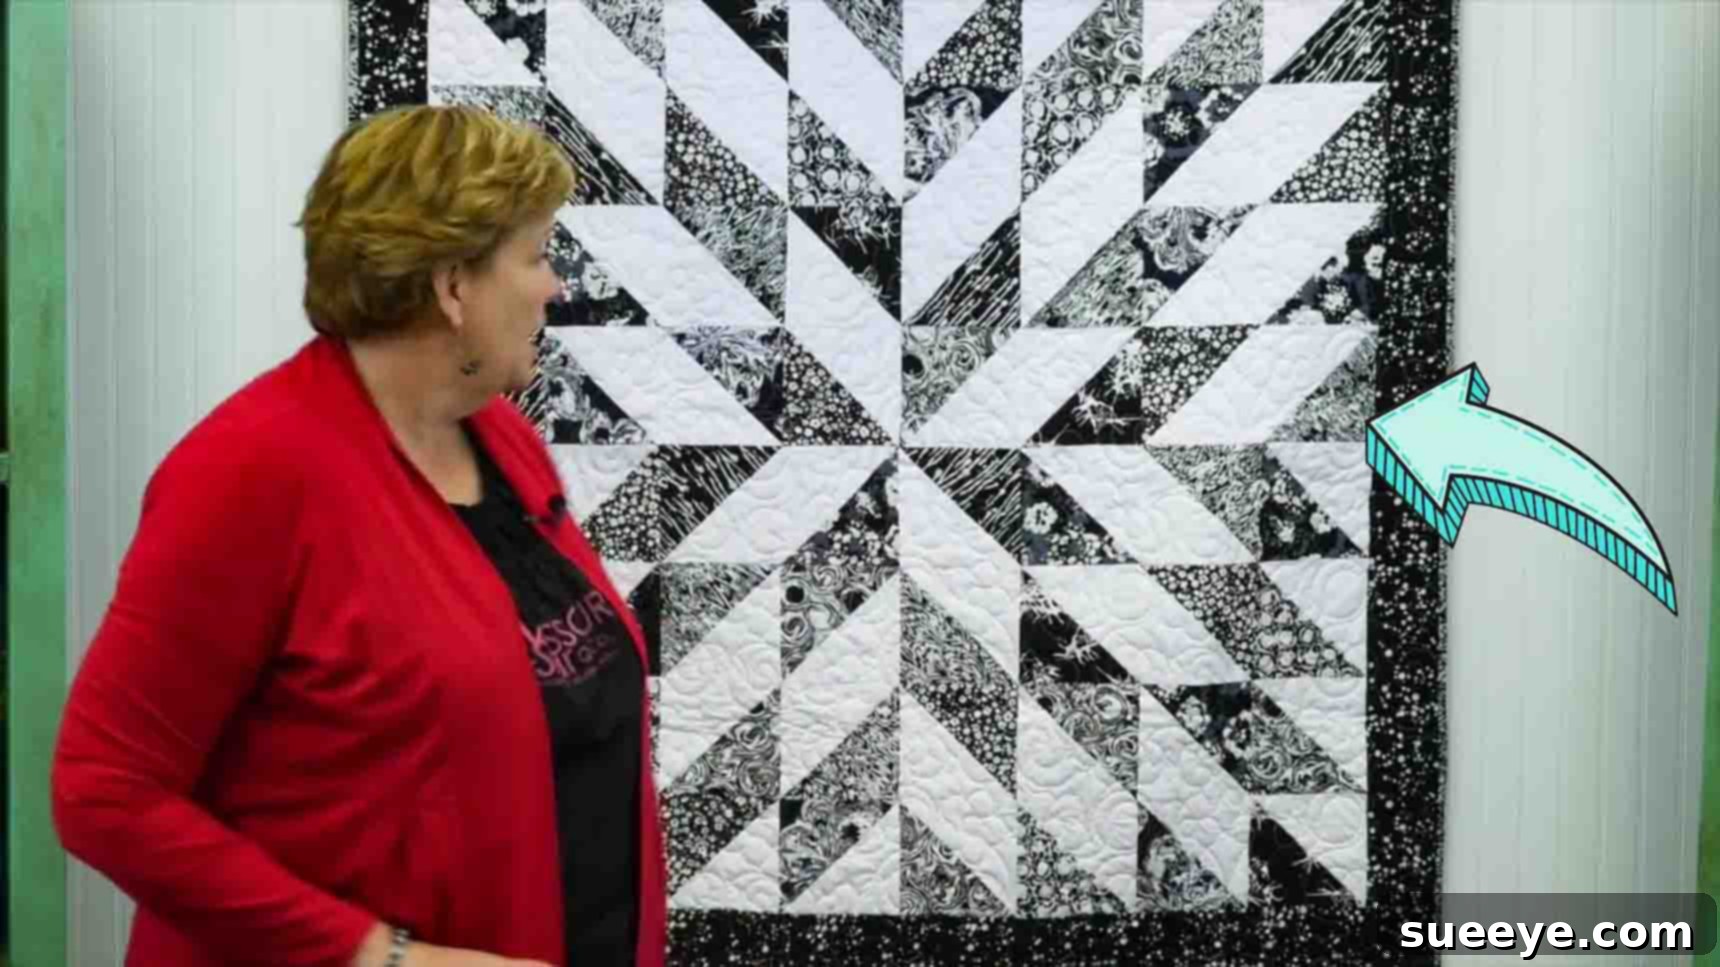
Embark on a rewarding quilting journey with the mesmerizing Starburst Quilt! If you’re searching for a captivating project that looks intricate but is surprisingly simple to construct, this beginner-friendly design is perfect for you. Inspired by the renowned experts at Missouri Star Quilt Company, this tutorial will guide you through creating a visually stunning quilt that radiates charm and sophistication. The best part? It utilizes convenient pre-cut layer cakes, making fabric selection a breeze and allowing you to dive straight into the joy of sewing. Get ready to transform your favorite fabric bundles into a masterpiece that will be cherished for years to come.
Why the Starburst Quilt is Perfect for Beginners
The Starburst Quilt pattern is a fantastic choice for anyone new to quilting, or even experienced quilters looking for a quick and satisfying project. Its beauty lies in its deceptive complexity; while the finished design boasts an impressive burst of color and pattern, the underlying construction relies on fundamental quilting techniques, primarily the creation and arrangement of Half-Square Triangles (HSTs). This method not only builds confidence but also teaches essential skills like precise cutting, accurate seam allowances, and efficient block assembly. Using layer cakes—pre-cut 10-inch fabric squares—eliminates the need for extensive fabric cutting, allowing you to focus on the enjoyable process of piecing. The clear, step-by-step instructions, popularized by quilting educators like Jenny Doan, ensure a smooth and enjoyable experience from start to finish. This project is a gateway to more complex patterns, equipping you with foundational skills in a fun and engaging way.
Materials for Your Easy Starburst Quilt Project
Gathering your materials is the first exciting step in any quilting adventure. For this Starburst Quilt, we focus on convenience and quality to ensure a beautiful outcome. Here’s what you’ll need to bring your vision to life:
- 1 Pack 10″ Fabric Squares (Layer Cake): A standard layer cake typically contains 42 pre-cut 10×10 inch squares, offering a beautiful assortment of coordinated fabrics from a single collection. These pre-cuts are a quilter’s best friend, saving you hours of cutting time and guaranteeing a harmonious color palette, which is ideal for the vibrant “starburst” effect. Choose a pack with good contrast between light and dark fabrics to maximize the visual impact of your design.
- 1 ¼ Yards of Background Fabric: The background fabric plays a crucial role in making your starburst design pop. It provides the negative space that allows the colored fabrics to shine. Choose a solid, a tone-on-tone print, or a subtle blender that offers a strong contrast to your layer cake fabrics. For a classic look, a crisp white or cream works wonderfully, but a light gray or pastel could also create a unique ambiance. This fabric will form the lighter sections of your Half-Square Triangles, highlighting the intricate pattern.
- 1 Yard of Outer Border Fabric: The outer border frames your quilt top, giving it a polished and finished look. It acts as a visual resting place for the eye and helps to “contain” the energetic design of the starburst. Select a fabric that complements your layer cake and background, tying all the elements together. This can be a solid to calm the eye, a coordinating print to add another layer of visual interest, or a darker shade to provide definition.
- 3 ¾ Yards of Backing Fabric: The backing fabric provides the underside of your quilt and contributes significantly to its overall comfort and drape. You can opt for a wide-back fabric (usually 108 inches wide) to avoid piecing, or choose standard width fabric and piece it together. Consider a soft flannel for extra coziness, a smooth cotton that matches your quilt’s aesthetic, or even a fun contrasting print that adds a surprise element.
- Batting (Twin Size approximately 72″ x 90″): While not explicitly listed in the original, batting is essential for any quilt. It provides warmth, loft, and helps to define the quilting stitches, giving your quilt its characteristic texture. Choose from various types like cotton, polyester, or a blend, depending on your desired feel, drape, and warmth.
- Coordinating Thread: High-quality 100% cotton thread that matches or subtly blends with your fabrics is crucial for durable seams and a professional finish. Aurifil or Superior Threads are popular choices among quilters.
- Basic Quilting Tools: To ensure a smooth and enjoyable process, have these essential tools on hand:
- Reliable Sewing Machine with a ¼-inch foot
- Sharp Rotary Cutter with a fresh blade (a 45mm or 60mm works well)
- Large Self-Healing Cutting Mat (at least 24″ x 36″)
- Acrylic Quilting Rulers (a large square ruler and a long rectangular ruler are most useful)
- Steam Iron and a well-padded Ironing Board or Pressing Mat
- Fabric Pins or Wonder Clips for holding fabric layers
- Seam Ripper (an essential tool for every quilter, just in case!)
- Fabric Marker (such as a Frixion pen or chalk marker)
Directions: Crafting Your Radiant Starburst Quilt
Follow these detailed steps to bring your Starburst Quilt to life. Precision in cutting and sewing is key to achieving crisp points and a stunning finished product, but don’t let that intimidate you – with careful attention, even beginners can achieve fantastic results. Remember to press after each sewing step to ensure flat seams and accurate piecing.
Step 1: Preparing Your Half-Square Triangles (HSTs)
Half-Square Triangles (HSTs) are the fundamental building blocks of this beautiful Starburst quilt, and mastering their creation is a foundational skill in quilting. For this project, we’ll create a total of 32 finished HST units from 16 pairs of 10-inch squares.
Begin by selecting one vibrant 10″ square from your layer cake and pair it with one 10″ square of your chosen background fabric. Place these two squares right sides together, ensuring all edges are perfectly aligned. This initial precision is paramount for preventing skewed blocks later on. It’s a good practice to nestle the corners precisely and use a couple of pins to hold them securely.
Using your sewing machine, sew a precise ¼” seam allowance all the way around the outside perimeter of the layered squares. It’s vital that this seam is consistent on all four sides to ensure your resulting HSTs are accurate and easy to work with. Many quilters find a special ¼-inch presser foot indispensable for maintaining this accuracy. Once the perimeter is sewn, take your quilting ruler and a fabric marking tool (like a fabric pencil or Frixion pen). Line your ruler from one corner diagonally to the opposite corner, and draw a line. Repeat this for the other two diagonal corners, creating an “X” shape across your sewn square.
Now, with your rotary cutter and ruler, carefully cut along both diagonal lines you just marked. This action will yield four smaller triangle units from your original 10-inch square pair. After cutting, you will have four unsewn triangular pairs. Gently separate each pair of triangles, then press each half-square triangle unit open. Pressing carefully and accurately, ideally towards the darker fabric to minimize shadow-through (or open if you prefer less bulk at seam intersections), ensures flat, crisp seams which are crucial for precise piecing later. For optimal flatness, a little burst of steam and a pressing mat can work wonders. Repeat this entire process until you have a total of 32 perfectly pressed Half-Square Triangle units. These HSTs are the stars of your starburst pattern!
Step 2: Assembling Your Quilt Quadrants (Blocks)
Once all your individual Half-Square Triangle units are complete and neatly pressed, it’s time to bring them together to form the foundational blocks of your Starburst quilt. For this pattern, each block is essentially a “quadrant” of the larger starburst design, built from a 4×4 arrangement of your newly made HSTs.
Carefully lay out your HSTs on a design wall or a large, flat surface according to the visual guide provided in the example image below. Pay close attention to the orientation of each colored triangle – this is where the magic of the starburst pattern truly comes to life. The goal is to create a dynamic, radiating effect where the colored points of the HSTs converge to form the starburst. Take your time to arrange them, stepping back occasionally to ensure the pattern flows correctly and the colors are distributed pleasingly. This “auditioning” step is crucial for the final aesthetic of your quilt, so don’t rush it.
Once you are satisfied with your layout, begin assembling the block by sewing the units together in rows. For the first row, take the first two HSTs, place them right sides together, and sew them with a precise ¼” seam. Repeat this for the remaining pairs in that row, and then for all subsequent rows. It’s often helpful to “chain piece” these units (sewing them one after another without lifting the presser foot or cutting threads in between) to save time. After sewing each row, press your seams, ideally in alternating directions for adjacent rows. This technique, known as “nesting seams,” helps to reduce bulk at the seam intersections and allows for perfectly matching points when you join the rows together.
After all the units in each row are sewn and pressed, it’s time to join the rows themselves. Place the first row right sides together with the second row, carefully aligning all seams and pinning generously, especially at the intersections where points meet. Sew with a ¼” seam, then press the seam open or to one side. Continue joining the remaining rows in the same manner until your 4×4 quadrant is complete. Each perfectly assembled quadrant will showcase a beautiful part of your starburst. You will repeat this process to create the necessary number of quadrants for your desired quilt size, typically four quadrants for a full starburst design, resulting in a stunning center.
Step 3: Assembling the Quilt Top and Adding Borders
Once you have constructed all your individual Starburst quadrants (blocks), the next step is to arrange them to form the full quilt top. This is where your overall design truly takes shape. Lay out all your finished blocks on your design wall or floor, experimenting with different rotations and placements until you achieve the overall starburst effect you desire. For a typical large starburst, you’ll arrange four quadrants into a 2×2 grid. Once satisfied with the layout, sew the blocks together, first joining them into rows, and then joining the rows. Always use a consistent ¼” seam allowance and press seams carefully as you go, nesting them where possible to ensure smooth joins and perfectly matched points. Square up your quilt center if necessary after joining.
After your main quilt center is assembled, it’s time to add the outer border. Borders not only provide a beautiful frame for your intricate starburst design but also help to stabilize and square up the quilt top, ensuring it hangs nicely. First, measure the length and width of your quilt top in several places and take an average to ensure accuracy. Cut your outer border fabric into strips of the desired width (e.g., 4-6 inches wide for a balanced look). First, sew the side borders to the quilt, carefully aligning and pinning along the length. Press seams towards the border. Then, measure the quilt with the side borders attached and cut the top and bottom borders to fit. Attach these, pressing seams again. Your quilt top is now complete and ready for the next stages!
Step 4: Layering, Quilting, and Finishing Your Masterpiece
With your quilt top proudly pieced together, the final stages involve layering, quilting, and binding – steps that transform your fabric pieces into a functional, cozy quilt. First, create your quilt sandwich: lay your backing fabric wrong side up on a clean, flat surface, smoothing out all wrinkles. Next, center your batting on top of the backing. Finally, carefully place your quilt top, right side up, on top of the batting. Ensure all three layers are taut and wrinkle-free. Baste the layers together using your preferred method – safety pins spaced every 4-6 inches, basting spray, or hand-stitches – to prevent any shifting during the quilting process.
Now comes the quilting itself – the stitching that holds all three layers together and adds texture and dimension to your project. This is where your quilt truly comes to life! For beginners, simple straight-line quilting using your walking foot is an excellent choice. You could quilt along the seams (often called “stitch in the ditch”), or create parallel lines radiating from the starburst points or crisscrossing the blocks. Alternatively, if you’re feeling adventurous, try a simple meander or stipple for free-motion quilting. Don’t be afraid to keep it simple; even basic quilting patterns can enhance the beauty of your piecing.
Finally, bind your quilt. This involves cutting fabric strips, joining them to create one long continuous strip, folding it, and sewing it around the raw edges of your quilt. The binding not only finishes the edges neatly but also provides a durable border that protects your quilt. Attach the binding to the front of your quilt by machine, then hand-stitch or machine-stitch it to the back. Take your time with this step, as a well-executed binding gives your quilt a professional, handmade touch and ensures it will withstand years of use and love.
Easy Starburst Quilt with Jenny Doan – Missouri Star Quilt Co.
This Starburst Quilt design, popularized by the engaging tutorials from Jenny Doan of Missouri Star Quilt Company, truly embodies their philosophy of making quilting accessible and enjoyable for everyone. Jenny’s clear instructions, encouraging demeanor, and clever techniques for using pre-cut fabrics have inspired countless quilters worldwide. This project is a shining example of how seemingly complex patterns can be broken down into manageable steps, making the art of quilting approachable for all skill levels. By following her guidance, you’ll not only create a beautiful and functional quilt but also gain valuable skills that will serve you in all your future quilting endeavors. Remember, quilting is a journey of creativity and learning, and every stitch adds to your unique story and growing expertise.
Ready to watch the expert in action and get started on your own Starburst Quilt? Dive into the detailed video tutorial provided by Missouri Star on Youtube. It’s the perfect companion to these written instructions, offering visual clarity for every step and invaluable tips directly from Jenny Doan. Happy quilting! Watch the full Missouri Star Starburst Quilt tutorial here!