
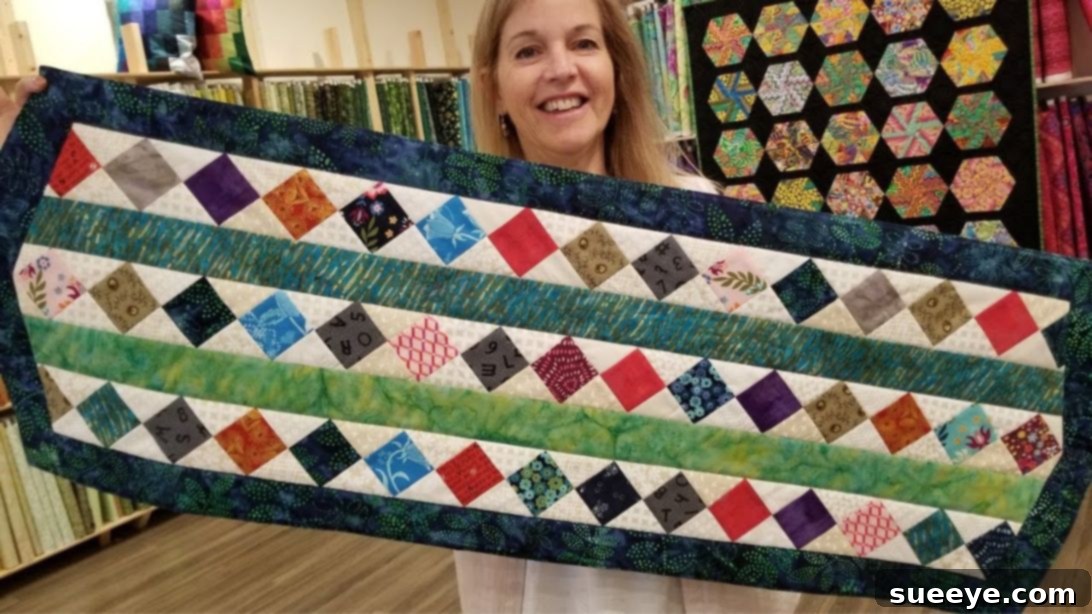
Are your sewing baskets overflowing with a mountain of beautiful, yet seemingly unusable, fabric scraps? Do you find yourself wondering how to breathe new life into those small remnants of cherished projects past? Look no further! The solution to your fabric dilemma lies in creating a stunning and functional piece of home decor: **Donna’s Scrap Buster Table Runner**. This brilliant quilting project, brought to life by the expert quilters at Jordan Fabrics, is an ingenious way to transform those leftover pieces into a vibrant display of craftsmanship.
Imagine your dining table, coffee table, or even a side console adorned with a unique, handcrafted table runner that tells a story through its diverse fabric medley. Not only is it a fantastic way to declutter your craft space and embrace sustainable crafting by upcycling, but it also results in a beautiful item that can elevate the aesthetic of any room. Beyond personal use, a handmade table runner makes an incredibly thoughtful and personalized gift for family and friends, perfect for holidays, housewarmings, or just because. This detailed guide will walk you through each step, ensuring a smooth and enjoyable quilting journey, regardless of your experience level. Get ready to unleash your creativity and turn those scraps into a masterpiece!
Materials for Your Scrap Buster Table Runner
Before diving into the fun of stitching, gathering your materials is key. The beauty of this project lies in its flexibility, allowing you to truly bust through your stash. Here’s what you’ll need:
- Neutral-Colored Fabric Strips: These strips will serve as the backbone of your design, providing contrast and stability. Opt for solid colors like cream, white, beige, light gray, or even a very subtle tone-on-tone print. Cotton is highly recommended for quilting due to its ease of handling and durability. You’ll need enough length to create multiple foundational units, so having a good quantity on hand is beneficial.
- Fabric Strips from Scraps (at least 5 inches long): This is where your scrap busting truly shines! Raid your stash for any fabric pieces that are at least 5 inches in length and can be cut into strips. Don’t be afraid to mix and match patterns, colors, and textures – the more variety, the more dynamic and interesting your finished table runner will be. This is a fantastic opportunity to use up those smaller cuts that might seem too small for other projects.
- Jelly Rolls (Optional, but Recommended): Jelly rolls are pre-cut fabric strips, typically 2.5 inches wide, neatly rolled up. They are excellent for adding cohesive borders or feature elements to your quilt, especially if you want to introduce a consistent color palette or pattern. If you don’t have jelly rolls, you can certainly cut your own strips from yardage or larger scraps to achieve a similar effect. They help in framing your scrap-pieced sections beautifully.
- Basic Quilting Supplies: You’ll also need a sewing machine, a rotary cutter, a self-healing cutting mat, an acrylic ruler, fabric scissors, thread (matching your neutral strips or a good all-purpose color), an iron and ironing board, and quilting pins or clips.
Step-by-Step Guide: Crafting Donna’s Scrap Buster Table Runner
Step 1: Constructing Your Initial Scrap-Pieced Strips
This is where your scraps begin their transformation! Start by taking one of your neutral-colored fabric strips. Next, select a fabric scrap piece and align its raw edge with one raw edge of the neutral strip, ensuring right sides are together. Stitch them together using a precise quarter-inch seam allowance. This consistent seam allowance is crucial for accurate piecing and a professional finish.
Once stitched, gently open the fabrics. Now, grab another scrap piece, preferably with a different color or pattern to maximize visual interest, and place its raw edge next to the bottom edge of the newly attached scrap piece, again with right sides together. Continue stitching with that same quarter-inch seam allowance. The goal here is to keep adding scrap pieces, one after another, until you have completely covered the entire length of your initial neutral strip. Once all your scrap pieces are sewn onto the neutral strip, take a moment to finger press the seam allowances. Finger pressing means gently pressing the seams open or to one side with your fingers, typically towards the darker fabric (in this case, towards the scrap pieces), to temporarily flatten them before taking them to the iron. This makes the next step easier and ensures a flatter unit.
Step 2: Securing Your Scrap Strip Units
Now that you have a beautifully pieced scrap strip, it’s time to integrate it further into the runner’s design. Take another fresh neutral fabric strip. Place your newly sewn scrap strip unit on top of this neutral strip, ensuring the right sides are together. The side with the scrap pieces should be positioned on the right, aligning perfectly with the raw edge of the new neutral strip underneath. This precise alignment is important for maintaining straight lines and an even flow in your design.
Carefully sew these two pieces together along the aligned edge, once again maintaining that consistent quarter-inch seam allowance. After stitching, open up the fabrics and take them to your ironing board. Press the seam allowances towards the center, away from the newly added scrap unit. Pressing towards the center helps to reduce bulk, creates a crisper finish, and prepares the unit for accurate cutting in the next step. You should now have a long, foundational strip unit ready for the next phase of the project.
Step 3: Precision Cutting and Unit Duplication
With your strip unit pressed, it’s time to move to the cutting board for precision work. Lay your sewn strip unit flat on your self-healing cutting mat. Using your rotary cutter and an acrylic ruler, trim off any uneven selvages or ragged edges from both long sides of the unit. This squaring-up process is essential for ensuring all your subsequent cuts are clean and accurate.
Once the edges are squared, begin cutting your strip unit into smaller, uniform pieces. Each piece should be 2 1/2 inches wide. As you cut, pay close attention to the fabric designs. It’s crucial that each 2 1/2-inch piece has only one distinct fabric design visible in the middle section of the scrap part. If you find that a cut results in two different scrap fabrics being prominently featured within one 2 1/2-inch piece, adjust your cut by trimming off any excess from the last fabric piece until you achieve the desired single-design look. This meticulous cutting ensures a consistent and intentional visual flow in your final runner. You will repeat the entire process from Step 1 and Step 2 to create a total of five identical strip units. Consistency in these foundational units is key to the overall pattern integrity of your table runner.
Step 4: Assembling the Chevron Pattern Rows
This step brings the distinctive chevron or zig-zag pattern of the table runner to life. Take two of your precisely cut 2 1/2-inch blocks. To create the pattern, arrange them so that the top edge of the second block aligns perfectly with the middle point of the first block. This off-set arrangement is what creates the dynamic zig-zag. Place them right sides together, carefully lining up the intersections where the different fabric sections meet. Use pins to hold them securely in place, ensuring the points will match up nicely once sewn.
Stitch along the aligned edge with your quarter-inch seam allowance. After stitching, open the joined blocks and finger press the seam open or to one side. This immediate flattening helps you see how the pattern is forming. Continue this process, adding another block in the same manner, aligning its top edge with the middle of the previous block, and so on. You will continue joining blocks until you have a long row consisting of 17 individual blocks. The visual impact of the repeating pattern will start to emerge beautifully.
After completing your first 17-block row, you will need to create two more identical rows following the exact same procedure. This means you will have a total of three long rows, each made up of 17 joined blocks, displaying the unique scrap-pieced chevron pattern. Once all three rows are complete, take them to your ironing board. Iron each row thoroughly, always pressing with the grain of the fabric to prevent stretching or distorting your carefully pieced blocks. A well-pressed unit contributes significantly to the accuracy and beauty of the final project.
Step 5: Refining the Edges of Your Pattern Rows
With your three patterned rows constructed and pressed, the next step involves refining their edges to create a clean and polished look that will make your zig-zag design pop. Lay one of your rows flat on your cutting mat. Place your acrylic ruler a precise quarter-inch beyond all of the sharp tips along the top edge of the patterned row. Carefully use your rotary cutter to trim along this line. This cut will square up the top edge, giving it a neat, straight finish while preserving the integrity of your points.
Repeat this exact process for the bottom edge of the same patterned row. Position your ruler a quarter-inch beyond all the tips on the bottom, and make a clean cut. These two cuts create perfectly straight, parallel top and bottom edges for your patterned units. Finally, you’ll need to trim the ends of each row. Align your ruler so that you are trimming a quarter-inch beyond the very last intersection point at each end of the row. This ensures that when you join your rows later, all the points will align beautifully and the overall length will be precise. Precision in these trimming steps is vital for achieving a professional and cohesive appearance for your finished table runner.
Step 6: Final Assembly with Jelly Rolls
Now it’s time to bring all the components together, adding the final touch with your jelly roll strips. Begin by laying out your three trimmed patchwork strips. Take two jelly roll strips (or your own pre-cut 2.5-inch strips) and place them in between the three patchwork rows. These will act as separators and design elements, highlighting your pieced work. Then, take two additional jelly roll strips and place one along the top edge of your first patchwork row and the other along the bottom edge of your third patchwork row. These will form the outer borders.
Visually inspect the length of your jelly roll strips against your patchwork rows. If needed, trim the jelly roll strips to match the exact length of your patchwork rows. Next, working one section at a time, take the first patchwork row and the jelly roll strip that will go above it. Place them right sides together, aligning all edges carefully. Stitch them together using a quarter-inch seam allowance. As you sew, be extremely careful not to stitch over the intricate points of your patchwork design. This is crucial for preserving the sharpness of your chevron pattern. Take your time, perhaps using pins to align the points perfectly.
Continue this process: attach the first jelly roll strip to the first patchwork row, then attach the second patchwork row to the other side of that jelly roll strip, and so on. You’re essentially building a layered “sandwich” of patchwork and jelly roll strips. Carefully sew all the remaining pieces together in sequence until you have assembled one nice, big, cohesive block that forms the complete body of your table runner. Once all sections are sewn, give the entire piece a final, thorough press with your iron, ensuring all seams are flat and the fabric is smooth. This final pressing will set your stitches and give your table runner a crisp, finished appearance, ready for backing and binding.
Donna’s Scrap Buster Table Runner: Your Finished Masterpiece
Congratulations! You’ve successfully navigated the steps to create Donna’s Scrap Buster Table Runner. What started as a pile of disparate fabric scraps has been transformed into a beautiful, functional, and deeply personal piece of art. This project is more than just a table runner; it’s a testament to creativity, sustainability, and the joy of quilting.
Your finished table runner is perfect for adding a touch of handmade charm to your own home decor. Drape it over your dining table for everyday elegance or special occasions, use it to protect your coffee table, or even brighten up a console table in your entryway. The unique combination of colors and patterns from your scrap collection ensures that no two runners will ever be exactly alike, making yours truly one-of-a-kind.
Moreover, think about the incredible gift potential! A handmade quilt item like this table runner carries immense sentimental value. It’s a thoughtful present that showcases your effort, skill, and affection, perfect for birthdays, holidays, housewarmings, or weddings. By using up your fabric scraps, you’ve not only created something beautiful but also practiced eco-friendly crafting, giving new life to materials that might otherwise have gone unused.
We encourage you to experiment with different scrap combinations and even consider varying the width of your neutral strips or jelly rolls for future projects. The possibilities are endless when it comes to scrap busting! We hope you enjoyed this journey with Jordan Fabrics and that your new table runner brings warmth and style to your home for years to come. Don’t forget to share your creations and inspire fellow quilters!
For a visual walkthrough and further insights, make sure to watch the full instructional video by Jordan Fabrics.