
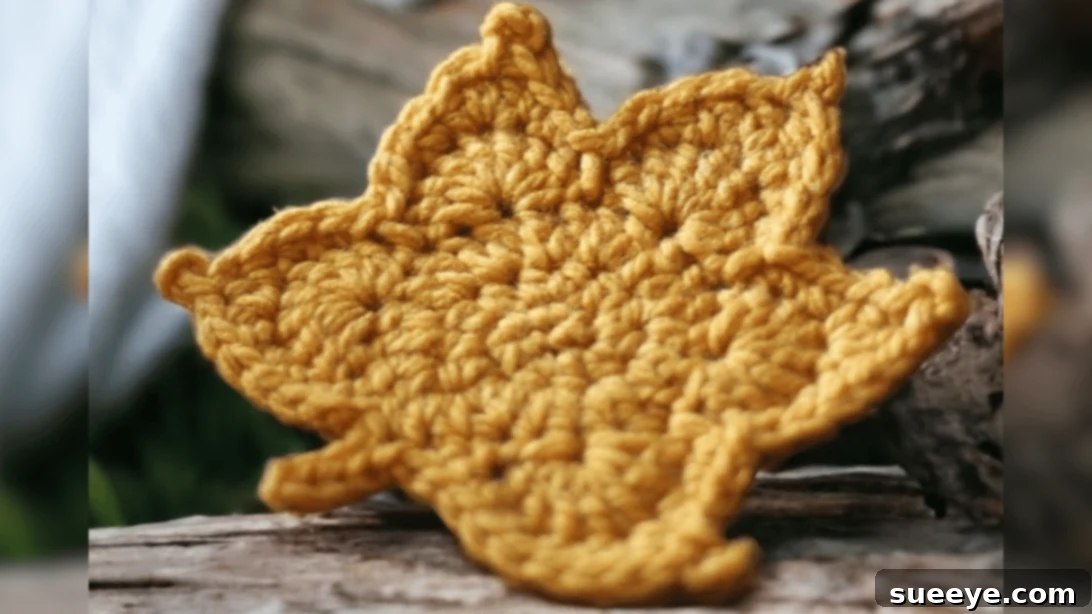
Easy Crochet Maple Leaf Tutorial: Your Perfect Fall Craft Project
As the air begins to crisp and leaves transform into a vibrant palette of reds, oranges, and golds, it’s the perfect time to infuse your home with the warmth and beauty of autumn. What better way to celebrate the season than by crafting your own stunning fall-themed decor? This comprehensive guide will walk you through crocheting an adorable maple leaf, a project so simple and delightful, even absolute beginners can master it.
This fantastic tutorial, originally brought to life by the talented Pretty Darn Adorable Crochet Tutorials on YouTube, offers clear, step-by-step instructions that make the process enjoyable and rewarding. Whether you envision these charming leaves as cozy coasters for your autumn beverages, festive ornaments to hang, or unique appliques to embellish other projects, their versatility is endless.
RELATED: If you’re eager to explore more beginner-friendly crochet patterns, don’t miss our guide on How to Crochet A Woven Heart.
Why Choose the Crochet Maple Leaf for Your Next Project?
For those new to the world of crochet, finding the perfect starter project can be daunting. You want something achievable, engaging, and with a beautiful result that motivates you to continue. The crochet maple leaf ticks all these boxes and more. It’s not just a craft; it’s an introduction to fundamental crochet stitches presented in a fun, seasonal context. You’ll learn essential techniques like chaining, single crochet, half-double crochet, double crochet, and slip stitching – all crucial building blocks for your future crochet journey.
Beyond its educational value, the maple leaf holds a special place in autumn symbolism. It represents the changing seasons, nature’s artistry, and a cozy transition. Crafting these leaves allows you to bring that natural beauty indoors, adding a personal, handmade touch to your fall decorations. Imagine a collection of these leaves scattered across your dining table, adorning a mantelpiece, or strung together as a garland – each one a testament to your burgeoning crochet skills and love for the season.
Beginner-Friendly Design: Learn and Create with Confidence
The beauty of this particular maple leaf pattern lies in its simplicity and the detailed guidance provided. The instructions are incredibly clear, breaking down each round into manageable steps. This means you won’t feel overwhelmed, even if it’s your very first time picking up a hook. The small size of the project also means quick gratification, allowing you to see your progress rapidly and build confidence with every finished leaf. Don’t be afraid to experiment with different yarn colors – a medley of traditional autumn shades like deep red, burnt orange, sunny yellow, and rustic brown will create a stunning visual display!
Materials You’ll Need for Your Crochet Maple Leaf
Gathering your materials is the first exciting step in any crafting adventure. For this crochet maple leaf project, you’ll need a few basic supplies, most of which are readily available at craft stores or online. Choosing the right materials not only makes the crocheting process smoother but also ensures your finished leaves are beautiful and durable.
- 5.5mm Hook: This size is ideal for the bulky yarn specified, creating a nice, firm fabric for your leaves. Ensure your hook feels comfortable in your hand and allows for comfortable stitch manipulation.
- Tapestry Needle: Essential for weaving in yarn ends neatly, giving your finished maple leaves a professional and polished look. A tapestry needle has a blunt tip and a large eye, perfect for bulky yarn.
- Stitch Markers: Invaluable for beginners, stitch markers help you keep track of your first and last stitches in a round, preventing errors and frustration, especially when working in continuous spirals.
- #5 Bulky Yarn: A bulky weight yarn (also known as chunky yarn) works up quickly and creates a substantial leaf. Acrylic yarn is a great choice for its affordability and wide color range, but cotton or wool blends can also offer beautiful texture and different drape.
- Permanent Fabric Glue: If you plan to turn your leaves into coasters, this glue is necessary for attaching the felt backing securely. Look for one that dries clear and is washable if needed.
- Craft Felt: Specifically for the bottom of coasters, felt provides stability, adds a neat finish, and protects surfaces from scratches. Choose a color that complements your yarn or a neutral shade.
- Craft Scissors: A sharp pair of scissors is always handy for cutting yarn tails neatly and accurately.
How to Crochet a Maple Leaf: Step-by-Step Tutorial
Now, let’s get started on crocheting your beautiful maple leaf! Follow these detailed instructions carefully, and remember that practice makes perfect. Don’t hesitate to pause and rewatch sections of the accompanying video tutorial if anything is unclear.
The Leaf Base and Initial Rounds
Step 1: Creating the Center Loop
Begin by making a slip knot on your hook, then chain 2 stitches. The second chain from your hook will be your starting point for the first round. Working into this second chain, make 6 single crochet (sc) stitches. This creates a small, tight circle – the very center of your leaf. It can be a bit fiddly at first to get your hook into that chain, so take your time and use a stitch marker in your first sc if it helps keep track.
Step 2: Expanding with Half Double Crochets
For Round 2, you’ll begin to increase your stitches to flatten out the circle and make it grow. Make 2 half double crochet (hdc) stitches into the 1st single crochet stitch of the previous round. Continue this pattern: make 2 half double crochet stitches into each subsequent stitch around the circle. By placing two stitches into each previous stitch, you’re effectively doubling the stitch count, which will gently expand the circumference of your work and create a flat base.
Step 3: Forming the Leaf’s Fullness with Double Crochets
Proceed to Round 3. This round will add more height and fullness to your leaf. Make 2 double crochet (dc) stitches into the 1st stitch of the previous round. Continue to make 2 double crochet stitches into each stitch around the entire circle. Once you’ve completed all the stitches for this round, join it with a slip stitch (sl st) to the top of the 1st double crochet you made. This slip stitch closes the round neatly and prepares you for shaping the distinct maple leaf points.
Shaping the Maple Leaf Points
Step 4: Creating the First Point
This is where your maple leaf really starts to take shape and become recognizable! For Round 4, after your slip stitch join, begin by skipping the 1st stitch immediately next to where you made your join. Then, in the very next stitch, you will work a cluster of 7 double crochet (dc) stitches. This dense cluster of stitches will form the first prominent point of your maple leaf. After completing the 7 double crochets, skip the next stitch, and then make a slip stitch (sl st) into the following stitch. This slip stitch anchors the point, creating a defined edge and securing its shape.
Step 5: Repeating for Additional Points
Now, you’ll repeat the process from Step 4 to create the remaining points of your maple leaf, giving it its classic five-point silhouette. Skip the next stitch after your last slip stitch. Then, repeat the sequence of “7 double crochet in the next stitch, skip the next stitch, and slip stitch in the next” three more times. This will give your leaf a total of four distinct points so far, with one more to go.
Step 6: Completing the Leaf and Adding the Stem
After completing your four points using the repetition, you will have a few stitches remaining to form the final point and prepare for the stem. To finish the main body of the leaf, make 7 double crochet (dc) stitches into the next available stitch. Then, skip the next stitch, and make a slip stitch (sl st) into the next 3 stitches. This will lead you back towards the base of the leaf where the stem will emerge. Now, proceed to crochet the maple leaf stem according to the video tutorial’s specific instructions. This typically involves chaining a few stitches or making a small series of single crochets extending from the base. Once the stem is complete, fasten off your yarn, leaving a tail long enough to weave in. Weave in all loose ends using your tapestry needle for a clean and professional finish.
For a visual guide and to ensure every stitch is perfect, be sure to watch the full video tutorial by Pretty Darn Adorable Crochet Tutorials. It offers invaluable visual cues, especially for understanding stitch placement and the stem creation!
Transforming Your Maple Leaf into a Coaster (Optional)
If your goal is a functional and beautiful coaster, there’s one more essential step to consider for durability and protection. Once your maple leaf is crocheted and all ends are neatly woven in, lay it flat on your craft felt. Trace its shape onto the felt with a fabric marker or pen. Carefully cut out the felt shape, making it slightly smaller than your crochet leaf to ensure it’s not visible from the front edges. Apply a thin, even layer of permanent fabric glue to the entire back surface of your crochet leaf. Carefully center and press the felt shape onto the glued area. Allow it to dry completely according to the glue manufacturer’s instructions, typically overnight. This felt backing not only gives your coaster a neat and professional finish but also adds stability, prevents slipping, and protects your furniture surfaces from scratches and moisture.
Tips for Crocheting Perfect Maple Leaves
Here are some additional tips to help you succeed and get the most out of your crochet maple leaf project, ensuring beautiful results every time:
- Maintain Even Tension: Consistent tension throughout your work is crucial for uniform stitches and a beautifully shaped leaf. If your stitches are too tight, they’ll be hard to work into; too loose, and your leaf might lose its crisp shape. Practice holding your yarn and hook comfortably.
- Count Your Stitches Carefully: Especially in the initial rounds and when forming the points, carefully counting your stitches ensures your leaf grows correctly and prevents accidental increases or decreases. Stitch markers are your best friend here – place one in the first stitch of each round to avoid confusion.
- Experiment with Colors: Don’t limit yourself to traditional autumn colors! While reds, oranges, and yellows are classic, consider shades of deep green for summer leaves, or even pastels for a whimsical, non-traditional touch. Variegated yarns can also create stunning multi-toned effects without requiring you to change colors manually.
- Yarn Weight Matters: While the tutorial suggests #5 bulky yarn, you can experiment with other weights. A finer yarn (e.g., worsted weight #4) will create a smaller, more delicate leaf (you might need to adjust your hook size down accordingly, e.g., to a 4.0mm hook). A super bulky yarn (#6) will result in a much larger, cozier leaf, perfect for floor mats or large appliques.
- Practice Makes Progress: If your first leaf isn’t absolutely perfect, don’t get discouraged! Crochet is a skill that improves with practice. Each leaf you make will be a little bit better than the last as your muscle memory and technique develop.
- Block Your Leaves for a Polished Look: For truly professional-looking leaves, consider blocking them. Wet the finished leaves gently, shape them by hand into their desired form, and pin them to a foam blocking board or a thick towel. Allow them to dry completely. This process helps to set the stitches, smooth out any irregularities, and gives your leaves a crisper, more defined shape.
Creative Ways to Use Your Crochet Maple Leaves
Once you’ve crocheted a collection of these charming maple leaves, the possibilities for incorporating them into your fall decor and beyond are truly endless. Their versatility makes them perfect for a wide range of decorative and practical uses. Here are some inspiring ideas:
- Autumn Coasters: As detailed previously, backed with felt, they make functional and festive coasters for hot or cold beverages, adding a touch of fall to your coffee table.
- Fall Garlands & Banners: String multiple leaves together on a length of yarn, twine, or jute to create a beautiful garland for your mantelpiece, doorway, window, or stair banister.
- Table Scatter & Centerpieces: Arrange a handful of leaves elegantly around candles, vases, serving dishes, or a pumpkin centerpiece to add an instant, rustic touch of autumn to your dining or coffee table settings.
- Gift Toppers & Tags: Replace traditional bows with a crochet maple leaf for a unique, handmade touch on gifts. You can even write a message on a small piece of cardstock and attach it to the leaf with a ribbon.
- Appliques for Garments & Accessories: Sew these leaves onto plain sweaters, cardigans, hats, scarves, tote bags, or even denim jackets to customize them with beautiful seasonal flair.
- Christmas Ornaments: Don’t limit them strictly to fall! Crochet some in traditional red, green, or gold yarns, add a simple loop, and hang them on your Christmas tree for a rustic, natural, and charming holiday vibe.
- Bookmarks: Attach a small tassel or a few beads to the stem of a single leaf, and you have a charming, sturdy bookmark perfect for your favorite autumn reads or as a thoughtful gift.
- Magnets: Glue a small, strong magnet to the back of a finished leaf to decorate your refrigerator, a magnetic message board, or any metal surface with seasonal cheer.
- Wreath Embellishments: Attach them to a plain grapevine or foam wreath base, perhaps alongside artificial berries or pinecones, to create a stunning and personalized autumn door decoration.
- Cushion & Blanket Accents: Sew them onto throw pillows or blankets for added texture and a cozy, autumnal feel, transforming plain textiles into seasonal statements.
- Hair Accessories: Attach a small leaf to a plain hair clip, barrette, or headband for a subtle yet stylish seasonal accessory.
*All these images are credited to Pretty Darn Adorable Crochet Tutorials via YouTube. We highly recommend visiting her channel and subscribing for more delightful and inspiring crochet projects and valuable tips!
With this detailed tutorial, a handful of materials, and a little bit of patience, you’ll be able to create a beautiful collection of crochet maple leaves that truly celebrate the vibrant and cozy spirit of autumn. Happy crocheting, and enjoy the beauty of your handmade fall decor!