
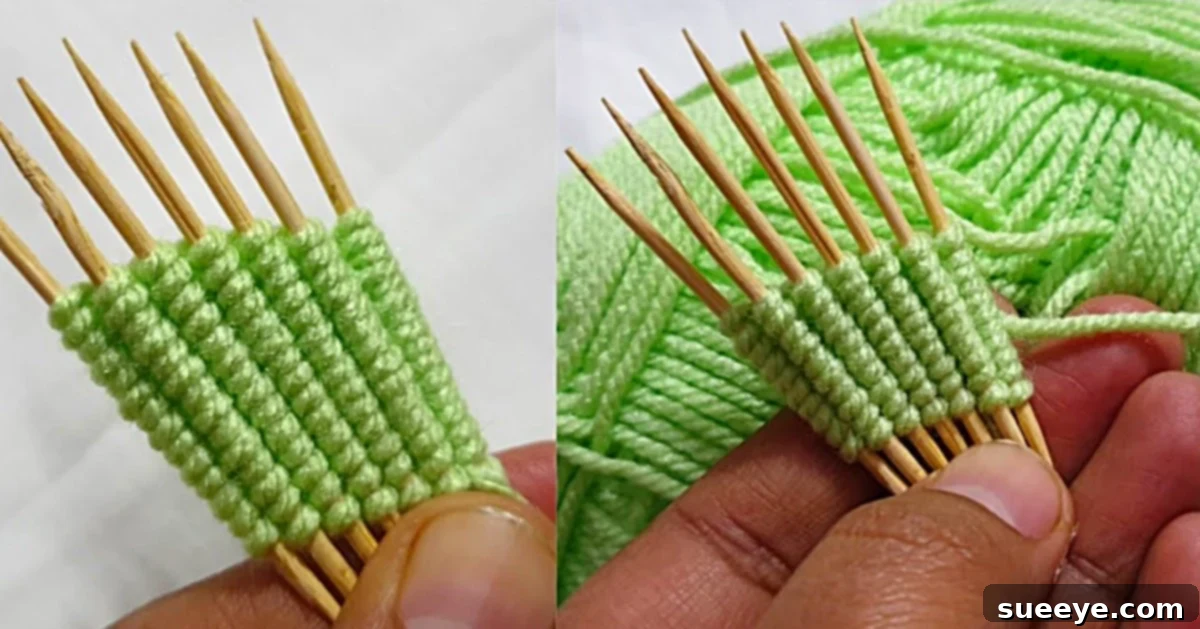
Master the Hand Embroidery Toothpick Trick: Unleash Your Creativity with Yarn and Toothpicks
In the vibrant world of DIY and crafting, there’s always a new technique or hack waiting to be discovered that can spark joy and unlock unexpected creative potential. Among these delightful revelations, the Hand Embroidery Toothpick Trick stands out as a true gem. This ingenious method, which recently captured my attention and quickly ascended to the top of my favorite crafting activities, demonstrates how the simplest tools can yield the most beautiful and intricate results. Imagine transforming ordinary toothpicks and colorful yarn into delicate butterfly wings, charming floral designs, or unique decorative elements – all with surprising ease. This isn’t just a craft; it’s a testament to the power of creative thinking and accessible artistry.
The beauty of this particular trick lies in its incredible simplicity and minimal material requirements. You genuinely only need two primary items: a handful of toothpicks and some yarn. That’s it! No complex machinery, no expensive specialized tools, just these humble household staples. This makes it an ideal project for crafters of all skill levels, from absolute beginners to seasoned artisans looking for a quick and satisfying creative escape. The technique, masterfully demonstrated in a clear, step-by-step tutorial by @w_sfashion on YouTube, guides you through the process with such clarity that you’ll be weaving intricate patterns in no time.
Beyond its captivating aesthetic appeal, this yarn toothpick trick offers a fantastic solution for those moments when inspiration is needed most, or when little hands are yearning for a productive, engaging activity. During long car rides, holiday breaks, or quiet afternoons at home, this craft serves as an unparalleled boredom buster for children. I’ve personally found immense success in keeping a small kit – a selection of vibrant yarns and a pack of toothpicks – stashed in my car’s glove compartment. The moment fidgeting starts or restlessness sets in, out come the supplies, and the transformation is immediate: irritable silence turns into focused, joyful concentration. It’s truly remarkable how a few simple items can provide hours of peaceful, creative engagement for kids and adults alike.
This method isn’t just a passing fad; it’s a sustainable and versatile approach to creating small, beautiful textile art. Whether you’re crafting charming gifts, unique embellishments, or simply exploring a new tactile hobby, the hand embroidery toothpick trick offers an accessible entry point into the world of fiber arts. Its charm lies not only in the stunning results but also in the meditative process of weaving, making it a truly rewarding experience for anyone who tries it.
Essential Materials for Your Toothpick Yarn Creations
As we’ve highlighted, one of the most appealing aspects of the hand embroidery toothpick trick is its minimal material list. This accessibility ensures that almost anyone can try their hand at this fascinating craft without a significant investment. Here’s a closer look at what you’ll need:
- Yarn: This is your primary artistic medium, offering a vast spectrum of colors, textures, and weights.
- Type: Acrylic yarn is an excellent choice for beginners due to its affordability, wide color range, and ease of use. Cotton yarn offers a more natural feel and a slightly different drape. Wool yarns can provide unique textures and warmth, though they might be a bit pricier.
- Weight: Lighter weight yarns (like DK or sport weight) work wonderfully for delicate, intricate designs, allowing for more detailed weaving around the toothpicks. Thicker yarns (like worsted or bulky) can create more robust and textural pieces, filling out spaces more quickly. Experimentation is key to discovering what works best for your desired outcome.
- Color: Don’t limit yourself to single colors! Ombre yarns, variegated yarns, or combining multiple solid colors can lead to stunning, multi-dimensional effects. Consider how different hues will blend and contrast to create depth in your butterfly wings or other designs.
- Long Embroidery Needle: While the core weaving can often be done with fingers, a long embroidery needle proves invaluable for precision.
- Purpose: It helps guide the yarn through tighter spaces, especially as your design builds up layers around the toothpicks. It’s also crucial for tucking in loose ends neatly and adding finer details or securing stitches once the main weaving is complete.
- Eye Size: Ensure the needle has an eye large enough to accommodate your chosen yarn weight. A tapestry needle with a blunt tip is often preferred as it won’t split the yarn strands as easily as a sharp sewing needle.
- Some Toothpicks: The structural backbone of your woven creation.
- Quantity: The number of toothpicks you need will vary depending on the size and complexity of your project. For a small butterfly wing, you might use 5-10. For larger, more intricate patterns, you could use dozens.
- Type: Standard wooden toothpicks are perfect. Flat toothpicks might offer a slightly different weaving experience and can be easier to hold in place. Ensure they are sturdy enough not to break easily during the weaving process.
- Arrangement: The way you arrange your toothpicks is fundamental to the final shape of your creation. They can be fanned out like spokes of a wheel, arranged in parallel rows, or formed into geometric patterns like squares or triangles. This initial setup dictates the canvas for your yarn artistry.
Step-by-Step Directions to Weave Your Yarn Masterpiece
The magic of the Hand Embroidery Toothpick Trick truly unfolds in the weaving process. Follow these detailed steps to bring your yarn and toothpick creation to life:
Phase 1: Setting Up Your Framework
- Prepare Your Toothpicks: Begin by deciding on the shape of your desired finished piece. For classic butterfly wings, arrange your toothpicks in a radial pattern, resembling spokes emanating from a central point. You might use 5-8 toothpicks, fanning them out slightly from a common base. For other shapes, you could arrange them in parallel lines, a square, or a triangle. You can temporarily secure the base of the toothpicks together with a small piece of tape if needed, or simply hold them in place initially.
- Anchor Your Yarn: Take your chosen yarn and tie a small, secure knot around the base of one of your toothpicks. Leave a tail of a few inches, which you can weave in later. This initial knot provides the anchor point for your entire design.
Phase 2: The Art of Weaving
- Start Weaving: Begin to weave your yarn around the toothpicks. The most common technique is an “over and under” pattern, similar to basic weaving.
- Pass the yarn over one toothpick, then under the next.
- Continue this pattern, moving in a circular or linear fashion around your toothpick arrangement.
- As you weave, gently push the yarn downwards towards the base of the toothpicks to keep your stitches compact and even. This creates a denser fabric.
- Build Layers: Continue weaving, going around the toothpicks multiple times. Each pass adds a new layer, building up the texture and density of your design.
- Tension Control: Maintain a consistent, gentle tension on your yarn. Too loose, and your fabric will be flimsy; too tight, and it might bend or break the toothpicks.
- Using the Needle: As your design becomes denser, especially in the center, you may find it easier to use your long embroidery needle to guide the yarn through tight spots or to push existing stitches down to make room for new ones.
- Introduce New Colors (Optional): If you wish to incorporate multiple colors, simply tie off your current yarn color with a small knot (ideally hidden on the back) and introduce a new color by tying it onto a toothpick and continuing the weaving pattern. This can create beautiful gradients or distinct color blocks.
- Forming Shapes: By manipulating the weaving pattern – for instance, weaving more densely in one area or skipping a toothpick occasionally – you can influence the final shape. For butterfly wings, you’ll naturally create a rounded, fan-like shape as you build out the yarn.
Phase 3: Finishing Your Creation
- Secure the End: Once your woven piece has reached the desired size and density, carefully tie off the working yarn by making a secure knot around one of the toothpicks or by weaving the end back into the finished piece with your needle. Trim any excess yarn, leaving a small tail to weave in.
- Careful Removal: This is a delicate but satisfying step. Gently slide the woven yarn structure off the toothpicks. You might need to gently push the yarn upwards from the base of the toothpicks to loosen it. Take your time to avoid snagging or distorting your hard work.
- Final Touches: Examine your finished piece. Trim any remaining loose ends. You might want to gently shape it with your fingers. For butterfly wings, you can create a pair and join them at the center with a few stitches or a dab of craft glue, then add a small pipe cleaner or a piece of yarn for the body and antennae.
Beyond Butterfly Wings: A Universe of Creative Possibilities
While the initial appeal of this toothpick trick often centers around creating enchanting butterfly wings, its potential truly extends far beyond this single application. Once you’ve mastered the basic weaving technique, you’ll discover that you’ve unlocked a versatile foundation for a multitude of creative projects. The arrangement of your toothpicks, the type of yarn you use, and the weaving pattern you employ can all be tweaked to produce a stunning array of designs and functional items.
Creative Applications for Your Yarn Creations:
- Decorative Embellishments: Attach your woven pieces to clothing, bags, hats, or even simple headbands for a personalized touch. They can instantly elevate a plain item into something unique and artistic.
- Unique Jewelry Components: Smaller, more intricate woven pieces can be transformed into one-of-a-kind earrings, pendants for necklaces, or charming brooches. Imagine a delicate pair of woven butterfly wing earrings!
- Home Decor Accents: Create small coasters for drinks, intricate wall art pieces, or festive ornaments for holidays. Larger toothpick setups can even produce small mandalas or abstract art for framing.
- Appliqués for Cards and Scrapbooks: Add a three-dimensional, tactile element to your greeting cards, scrapbooking pages, or journal entries. These woven shapes provide a beautiful contrast to flat paper.
- Educational Tools: For educators or parents, this craft is an excellent way to teach children about basic weaving principles, geometry (through toothpick arrangements), and the importance of patience and precision.
- Figurine Details: Use the woven pieces as intricate clothing details for handmade dolls or action figures, or as natural-looking leaves and petals for miniature botanical scenes.
Experiment with different arrangements of toothpicks – a tight cluster for a dense circle, a linear setup for a rectangular piece, or even an irregular pattern for an abstract design. Varying your yarn choices, from chunky to fine, glossy to matte, will also dramatically change the final appearance and texture of your creations. The only limit is your imagination!
The Therapeutic Benefits: Why This Craft is More Than Just Fun
Engaging in crafts like the Hand Embroidery Toothpick Trick offers a wealth of benefits that extend beyond the creation of a beautiful object. For both children and adults, this simple activity provides valuable cognitive and emotional advantages.
For Children:
- Fine Motor Skill Development: The intricate movements required to weave yarn around toothpicks significantly enhance dexterity and hand-eye coordination.
- Patience and Focus: Completing a woven piece requires sustained attention and patience, skills that are increasingly vital in our fast-paced world.
- Creativity and Imagination: Children are encouraged to experiment with colors, patterns, and shapes, fostering their innate creativity and imaginative thinking.
- Problem-Solving Skills: Deciding on toothpick arrangements, correcting weaving errors, and finding ways to finish a piece all engage problem-solving abilities.
- A Sense of Accomplishment: The tangible result of their efforts provides a powerful boost to self-esteem and confidence.
For Adults:
- Stress Relief and Mindfulness: The repetitive, rhythmic action of weaving can be incredibly meditative, helping to quiet a busy mind and reduce stress. It serves as a perfect form of mindfulness.
- Creative Outlet: In our daily routines, opportunities for pure creative expression can be rare. This craft offers an accessible and satisfying way to tap into your artistic side.
- Accessible Hobby: With its minimal cost and space requirements, it’s an ideal hobby for anyone, regardless of living situation or budget.
- Unique Handmade Gifts: The ability to create personalized, thoughtful gifts adds a special touch to presents for friends and family.
- Boosted Mood: Engaging in creative activities has been linked to improved mood and overall well-being. The satisfaction of creating something beautiful with your own hands is truly uplifting.
Tips for Success and Further Exploration
To ensure your hand embroidery toothpick trick experience is as enjoyable and successful as possible, consider these additional tips:
- Start Simple: Don’t try to create a complex masterpiece on your first attempt. Begin with a simple radial toothpick arrangement and a single color of yarn to get a feel for the technique.
- Experiment with Yarn: Different yarn fibers and weights will produce varying results. Acrylic is forgiving, cotton offers definition, and wool can provide lovely texture. See what you enjoy working with most.
- Consider Your Toothpick Setup: Before you begin weaving, visualize your desired shape and arrange your toothpicks accordingly. A small piece of modeling clay or floral foam can be useful for holding toothpicks upright in a specific pattern, especially for more complex designs.
- Lighting is Key: Work in a well-lit area to easily see your stitches and avoid straining your eyes.
- Don’t Fear Mistakes: Every crafter makes mistakes. Embrace them as learning opportunities. Unraveling and re-weaving is part of the process and will only refine your skills.
- Share Your Work: Join online crafting communities or share your creations with friends and family. Seeing what others have made can provide immense inspiration and motivation. Use hashtags like #ToothpickYarnTrick #HandEmbroidery and #DIYCrafts to connect with fellow enthusiasts.
- Clean Up Ends: After removing your woven piece, take the time to neatly weave in any loose yarn tails using your embroidery needle. This gives your finished product a professional and polished look.
The Hand Embroidery Toothpick Trick is more than just a craft; it’s an invitation to explore your creativity with the simplest of means. It’s a wonderful reminder that ingenuity and artistry can be found in the most unexpected places. So gather your yarn and toothpicks, and prepare to be delighted by the beautiful possibilities that await. This idea is truly awesome, and I am so glad to have discovered it, and I encourage you to experience its magic too!