
The Ultimate Guide to Freezing Milk: Extend Shelf Life & Reduce Waste
Whether you’re proactively stocking up for potential emergencies, striving to reduce food waste, or simply bought an extra gallon of milk during a sale, knowing how to properly freeze and thaw milk is an invaluable skill. This comprehensive guide will walk you through everything you need to know about preserving milk, ensuring you always have it on hand when you need it most. We’ll cover the best freezing practices, safe thawing methods, and how long you can expect your frozen milk to last.
Why Freeze Milk? Benefits of Smart Storage
Freezing milk is a practical solution that offers numerous advantages, making it a smart move for any household:
- Reduce Food Waste: Milk often has a relatively short shelf life. If you find yourself with an abundance of milk nearing its expiration date, freezing it can prevent it from going bad, saving you money and contributing to a more sustainable kitchen.
- Emergency Preparedness: Having a stash of frozen milk means you’re prepared for unexpected events, such as power outages (though power outages require careful thawing) or simply being unable to get to the grocery store.
- Cost Savings: Take advantage of sales by buying milk in bulk without worrying about it spoiling. Freezing allows you to store larger quantities and enjoy savings over time.
- Convenience: For smaller households or those with varying milk consumption, freezing milk in smaller portions ensures you always have the right amount available without opening a fresh gallon every time.
- Baking and Cooking: Thawed milk is perfectly suitable for most cooking and baking applications, ensuring your recipes never lack this essential ingredient.
What Types of Milk Can You Freeze?
Good news! Most types of dairy milk can be successfully frozen. This includes:
- Whole Milk: Freezes very well, though some fat separation may occur upon thawing.
- Low-Fat Milk: Also freezes effectively with minimal issues.
- Fat-Free (Skim) Milk: Tends to freeze and thaw with fewer texture changes than higher-fat varieties.
- Half-and-Half: Can be frozen, but may experience more noticeable separation due to its fat content. It’s often best used for cooking or in coffee after thawing.
- Heavy Cream: While technically freezable, heavy cream can become grainy or separate significantly after thawing. It’s usually better suited for cooking or baking rather than whipping.
It’s worth noting that while freezing is possible for these, milk with higher fat content might separate slightly more upon thawing. This is normal and doesn’t affect safety, just texture. Plant-based milks like almond or soy milk can also be frozen, but their texture changes can be more pronounced, often resulting in grittiness or significant separation. For the best results, dairy milk is generally preferred for freezing.
Preparing Your Milk for Freezing: Step-by-Step
Proper preparation is crucial to ensure your milk freezes and thaws optimally. Follow these simple steps:
Choose the Right Container
The container you choose plays a significant role in successful freezing. Here are your best options:
- Original Jug: If you plan to freeze a full gallon or half-gallon, you can use its original plastic jug. However, it’s essential to pour out about 1-2 cups of milk before freezing. This is because milk, like water, expands as it freezes, and failing to leave sufficient headspace can cause the container to burst.
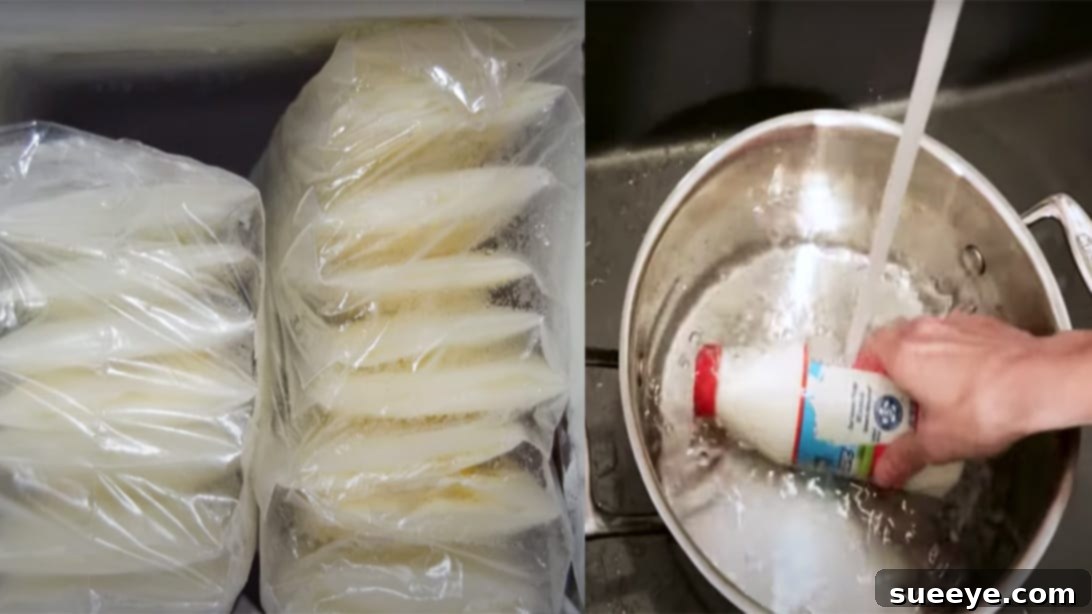
- Freezer-Safe Plastic Bags: For maximizing freezer space and freezing smaller portions, heavy-duty freezer bags are excellent. Lay them flat after filling to freeze them like “milk bricks,” which are easy to stack. Be sure to squeeze out as much air as possible before sealing.
- Freezer-Safe Containers: Hard plastic or glass containers designed for freezing are also suitable. Again, remember to leave headspace.
- Ice Cube Trays: For very small portions ideal for coffee, smoothies, or recipes, pour milk into ice cube trays. Once frozen solid, transfer the milk cubes to a freezer bag for long-term storage.
Remember to Leave Headspace
This point cannot be stressed enough. When milk freezes, its volume increases. If your container is filled to the brim, the expanding milk can crack or even explode the container, leading to a messy freezer and wasted product. Always leave at least an inch (2.5 cm) of space from the top of the container.
Labeling is Key
Before placing any milk in the freezer, clearly label the container with:
- Date of Freezing: This helps you track its freshness and ensures proper rotation.
- Type of Milk: Especially if you freeze different varieties (e.g., whole, skim, half-and-half).
- Quantity: Useful if you’ve portioned it out (e.g., “1 cup milk”).
A permanent marker is your best friend here. This simple step prevents guesswork and ensures you use your oldest milk first.
The Freezing Process: Best Practices
Once your milk is properly prepared and labeled, it’s ready for the freezer. For optimal freezing:
- Freeze Standing Up (Initially): If you are freezing milk in its original jug or a large container, particularly in a drawer-type freezer, it’s best to freeze it standing upright until it’s solid. This prevents any potential leaks while the milk is still liquid and expanding. Once solid, you can position it horizontally if it fits better.
- Quick Freeze: Place the milk in the coldest part of your freezer to ensure it freezes as quickly as possible. Rapid freezing helps maintain the milk’s quality.
- Avoid Overcrowding: Don’t overload your freezer. Air circulation is important for efficient freezing.
How Long Does Frozen Milk Last? Maximizing Shelf Life
Frozen milk has a surprisingly long shelf life, but there’s an optimal window for quality:
Generally, milk can be safely stored in the freezer for up to six months. However, for the best taste and texture, it’s highly recommended to use it within three months. While it remains safe to consume beyond three months, you might start to notice some minor changes in its appearance or consistency.
- Color Change: Around month four or five, you might observe that the milk takes on a slightly yellowish tint. This is a common and harmless phenomenon caused by fat oxidation, but it can affect its aesthetic appeal.
- Texture Changes: The longer milk is frozen, the more likely it is to experience slight separation of fats and solids upon thawing. This doesn’t mean it’s spoiled, but it might require a good shake or stir to recombine.
- Flavor: The fresh taste can diminish slightly after prolonged freezing, but it generally remains quite good, especially for cooking and baking.
To ensure you’re always using milk at its peak quality, aim to rotate your stock every three months. Always mark the freezing date clearly on your containers!
Safely Thawing Frozen Milk: Methods and Tips
Thawing milk requires patience and adherence to food safety guidelines to prevent bacterial growth and maintain quality.
Refrigerator Thawing: The Gold Standard
This is the safest and most recommended method for thawing frozen milk:
- Transfer to Refrigerator: Simply take your frozen milk out of the freezer and place it in the refrigerator.
- Allow Time: Depending on the volume, thawing can take anywhere from 24 to 48 hours for a gallon. Smaller portions will thaw more quickly.
- Shake Well: Once fully thawed, you’ll likely notice some separation, especially if it’s whole milk. Give the container a really good shake to help recombine the milk solids and fat. You can also whisk it vigorously or even use a blender for a smoother consistency.
Cold Water Bath: For Faster Thawing
If you need milk more quickly, a cold water bath is a safe alternative:
- Submerge in Cold Water: Place the sealed container of frozen milk into a large bowl or clean sink filled with cold tap water.
- Change Water Regularly: Change the water every 30 minutes to ensure it remains cold and facilitates thawing.
- Never Use Hot Water: While tempting, hot water can cause the milk to warm to an unsafe temperature, encouraging bacterial growth, and can also “cook” the milk, changing its texture and flavor.
This method is faster than refrigerator thawing but still takes several hours for larger quantities. Always make sure the container is fully submerged and sealed to prevent contamination.
What NOT to Do: Avoiding Hot Water and Room Temperature Thawing
As mentioned, never thaw milk under hot water or at room temperature. These methods expose the milk to the “danger zone” (between 40°F and 140°F / 4°C and 60°C), where bacteria multiply rapidly, making the milk unsafe for consumption.
Texture and Taste After Thawing: What to Expect
A common question is, “Does frozen milk that’s been thawed out taste the same?” The answer is generally yes, the taste remains remarkably similar to when you first bought it. However, the texture can sometimes be slightly different:
- Separation: You might notice that the fat separates from the liquid, especially in higher-fat milks. This can give it a slightly lumpy or grainy appearance. A good shake or whisking will usually resolve this.
- Subtle Graininess: Some people report a subtle chalkiness or graininess, particularly if the milk has been frozen for a long time. This is primarily a textural change and does not indicate spoilage.
For drinking straight, some people are more sensitive to these minor textural shifts. However, for cooking, baking, smoothies, or adding to cereal, these differences are usually negligible.
Using Thawed Milk: Best Practices for Consumption
Once your milk is thawed, it needs to be treated like fresh milk in terms of consumption:
- Consume Within 3-4 Days: Just like a new carton of milk, thawed milk should be consumed within three to four days after it has fully thawed.
- Label the Thaw Date: A really quick and helpful tip is to grab a Sharpie and write the date you took the milk out to thaw on its container. This helps you keep track and ensures you consume it within the safe window.
- Ideal Uses: Thawed milk is perfect for a wide range of uses, including:
- Baking recipes (cakes, cookies, bread)
- Cooking (sauces, soups, casseroles)
- Smoothies and milkshakes
- Adding to coffee or tea
- Pouring over cereal
- Do Not Refreeze: Once milk has been thawed, it should not be refrozen. Refreezing can significantly degrade its quality, texture, and potentially compromise its safety due to repeated temperature fluctuations.
Advanced Tips for Freezing Milk Like a Pro
- Portion Control: Consider freezing milk in the quantities you typically use. For instance, freeze 1-cup portions for recipes, or half-gallon portions for regular family use. This prevents thawing more than you need.
- First In, First Out (FIFO): Always use the oldest frozen milk first. This ensures proper rotation and prevents milk from exceeding its optimal freezing duration.
- Check for Spoilage: Even with careful freezing, always give thawed milk a quick sniff and visual check. If it smells sour, looks chunky (beyond normal separation), or tastes off, discard it.
- Consider Your Freezer Type: Chest freezers generally maintain a more consistent temperature, which is ideal for long-term storage, compared to refrigerator-freezer combos that are opened more frequently.
Conclusion
Freezing milk is an excellent way to extend its shelf life, minimize waste, and ensure you always have this versatile staple available. By following the proper techniques for preparation, freezing, and thawing, you can confidently store milk for several months without significantly compromising its quality or taste. So next time you find yourself with extra milk or spot a great deal, don’t hesitate to stock up. Your future self (and your wallet) will thank you!