
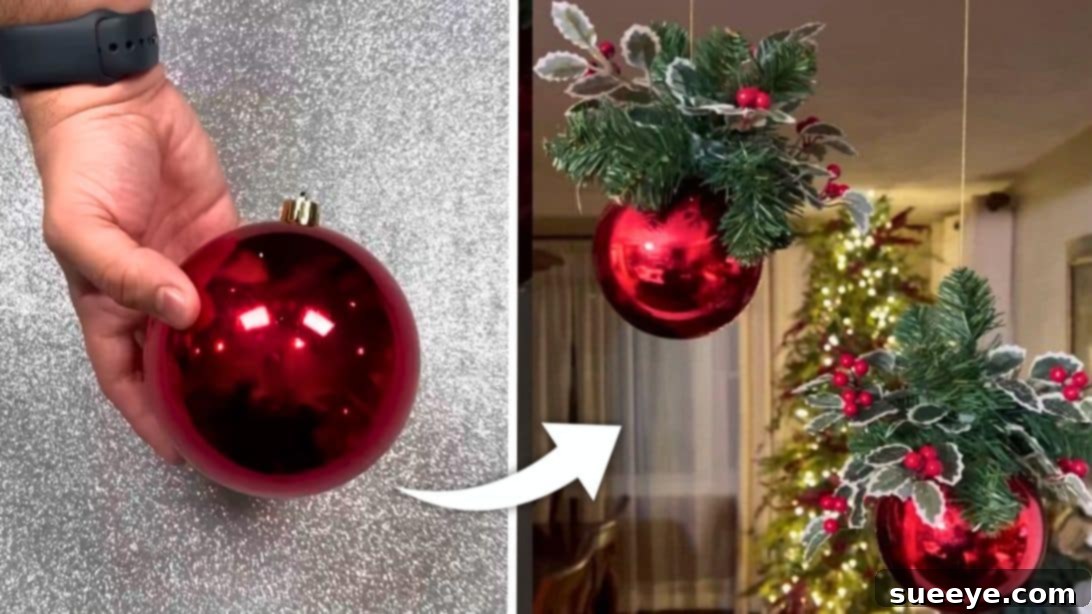
The holiday season is a magical time for crafting, decorating, and bringing a touch of festive cheer into every corner of your home. While store-bought decorations are convenient, there’s a unique satisfaction that comes from creating something beautiful with your own hands. If you’re looking to refresh your holiday decor without breaking the bank, or simply wish to give new life to existing items, you’ve come to the right place. This guide will show you how to transform ordinary Christmas balls into breathtaking hanging ornaments, enhanced with lush greenery, providing a sophisticated and personalized touch to your festive arrangements.
Inspired by the brilliant ideas from creators like Nick’s Seasonal Décor, this simple yet impactful DIY project proves that a little creativity can go a long way. Imagine your classic Christmas balls, no longer tucked away in storage, but revitalized with elegant sprigs of evergreen, dangling gracefully and catching the light. This project is not just about decorating; it’s about upcycling, saving money, and infusing your unique style into your holiday home. The finished ornaments exude a fresh, natural charm, making them perfect for creating a cozy and inviting atmosphere.
One of the most appealing aspects of these DIY hanging Christmas ball ornaments is their incredible versatility. While traditionally hung on a Christmas tree, these revitalized decorations are designed to be showcased throughout your entire house. Utilizing damage-free command strips, you can effortlessly hang them from ceilings, doorways, window frames, or even create stunning visual clusters at varying heights. This flexibility allows for dynamic and interesting displays that truly personalize your festive environment. Whether you choose uniform sizes for a cohesive look or mix different ornament dimensions for added visual interest, the result will undoubtedly be captivating and reflect your holiday spirit.
Why Embrace DIY Christmas Decorations This Holiday Season?
Diving into the world of DIY Christmas decorations offers a multitude of benefits beyond just saving money. It’s an opportunity to infuse personality and warmth into your holiday setup, creating memories along the way. Crafting your own ornaments allows for complete customization, ensuring your decor perfectly matches your home’s aesthetic and your personal style. Furthermore, it’s an eco-conscious choice, as you’re giving old items a new purpose, reducing waste and contributing to a more sustainable holiday. This hands-on approach can also be a wonderful family activity, fostering togetherness and creating cherished traditions as you work on projects together. The satisfaction of displaying something you’ve crafted yourself is immeasurable, adding a deeper layer of meaning to your festive environment.
Related Festive Crafts to Explore
If you’re eager to continue your crafting journey, here are a couple of other delightful holiday projects to inspire your creativity:
- Discover the intricate beauty of Macrame Snowflake Ornament Tutorial for a touch of bohemian elegance.
- Add a whimsical touch with the DIY Honeycomb Christmas Tree Ornament, a playful and unique addition to your tree.
Easy DIY Hanging Christmas Ball Ornament Materials: What You’ll Need
Before you begin transforming your old Christmas balls, gather all your supplies. Having everything laid out will make the crafting process smooth and enjoyable. Here’s a detailed list of what you’ll need, along with some tips for selection:
- Plastic Ornament: Start with any size or color of plastic Christmas ball. Plastic is recommended for durability, especially when hanging in areas where they might be bumped. However, if you prefer, glass ornaments can also be used with extra care. Consider plain ornaments as your base, as the greenery will be the star.
- String: A sturdy piece of string is essential for hanging your ornament. Options include twine, fishing line (for an almost invisible hang), decorative ribbon, or even a thin craft wire. Choose a color that blends with your decor or complements the greenery.
- Foam Inserts: Small pieces of floral foam or even styrofoam will serve as the base for securing your greenery. These provide a stable and easy-to-pierce anchor for the branches. You can often find small craft foam blocks at hobby stores.
- Hot Glue Gun and Glue Sticks: Your trusty hot glue gun will be indispensable for securely attaching the foam and ensuring your greenery stays firmly in place. Always exercise caution when using a hot glue gun to prevent burns.
- Christmas Tree Branches (Faux or Real): This is where the magic happens! You can use cuttings from a real Christmas tree for an authentic scent and look, or opt for high-quality faux branches for longevity and reusability. If using real branches, ensure they are fresh and pliable. Gather a variety of small sprigs.
- Wire Cutter: A simple wire cutter or even strong craft scissors will be needed to trim your Christmas tree branches and holly sprigs to the desired size.
- Variegated Holly (or other decorative accents): Adding variegated holly provides a beautiful pop of color and texture, enhancing the natural appeal of the ornament. Alternatively, consider small berries, miniature pinecones, tiny frosted leaves, or even subtle glittered accents to personalize your creation.
- Command Strips: For damage-free hanging on walls, ceilings, or doorframes, command strips are an excellent choice. Ensure you select strips appropriate for the weight of your finished ornament, though these are typically lightweight.
How to Make Hanging Christmas Ball Ornaments: Step-by-Step
Now that you have all your materials, let’s dive into the crafting process. Follow these detailed steps to create your beautiful hanging Christmas ball ornaments.
Step 1: Preparing the Base – Attaching the Foam
Begin by taking your plastic Christmas ball. Cut two small, manageable pieces of floral foam. These pieces will serve as the foundation for your greenery. Apply a generous amount of hot glue to one side of each foam piece, then carefully press them onto the very top of your Christmas ball, positioning them close to where the existing hanger loop is. Ensure they are securely adhered and stable, as they will need to hold the weight of your greenery. Allow the glue to cool and set completely before moving on.
Step 2: Adding the Hanging Loop
Next, take a piece of your chosen string. The length will depend on how low you want your ornament to hang. A good starting point is about 12-18 inches, which you can adjust later. Thread one end of the string through the small loop or cap at the very top of your plastic ornament. Once threaded, tie the ends of the string together with a secure double knot, forming a loop. This loop will be used to hang your finished ornament. Double-check the knot’s strength to ensure it can support the ornament.
Step 3: Readying Your Greenery – Cutting Branches
Gather your Christmas tree branches, whether they are fresh clippings or artificial sprigs. Using your wire cutters, carefully trim them into smaller, individual pieces. Aim for various lengths, generally ranging from 2 to 4 inches. Having a variety of lengths will help create a more natural and voluminous look. Make sure the cut ends are somewhat pointed, as this will make insertion into the foam easier. Prepare a good handful of these pieces, ensuring you have more than enough to completely cover the foam.
Step 4: Creating the Lush Greenery Top
Now, it’s time to transform your ornament! Take one of the trimmed evergreen pieces. Apply a small dab of hot glue to the cut end of the branch. Immediately insert the glued tip into one of the foam pieces on top of your Christmas ball. Hold it in place for a few seconds until the glue sets. Continue this process, adding branch by branch, working your way around and into the foam. The key is to insert them closely together, creating a dense and lush coverage. Make sure to cover all visible foam on all sides, building up a beautiful, natural-looking cluster of greenery. Experiment with different angles and lengths to achieve a full, organic appearance.
Step 5: Incorporating Decorative Accents – Adding Holly
Once your evergreen base is complete, it’s time to add the finishing touches. If using variegated holly or other small decorative elements, separate their stems. Take an individual holly sprig, apply a tiny dot of hot glue to its base, and carefully work it into the foam amidst the evergreen branches. Place these accents strategically to add pops of color and visual interest. Distribute them evenly or create small clusters, ensuring they enhance the overall aesthetic without overpowering the natural greenery. This step truly personalizes your ornament.
Step 6: The Grand Finale – Hanging Your Creation
With your ornament fully assembled and looking splendid, it’s time to display it! Choose your desired location – perhaps from the ceiling, a doorway, or near a window. Attach a command strip to the clean, dry surface according to the manufacturer’s instructions. Allow it to adhere for the recommended time. Once secure, simply tie the string loop of your beautiful ornament to the command strip’s hook. Adjust the length of the string to achieve the perfect hanging height, whether you prefer it to hang low or high. Consider hanging multiple ornaments at different heights to create a dynamic and captivating display.
Creative Variations and Personalization Ideas
The beauty of DIY lies in customization. While this guide provides a fantastic base, feel free to experiment and make these ornaments uniquely yours. Instead of just holly, try incorporating miniature pinecones, small berries (faux or real), delicate ribbons, frosted elements, or even a dusting of glitter for an extra sparkle. You could also experiment with different types of greenery – cedar, cypress, or even eucalyptus for a modern twist. Consider the color of your ornaments; white or silver balls can create a winter wonderland effect, while classic red or gold adds traditional charm. Create themed sets, perhaps one with rustic twine and pinecones, and another with satin ribbons and pearl accents. The possibilities are endless!
Where to Hang Your Festive Creations: Beyond the Tree
While these ornaments would look magnificent on your Christmas tree, their hanging design makes them perfect for various locations throughout your home. Imagine them suspended above your dining table for a festive centerpiece, gracefully dangling from a mantelpiece, or adorning your staircase banister. They can transform a simple doorway into an inviting entrance or add a touch of holiday magic to a window display. For outdoor use (weather permitting, and if using durable faux materials), they could even embellish a porch or patio, welcoming guests with seasonal cheer.
Care and Longevity Tips
To ensure your beautiful DIY ornaments last for seasons to come, especially if using artificial greenery, store them carefully in a box after the holidays. If you’ve used real evergreen branches, they will eventually dry out. While dried evergreens can still look charming, they may become brittle. For long-term display, consider replacing real greenery with high-quality faux alternatives each year, or simply enjoy them for the duration of the fresh greenery’s life. A light dusting can keep them looking vibrant throughout the season.
Safety First: Crafting with Care
As with any DIY project, safety is paramount. When using a hot glue gun, always be mindful of the hot nozzle and glue to prevent burns. Keep wire cutters out of reach of children and always cut away from your body. Ensure your command strips are applied to clean, dry surfaces and allowed adequate time to set to prevent your beautiful creations from falling. A little caution ensures a safe and enjoyable crafting experience.
Hanging Christmas Ball Ornament: Your Masterpiece Awaits
This project is a fantastic way to add a personal and elegant touch to your holiday decorations. By following these steps, you’ll not only create stunning hanging ornaments but also discover the joy of transforming everyday items into festive treasures. So, gather your materials, unleash your creativity, and get ready to impress your family and friends with your beautiful, handcrafted hanging Christmas ball ornaments. Happy crafting, and happy holidays!