
Classic Dream Bars: A Timeless Recipe You’ll Cherish
Step into a world of nostalgic flavors with this incredible 90-year-old Dream Bars recipe, masterfully presented by Simply Mamá Cooks on YouTube. This isn’t just any dessert; it’s a culinary journey back to simpler times, offering a perfect blend of buttery crust, chewy coconut, and crunchy nuts. Each bite delivers a harmonious symphony of textures and tastes, making it an instant favorite that will undoubtedly leave you craving more.
Dream Bars are the epitome of comfort baking – a quick and remarkably easy dessert that effortlessly feeds a crowd. Whether you’re hosting a family gathering, preparing for a potluck, or simply looking for a new and fun baking project, this recipe is your answer. Its straightforward steps ensure a delightful outcome even for novice bakers, guaranteeing a treat that tastes like it took hours to make. Trust us, you won’t regret adding this classic to your recipe repertoire.
What Makes Dream Bars So Irresistible?
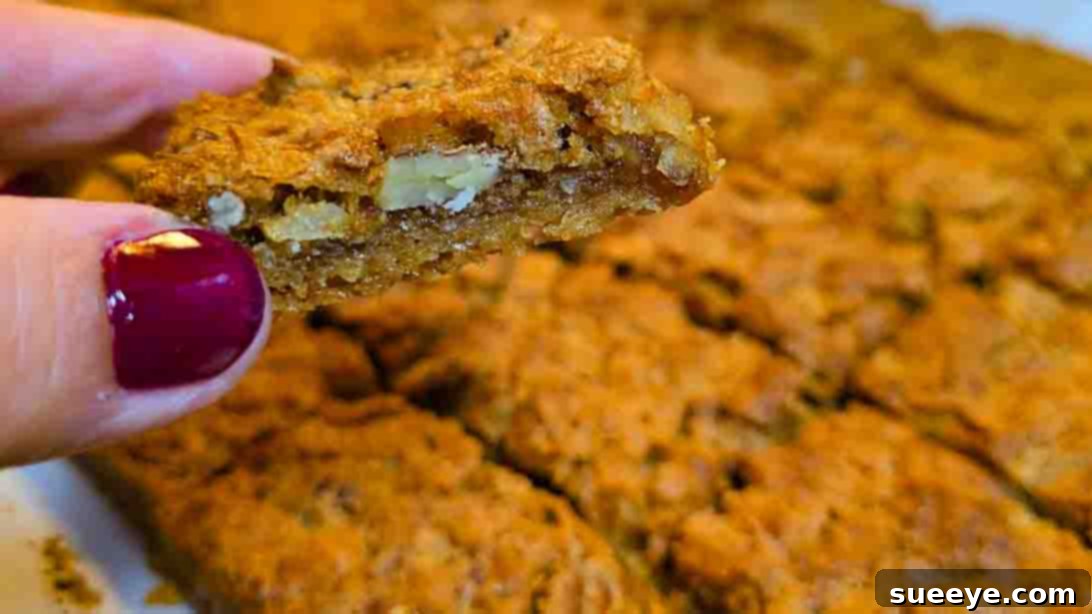
The allure of Dream Bars lies in their perfectly balanced components. At its foundation is a rich, buttery shortbread-like crust that provides a delicate crunch and a melt-in-your-mouth texture. Layered atop this golden base is a luscious, chewy filling, generously studded with an abundance of sweet shredded coconut and hearty chopped nuts – typically pecans or walnuts. The combination creates a delightful contrast: the firm, crumbly crust against the soft, gooey, and nutty topping. This makes Dream Bars a truly satisfying dessert experience, appealing to a wide range of palates. Their rich flavor profile and satisfying chewiness make them a standout treat for any occasion, from casual afternoon snacks to elegant dessert spreads.
A Glimpse into the World of Bar Desserts: The Enduring Appeal
Bar desserts, in general, hold a special place in the hearts of home bakers. They are the unsung heroes of potlucks, bake sales, and holiday gatherings, offering the perfect blend of convenience and deliciousness. Unlike cakes or pies that often require intricate decoration or precise slicing, dessert bars are inherently forgiving and easy to serve. They provide individual portions without much fuss, making them ideal for sharing. Dream Bars, with their classic appeal, represent this tradition beautifully. Their popularity spans generations because they evoke a sense of warmth and homemade goodness, reminding many of cherished family recipes passed down through time. This particular 90-year-old recipe embodies that vintage charm, promising a taste of history with every bite.
Why Choose This Simply Mamá Cooks Dream Bars Recipe?
Simply Mamá Cooks is renowned for her clear, concise, and incredibly reliable recipes, and her take on these classic Dream Bars is no exception. Her video tutorial guides you through each step with an ease that makes even complex-sounding baking processes feel approachable. This recipe stands out because it preserves the authenticity of the original Dream Bars while offering practical tips for modern home kitchens. It’s a testament to the fact that some of the best desserts are those that have stood the test of time, proving their enduring deliciousness decade after decade. By following her method, you’re not just baking a dessert; you’re recreating a piece of culinary history that continues to delight.
Gathering Your Ingredients: The Heart of Delicious Dream Bars
The success of any great recipe begins with quality ingredients. For these Dream Bars, each component plays a crucial role in achieving that perfect texture and unforgettable flavor. Gathering everything before you start will ensure a smooth and enjoyable baking process.
For the Perfect Buttery Crust:
- 1 cup all-purpose flour: The foundation of our crust, providing structure and a tender crumb.
- 1/2 cup light brown sugar: Adds a subtle sweetness and a hint of molasses, contributing to the crust’s golden hue and depth of flavor.
- 8 tbsp unsalted butter: Crucial for a rich, tender, and flaky crust. Unsalted butter allows you to control the overall saltiness of the dish. Make sure it’s softened for easy mixing.
For the Irresistible Topping:
- 1 cup light brown sugar: Provides the primary sweetness and chewy texture for the topping, complementing the crust beautifully.
- 2 large eggs: Act as a binder, helping the topping set, and contribute to its rich, custardy consistency.
- 1 tsp vanilla extract: A key flavor enhancer, vanilla brings warmth and depth to the sweet, nutty, and coconut notes.
- 3 tbsp all-purpose flour: Helps to thicken the topping slightly, ensuring it holds together without being too dense.
- 1 tsp baking powder: Provides a light lift to the topping, preventing it from becoming overly flat and dense.
- 1/4 tsp salt: A crucial ingredient that balances the sweetness and enhances all the other flavors, preventing the bars from tasting overly sugary.
- Chopped pecans or walnuts: These add a delightful crunch and earthy, nutty flavor that contrasts wonderfully with the chewy coconut. Feel free to use your favorite!
- 7 oz bag of sweetened shredded coconut: The star of the topping, providing that iconic chewiness and tropical sweetness that defines Dream Bars.
Step-by-Step Guide to Baking Your Dream Bars
Creating these delectable Dream Bars is a simple and rewarding process. Follow these detailed steps to ensure perfectly baked results every time.
Step 1: Crafting the Golden Crust
Begin by preparing the foundation of your Dream Bars – the rich, buttery crust. In a medium-sized mixing bowl, combine 1 cup of all-purpose flour with 1/2 cup of light brown sugar. Use a whisk or a fork to mix them thoroughly, ensuring there are no lumps of brown sugar. Next, add the 8 tablespoons of softened unsalted butter. Using your fingertips or a pastry blender, work the butter into the flour and sugar mixture until it resembles coarse crumbs. The mixture should be uniform and crumbly, yet able to hold together when pressed. This crumbly texture is essential for a tender, shortbread-like crust.
Once your crumb mixture is ready, transfer it to a parchment paper-lined baking tray. A 9×13 inch pan is ideal for this recipe. Evenly spread the mixture across the bottom of the pan, then use the back of a spoon or your clean hands to press it down firmly and uniformly. A well-compacted crust will bake evenly and provide a stable base for your topping. Place the pan into a preheated 350°F (175°C) oven and bake for exactly ten minutes. This initial baking step, known as blind baking, helps to create a crispy crust and prevents it from becoming soggy once the wet topping is added. After baking, carefully remove the pan from the oven and set it aside to cool completely. It’s crucial for the crust to be fully cooled before the topping is added to prevent premature cooking of the eggs in the filling.
Step 2: Preparing the Decadent Topping and Final Bake
While your crust cools, it’s time to prepare the star of the show – the rich and chewy topping. In another mixing bowl, combine 1 cup of light brown sugar, two large cracked eggs, and 1 teaspoon of vanilla extract. Whisk these wet ingredients together vigorously until they are well combined and the mixture is smooth and slightly frothy. Ensure the brown sugar dissolves as much as possible.
Next, it’s time to incorporate the dry ingredients. Sift 3 tablespoons of all-purpose flour, 1/4 teaspoon of salt, and 1 teaspoon of baking powder directly into the wet mixture. Sifting helps to eliminate any lumps and ensures these ingredients are evenly distributed, leading to a lighter, more uniform topping. Gently fold these dry ingredients into the wet mixture until just combined, being careful not to overmix. Overmixing can develop the gluten in the flour, resulting in a tougher topping.
Finally, it’s time for the delightful additions: generously fold in your chopped pecans or walnuts and the entire 7-ounce bag of sweetened shredded coconut. Stir just enough to distribute these ingredients evenly throughout the batter. The topping should be thick and studded with nuts and coconut.
Once the crust has cooled completely, carefully pour the prepared filling over it. Use a spatula to spread the topping nicely and evenly across the entire surface of the crust, ensuring every square inch is covered. Return the baking tray to the preheated 350°F (175°C) oven and bake for an additional 20 to 25 minutes. The topping should appear set, golden brown, and slightly firm to the touch when gently pressed in the center. A toothpick inserted into the center should come out clean or with moist crumbs, but not wet batter.
After baking, remove the Dream Bars from the oven and the real test of patience begins! Allow the bars to cool completely in the pan, preferably for at least one hour, or even longer. Cooling is absolutely essential for the bars to set properly, ensuring clean, defined slices. Attempting to cut them while warm will result in a crumbly mess. Once fully cooled, use the parchment paper to lift the entire slab out of the pan. Place it on a cutting board and slice it into bite-sized pieces – squares or rectangles work best. Now, your homemade Dream Bars are ready to be enjoyed!
Expert Tips for Flawless Dream Bars
Achieving bakery-quality Dream Bars at home is easier than you think, especially with a few handy tips:
- Measure with Precision: Baking is a science! Use proper measuring cups and spoons, and level off your ingredients, especially flour and sugar, for consistent results.
- Don’t Overmix the Crust: Once the butter is incorporated and crumbly, stop mixing. Overworking the dough can lead to a tough crust.
- Cooling is Absolutely Key: We cannot stress this enough. Rushing the cooling process for both the pre-baked crust and the final bars will lead to crumbling and difficult-to-cut pieces. Patience ensures beautiful, neat squares.
- Parchment Paper is Your Best Friend: Lining your baking pan with parchment paper, leaving an overhang on the sides, makes lifting the entire baked slab out incredibly easy. This prevents sticking and ensures clean removal.
- Toast Your Nuts (Optional): For an extra layer of flavor and aroma, lightly toast your chopped pecans or walnuts in a dry skillet over medium heat for a few minutes before adding them to the topping. Let them cool completely before mixing.
- Quality Ingredients Matter: Use good quality butter and fresh, not stale, nuts. The difference in flavor is noticeable.
- Adjust Sweetness: If you prefer less sweetness, you can slightly reduce the brown sugar in the topping, but be mindful that it also contributes to the texture.
- Storage: Store your Dream Bars in an airtight container at room temperature for up to 3-4 days, or in the refrigerator for up to a week. They can also be frozen for longer storage (up to 2-3 months) – simply thaw at room temperature before serving.
Variations to Personalize Your Dream Bars
While the classic Dream Bar recipe is perfect as is, you can always get creative and add your own touch:
- Chocolate Lover’s Dream: Fold in a cup of mini chocolate chips or chopped chocolate bars into the topping mixture for an added layer of indulgence.
- Nutty Adventures: Experiment with different types of nuts like macadamia nuts, slivered almonds, or even a mix of several varieties for a diverse texture and flavor profile.
- Fruity Twist: Add a handful of finely chopped dried cranberries, apricots, or cherries to the topping for a touch of tartness and chewiness.
- Citrus Zest: Grate in the zest of one lemon or orange into the topping mixture for a bright, fresh note that cuts through the sweetness.
- Salted Caramel Drizzle: Once the bars are completely cooled, drizzle a store-bought or homemade salted caramel sauce over the top for an extra decadent finish.
- Spice It Up: A pinch of cinnamon or nutmeg added to the topping can give it a warm, inviting aroma and flavor.
Serving Suggestions for Your Homemade Dream Bars
These versatile dessert bars are perfect for a multitude of occasions and pair beautifully with various accompaniments:
- Coffee Break Companion: Enjoy a square with your morning coffee or afternoon tea for a delightful pick-me-up.
- A La Mode: Serve a slightly warmed Dream Bar with a scoop of premium vanilla bean ice cream or a dollop of fresh whipped cream for an indulgent dessert.
- Dessert Platter Star: Cut into smaller, elegant squares and arrange on a dessert platter alongside other treats for parties and gatherings.
- Thoughtful Gift: Wrap a few bars in decorative paper or place them in a pretty box to share with friends, family, or neighbors. They make a wonderful homemade gift!
- Picnic Perfect: Easily transportable, Dream Bars are an excellent addition to any picnic basket or potluck contribution.
Your New Favorite Dessert Awaits!
The Classic Dream Bars recipe truly lives up to its name, offering a dream-like experience with every bite. Its simple preparation, wholesome ingredients, and undeniable deliciousness make it a recipe that you’ll return to again and again. Whether you’re baking for a special occasion or simply treating yourself to a taste of nostalgia, these bars are guaranteed to bring smiles and satisfaction. Dive into the wonderful world of vintage baking and discover why this 90-year-old classic continues to be a beloved favorite. Happy baking!