
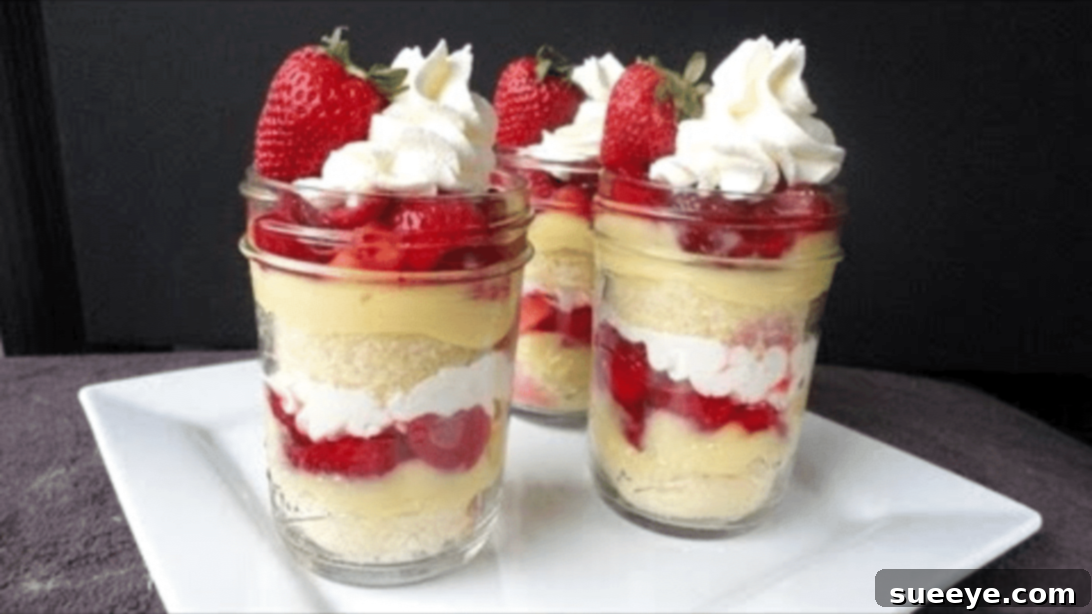
If you’re on the hunt for a show-stopping yet delightfully simple dessert, look no further than this incredible Easy Strawberry Shortcake Trifle. Inspired by the fantastic recipe from Crouton Crackerjacks on YouTube, this recipe transforms classic flavors into an irresistible treat perfect for any occasion. Imagine luscious layers of sweet, macerated strawberries, rich vanilla pudding, fluffy whipped cream, and tender pound cake, all nestled together in charming individual servings. It’s a symphony of textures and tastes that promises to be a crowd-pleaser every single time.
Strawberry shortcake is a beloved dessert for good reason: the vibrant, fresh taste of strawberries, a hint of tang, and a satisfyingly tender texture. When combined with the creamy decadence of vanilla pudding and whipped cream, then complemented by the subtle sweetness of pound cake, you get a dessert that’s truly greater than the sum of its parts. This particular trifle rendition elevates the experience by breaking it down into convenient, portion-controlled mini trifles, making it an ideal choice for parties, potlucks, or simply a delightful family treat. Best of all, you only need a handful of readily available ingredients and minimal prep time to create this masterpiece. Get ready to impress your guests and satisfy your sweet cravings with this remarkably simple yet elegant dessert.
Essential Ingredients for Your Perfect Strawberry Shortcake Trifle
Crafting this divine strawberry shortcake trifle requires just a few key components. The beauty of this recipe lies in its simplicity and the way these humble ingredients come together to create something extraordinary. For approximately 6 mini trifles (using half-pint mason jars), here’s what you’ll need:
- 1 lb of Fresh Strawberries: The star of the show! Opt for bright red, firm berries with green caps for the best flavor and texture. Fresh is always preferred for this recipe to ensure that vibrant burst of taste and a naturally sweet and slightly tart profile.
- 1/4 cup of White Granulated Sugar: This isn’t just for sweetness; it’s crucial for macerating the strawberries, a process that draws out their natural juices and intensifies their flavor, creating a luscious syrup that permeates the trifle.
- 1 Package of Instant Vanilla Pudding Mix: A convenient shortcut that delivers creamy, delicious results. Ensure you have enough milk (whole milk often yields a richer pudding) on hand to prepare it according to the package instructions. You can also experiment with other pudding flavors like cheesecake, banana, or white chocolate for a unique twist.
- 1 Pound Cake (Homemade or Store-Bought): The foundation of our trifle. A classic pound cake offers a dense yet tender crumb that holds up beautifully to the moist layers of fruit and cream. Feel free to use a good quality store-bought cake for ease, or bake your favorite homemade version for an extra personal touch and depth of flavor. Other cake bases like angel food cake or even shortbread cookies can also be used.
- Whipped Cream: The crowning glory! Whether you prefer the convenience of store-bought whipped topping or the luscious richness of freshly made whipped cream, it adds an essential light, airy, and creamy finish that perfectly balances the sweetness of the other layers.
Recommended Equipment: While not an ingredient, a set of half-pint mason jars (approximately 8 oz capacity) is perfect for creating these adorable individual trifles. Their clear glass allows the beautiful layers to shine through, adding to the visual appeal and making them ideal for portion control and elegant presentation at any gathering.
Step-by-Step Guide to Assembling Your Easy Strawberry Shortcake Trifle
Creating these delightful mini trifles is an enjoyable process, broken down into simple, manageable steps. Follow these instructions carefully to ensure your dessert turns out perfectly balanced, beautiful, and utterly delicious. The key is in the meticulous preparation of each component before the final layering phase, ensuring maximum flavor and an appealing presentation.
Step 1: Preparing Your Sensational Strawberries
Begin by giving your fresh strawberries a thorough rinse under cool running water to remove any dirt or residue. Once cleaned, gently pat them dry with a paper towel. Carefully remove the green leafy caps (hull them) using a small paring knife or a strawberry huller, ensuring you remove the tough white core. Transfer the hulled strawberries to a medium-sized bowl and cut them into bite-sized pieces. Aim for pieces that are roughly uniform in size to ensure an even distribution throughout your trifle layers, typically quartered or sliced depending on the size of the berries.
Next, sprinkle the 1/4 cup of white granulated sugar evenly over the cut strawberries. Using a spoon or spatula, gently stir the berries until each piece is lightly coated with sugar. This crucial process, known as maceration, is vital. The sugar will draw out the natural juices from the strawberries, creating a luscious, sweet syrup that intensifies their flavor, softens their texture slightly, and makes them incredibly succulent. Let the strawberries sit at room temperature for approximately 20 to 30 minutes. During this time, you’ll notice a beautiful, vibrant red liquid forming at the bottom of the bowl – that’s pure strawberry goodness, ready to infuse your cake layers with flavor.
Step 2: Whipping Up the Cream and Perfecting the Pudding
While your strawberries are macerating and developing their incredible flavor, it’s the perfect time to prepare the creamy components of your trifle. For the instant vanilla pudding, simply follow the specific instructions on the package. This usually involves whisking the pudding mix vigorously with cold milk (typically 2 cups for a standard 3.4 oz package) for a couple of minutes until it thickens. Once prepared, set it aside to chill slightly, allowing it to firm up further. For a richer, more luxurious pudding, you might consider using whole milk or even half-and-half, which will yield a creamier texture.
Next, turn your attention to the whipped cream. You have two excellent options here: for ultimate convenience, use a good quality store-bought whipped topping (like Cool Whip) or aerosol whipped cream. If you prefer a homemade touch, making your own whipped cream is incredibly simple and yields a superior flavor and texture. To do so, chill a large mixing bowl and your whisk attachment (or beaters) in the freezer for 10-15 minutes. Pour 1 pint (2 cups) of very cold heavy cream into the chilled bowl, add 2-4 tablespoons of powdered sugar (also known as confectioners’ sugar – adjust to your sweetness preference) and 1 teaspoon of pure vanilla extract. Beat on medium-high speed until soft peaks form, then increase speed until firm peaks are achieved, being careful not to over-whip, which can cause it to become grainy or turn into butter.
Step 3: Preparing the Pound Cake Layers
With your strawberries glistening and your creams ready, it’s time to prepare the structural component of your trifle: the pound cake. The goal here is to create uniform pieces that will fit nicely into your mason jars, forming the base and middle layers. Slice the pound cake into approximately 1/2-inch thick slices. To achieve perfect circles that are slightly smaller than the diameter of your half-pint mason jars, use a biscuit cutter, a round cookie cutter, or even the rim of a small measuring cup. This ensures a snug fit without being too tight, allowing space for the other delicious layers to settle beautifully.
You will need two slices of pound cake per jar. If you don’t have a specific cutter, you can carefully cut the pound cake into squares or rectangles that fit your jars, making sure they are slightly smaller than the jar’s opening. Don’t discard the leftover cake scraps! They make a wonderful snack, can be crumbled and used as a topping, or even added as an extra layer if desired. This step is crucial for maintaining the beautiful layered aesthetic of the mini trifles and ensuring each serving has a balanced ratio of ingredients. For an extra layer of flavor and moisture, you can lightly brush the cake slices with a tiny bit of the strawberry syrup or a very light splash of milk or fruit juice before layering.
Step 4: Assembling Your Magnificent Mini Trifles
Now for the most exciting part – assembling your individual strawberry shortcake trifles! This is where the magic happens and your dessert comes to life, showcasing the vibrant colors and appealing textures. Take your half-pint mason jars and begin layering each component carefully to build a visually stunning and delicious dessert:
- First Layer (Cake Base): Gently place one slice of your prepared pound cake at the very bottom of each mason jar. Press it down lightly to create a stable base for the layers that will follow.
- Second Layer (Pudding Power): Spoon a generous dollop (approximately 2-3 tablespoons) of the prepared instant vanilla pudding on top of the pound cake layer. Spread it gently to cover the cake, creating a smooth, creamy stratum that will begin to soften the cake.
- Third Layer (Strawberry Bliss): Next, add a spoonful of your macerated, sugar-coated strawberries. Be sure to include some of the lovely strawberry syrup that has collected in the bowl – it adds crucial moisture and intensified flavor to the cake below and throughout the trifle.
- Fourth Layer (Whipped Cloud): Finish this first complete layer with a dollop of whipped cream, spreading it evenly to create a light and airy barrier.
Repeat these layers once more for each jar: another slice of pound cake, followed by more vanilla pudding, then more strawberries, and finally, a generous topping of whipped cream. This layering technique will create approximately 6 beautifully constructed mini trifles, showcasing all the vibrant colors and textures. Once all your jars are assembled, cover them loosely with their lids or plastic wrap.
For the best flavor development and to allow the trifle to set properly, place the assembled mini trifles in the refrigerator. Refrigerate for at least a few hours, ideally 3-4 hours, or even overnight. This chilling time is essential as it allows the flavors to meld beautifully, the cake to absorb some of the strawberry juices and pudding moisture, and for the entire dessert to firm up, resulting in an even more tender and flavorful treat that is easier to eat. When ready to serve, you can garnish with an extra fresh strawberry slice, a sprig of mint, or a sprinkle of white chocolate shavings for an elegant touch. Enjoy this delightful and easy-to-make dessert!
Why This Easy Strawberry Shortcake Trifle is Your Go-To Dessert
This easy strawberry shortcake trifle isn’t just a recipe; it’s a solution for effortless entertaining and satisfying sweet cravings with minimal fuss. Its popularity stems from several key benefits that make it an absolute winner in any dessert lineup, consistently delivering on taste, presentation, and convenience.
Perfect for Any Occasion
Whether you’re hosting a casual backyard BBQ, a sophisticated brunch, a festive birthday party, a holiday gathering, or even just a cozy family dinner, these individual trifles fit right in. Their elegant presentation in clear mason jars makes them visually appealing, serving as delightful centerpieces or charming individual servings that guests can easily grab and enjoy. The portion control is ideal, and they eliminate the need for extra plates and forks if you provide spoons, simplifying cleanup significantly. They’re also fantastic for potlucks, picnics, or school events because they’re easily transportable and stay fresh, making them a worry-free dessert option.
Simple Yet Sophisticated
Despite its impressive appearance, this recipe is surprisingly straightforward to prepare. Utilizing instant pudding and good quality store-bought pound cake significantly cuts down on prep time, making it accessible even for novice bakers or those with limited time. The simple, repetitive layering technique ensures beautiful results without requiring advanced culinary skills. It’s the perfect example of how simple, accessible ingredients, thoughtfully combined, can create a truly sophisticated dessert experience that looks like it took hours of effort.
Customizable and Versatile
While the classic strawberry and vanilla combination is undeniably delicious and universally loved, this trifle is incredibly versatile, allowing for endless customization. You can easily swap out the fruit for blueberries, raspberries, blackberries, peaches, or a mix of seasonal berries. Consider different pudding flavors like banana, chocolate, lemon, or even a cheesecake flavor for a fresh take. Angel food cake, shortbread cookies, or even crumbled amaretti biscuits can replace pound cake for varying textures and flavor profiles. For an adult version, add a splash of fruit liqueur (like Grand Marnier or Chambord) brushed onto the cake layers. Incorporate toasted nuts, chocolate shavings, or shredded coconut for extra crunch and flavor. This adaptability ensures you can tailor it to any taste preference, dietary consideration, or seasonal availability.
Make-Ahead Convenience
One of the biggest advantages of this trifle is that it tastes even better when made ahead. The essential chilling time allows all the individual flavors to deepen, meld beautifully, and truly integrate, transforming from distinct components into a harmonious dessert. Moreover, the cake layers get a chance to absorb moisture from the strawberries and pudding, resulting in a perfectly tender and cohesive dessert texture. This means you can prepare these trifles a full day in advance, freeing up your time on the day of your event to focus on other preparations, interact with your guests, or simply relax and enjoy the occasion. This make-ahead capability is a true lifesaver for busy hosts and ensures a stress-free dessert presentation.
Expert Tips for Trifle Perfection
Achieving the perfect strawberry shortcake trifle is easy, especially with these helpful tips designed to enhance flavor, texture, and presentation, ensuring your dessert is a memorable hit every time.
- Choose Ripe, Fresh Strawberries: The quality of your strawberries directly impacts the overall flavor and sweetness of your trifle. Always look for bright red berries that are firm, fragrant, and free of blemishes. Avoid overly soft or pale berries, as they will lack flavor.
- Don’t Skip Maceration: Allowing the sliced strawberries to sit with sugar is a crucial step. This process draws out their natural juices, creating a delicious, concentrated strawberry syrup and softening the berries slightly. This not only enhances their flavor but also adds moisture to the cake layers.
- Chill Your Whipped Cream Bowl (for homemade): If you’re making homemade whipped cream, chilling your mixing bowl and whisk attachment in the freezer for 10-15 minutes beforehand will significantly help the cream whip faster and achieve a firmer, more stable consistency. Always use very cold heavy cream.
- Cut Cake Uniformly: Consistent, evenly sized cake pieces ensure even layering and a beautiful, professional-looking presentation. Using a cookie or biscuit cutter for round shapes is ideal, or carefully cut squares for a neat appearance.
- Avoid Over-Soaking the Cake (Initially): While the cake absorbs moisture during chilling, you don’t want it to be soggy from the start. Apply the strawberry syrup and pudding evenly, but don’t drench the cake slices excessively during assembly. The long chilling time will do the work.
- Allow Adequate Chilling Time: This is perhaps the most important tip for any trifle. Refrigerating the assembled trifles for at least 3-4 hours (or even better, overnight) allows all the flavors to meld beautifully, deepen, and mature. It also ensures the pudding and whipped cream set properly, creating a more cohesive dessert that is easier and cleaner to serve.
- Garnish Just Before Serving: For the freshest and most appealing look, add any delicate garnishes like fresh strawberry slices, a sprig of fresh mint, a dusting of powdered sugar, or chocolate shavings right before serving. This prevents wilting or sogginess.
- Experiment with Flavors: Don’t be afraid to customize! A splash of orange liqueur, strawberry liqueur, or even a hint of balsamic glaze brushed on the cake layers can add a sophisticated and unexpected touch that complements the strawberries beautifully.
Creative Trifle Variations and Elegant Serving Ideas
While the classic Strawberry Shortcake Trifle is a star in its own right, its wonderfully adaptable nature allows for endless creative variations. Don’t hesitate to personalize this delightful dessert to suit your specific taste preferences, the seasonality of ingredients, or the theme of your occasion.
Exciting Flavor Combinations:
- Mixed Berry Trifle: Elevate the fruit profile by combining strawberries with blueberries, raspberries, and blackberries for a medley of vibrant colors and complex flavors.
- Peach Melba Trifle: Replace strawberries with fresh sliced peaches (or well-drained canned peaches if fresh are out of season) and add a delightful drizzle of raspberry sauce or fresh raspberries between the layers for a classic pairing.
- Chocolate Strawberry Trifle: Indulge your chocolate cravings by using chocolate pudding and chocolate pound cake, or by incorporating rich chocolate shavings or mini chocolate chips between the layers for an irresistible dessert.
- Lemon Raspberry Trifle: Opt for a brighter, tangier profile by using lemon pudding and fresh raspberries, perhaps even with a lemon-infused pound cake for an extra citrusy kick.
- Tropical Trifle: Give your trifle an exotic twist by layering with diced mango, pineapple, and a hint of coconut cream incorporated into the whipped topping for a refreshing dessert.
Different Cake Bases:
- Angel Food Cake: A lighter, airy alternative to pound cake, angel food cake absorbs flavors beautifully and contributes to a less dense trifle.
- Shortbread Cookies: Crumbled shortbread adds a delightful crunch and a buttery, rich flavor that pairs wonderfully with fruit and cream.
- Ladyfingers: Light and airy, ladyfingers are a classic choice for trifles and can be lightly brushed with fruit juice or a complementary liqueur for added moisture and flavor.
Enhanced Toppings & Garnishes:
Beyond a simple fresh strawberry, consider these options to elevate your trifle’s presentation and taste:
- Toasted Almond Slices: Add a pleasant nutty crunch and aroma.
- White Chocolate Curls: A sophisticated touch that melts delicately in your mouth.
- Fresh Mint Leaves: For a refreshing aroma, a pop of vibrant green color, and a cooling sensation.
- Lemon Zest: A bright and fragrant finish that enhances the fruit flavors.
- Crushed Pistachios: Adds beautiful green color and a unique, slightly earthy flavor.
Serving Suggestions: These individual trifles, presented in mason jars or clear dessert cups, are designed for ultimate convenience and charm. Serve them directly from their containers with small spoons. For a larger, more traditional gathering, you can also create a grand, communal trifle in a single large glass trifle bowl, allowing guests to serve themselves. This showcases the beautiful layers even more dramatically and makes for an impressive centerpiece. Pair these delightful trifles with a light tea or coffee for an afternoon delight, or serve them as the perfect sweet and refreshing ending to any meal.
Frequently Asked Questions About Strawberry Shortcake Trifle
- Can I use frozen strawberries for this recipe?
- While fresh strawberries are highly recommended for the best texture and vibrant flavor in this easy strawberry shortcake trifle, you can use frozen strawberries if fresh are not available. Thaw them completely, drain any excess liquid thoroughly to prevent a watery trifle, and then proceed with the maceration step as described. Be aware that frozen berries may have a slightly softer texture once thawed.
- How far in advance can I make this trifle?
- One of the great advantages of this individual strawberry shortcake trifle recipe is its make-ahead potential. You can prepare and assemble these trifles up to 24 hours in advance. In fact, making them a day ahead often allows the flavors to meld beautifully and the cake to soften to the perfect consistency, resulting in an even more delicious dessert. Always store them covered in the refrigerator.
- How do I store leftover trifle?
- Any leftover individual trifles should be covered tightly with plastic wrap or their lids and refrigerated promptly. They are best enjoyed within 2-3 days of preparation. While the cake layers may continue to soften over time, the flavors will generally remain excellent, making them a great snack or dessert for a few days.
- Can I use homemade pudding or cake instead of store-bought?
- Absolutely! Using homemade vanilla pudding or a homemade pound cake will undoubtedly elevate the trifle to another level of gourmet deliciousness, adding a deeper, more nuanced flavor. Just ensure your homemade components are completely cooled to room temperature before assembling the trifle to prevent the whipped cream from melting.
- What if I don’t have mason jars for individual servings?
- No problem at all! You can easily adapt this recipe. You can use any clear glass cups, small dessert bowls, wine glasses, or even small teacups for individual servings. For a larger, more traditional presentation, simply layer all the ingredients in a single large glass trifle bowl, which beautifully showcases all the layers.
This Easy Strawberry Shortcake Trifle recipe is more than just a dessert; it’s a testament to how simple ingredients, when combined with a touch of care and creativity, can create something truly memorable and impressive. Whether you’re a seasoned baker looking for a quick win or just starting your culinary journey, this recipe promises delightful results and countless compliments. So go ahead, gather your ingredients, and prepare to indulge in this magnificent layered creation that’s perfect for any sweet occasion!