
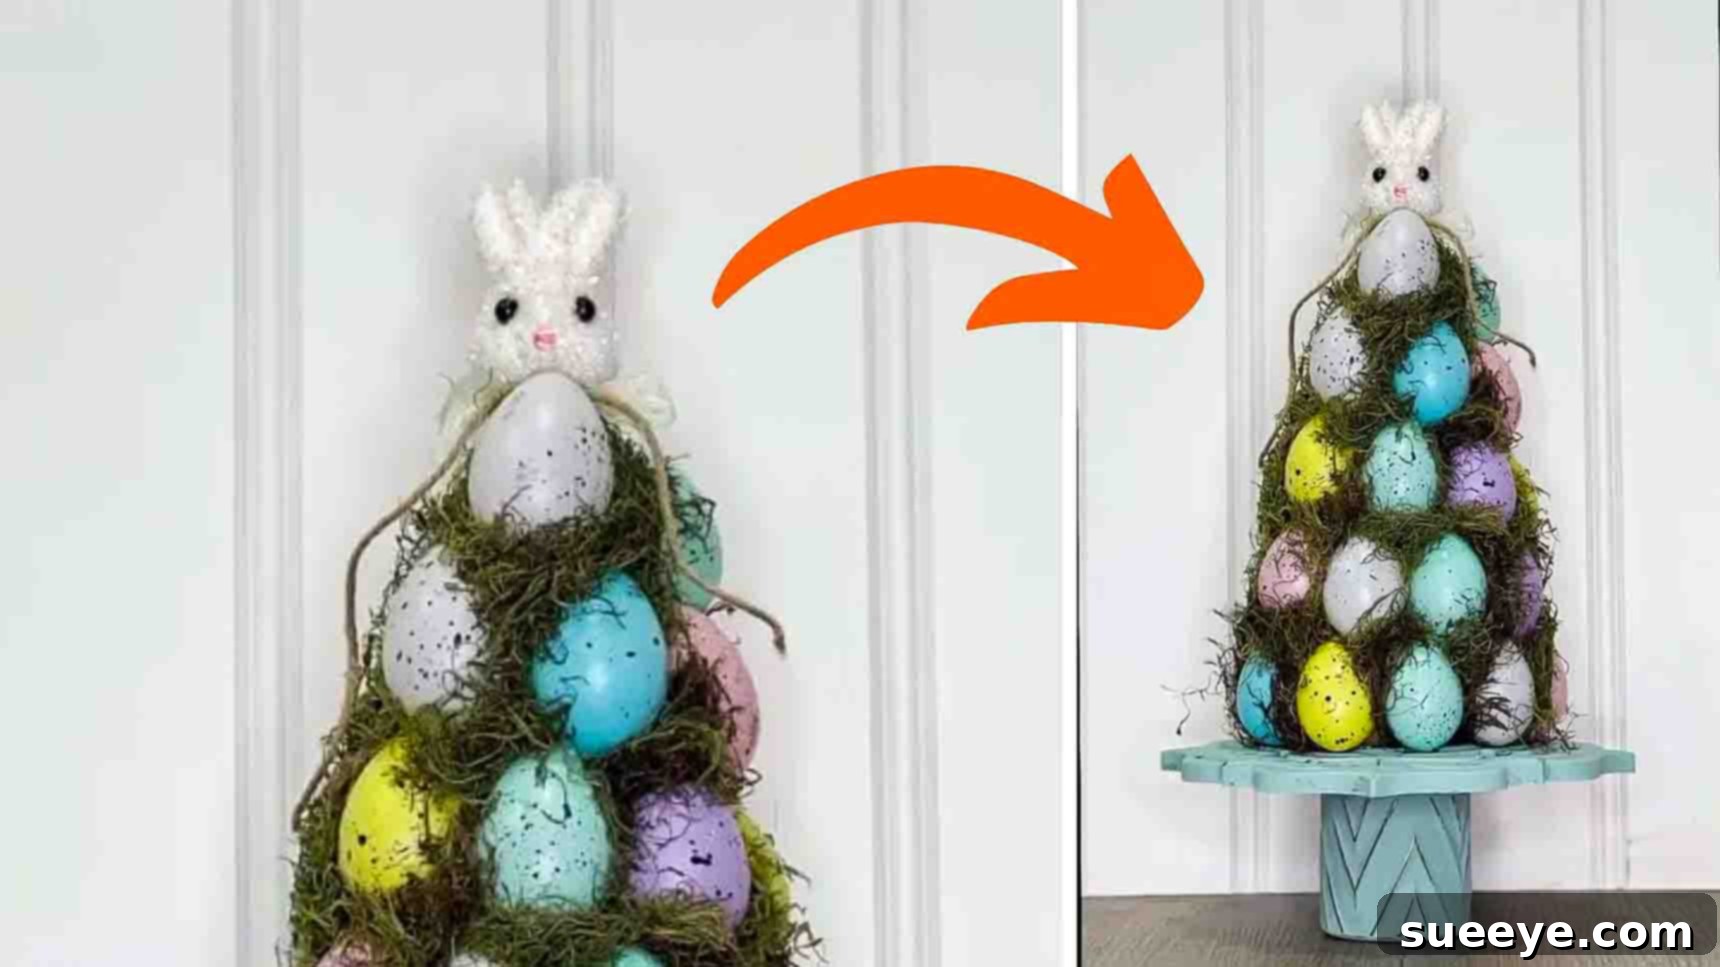
As spring dawns and the festive spirit of Easter approaches, there’s no better time to infuse your home with delightful, handmade decorations. While browsing for fresh inspiration, I stumbled upon an incredibly charming DIY Easter egg tree tutorial from Chalk It Up Fancy on YouTube. The moment I saw it, I was captivated by its adorable simplicity and undeniable charm. Given Easter was just around the corner, I instantly knew I had to try recreating one myself. What followed was a wonderfully fun and rewarding crafting experience, proving that beautiful decor doesn’t have to break the bank.
One of the most appealing aspects of this project is its incredible affordability. Every single material required can be easily sourced from your local Dollar Tree, making it a truly budget-friendly endeavor. This little tree isn’t just a craft; it’s a vibrant addition that instantly brightens any Easter display, transforming ordinary spaces into festive havens. Its whimsical appeal ensures it will become a cherished part of my seasonal decor for years to come. If you’re looking to add a touch of handcrafted elegance and playful spirit to your spring home, follow along with this detailed guide. We’ll walk you through each step, from gathering your materials to applying the final charming touches, ensuring you can create your own stunning Dollar Tree Easter Egg Tree with ease.
Why DIY Your Easter Decor?
In a world of mass-produced goods, creating your own holiday decorations offers a unique sense of satisfaction and several tangible benefits. Firstly, DIY projects like this Easter egg tree allow for unparalleled personalization. You can choose colors, textures, and embellishments that perfectly match your existing home decor and personal style, resulting in a truly one-of-a-kind piece that can’t be bought in stores. Secondly, it’s incredibly cost-effective. By utilizing affordable materials from stores like Dollar Tree, you can achieve high-end looks without the hefty price tag, making beautiful decor accessible to everyone.
Beyond the financial savings, crafting provides a wonderful creative outlet. It’s a therapeutic activity that can be enjoyed solo for some quiet time or transformed into a fun family project, creating cherished memories with loved ones. It also promotes a sense of accomplishment, as you watch your vision come to life from simple materials. Furthermore, handmade items often carry a deeper sentimental value, becoming treasured heirlooms that tell a story. This DIY Easter Egg Tree embodies all these advantages, offering a delightful way to celebrate the season with creativity and flair.
Essential Materials for Your DIY Easter Egg Tree
Gathering your supplies is the first exciting step in any craft project. The beauty of this particular Easter egg tree is that it relies almost exclusively on budget-friendly finds, primarily from Dollar Tree. Here’s what you’ll need, along with some tips for selection:
- Paper Cone (or a Party Hat): This forms the foundational structure of your tree. You can find pre-made craft cones in various sizes, or for an even more economical option, repurpose a sturdy paper party hat. The size of your cone will dictate the final height and fullness of your tree, so choose one that fits your desired display space.
- Dollar Tree Easter Eggs: The stars of our tree! Dollar Tree offers a fantastic assortment of plastic Easter eggs in various colors and finishes. Consider a mix of pastel shades for a classic look, or choose a monochromatic scheme for a more modern aesthetic. You’ll need a generous amount to cover the cone completely, so grab an extra pack or two just in case.
- Hot Glue Gun and Glue Sticks: An essential tool for this project, a hot glue gun provides a quick and strong bond. Ensure you have plenty of glue sticks on hand, as you’ll be attaching numerous eggs and moss. Always exercise caution when working with hot glue.
- Scissors: Necessary for trimming the cone and shaping the faux moss. Any pair of sharp craft scissors will do the trick.
- Faux Green Moss: This adds a beautiful, natural texture and helps fill any visible gaps between the eggs, creating a lush, cohesive look. Dollar Tree typically carries bags of craft moss; choose a vibrant green shade for a fresh spring feel.
- Dollar Tree Vintage Mirror (Small): This will serve as the elegant base for your tree. Dollar Tree often carries small decorative mirrors with ornate frames that are perfect for adding a touch of vintage charm. Look for one that has a flat bottom or can be easily leveled.
- Dollar Tree Vintage Jar: This component will elevate your tree, giving it height and a refined pedestal appearance. Mason jars or decorative glass jars with a vintage feel are ideal. Ensure it has a stable base to support the mirror and tree.
- Dollar Tree Bunny Head (or other topper): This adorable little bunny head will be the crowning glory of your Easter egg tree. Dollar Tree usually has various small bunny figurines or embellishments that can be used. Alternatively, you could use a small bird, a decorative bow, or even a tiny basket as your tree topper.
- Paint (Color of Your Choice): To customize your mirror and jar. Chalk paint is excellent for achieving a distressed, vintage look, but acrylic craft paints also work beautifully. Popular choices for Easter include soft pastels, white, cream, or even metallics like gold or silver for an elegant touch.
- Sandpaper (Fine-Grit): Used for distressing the painted mirror and jar. A fine-grit sandpaper (around 180-220 grit) will allow you to gently wear away paint from the edges, revealing the material beneath and creating an aged, shabby chic effect.
- E6000 Adhesive: While hot glue offers an immediate bond, E6000 provides a superior, long-lasting, and incredibly strong bond for assembling the base components (jar to mirror). It’s crucial for ensuring the stability and durability of your finished tree. Be sure to work in a well-ventilated area when using E6000.
Step-by-Step Directions to Craft Your Easter Egg Tree
Now that you have all your materials, let’s dive into the creative process! Follow these detailed steps to bring your charming DIY Easter Egg Tree to life.
Step 1: Building the Egg Tree Base and Preparing the Stand
Begin the assembly of your main tree structure. Take your paper cone and your collection of Dollar Tree Easter eggs. Using your hot glue gun, carefully start attaching the Easter eggs all over the paper cone. Work from the bottom up or top down, ensuring the eggs are placed closely together to minimize gaps. Don’t worry if there are small spaces; we’ll address those later. Aim for an even distribution and a visually appealing arrangement of colors if you’re using a mix. Once the cone is fully covered, carefully cut the very tip off the top of the cone. This creates a small opening where your tree topper will eventually reside.
Next, it’s time to add a touch of lush greenery. Take your hot glue gun and apply small dabs of glue into the visible gaps between the Easter eggs. Immediately press small tufts of faux green moss into these glued spots, ensuring the gaps are nicely filled. This step adds depth, texture, and a more natural, finished look to your tree. Once the moss is securely in place and dry, use your scissors to trim back any excess or straggling pieces, shaping it neatly around the eggs. This makes the tree appear fuller and more refined.
While the egg tree base sets, shift your attention to preparing the stand. Take your Dollar Tree vintage mirror and the vintage jar. Apply your chosen paint color evenly to both the mirror’s frame and the jar. For best results, apply thin, even coats and allow each coat to dry completely before adding another. This prevents drips and ensures a smooth finish. Once the paint is fully dry, it’s time for distressing. Using your fine-grit sandpaper, gently sand the edges and raised details of both the mirror frame and the jar. Focus on areas where natural wear would occur to achieve an authentic, aged, or shabby chic look. This step adds character and charm to your stand, perfectly complementing the whimsical tree.
Step 2: Assembling the Stand and Adding Finishing Touches
With your tree base and painted stand components ready, it’s time for the final assembly. For maximum stability and durability, you’ll be using both E6000 and hot glue for the critical connections. Start by taking your E6000 adhesive and apply a generous bead around the rim of your painted vintage jar. Then, immediately apply a few dots of hot glue on top of the E6000. The hot glue will provide an instant hold while the E6000 cures, creating an incredibly strong, permanent bond. Carefully center and press the bottom of your painted vintage mirror onto the top of the jar, holding it firmly in place for a minute or two until the hot glue sets. Allow the E6000 to cure fully according to package directions, typically 24-72 hours, before moving the stand excessively.
Once your stand is stable, it’s time to attach the star of the show: your DIY Easter egg tree. Apply another liberal amount of E6000 to the center of the mirror’s surface, where the base of your egg tree will sit. Again, add a few dots of hot glue on top for immediate adhesion. Carefully center the bottom of your egg-covered cone onto the glued area of the mirror. Press down firmly and hold for a few minutes to ensure a strong connection. Take a step back to check that the tree is upright and stable on its new base.
To finish off your adorable Easter egg tree, take your Dollar Tree bunny head (or chosen topper). Apply a small amount of hot glue to the bottom of the bunny head and gently insert it into the hole you created at the very top of the egg tree. Hold it in place until the glue dries. This final touch adds personality and completes the whimsical look of your springtime masterpiece. Your charming, budget-friendly DIY Easter Egg Tree is now complete and ready to be proudly displayed!
Customizing Your Dollar Tree Easter Egg Tree
While the original design is undeniably cute, don’t hesitate to infuse your own creativity into this project. Here are a few ideas to customize your Easter Egg Tree:
- Color Palettes: Instead of traditional pastels, consider a modern monochromatic scheme (all white or all gold eggs), a vibrant rainbow mix, or a rustic woodland palette with natural browns and greens.
- Egg Embellishments: Add extra sparkle by gluing tiny beads, rhinestones, or glitter onto some of the eggs. You could also use small floral stickers or paint delicate patterns on them.
- Alternative Toppers: If a bunny isn’t your style, consider a tiny bird figurine, a delicate fabric bow, a miniature basket filled with faux flowers, or even a personalized initial.
- Base Variations: Instead of a mirror and jar, you could use a small wooden plaque, a decorative planter, or even a vintage teacup as your base, depending on the aesthetic you’re aiming for.
- Added Details: Drape a delicate string of fairy lights around the tree for an enchanting glow, or nestle small faux flowers or greenery sprigs among the eggs for extra botanical appeal.
Displaying Your Masterpiece
Once your beautiful DIY Easter Egg Tree is complete and the adhesives have fully cured, it’s time to find its perfect spot! This charming decoration is versatile enough to enhance various areas of your home. Consider placing it as the centerpiece on your dining table, perhaps surrounded by a small spring wreath or a scattering of faux flower petals. It also makes a fantastic addition to a mantelpiece, paired with other Easter figurines, candles, or garlands. An entryway console table is another excellent location, welcoming guests with a festive touch as soon as they step inside. You could even use smaller versions of this tree as accent pieces on shelves or side tables throughout your home. Experiment with different placements to see where it shines brightest and brings the most joy to your spring decor.
Care and Storage for Your DIY Easter Egg Tree
To ensure your Dollar Tree Easter Egg Tree remains a cherished part of your holiday decor for many seasons, proper care and storage are key. Since most components are lightweight and potentially fragile, handle your tree with care when moving or storing it. Dust your tree gently with a soft brush or a can of compressed air to keep it looking fresh. When Easter is over and it’s time to put away your decorations, find a sturdy box that is large enough to accommodate the tree without squishing any of the eggs or moss. You may want to wrap the tree loosely in tissue paper or bubble wrap for added protection, especially around the bunny topper and the distressed base. Store it in a cool, dry place away from direct sunlight to prevent any fading or damage to the materials. With a little care, your handmade Easter Egg Tree will be ready to delight again year after year, a testament to your crafting skill and a symbol of spring’s renewal.
Conclusion: Craft Your Way to a Joyful Easter
Creating this DIY Dollar Tree Easter Egg Tree is more than just a craft project; it’s an invitation to embrace the festive spirit of spring and add a personal touch to your home decor. Inspired by the delightful tutorial from Chalk It Up Fancy, this budget-friendly project proves that stunning decorations don’t require a hefty investment. With easily accessible materials and straightforward steps, you can craft a whimsical and unique centerpiece that reflects your style and brings a smile to everyone’s face.
From the satisfying process of gluing each egg to the joy of distressing the vintage-inspired base, every step is designed to be enjoyable and rewarding. The finished product is a vibrant, charming tree that will undoubtedly become a highlight of your Easter and spring displays for years to come. So gather your supplies, unleash your creativity, and embark on this delightful crafting journey. We encourage you to share your beautiful creations and any unique customization ideas you come up with! Happy crafting, and Happy Easter!