
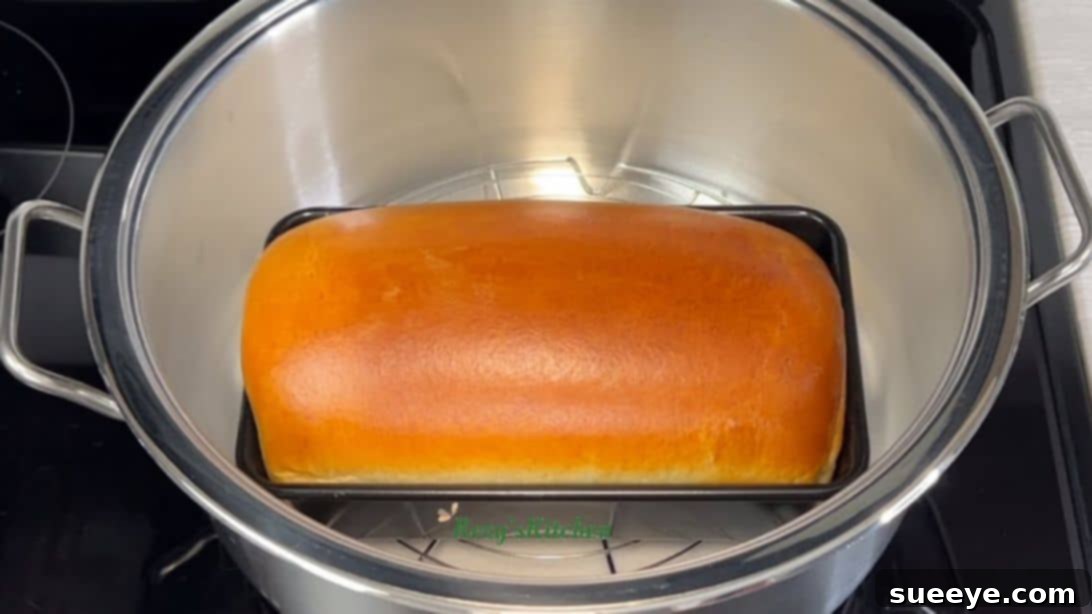
Dreaming of warm, freshly baked bread but don’t have an oven? Or perhaps your oven is on the fritz, or you’re simply looking for an alternative baking method? Whatever your reason, the good news is you can achieve incredibly soft, fluffy, and utterly delicious bread right on your stovetop! This revolutionary Rozy’s Kitchen recipe proves that a conventional oven is not always a prerequisite for homemade baking excellence. You’ll be amazed at how this simple technique yields a perfectly golden-brown crust and a tender crumb, rivaling any oven-baked loaf. Get ready to transform your kitchen into a bakery, no matter your equipment!
RELATED: No-Knead 4-Ingredient Air Fryer Bread Recipe
This fantastic stovetop bread recipe is not only incredibly effective but also remarkably simple, requiring just seven basic ingredients that you likely already have in your pantry: milk, active dry yeast, sugar, flour, salt, oil, and an egg. The step-by-step instructions are clear and easy to follow, making this an ideal project for both novice and experienced bakers. If you’ve been craving the comforting aroma and taste of homemade bread, but felt limited by a lack of an oven, this recipe is your perfect solution. Prepare to impress yourself and your loved ones with this unexpectedly delightful method.
Here’s another bread recipe for you to try: Easy Garlic Butter Cheese Bread Recipe
Essential Ingredients for Perfect No-Oven Bread
Crafting delicious bread on your stovetop requires a few key components, each playing a vital role in the final texture and flavor. Here’s a detailed look at what you’ll need, ensuring you’re fully prepared for a successful bake:
- 1 cup of milk (plus a little extra for egg wash): Milk contributes to a richer flavor and a softer crumb compared to water. It also aids in browning the crust beautifully. Ensure your milk is lukewarm (around 105-115°F or 40-46°C) for activating the yeast without killing it.
- 1 tablespoon of active dry yeast or instant yeast: This is your leavening agent, responsible for making the bread rise and become airy. If using active dry yeast, proofing is essential. Instant yeast can often be mixed directly with dry ingredients, but proofing a small portion can still confirm its viability.
- 1/4 cup of sugar: Sugar not only sweetens the bread subtly but, more importantly, provides food for the yeast, encouraging vigorous activity and a good rise. It also contributes to the golden-brown color of the crust.
- 3 cups of all-purpose flour: All-purpose flour is versatile and works well for this recipe, providing the necessary gluten structure for a chewy yet tender loaf. Sifting your flour can help incorporate air and prevent lumps, leading to a smoother dough.
- 2 teaspoons of salt: Salt is crucial for flavor enhancement, balancing the sweetness, and controlling the yeast’s activity, preventing it from rising too quickly. It also strengthens the gluten network, contributing to better dough structure.
- 1/4 cup of oil (vegetable, canola, or light olive oil work best): Oil adds moisture and richness to the dough, resulting in a tender crumb and a longer shelf life. It also makes the dough easier to handle during kneading and shaping.
- 1 egg: Primarily used for the egg wash, which will give your stovetop bread a beautiful, glossy, and golden-brown finish, making it visually appealing and adding a touch of richness to the crust.
Gathering these simple ingredients is the first step towards creating a remarkable homemade loaf without the need for a conventional oven.
Mastering Stovetop Baking: Your Step-by-Step Guide to No-Oven Bread
Embark on a culinary adventure as we guide you through each meticulous step of creating a perfect, golden loaf using only your stovetop. This method is surprisingly straightforward and yields consistently impressive results.
Step 1: Activating the Yeast – The Foundation of a Fluffy Loaf
In a spacious mixing bowl, combine 1 cup of lukewarm milk, 1 tablespoon of active dry yeast, and 1/4 cup of sugar. It’s crucial that the milk is at the right temperature (ideally between 105-115°F or 40-46°C) – too hot and it will kill the yeast; too cold and it won’t activate properly. Stir the mixture gently until the sugar dissolves and the yeast is fully incorporated. Once mixed, cover the bowl with a clean cloth or plastic wrap and set it aside in a warm spot for 8 to 10 minutes. This process, known as proofing, allows the yeast to activate. You’ll know it’s ready when the mixture becomes visibly foamy and bubbly, indicating that the yeast is alive and active, ready to make your bread rise beautifully.
Step 2: Combining Dry and Wet Ingredients – Forming the Dough Base
Once your yeast mixture is gloriously bubbly, it’s time to introduce the dry components. Add 3 cups of all-purpose flour and 2 teaspoons of salt directly into the bowl with the proofed yeast. Using a sturdy spoon or a dough whisk, begin to mix these ingredients together. Continue mixing until all the flour is hydrated and a shaggy, cohesive dough starts to form. At this stage, it might look a bit rough and sticky, but don’t worry, the next step will transform it into a smooth and elastic dough.
Step 3: Kneading for Perfection – Developing Gluten for Structure
Now, add 1/4 cup of oil to the dough. Incorporate the oil by gently folding it in until it’s mostly absorbed. Then, transfer the dough onto a lightly floured clean work surface. This is where the magic of kneading begins! Knead the dough vigorously for at least 15 minutes. The goal is to develop the gluten, which gives the bread its structure, elasticity, and chewiness. You can use the traditional push, fold, and turn method, or if you prefer, a stand mixer with a dough hook can do the job in about 8-10 minutes. The dough should become progressively smoother, more elastic, and less sticky. To test if it’s properly kneaded, perform the “windowpane test”: take a small piece of dough and gently stretch it. If you can stretch it thin enough to see light through it without tearing, your dough is ready. It should also spring back slowly when lightly pressed.
Step 4: The First Rise – Allowing Flavor and Volume to Develop
Lightly grease a large, clean bowl with a little bit of oil, ensuring the entire inner surface is coated. Place your beautifully kneaded dough into the bowl, turning it once to coat the entire surface with oil (this prevents it from drying out). Cover the bowl tightly with cling wrap or a damp cloth. Find a warm, draft-free spot in your kitchen – a turned-off oven with the light on, or a sunny windowsill can work wonders. Let the dough rise for about an hour, or until it has noticeably doubled in size. This first rise, known as bulk fermentation, is crucial for developing the bread’s flavor and creating the airy texture.
Step 5: Shaping the Loaf – Preparing for its Final Form
Once your dough has completed its first rise, gently punch it down to release the trapped air. This step helps to redistribute the yeast and creates a finer crumb. Lightly flour your work surface again and transfer the dough. Using a rolling pin, flatten the dough into a rectangular shape, aiming for dimensions that will fit comfortably within your loaf pan. Next, starting from one of the longer sides, tightly roll the dough into a log. As you roll, ensure each turn is snug to prevent large air pockets in the finished bread. Once rolled, firmly pinch the seams closed along the bottom and at the ends to create a smooth, sealed loaf. This careful shaping ensures an even rise and a beautiful final appearance.
Step 6: The Second Rise – Building Final Volume and Lightness
Generously grease your loaf pan to prevent sticking. Carefully transfer the shaped dough seam-side down into the prepared pan. Cover the loaf pan with cling wrap or a clean kitchen towel. Return it to your warm, draft-free spot for a second rise, typically lasting another hour. During this final proofing stage, the dough will continue to expand, becoming visibly puffy and light. It should nearly double in size again, reaching just below the rim of your loaf pan. This second rise is essential for achieving a light, airy crumb and a good oven spring (or in this case, “pot spring”).
Step 7: Preparing Your Stovetop “Oven” – Setting the Stage for Baking
Choose a large, heavy-bottomed pot with a tight-fitting lid – a Dutch oven works perfectly, but any large pot will do. Place a metal rack or trivet inside the pot. To further protect the bottom of your pot and ensure more even heat distribution, you can line the bottom with a layer of coarse salt, sand, or even aluminum foil balls before placing the rack. Cover the pot with its lid and place it over medium heat on your stovetop. Allow it to preheat for 10 to 15 minutes. This preheating step is vital, as it creates a hot, enclosed environment, mimicking the interior of a conventional oven and helping the bread to rise quickly and evenly.
Step 8: Crafting the Golden Egg Wash – For a Perfect Crust
While your pot is preheating, prepare the egg wash. In a small bowl, crack one egg and add a small splash of milk (about 1-2 tablespoons). Using a fork or a small whisk, beat the mixture thoroughly until the egg yolk and white are fully combined with the milk, creating a smooth, uniform liquid. This egg wash is the secret to achieving that beautiful, glossy, golden-brown crust that makes homemade bread so appealing. It also adds a subtle richness and softness to the exterior.
Step 9: The Stovetop Bake – Transforming Dough into Bread
Once your dough has completed its second rise and the pot is perfectly preheated, carefully remove the lid. Gently brush the top of the dough in the loaf pan with the prepared egg wash, ensuring an even coating. Then, using oven mitts, carefully place the loaf pan onto the rack inside the preheated pot. Quickly cover the pot with its lid, ensuring it’s sealed tightly to trap the heat and steam. Reduce the heat to medium-low to prevent burning. Cook the bread for approximately 30 minutes. Resist the urge to lift the lid too frequently, as this releases precious heat and steam. After 30 minutes, you should have a beautifully baked loaf with a golden-brown crust. To double-check, you can gently tap the top; it should sound hollow.
Step 10: Cooling and Serving – The Final Step to Enjoyment
Once baked to perfection, carefully remove the loaf pan from the pot. Immediately turn the bread out of the pan and place it on a wire cooling rack. This is a critical step; allowing the bread to cool on a rack ensures air circulation, preventing the bottom crust from becoming soggy from trapped steam. Resist the temptation to slice into it immediately! Letting the bread cool completely (or at least until warm) allows the internal structure to set and the flavors to fully develop. Once cooled, slice your incredible stovetop bread and serve it as desired – perfect with butter, jam, or alongside your favorite meal. Enjoy the fruits of your stovetop baking success!
Pro Tips for Achieving Perfect Stovetop Bread Every Time
While the basic steps are straightforward, a few expert tips can elevate your stovetop bread baking experience and ensure consistently excellent results:
- Choose the Right Pot: A heavy-bottomed pot, like a Dutch oven, is ideal as it distributes heat more evenly and retains it better. If using a thinner pot, monitor the heat very closely to prevent burning on the bottom.
- Maintain Consistent Heat: The key to stovetop baking is managing the heat. Medium-low heat is generally recommended. If your stove runs hot, you might even need to go lower. Too high, and the crust will burn before the inside cooks; too low, and the bread won’t rise properly or develop a good crust.
- Don’t Peek Too Often: Each time you lift the lid, you release valuable heat and steam, which can affect the bread’s rise and crust formation. Try to resist the urge until the recommended cooking time is nearly up.
- Verify Yeast Activity: Always proof your active dry yeast, even if a recipe suggests otherwise. If your yeast doesn’t foam, it’s likely dead, and your bread won’t rise. It’s better to start with fresh yeast than waste ingredients on a flat loaf.
- Accurate Measurements: Baking is a science. Use kitchen scales for flour if possible, or measure precisely with cups, leveling off dry ingredients. Slight variations can impact the dough’s consistency and final texture.
- Listen to Your Dough: The kneading time can vary based on flour type, humidity, and your technique. Focus on the dough’s feel – it should be smooth, elastic, and pass the windowpane test. Don’t strictly adhere to time if the dough isn’t ready.
- Experiment with Heat Distribution: If you find the bottom of your bread is browning too quickly, try adding more salt or sand to the base of your pot under the rack, or even a layer of crumpled aluminum foil, to diffuse the heat.
- Storage: Once completely cooled, store your homemade stovetop bread in an airtight container or bread bag at room temperature for 3-4 days. For longer storage, slice and freeze for up to 3 months.
The Unexpected Joys and Benefits of Baking Bread Without an Oven
Beyond the simple convenience, baking bread on your stovetop offers a unique set of advantages that make it a truly rewarding experience:
- Accessibility for All: This method opens up the world of homemade bread to anyone without a conventional oven. This includes those living in small apartments, dorm rooms, RVs, or even when camping. It’s also a fantastic solution during power outages or if your oven breaks down.
- Energy Efficiency: A stovetop typically heats up faster and uses less energy than a large oven, especially for a single loaf of bread. This can lead to energy savings and a cooler kitchen, particularly appealing during warmer months.
- Unique Texture and Crust: The confined, steamy environment of a covered pot on the stovetop creates a wonderfully soft interior and a surprisingly crisp, golden-brown crust that’s distinct from oven-baked bread. The steam trapped inside the pot helps the crust stay pliable longer, allowing the bread to achieve a fantastic rise.
- Cost-Effective: Making your own bread at home is significantly cheaper than buying it from a bakery or supermarket. Plus, you control the ingredients, avoiding unwanted preservatives or additives.
- The Sheer Satisfaction of Homemade: There’s an undeniable pride and joy that comes from pulling a warm, fragrant loaf of bread, made by your own hands, from a simple pot. The aroma alone is worth the effort, and the taste of fresh, preservative-free bread is unparalleled.
- Learning a New Skill: Mastering stovetop bread baking adds a versatile skill to your culinary repertoire, demonstrating resourcefulness and adaptability in the kitchen.
This method challenges conventional baking wisdom and proves that delicious, high-quality bread is attainable regardless of your kitchen setup. It’s a testament to simple ingredients, a little patience, and clever technique.
Conclusion: Your Stovetop Bakery Awaits
Who knew that creating a loaf of soft, delectable bread could be so simple, even without the traditional oven? This comprehensive guide, inspired by the innovative recipe from Rozy’s Kitchen, has shown you how to transform basic pantry staples into a homemade masterpiece, using nothing more than your stovetop and a pot. The golden crust, the tender crumb, and the irresistible aroma that fills your kitchen are proof that limitations can spark incredible culinary creativity.
Whether you’re battling a small kitchen, a broken appliance, or simply eager to explore new baking frontiers, this no-oven bread recipe is your ticket to freshly baked goodness. Say goodbye to store-bought loaves and embrace the satisfying process of making your own bread. Give this recipe a try, and prepare to be genuinely amazed by the results. Don’t forget to share your stovetop bread success stories and photos with us – happy baking!