
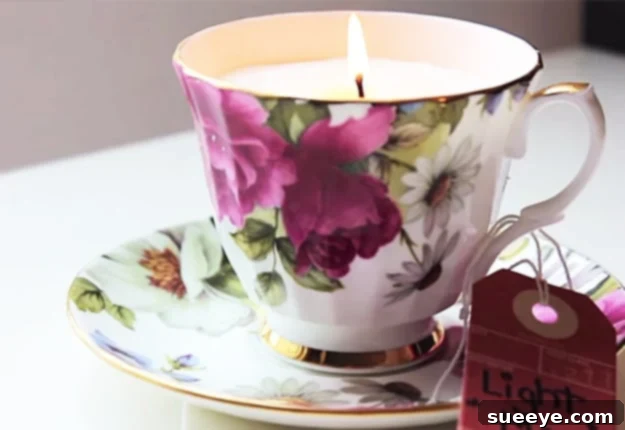
Crafting Charm: Your Ultimate Guide to DIY Teacup Candles for Home & Gifts
Transforming ordinary vintage teacups into exquisite, fragrant candles is an incredibly rewarding and straightforward DIY project. Not only does it offer a wonderful opportunity to upcycle cherished items, but it also allows you to create unique, personalized home decor pieces or thoughtful handmade gifts. This comprehensive guide will walk you through every step of making your own beautiful teacup candles, ensuring a smooth and enjoyable crafting experience from start to finish. Dive into the world of candle making and discover how easy it is to add a touch of vintage elegance and a delightful aroma to any space.
Why Choose Teacup Candles? The Allure of Upcycling and Unique Design
The charm of teacup candles lies in their distinct blend of nostalgia, elegance, and eco-friendliness. Unlike mass-produced candles, each teacup candle possesses a unique character, often reflecting the history and artistry of its vessel. Here’s why this DIY endeavor is so captivating:
- Sustainable Upcycling: Give new life to antique or forgotten teacups, diverting them from landfills and embracing a more sustainable approach to home decor. This practice reduces waste and promotes creative reuse.
- Unrivaled Aesthetics: Teacups, with their intricate patterns, delicate designs, and diverse color palettes, serve as beautiful, readymade containers that instantly elevate the visual appeal of your candles. They blend seamlessly with various decor styles, from rustic farmhouse to chic bohemian or classic vintage, making them versatile additions to any room.
- Personalized Gifts: Hand-poured teacup candles make exceptionally personal and memorable gifts for birthdays, holidays, housewarmings, or “just because” moments. Tailor the scent and color to the recipient’s preferences for an extra special, customized touch that shows you care.
- Cost-Effective Crafting: Often, you can find charming teacups at thrift stores, antique markets, garage sales, or even in your own forgotten cupboards for a fraction of the cost of new candle vessels. This makes it an economical way to create high-quality, artisanal candles without breaking the bank.
- Creative Expression: Candle making is a wonderfully meditative and creative outlet. It allows you to experiment with different waxes, wicks, scents, and colors to craft candles that perfectly match your personal style, desired ambiance, or a specific theme.
Essential Materials: Gathering Your Teacup Candle Making Supplies
Before you embark on your candle-making journey, it’s crucial to gather all the necessary supplies. Having everything on hand will make the process much smoother and more enjoyable. Here’s a detailed list of what you’ll need to create stunning homemade teacup candles:
1. Teacups
- Vintage or New: Any teacup can work, but vintage ones often add a unique, nostalgic charm. Ensure they are impeccably clean, completely dry, and free of any cracks or chips that could compromise safety during burning. Look for sturdy cups with stable bases to prevent tipping.
- Material Matters: Ceramic, porcelain, or stoneware teacups are ideal due to their heat resistance. Avoid thin glass or plastic cups as they may not withstand the heat of molten wax or a burning flame safely.
2. Candle Wax
The type of wax you choose significantly impacts the candle’s burn time, scent throw (how well the fragrance disperses), and overall appearance. Consider these popular options:
- Soy Wax: A popular choice for its eco-friendliness, clean burn, and excellent scent throw. It’s derived from soybeans, biodegradable, and renewable. Soy wax has a lower melting point, which means a longer burn time, and it cleans up easily with soap and water.
- Paraffin Wax: The most common and cost-effective wax available. It holds color and fragrance exceptionally well and typically has a strong scent throw. However, it’s a petroleum byproduct, which some crafters prefer to avoid for environmental reasons.
- Beeswax: A natural, non-toxic wax that burns very cleanly and slowly. It often has a subtle, natural honey-like scent and can be more challenging to work with for beginners due to its higher melting point and tendency to contract upon cooling.
- Coconut Wax: Gaining popularity, coconut wax offers an incredibly clean burn and excellent scent retention. It often blends well with soy wax to create a smoother finish and enhanced performance.
- Wax Flakes or Pellets: These forms are generally easier to measure and melt than solid blocks of wax.
3. Candle Wicks
Selecting the correct wick size is vital for an even burn and to prevent tunneling (where the wick burns down the center, leaving wax on the sides). The wick should be appropriate for the diameter of your teacup and the specific type of wax you’re using.
- Cotton Wicks with Tabs: Pre-tabbed wicks are the easiest to use as they come with a metal base for stability. Choose a size (e.g., small, medium, large, or specific millimeter ratings) that matches the diameter of your teacup and the type of wax. A wick that’s too small will cause tunneling, while one that’s too large will create an overly large flame and excessive soot.
4. Fragrance Oils or Essential Oils
This is where you infuse your candles with delightful aromas, transforming them into a sensory experience.
- Candle Fragrance Oils: Specifically designed for candle making, these oils are formulated to withstand high temperatures and provide a strong scent throw. They come in an enormous variety of scents, from floral and fruity to earthy and gourmand.
- Essential Oils: While natural, essential oils can be less potent in candles than synthetic fragrance oils and may require higher concentrations to achieve a noticeable scent throw. Research which essential oils are safe and effective for candle use, as some can be flammable or lose their scent quickly when heated. Always use reputable, high-quality oils.
- Scent Load: Most waxes can hold 6-10% fragrance oil by weight. Always refer to your wax manufacturer’s recommendations for the optimal scent load to avoid issues like poor burn quality or excessive soot.
5. Candle Dye (Optional)
- Liquid or Solid Dye: Specifically formulated for candles, these dyes allow you to add a pop of color to match your decor or personalize your gifts. Remember that a little goes a long way; the color will look lighter when liquid and darken as it solidifies.
6. Essential Equipment and Tools
- Heat-Resistant Pouring Pot: A dedicated pot with a spout for safely melting wax and pouring it into containers.
- Double Boiler Setup: A larger pot for water and your pouring pot for wax, or a specific double boiler. **Never melt wax directly over high heat, as it can be a fire hazard.**
- Thermometer: Essential for monitoring wax temperature. A candy thermometer or a dedicated wax thermometer works perfectly, ensuring you hit crucial temperature points for melting, adding fragrance, and pouring.
- Wick Centering Tools: These could be specialized clips, two popsicle sticks taped together, or a clothespin. They are vital for holding the wick upright and perfectly centered while the wax sets.
- Stirring Utensils: Popsicle sticks, metal spoons (dedicated for wax to avoid food contamination), or silicone spatulas for mixing wax, fragrance, and dye.
- Protective Surface: Newspaper, old towels, or a silicone mat to protect your workspace from wax spills and drips.
- Kitchen Scale: A precise kitchen scale is invaluable for accurately measuring wax and fragrance oils by weight, which is critical for consistent results.
- Scissors: For trimming wicks before and after the candle has set.
The Art of Candle Making: Step-by-Step Teacup Candle Tutorial
With all your supplies ready, it’s time to begin crafting! Follow these simple, detailed steps for perfect DIY teacup candles every time.
Step 1: Prepare Your Teacups and Workspace
- Clean and Dry: Ensure your teacups are impeccably clean and completely dry. Any moisture can negatively affect the wax, causing issues like tunneling or poor adhesion.
- Protect Your Area: Lay down newspaper, parchment paper, or an old towel to protect your work surface from wax drips and spills, which can be difficult to clean once hardened.
- Pre-heat (Optional but Recommended): For better wax adhesion and to prevent “wet spots” (where the wax pulls away from the container sides, creating clear patches), you can gently pre-heat your teacups in a low oven (around 150°F / 65°C) for about 10-15 minutes. Ensure they are fully cooled to a safe handling temperature before pouring wax, but slightly warm is ideal.
Step 2: Secure the Wick
- Center the Wick: Take a pre-tabbed wick and place a small dab of hot glue (from a glue gun) or a wick sticker on the center of the metal tab. Firmly press it to the absolute center of the bottom of your teacup. This positioning is crucial for an even burn.
- Secure the Top: Use a wick centering tool, two popsicle sticks taped together, or a clothespin to hold the top of the wick upright and perfectly centered over the teacup opening. This prevents the wick from moving as the wax is poured and sets.
Step 3: Measure and Melt the Wax
- Calculate Wax Needed: To determine how much wax you need, you can fill your teacup with water, then measure the water’s volume. Multiply this by 0.85 to get an approximate weight of wax in ounces/grams (as wax is less dense than water). Alternatively, a simpler method for beginners is to melt slightly more wax than you think you need; you can always save leftover wax for future projects.
- Double Boiler Method: Place your measured wax flakes or pellets into the pouring pot. Set the pouring pot inside a larger pot filled with a few inches of water (creating a double boiler).
- Gentle Heat: Heat the water over medium-low heat. Stir the wax occasionally as it melts to ensure even heating. Avoid direct high heat, as this can scorch the wax, affect its properties, or even pose a fire risk.
- Monitor Temperature: Use your thermometer to monitor the wax temperature. Most waxes have a specific melting and pouring temperature range. For soy wax, it’s often fully melted around 185°F (85°C). Refer to your wax manufacturer’s instructions for precise temperatures.
Step 4: Add Fragrance and Color (Optional)
- Cool Down to Scent/Dye Temperature: Once the wax is fully melted and has reached its maximum melting temperature, remove it from the heat. Allow it to cool slightly to the recommended fragrance/dye add temperature (often between 180-185°F / 82-85°C for soy, but always check your wax instructions). Adding fragrance when the wax is too hot can cause the scent to burn off or evaporate prematurely, resulting in a weak scent throw.
- Add Fragrance: Carefully measure your fragrance oil (typically 6-10% of the wax weight). Pour it into the melted wax and stir gently but thoroughly for at least 2 minutes. This ensures the fragrance is fully incorporated and will distribute evenly throughout the candle.
- Add Color: If using candle dye, add a few drops of liquid dye or a small piece of dye block at this stage. Stir until the desired color is achieved and evenly distributed. Remember, the color will look lighter when liquid and darker when solid.
Step 5: Pour the Wax
- Achieve Pouring Temperature: Let the scented and colored wax cool further to its ideal pouring temperature. This is crucial for achieving a smooth top surface, good wax adhesion to the container, and preventing issues like sinkholes or frosting. For soy wax, this is typically between 130-140°F (54-60°C). Again, consult your wax supplier’s guidelines for the best results.
- Slow and Steady Pour: Carefully and slowly pour the wax into your prepared teacups, leaving about a 1/2 inch to 1 inch of space from the rim. Pouring too quickly can introduce air bubbles, which can lead to imperfections as the candle sets.
Step 6: Allow to Cure
- Cooling: Let the candles cool completely at room temperature, undisturbed, for several hours or overnight. Avoid moving them or placing them in a cold draft, as rapid cooling can cause cracking, frosting, or uneven tops.
- Curing Time: For optimal scent throw and burn performance, most candles need to “cure” for at least 24-48 hours, though 1-2 weeks is often recommended, especially for soy wax. This allows the wax and fragrance molecules to bind properly, resulting in a stronger and more consistent scent when burned.
Step 7: Trim the Wick
- Before Burning: Once the wax is fully hardened and cured, remove the wick centering tool. Using sharp scissors or a dedicated wick trimmer, trim the wick to about 1/4 inch (6mm) above the wax surface. This prevents excessive flame, mushrooming of the wick, and soot, ensuring a clean and efficient burn.
Tips for Teacup Candle Success and Troubleshooting Common Issues
Even experienced candle makers encounter minor challenges. Here are some invaluable tips to ensure your teacup candles turn out beautifully every time, along with effective solutions for common problems:
Ensuring a Perfect Finish:
- Accurate Measurements: Always measure wax and fragrance by weight using a scale for consistent and predictable results. Eyeballing measurements can lead to uneven scent throw or poor burn quality.
- Temperature Control is Key: Pay close attention to melting, fragrance adding, and pouring temperatures specific to your wax type. This is arguably the single most important factor for success in achieving a smooth finish and strong scent.
- Pre-heating Containers: If you’re experiencing “wet spots” (where the wax pulls away from the teacup sides, creating translucent patches), try gently pre-heating your teacups before pouring. This helps the wax adhere better as it cools.
- Avoid Drafts: Allow your candles to cool in a stable, room-temperature environment away from open windows, air conditioning vents, or direct sunlight. Rapid temperature changes can contribute to cracking, frosting, or an uneven surface.
Troubleshooting Common Issues:
- Tunneling (Wick burns down the center, leaving a significant amount of wax on the sides):
- Cause: The wick is too small for the container diameter or the specific wax type. It might also occur if the first burn wasn’t long enough.
- Solution: For future candles, use a larger wick size. For an existing tunneling candle, try to scoop out some of the excess wax on the sides during a burn, or gently melt the surface with a heat gun to even it out. Ensure the first burn allows the wax pool to reach the edges of the container.
- Frosting (A white, crystalline appearance on the surface or sides of soy wax candles):
- Cause: This is a natural characteristic of soy wax, often due to temperature fluctuations during cooling. It’s purely cosmetic and does not affect burn quality.
- Solution: While harmless, you can minimize frosting by pouring at a slightly lower temperature, cooling candles more slowly, or incorporating a small amount of coconut wax into your blend.
- Sinkholes or Cracks on Top:
- Cause: Wax cools too quickly, or air pockets form during pouring. This is common, especially with natural waxes.
- Solution: Pour at the recommended cooler temperature. You can also save a small amount of melted wax for a “re-pour” or “top-up.” After the main pour has cooled for a few hours and started to set, gently melt the surface with a heat gun (if you have one) or pour a thin layer of freshly melted wax over the top to fill in any imperfections.
- Weak Scent Throw (The candle doesn’t smell much when burning):
- Cause: Not enough fragrance oil, adding fragrance at too high a temperature (causing it to burn off), or insufficient curing time.
- Solution: Ensure you’re using the correct fragrance load (percentage of wax weight) as per your wax manufacturer’s guidelines. Add fragrance at the recommended temperature. Most importantly, allow candles to cure for at least 1-2 weeks for the fragrance to properly bind with the wax.
Beyond the Basics: Enhancing Your Teacup Candle Experience
Once you’ve mastered the fundamentals of teacup candle making, consider these creative ideas to further elevate your creations and add a unique touch:
- Layered Scents: Experiment with pouring two or more different scented wax layers for a unique olfactory journey as the candle burns down. Ensure the first layer is fully set and firm before carefully pouring the next layer to prevent mixing.
- Decorative Touches: After the candle has fully cooled and hardened, you can gently place small, non-flammable botanicals (like dried lavender sprigs, rose petals, or tiny coffee beans – ensure they are well away from the wick when burning) on the surface for added visual appeal. Always prioritize safety and keep any decorations a safe distance from the flame to prevent fire hazards.
- Gift Presentation: Enhance the gifting experience by beautifully presenting your finished teacup candles. Wrap them in clear cellophane, tie with a coordinating ribbon, and attach a handmade label with the scent information, wax type, and essential burning instructions. They make truly exquisite, heartfelt gifts!
- Safety First Labels: Always include a warning label on the bottom of your teacup candles. These labels typically remind users to never leave a burning candle unattended, keep it away from drafts and flammable materials, trim the wick before each use, and discontinue use when 1/2 inch of wax remains.
Caring for Your Teacup Candles: Maximizing Enjoyment and Safety
To ensure your beautiful teacup candles burn safely and last as long as possible, follow these essential care tips. Proper candle care not only enhances the burning experience but also ensures the longevity of your handmade creations.
- The First Burn is Key: The very first time you light your candle, allow it to burn long enough for the entire surface of the wax to melt and create an even wax pool that reaches the edges of the teacup. This can take several hours and is crucial for preventing tunneling in future burns.
- Trim the Wick: Before each and every use, trim the wick to about 1/4 inch (6mm). A shorter wick creates a cleaner, brighter flame, prevents excessive soot buildup, and avoids the “mushrooming” effect at the wick’s tip.
- Optimal Burn Time: Do not burn candles for more than 4 hours at a time. This prevents the teacup from overheating, reduces excessive soot, and prolongs the overall life of your candle. Allow the candle to cool completely before relighting.
- Safety Always Comes First: Always place your burning candle on a stable, heat-resistant surface, away from drafts, children, pets, and any flammable objects. Never, under any circumstances, leave a burning candle unattended.
- Discontinue Use: Stop burning the candle when approximately 1/2 inch of wax remains at the bottom of the teacup. This prevents the flame from reaching the very bottom of the teacup and potentially causing damage or overheating the container.