
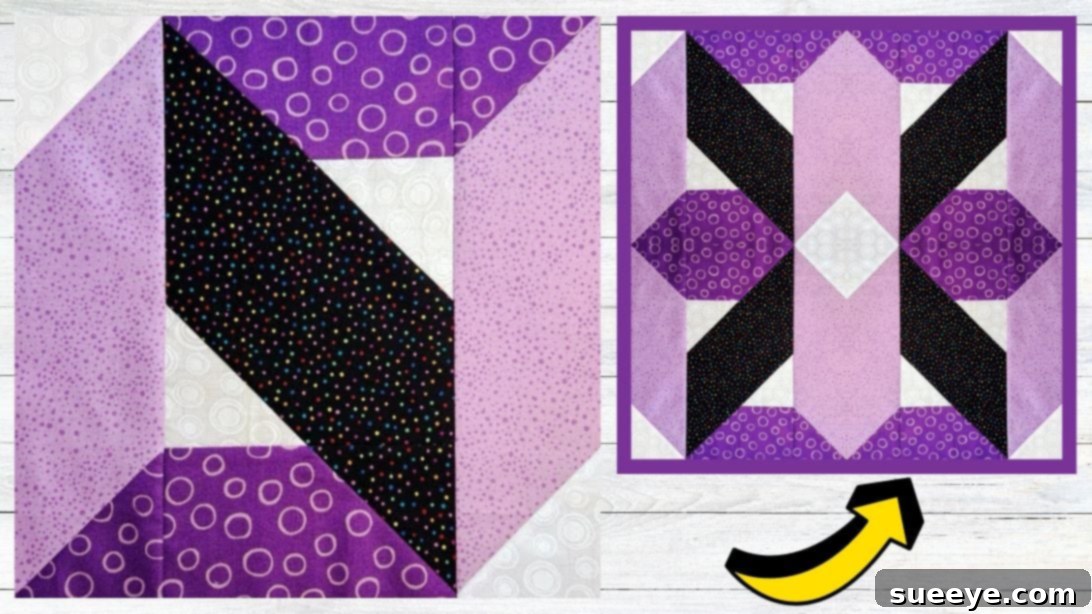
Master the Impossible Twist Illusion Quilt Block: A Beginner-Friendly Guide
Embark on a captivating quilting journey with the remarkable Impossible Twist Illusion Quilt Block. This design is not just a beautiful arrangement of fabric; it’s an optical marvel that creates a stunning sense of depth and movement, making it a truly mesmerizing addition to any quilt project. Believe it or not, crafting this intricate-looking block is incredibly fun and surprisingly easy, even if you’re new to the world of quilting. Its straightforward construction makes it an ideal project for beginners eager to develop their skills and achieve impressive results from the very first stitch.
The beauty of the Impossible Twist lies in its versatility. You have complete freedom to unleash your creativity, choosing any combination of fabric prints and colors that speak to your personal style. Whether you prefer vibrant, contrasting hues or subtle, harmonious tones, the final effect will be uniquely yours. Furthermore, once you’ve crafted several of these individual blocks, the possibilities for arranging them into a larger quilt top are endless. Experiment with different layouts to create various overall patterns and illusions, transforming a collection of simple blocks into a complex and visually dynamic masterpiece.
RELATED: Easy Optical Illusion Star Quilt Block Tutorial (Free Pattern Included)
If you’re searching for an engaging new quilt project to dive into this week, or simply looking for a fulfilling way to pass the time with a rewarding creative endeavor, then you’ve come to the right place. We’ll guide you through making this incredible illusion quilt block, inspired by the fantastic insights from Tulip Square’s tutorial on YouTube. To ensure your success, we’ve broken down the entire process into easy-to-follow, step-by-step instructions below. For those who prefer visual learning, we highly recommend watching the accompanying video tutorial from Tulip Square for additional clarity and detailed demonstrations.
Essential Materials for Your Impossible Twist Illusion Quilt Block
Precision and the right tools are key to achieving a flawless illusion quilt block. Before you begin cutting and sewing, gather the following essential materials. Having everything prepared beforehand will ensure a smooth and enjoyable crafting experience, allowing you to focus on the creative process.
- Low-Volume Print or White Fabric: This fabric serves as the crucial background, providing the necessary contrast to make the “twist” illusion truly pop. A solid white or a very subtle, light-colored print will work best.
- Light Print Fabric: Choose a fabric that is noticeably lighter than your medium print, but still provides some visual interest. This will help define the edges of your twisting elements.
- Medium Print Fabric: This fabric will create the middle ground of your illusion, offering a distinct contrast to both the light and dark fabrics.
- Dark Print Fabric: The darkest fabric in your palette is vital for creating depth and shadow, enhancing the three-dimensional effect of the twist. Strong contrast with the background and light/medium fabrics is crucial here.
- Ruler: A clear acrylic quilting ruler, preferably with ¼-inch markings, is indispensable for accurate measuring and precise cutting of your fabric pieces. Accuracy is paramount in quilting, especially for illusion blocks where slight inaccuracies can disrupt the visual effect.
- Marking Pen, Pencil, or Chalk: Essential for drawing precise lines on your fabric, particularly for diagonal stitching guides. Ensure it’s erasable or disappears with heat/water.
- Scissors or Rotary Cutter and a Cutting Mat: While scissors are fine for small cuts, a rotary cutter paired with a self-healing cutting mat offers superior speed and precision, especially for cutting multiple layers or long strips.
- Needle and Thread: High-quality cotton thread that matches your fabric or a neutral color is recommended for strong, durable seams.
- Iron: An iron is not just for wrinkles; it’s a critical tool for pressing seams flat. Proper pressing ensures your blocks lie flat, match up accurately, and contribute to a professional finish.
- Sewing Machine: A reliable sewing machine with a ¼-inch presser foot will make stitching consistent and efficient, saving you time and effort.
- Pattern: The specific cutting instructions and diagrams are vital. Click here to download the Impossible Twist Illusion Quilt Block pattern from Tulip Square.
Crafting Your Impossible Twist Illusion Quilt Block: Step-by-Step Guide
With your materials ready and your pattern downloaded, it’s time to bring this stunning illusion to life. Follow these detailed steps meticulously, and you’ll soon have a breathtaking quilt block that truly seems to twist before your eyes.
Step 1: Preparing Your Fabric Pieces and Initial Corner Attachments
The foundation of a perfect quilt block lies in accurate preparation. Begin by downloading and printing the provided pattern from Tulip Square. Carefully cut all your fabric pieces to the exact sizes specified in the pattern. Precision at this stage is crucial for the illusion to work correctly.
Once your pieces are cut, take your main background square – this is typically the low-volume or white fabric. On the wrong side of this background square, use your marking pen, pencil, or chalk to draw a diagonal line from one corner to the opposite corner. This line will serve as your stitching guide.
Now, take one of your smaller white (or background) squares. Place it on the top-left corner of a large dark print square, aligning the raw edges precisely. Ensure that the right sides of both fabrics are facing each other. Stitch directly along the diagonal line you marked earlier. Repeat this process for another small white square, placing it on the bottom-right corner of the same large dark square. After stitching, trim off the excess fabric, leaving a ¼-inch seam allowance. Press these seams open or towards the darker fabric, ensuring they lie perfectly flat. This technique creates what quilters often call a “snowball” corner, a fundamental skill for many block designs.
Step 2: Constructing the Dimensional Units
This step introduces a clever technique that builds the critical dimensional aspect of the block. Take a medium print fabric square and place a dark print square directly on top, ensuring their right sides are facing each other and edges are perfectly aligned. Using your marking tool, draw a diagonal line from one corner to the opposite corner of the dark square.
Now, carefully stitch directly along this drawn diagonal line. Here’s a key part of the technique: stitch a second diagonal line exactly ½ inch away from your first stitching line, towards the outer edge of the dark square. This method allows you to create two identical units from a single set of squares. Once both diagonal lines are stitched, use your rotary cutter or scissors to cut precisely between the two stitching lines. This will yield two new units.
Press the seams nicely for both of these newly created units. Repeat this entire process one more time to make a total of four such dimensional units. Refer to the video tutorial or the pattern diagram to see how these three-block units are assembled. Carefully arrange them in the specified configuration, then stitch them together one at a time, pressing the seams flat as you go. This meticulous pressing after each seam prevents bulk and ensures your block remains crisp and accurate.
Step 3: Integrating Light Elements and Final Block Assembly
With your intermediate block units ready, it’s time to integrate the lighter elements that will further define the “twist” and complete the individual block. Take a light print fabric strip. On each side of this strip, place one background square and one medium print square, ensuring their right sides are facing the light print strip. You will be stitching these diagonally, similar to the method used in Step 1 for the snowball corners. Imagine you are attaching small corner triangles to the ends of a strip to create a new rectangular unit. Stitch these diagonally and trim the excess, pressing the seams flat.
Repeat this process one more time to create a total of two stip units. Now, carefully refer to the video or the detailed diagram in your pattern. You will place these newly created strip units on each side of the block units you pieced together in Step 2. Take your time to align all edges and seams perfectly. Stitch these final components together to form your complete Impossible Twist Illusion Quilt Block. Once all pieces are joined, press all the seams nicely, ensuring your finished block is perfectly flat and square. This final pressing not only tidies up your work but also locks in the shape of the block.
Beyond a Single Block: Creating Your Quilt Masterpiece
Congratulations! You’ve successfully created your first Impossible Twist Illusion Quilt Block. While a single block is a satisfying achievement, the true magic often unfolds when multiple blocks are assembled into a larger quilt top. The way you arrange these blocks can dramatically alter the overall illusion, creating new patterns and visual effects.
Consider experimenting with different layouts. A straight set will create a uniform grid of twisting elements, while setting the blocks “on point” (rotated 45 degrees) can introduce a dynamic diamond pattern. You might also incorporate sashing strips between your blocks to create visual breathing room or to highlight the individual blocks even further. Don’t be afraid to play with your completed blocks on a design wall or even on the floor to visualize various arrangements before committing to stitching them together.
Once your quilt top is assembled, the next steps involve adding borders (if desired), preparing your quilt sandwich with batting and backing fabric, and finally, quilting and binding. Each of these stages offers additional opportunities for creative expression, allowing you to personalize your quilt even further and turn it into a cherished heirloom.
*All image credit for this tutorial belongs to Tulip Square via YouTube. We highly recommend you follow and subscribe to her channel for more inspiring and detailed quilting tutorials! Her expertise and clear instructions are invaluable for both beginners and experienced quilters.
Your Journey into Illusion Quilting Begins Now!
The Impossible Twist Illusion Quilt Block is more than just a sewing project; it’s an opportunity to create something truly magical with fabric. By following these steps, you’ve not only crafted a beautiful block but also gained valuable skills in precision cutting, diagonal stitching, and meticulous pressing – all fundamental techniques that will serve you well in your future quilting endeavors. We encourage you to embrace the process, enjoy the creative freedom, and delight in the stunning optical illusion you’ve brought to life. Share your creations with fellow quilters, inspire others, and continue to explore the endless possibilities that quilting offers!