
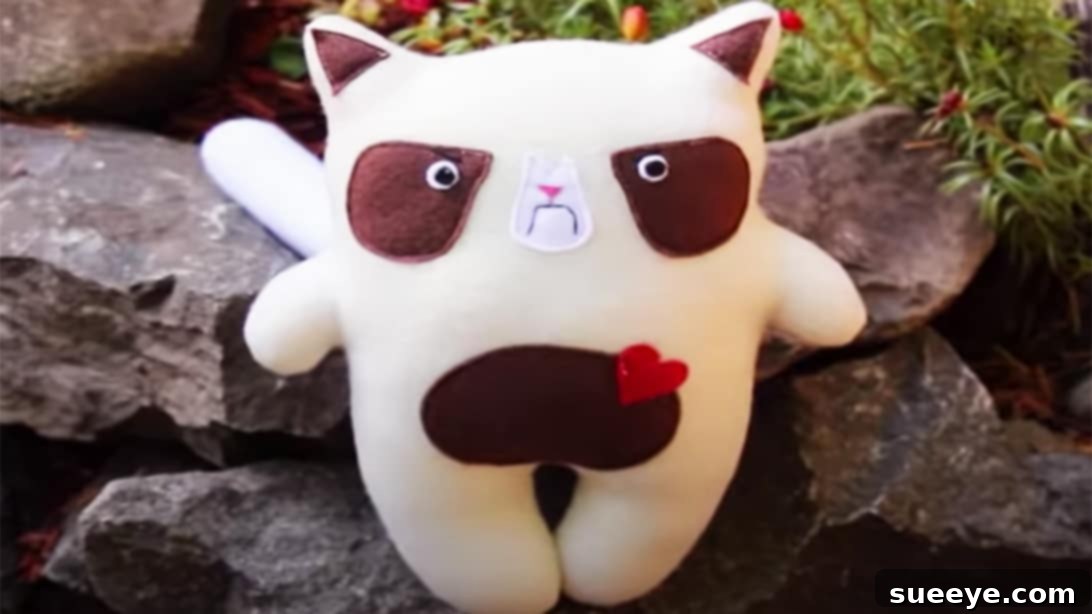
Craft Your Own Grumpy Cat Plushy: An Adorable DIY Sewing Project
For many, cats aren’t just pets; they’re cherished members of the family, bringing endless joy, quirky personalities, and a unique brand of love into our lives. Any true cat enthusiast will tell you that their feline companion often holds a special place, sometimes even above human relationships – and that’s perfectly okay! We adore cats in all their magnificent forms, from the sleek and graceful to the fluffy and, yes, even the perpetually grumpy.
If you’re a proud member of the cat-loving community, or simply someone who appreciates a good dose of internet meme nostalgia, then you’re in for a treat. This delightful DIY project allows you to create your very own stuffed animal inspired by the legendary Grumpy Cat. Shared with us by Claire’s DIY & Style, this plushy is not only incredibly cute but also surprisingly easy to make. The best part? You have the creative freedom to personalize it with your choice of fabrics, colors, and even expressions, making each Grumpy Cat truly unique!
Why Every Cat Lover Needs a Handmade Grumpy Cat Plushy
Grumpy Cat, officially known as Tardar Sauce, captured the hearts of millions with her distinctively downturned mouth and seemingly perpetual scowl. She became an internet sensation, embodying a relatable mood for many and bringing smiles despite her frown. While the original Grumpy Cat has sadly passed, her legacy lives on, and what better way to honor it than by creating a soft, cuddly tribute?
Making a plushy isn’t just a craft; it’s an act of creation, a way to bring a beloved character to life with your own hands. This project is perfect for beginners in sewing, offering straightforward steps that yield impressive results. Imagine the joy of holding your handmade Grumpy Cat, a tangible reminder of internet culture and your passion for felines. It makes an ideal gift for fellow cat enthusiasts, a charming decorative item for your home, or simply a comforting companion for those days when you feel a little grumpy yourself!
Essential Materials for Your Grumpy Cat Creation
Before diving into the fun of sewing, it’s crucial to gather all your materials. High-quality supplies will make the process smoother and ensure your finished plushy is durable and lovable. Here’s what you’ll need:
- Cat Pattern: This is the blueprint for your plushy. You can find free printable patterns online (often by searching “Grumpy Cat plushy pattern” or “cat stuffed animal pattern”) or even draw your own if you’re feeling artistic. A clear, well-defined pattern will be key to getting the iconic Grumpy Cat shape.
- Fleece Fabric: Fleece is an excellent choice for stuffed animals due to its softness, slight stretch, and anti-fray properties, which means less cleanup and easier sewing. Consider classic grey, black, or white for a traditional look, or get creative with vibrant colors or subtle patterns. You’ll need at least two contrasting colors for the body and facial features.
- Sharp Scissors: A good pair of fabric scissors is essential for clean, precise cuts. Avoid using them on paper, as this will dull the blades.
- Erasable Fabric Marker: This is a godsend for marking your fabric without leaving permanent traces. Chalk or disappearing ink pens are also great alternatives.
- Thread and Hand-Sewing Needle: While a sewing machine speeds things up, this project can absolutely be completed with hand stitching. Choose a strong polyester thread that matches your fabric colors for a seamless finish.
- Stuffing (Polyester Fiberfill): This is what gives your plushy its cuddly form. Polyester fiberfill is lightweight, washable, and retains its shape well. Ensure you have enough to make your Grumpy Cat plump and huggable.
- Pins: Sewing pins are incredibly useful for holding fabric pieces together before and during sewing, preventing shifting and ensuring accurate alignment.
- Optional: Sewing Machine: If you have one, a sewing machine can make the main body seams much quicker and more uniform. However, it’s not strictly necessary.
Step-by-Step Guide: How to Sew Your Grumpy Cat Plushy
Creating your Grumpy Cat plushy is a rewarding process, and breaking it down into manageable steps makes it even easier. Follow these directions carefully for the best results:
1. Prepare Your Workspace and Fabric
Before you begin, ensure your workspace is clean, well-lit, and provides ample space to lay out your fabric and pattern. Iron your fleece fabric if it has any significant creases, though fleece typically doesn’t wrinkle much. Lay your chosen fleece fabric flat, folding it in half with the right sides together. This ensures you cut two mirror-image pieces for the body simultaneously.
2. Trace and Precisely Cut Your Fabric Pieces
Position your cat pattern on top of the folded fleece fabric. Using your erasable fabric marker, carefully trace around the entire cat pattern. Precision here is key to achieving the desired shape. Once traced, cut out the fabric following your marked lines, remembering to leave a ¼-inch (approximately 0.6 cm) seam allowance all around the traced shape. This allowance is crucial for sewing and ensures your plushy retains its intended size. From the excess fleece, cut out two long, identical tail pieces. Next, using different colors of fleece (e.g., white or light grey for the tummy, black for eyes, pink for the nose, etc.), cut out the smaller pieces for the ears, eyes, nose, mouth, and tummy. Take your time with these details, as they define your Grumpy Cat’s iconic expression.
3. Assemble the Facial Features and Details
Now comes the fun part of bringing your Grumpy Cat to life! Take one of your main body pieces (this will be the front) and carefully arrange the smaller, cut-out pieces for the ears, eyes, nose, mouth, and tummy onto it. Experiment with their placement until you achieve the perfect Grumpy Cat expression. Once satisfied, use pins to securely hold each small piece in place. Now, using a needle and thread that matches the color of each small piece, carefully hand-sew them onto the front body piece. For the nose and the famously grumpy mouth, use pink and black threads respectively, ensuring your stitches are neat and secure. Double-knot the ends of your threads on the back to prevent unraveling. These details are what will give your plushy its unique character.
4. Construct the Body and Attach the Tail
Take one of your tail pieces and sew around its edges, leaving the base open. Now, grab the other main fleece cat fabric piece. On this piece (which will be the back), cut a small slit or opening at the position where the tail should be attached. Insert the sewn tail into this opening from the right side of the fabric, ensuring the right side of the tail is facing out. Securely sew the tail in place from the wrong side of the fabric. Next, place the two main body pieces (the front piece with features and the back piece with the tail attached) right sides together, aligning all edges carefully. Pin all around the perimeter, making sure everything stays aligned. Sew all the way around the pinned edges, either by hand or machine, but remember to leave a 2-3 inch opening at the bottom of the plushy. This opening will be used for turning and stuffing.
5. Stuff Your Plushy to Perfection
Once you’ve sewn the body pieces together, it’s time to turn your Grumpy Cat right side out. Carefully reach into the opening at the bottom and gently pull the fabric through, coaxing out all the curves and corners (especially the ears!). Use a blunt object like a chopstick or the eraser end of a pencil to push out the seams and get nice, defined edges. Now, begin stuffing your plushy with polyester fiberfill. Start by pushing small clumps of stuffing into the extremities – the ears, the tips of the feet, and the tail – ensuring they are firmly filled. Then, gradually fill the rest of the body, working your way around and ensuring even distribution. The key is to stuff it firmly enough to be plump and hold its shape, but not so tightly that it feels hard. Aim for a cuddly, squeezable consistency.
6. The Finishing Touches and Your First Hug
With your Grumpy Cat fully stuffed, it’s time to close the opening. Using a needle and thread that matches the body fabric, carefully hand-stitch the opening closed using a ladder stitch (also known as an invisible stitch). This stitch is perfect for closing openings on stuffed items as it creates a nearly invisible seam. Once the opening is securely closed, admire your creation! Your very own Grumpy Cat plushy is now complete. The final, and perhaps most important, step is to give your new grumpy friend a huge, warm hug. You’ve brought a piece of internet history to life with your crafting skills!
Personalize Your Grumpy Cat: Tips for Customization
While the classic Grumpy Cat is iconic, there’s no limit to how you can personalize your plushy:
- Fabric Choices: Experiment with different textures! Beyond fleece, consider soft minky fabric for extra cuddliness, or even a subtle patterned cotton for a unique look.
- Expressions: Why stop at grumpy? With minor adjustments to the mouth and eye shapes, you could create a happy cat, a sleepy cat, or even a surprised cat plushy using the same basic pattern.
- Accessories: Add a tiny bow tie, a felt crown, or a small embroidered heart to give your Grumpy Cat a distinct personality.
- Size Variations: Resize your pattern before printing to make a miniature Grumpy Cat keychain or an oversized, huggable companion.
- Weighted Fill: For an extra comforting touch, consider adding a small bag of poly pellets or rice (sealed securely in a separate bag) to the bottom of your plushy for a bit of weight.
Conclusion: Your New Grumpy Friend Awaits!
Congratulations! You’ve successfully embarked on a delightful crafting journey and created a charming Grumpy Cat plushy. This project is a testament to the joy of DIY, allowing you to produce something unique, meaningful, and utterly adorable with your own two hands. Whether your Grumpy Cat finds a home on your bed, desk, or becomes a treasured gift, it’s sure to bring a smile (or a knowing scowl) to anyone who sees it.
We hope you enjoyed this sewing adventure. Don’t hesitate to share your finished Grumpy Cat creations with us and fellow crafters online! Happy sewing!