
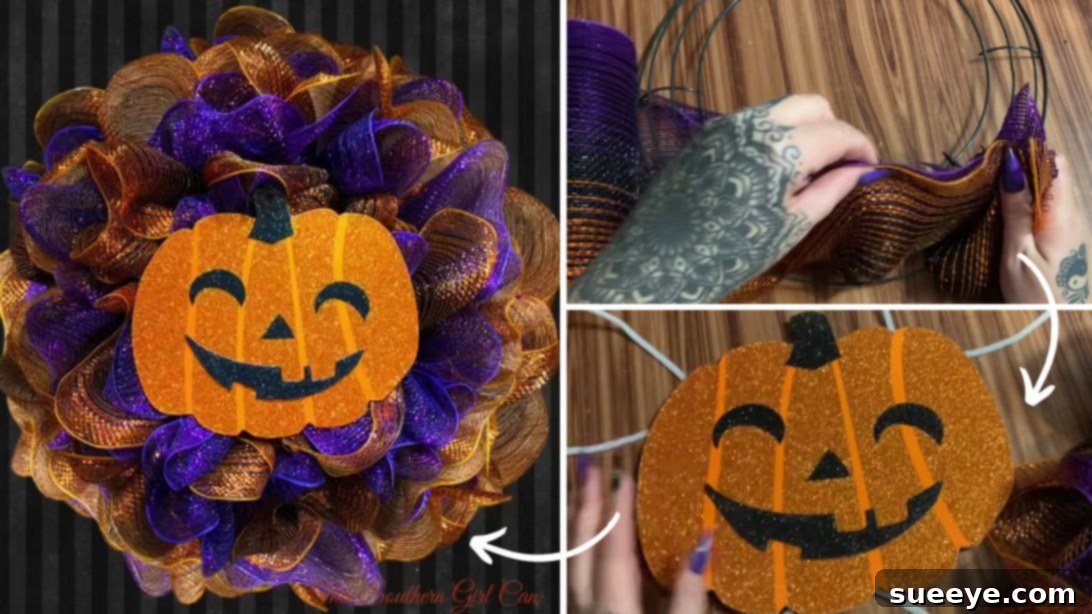
Craft a Spooktacular Halloween Pull-Through Mesh Wreath: An Easy DIY Guide
Halloween is a time for enchanting decorations, and what could be better than creating your own? If you’re searching for a delightful yet straightforward DIY project to add a touch of spooky charm to your home, look no further. This ingenious pull-through mesh wreath idea, expertly presented by This Southern Girl Can on YouTube, is an absolute game-changer. It’s perfectly tailored for anyone eager to craft a beautiful Halloween accent without the fuss of complicated steps or extensive material lists. Designed for simplicity and speed, this project can be completed in mere minutes, requiring only a handful of readily available and affordable supplies—many of which you can easily find at your local Dollar Tree. Embrace the spirit of the season and give this charming DIY wreath a try; it’s guaranteed to be a captivating display on your front door or anywhere in your home.
Creating your own seasonal decor offers immense satisfaction, and this particular Halloween wreath project truly embodies the joy of DIY. Forget intricate designs and lengthy crafting sessions; this tutorial focuses on delivering maximum visual impact with minimal effort. It’s an ideal craft for beginners, busy individuals, or even a fun activity to share with family. Imagine the compliments you’ll receive when guests see your unique, handmade decoration, knowing it was crafted with love and creativity, not a hefty price tag. Let’s dive into how you can bring this festive decoration to life and infuse your space with the spirit of Halloween!
Why Choose This Easy DIY Halloween Wreath Project?
In a world where holiday decorations can often be expensive and time-consuming to create, this DIY pull-through mesh wreath stands out as a beacon of simplicity and affordability. Here’s why this project is an absolute must for your Halloween crafting list:
- Unmatched Simplicity: The “pull-through” technique is incredibly intuitive, making it accessible for crafters of all skill levels, even those who consider themselves beginners. There’s no complex wiring, weaving, or extensive cutting involved.
- Budget-Friendly Materials: The reliance on Dollar Tree supplies means you can create a high-quality, festive decoration without breaking the bank. This aspect is particularly appealing for those looking to decorate on a budget or wanting to make multiple wreaths for different areas.
- Quick Completion: Unlike projects that might take hours or even days, this wreath can be assembled in a matter of minutes once you have your materials ready. It’s perfect for last-minute decorating or for anyone with a busy schedule.
- Customizable Potential: While the tutorial features a glittered pumpkin, the mesh base and the attachment method open up a world of possibilities for personalization. You can easily adapt it to match your specific Halloween theme or color palette.
- Rewarding Experience: There’s a special pride that comes with displaying handmade decor. This project offers that satisfaction without the frustration often associated with more intricate crafts.
- Family-Friendly Activity: The straightforward nature of the steps makes it a fantastic project to do with older children, fostering creativity and providing a fun bonding experience for the whole family.
Embrace the spirit of handmade holidays with a project that promises delightful results and a stress-free crafting journey.
Materials You’ll Need for Your Halloween Wreath
One of the many appealing aspects of this DIY Halloween wreath is its minimal and budget-friendly material list. Most items can be sourced from a Dollar Tree store, making it incredibly accessible. Here’s a closer look at what you’ll need:
- Wire Wreath Frame: This forms the foundational structure of your wreath. Dollar Tree typically offers various sizes, but a standard round frame is perfect. You can choose different sizes to create wreaths of varying dimensions. The frame’s wires will be essential for the pull-through technique.
- 10-inch Mesh (Deco Mesh): This is the star of your wreath! Look for rolls of decorative mesh, often referred to as deco mesh. A 10-inch width is ideal for creating voluminous ruffles. Colors like orange, black, purple, or even a classic black and white stripe will give your wreath that festive Halloween vibe. You might want to grab two rolls for an extra full look, depending on the roll length.
- Cable Ties (Zip Ties): These small but mighty tools are crucial for securely attaching the mesh to the wire frame, ensuring your ruffles stay in place. Clear or black cable ties tend to blend in seamlessly.
- Scissors: A good pair of sharp scissors is essential for cleanly cutting the mesh and trimming excess cable tie tails. Fabric scissors or craft scissors work best to prevent fraying.
- Dollar Tree Glittered Pumpkin Decoration: This provides the perfect focal point for your spooky creation. Dollar Tree offers a fantastic array of seasonal embellishments. If a pumpkin isn’t your preference, consider a glittered skull, a spooky sign, a bat, or even a plush ghost figure. The key is to choose something relatively lightweight that can be easily attached.
- Pipe Cleaners: These flexible wires covered in fuzzy material are incredibly versatile for crafting. You’ll use them to firmly attach your central decoration to the wreath frame. Choose colors that blend with your mesh or the decoration, such as black or orange.
- Hot Glue Gun and Glue Sticks: A hot glue gun is indispensable for securing any additional embellishments or ensuring that your central decoration is extra stable. Always exercise caution when using a hot glue gun to avoid burns.
With these simple items in hand, you’re ready to embark on your Halloween crafting adventure!
Step-by-Step Directions: Crafting Your Easy Halloween Pull-Through Wreath
Let’s transform these basic materials into a show-stopping Halloween decoration. Follow these detailed steps to create your very own pull-through mesh wreath.
Step 1: Building the Voluminous Mesh Base
This initial stage is where the magic of the “pull-through” technique truly shines, creating the fluffy, full base of your wreath. Begin by laying your wire wreath frame on a flat, clean surface. Take one end of your 10-inch mesh roll. You’ll want to pull a small section of the mesh, perhaps about 4-6 inches, under the lower wire of the bottom section of your wreath frame. Immediately after, pull another small section over the upper wire of the same bottom section. Carefully match the edges and sides of these two sections of mesh together, ensuring they are aligned. Hold this initial ‘cinched’ section tightly with one hand.
Now, with your other hand, begin to carefully pull loops of the mesh through the wreath frame. You’ll be creating a series of beautiful, voluminous ruffles. The key is to consistently pull loops of mesh through from the back of the frame to the front, creating a gathered effect. Work your way around the entire wreath frame, pushing the previously made ruffles together to ensure a dense, full appearance. The more mesh you pull through and ruffle, the thicker and more luxurious your wreath will look. Continue this process until the entire wire frame is completely covered with your vibrant mesh ruffles. Once you’ve reached the starting point and the frame is fully adorned, trim off any excess mesh, leaving a small tail. To secure the ends and prevent unraveling, use a cable tie to firmly fasten the mesh tails to the wire frame. Snip off the extra length of the cable tie to create a neat finish.
Step 2: Adorning Your Wreath with Spooky Charm
With your mesh base complete, the next exciting step is to add the central decoration that truly brings your Halloween wreath to life. First, if you haven’t already, ensure all excess tails from the cable ties used in Step 1 are snipped off cleanly for a polished look. If any mesh ruffles appear a bit flat, gently fluff them out to maximize volume and create an inviting texture. Set the mesh base aside for a moment.
Now, take your chosen glittered pumpkin decoration (or alternative embellishment). Flip it over to expose the back. This is where the pipe cleaners come into play for secure attachment. Carefully hot glue the middle section of two pipe cleaners onto each of the upper corners of your pumpkin decoration. For added stability and to prevent the pumpkin from flopping, also hot glue the middle of one pipe cleaner to the bottom center of the decoration. Allow the hot glue to cool and set completely, ensuring a firm bond between the pipe cleaners and the pumpkin.
Once the glue is dry, carefully position your pumpkin decoration at the very center of your newly crafted mesh wreath. Thread the ends of the pipe cleaners through the mesh and around the wire wreath frame from the front to the back. Twist the pipe cleaner ends tightly at the back of the frame, securely fastening the pumpkin in place. Ensure it’s snug and doesn’t wobble. Trim any excess pipe cleaner for a neat finish, and just like that, your easy, dazzling DIY Halloween pull-through wreath is complete and ready to enchant!
Customization and Personalization Ideas for Your Wreath
While the glittered pumpkin offers a classic Halloween look, the beauty of DIY is the ability to personalize! Here are some ideas to make your wreath uniquely yours:
- Alternative Central Embellishments: Instead of a pumpkin, consider a glittered skull, a whimsical ghost figure, a spooky “Happy Halloween” sign, or even a large, faux spider. You could also hot glue a cluster of smaller, themed ornaments like miniature bats, witches’ hats, or candy corn.
- Color Schemes Beyond Orange & Black: While traditional, you can explore other Halloween palettes. Think deep purples with greens, classic black and white, or even a moody gray with metallic accents for a gothic vibe. Using two different mesh colors can create a dynamic, layered look.
- Add Festive Ribbons: Weave in wired ribbons with spooky patterns (like spiders, cobwebs, or chevron stripes) or attach a large, matching bow at the top or bottom of your wreath. The wired edges of the ribbon will help it hold its shape.
- Integrate LED Lights: For an extra magical glow, entwine a string of battery-operated LED fairy lights through the mesh ruffles. Choose orange, purple, or warm white lights to illuminate your wreath, especially enchanting in the evening.
- Faux Flora and Foliage: Incorporate some artificial fall leaves, black roses, or small, spooky branches to add texture and depth.
- Spider Webs and Plastic Spiders: Drape some stretchy faux cobwebs across your wreath and nestle a few plastic spiders into the mesh for a truly creepy effect.
- Themed Accents: If you have a specific theme (e.g., haunted mansion, witch’s brew, friendly monster), choose embellishments that align with it. Mini cauldrons, potion bottles, or tiny broomsticks can be charming additions.
Don’t be afraid to experiment with different textures and elements. The mesh base is incredibly forgiving, allowing you to attach a wide variety of decorations with hot glue or additional pipe cleaners.
Where to Display Your Spooktacular Creation
Once your easy DIY Halloween pull-through mesh wreath is complete, the next exciting step is deciding where to showcase your crafting prowess! This versatile piece of decor can enhance numerous spots around your home, inside and out. Here are some popular and creative ideas for displaying your spooky masterpiece:
- Front Door: The most classic spot! A Halloween wreath on your front door instantly welcomes trick-or-treaters and guests with festive cheer. Just ensure it’s protected from heavy rain if your porch isn’t covered.
- Entryway or Foyer: If your front door isn’t suitable, hanging it in your entryway sets a welcoming, spooky tone as soon as visitors step inside.
- Above the Mantelpiece: A wreath makes a fantastic focal point above a fireplace. Pair it with other Halloween-themed trinkets, candles, or garlands for a stunning display.
- Windows: Hang smaller versions of the wreath in your windows, visible from both inside and out. This creates a cohesive look across your home.
- Interior Walls: Use it to adorn a blank wall in your living room, dining room, or even a kid’s bedroom for an instant dose of Halloween spirit.
- On a Mirror: Hanging a wreath over a mirror can create a beautiful reflection, making the decoration appear even larger and more impactful.
- As a Centerpiece: For larger wreaths, you can lay them flat on a dining table with a pumpkin or a cluster of candles in the center to create a unique table centerpiece.
- Gate or Fence: If you have a garden gate or a fence, a well-secured wreath can extend your Halloween decorations beyond your immediate home.
Remember to consider the size and weight of your wreath when choosing a hanger. For outdoor display, especially if exposed to elements, ensure all embellishments are securely attached to withstand wind and moisture. With so many options, your handmade Halloween wreath is sure to be a beloved addition to your seasonal decor!
Essential Tips for a Flawless DIY Wreath Project
To ensure your crafting experience is as enjoyable and successful as possible, here are a few expert tips to keep in mind:
- Prepare Your Workspace: Lay out all your materials and cover your work surface with an old tablecloth or newspaper to catch any glitter or stray mesh fibers. This makes clean-up much easier.
- Handle Mesh Gently: Deco mesh can sometimes fray, so try to handle it carefully, especially when cutting. If you encounter fraying, a touch of clear fabric glue or clear nail polish on the edges can help seal them.
- Achieve Uniform Ruffles: Consistency is key for a polished look. Try to make each “pull-through” loop of mesh roughly the same size and fullness. Don’t be afraid to adjust and fluff as you go.
- Secure Everything Tightly: Use plenty of cable ties and ensure they are pulled snug. For embellishments, twist pipe cleaners tightly and use hot glue liberally (but neatly) to prevent anything from falling off.
- Safety First with Hot Glue: A hot glue gun can cause burns. Always use it with caution, keep your fingers away from the nozzle, and have a safe resting place for the gun when not in use.
- Don’t Be Afraid to Experiment: While following the steps is helpful, feel free to put your own creative spin on it. Try different mesh colors, combine multiple types of embellishments, or experiment with unique ribbon placements.
- Shop Smart at Dollar Tree: Take advantage of the seasonal aisles at Dollar Tree. They often have a rotating selection of unique and budget-friendly decor pieces that are perfect for wreath embellishments.
- Step Back and Evaluate: Periodically step back from your work to get a full view of your wreath. This helps you identify any areas that need more fluffing, tightening, or additional embellishments.
With these tips, you’re well-equipped to create a stunning DIY Halloween wreath that will impress everyone!
Conclusion: Your Easiest DIY Halloween Pull-Through Wreath Tutorial Awaits!
As you can see, crafting a captivating Halloween decoration doesn’t have to be a daunting task. This easy DIY pull-through mesh wreath offers a fantastic combination of simplicity, affordability, and creative satisfaction. Thanks to the brilliant guidance from This Southern Girl Can, you now have all the tools and knowledge to transform basic Dollar Tree materials into a truly enchanting piece of seasonal decor.
Whether you’re looking to add a welcoming touch to your front door, a festive accent to your mantel, or a unique decoration to any space in your home, this wreath project is a perfect choice. It’s a wonderful way to express your creativity, embrace the festive spirit of Halloween, and even engage the whole family in a fun crafting session. So gather your materials, follow these straightforward steps, and get ready to display a handmade decoration that’s sure to garner compliments. Don’t forget to check out more amazing content from “This Southern Girl Can” via YouTube for endless crafting inspiration!
*These inspiring images are all credited to This Southern Girl Can via YouTube. Be sure to explore her other creative content and subscribe for more fantastic DIY ideas!