
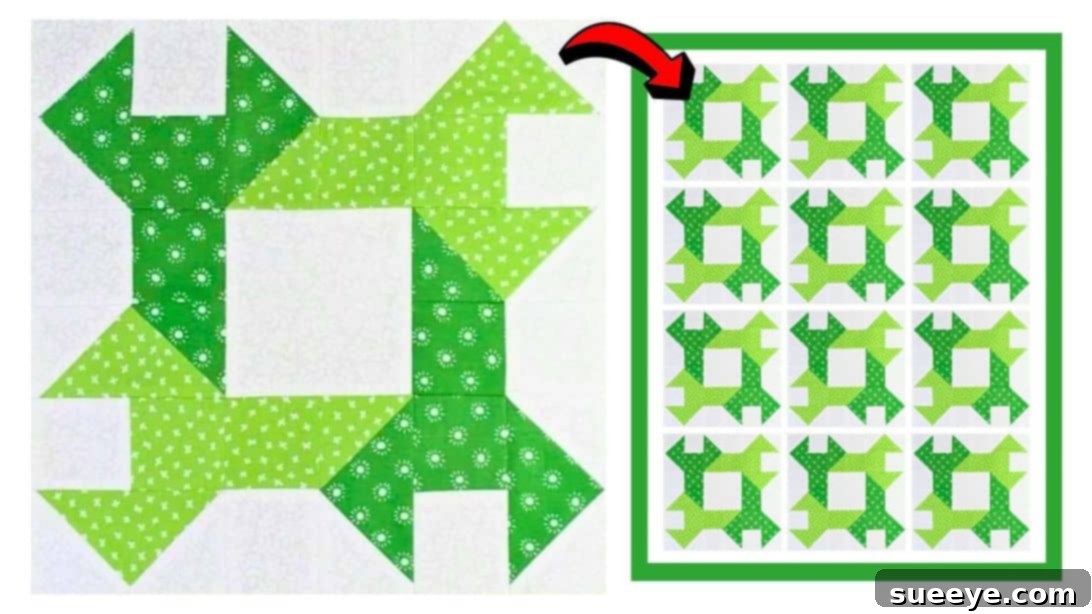
Master the Crab Claws Quilt Block: An Easy-to-Follow Tutorial with Free Pattern
Embark on an exciting quilting journey with the captivating Crab Claws Quilt Block! If you’re searching for a project that’s both engaging and delightfully simple, look no further. This stunning block, expertly showcased by Carol Thelen on YouTube, is a fantastic choice for quilters of all skill levels, from eager beginners to seasoned enthusiasts. What makes this design particularly appealing is its elegant simplicity, requiring just three different fabrics to achieve a striking visual impact—a characteristic I personally favor for its ability to create cohesive and beautiful quilts without overwhelming choices.
The Crab Claws Quilt Block offers a unique blend of geometric precision and flowing design, making it a versatile addition to any quilting project. Whether you envision a large, comforting quilt for your living room, a charming table runner, or a set of decorative throw pillows, this block lays the perfect foundation. Its straightforward construction means you can quickly build confidence in your quilting skills while producing a truly rewarding piece. Furthermore, a handmade quilt or quilted item crafted with this block makes an incredibly thoughtful and cherished gift for a loved one. Dive into this tutorial, download the free pattern, and prepare to fall in love with the artistry of the Crab Claws Quilt Block.
Essential Materials for Your Crab Claws Quilt Block
Gathering your materials is the first exciting step in any quilting project. For the Crab Claws Quilt Block, you’ll primarily need three distinct fabrics to create the depth and contrast that define this design. Precision in cutting and sewing is key to a beautiful finish, so ensure your tools are sharp and reliable. Here’s a comprehensive list of what you’ll need:
- Dark Print Fabric: This will be one of your primary contrast fabrics, providing definition to the “claws.” Choose a print that complements your overall color scheme.
- Light Print Fabric: Your second contrast fabric, creating visual interest against the dark print and background. A lighter print often adds brightness to the block.
- Background Fabric: This fabric ties the block together, allowing the “claws” to stand out. A solid or subtle tone-on-tone fabric works wonderfully here.
- Marking Pen, Pencil, or Chalk: Essential for transferring pattern lines and marking sewing guides onto your fabric. Ensure it’s erasable or disappears with heat/water.
- Ruler: A sturdy quilting ruler (preferably clear acrylic) is indispensable for accurate measuring and straight cuts.
- Scissors or Rotary Cutter and a Cutting Mat: A rotary cutter is highly recommended for speed and precision, especially when working with multiple fabric layers. Always use it with a self-healing cutting mat for safety and to protect your surfaces.
- Needle and Thread: High-quality cotton thread that matches your fabric or is a neutral color (like white or grey) is ideal for quilting.
- Iron, for pressing: A good iron is your best friend in quilting! Pressing seams after each step ensures flat, crisp blocks and accurate alignment.
- Sewing Machine: A reliable sewing machine with a quarter-inch seam allowance foot will make the piecing process smooth and consistent.
- Free Pattern: Don’t forget to download the dedicated pattern for precise cutting instructions and block assembly diagrams. Click here to download the free Crab Claws Quilt Block pattern.
Step-by-Step Directions to Create Your Crab Claws Quilt Block
Crafting the Crab Claws Quilt Block is a rewarding process that builds upon fundamental quilting techniques. Follow these detailed instructions to assemble your stunning blocks with ease and precision. Remember, careful pressing and accurate seam allowances are crucial for a professional finish.
Step 1: Crafting Your Flying Geese Units with Precision
The flying geese unit is a cornerstone of many quilt designs, and it forms the distinctive “claws” in this block. Begin by referring to your downloaded pattern for specific cutting dimensions for your fabric pieces. You’ll need rectangles (for the “goose”) and squares (for the “sky” triangles). Cut your dark print, light print, and background fabrics according to these measurements. Once cut, carefully sort your fabric pieces into the designated units for your flying geese construction. You’ll be assembling four distinct flying geese units for each Crab Claws block, which will later be arranged in pairs.
To construct a flying geese unit using the “stitch and flip” method, take one rectangular “goose” piece and two smaller square “sky” pieces. Position one “sky” square on top of one corner of the “goose” rectangle, aligning the raw edges precisely. Using your marking tool, draw a diagonal line from one corner of the square to the opposite corner. This line will serve as your sewing guide. Now, stitch directly along this marked line. After stitching, trim the excess fabric, leaving a ¼-inch seam allowance. Then, carefully press the sewn triangle open, ensuring the seam is flat. Pressing after each seam is vital for crisp, accurate blocks.
Next, repeat this process with the second “sky” square on the opposite corner of the same “goose” rectangle. Draw your diagonal line, stitch, trim, and press open. The goal is to create a perfect rectangle with two contrasting triangles on either side of the main “goose” fabric. Ensure your ¼-inch seam allowance is consistent throughout these steps, as it directly impacts the final size and accuracy of your block. Continue these precise steps until you have created all the necessary flying geese units, taking your time with each one to ensure neat and even results.
Step 2: Assembling Your Crab Claws Quilt Block
With your flying geese units prepared, it’s time to bring the Crab Claws design to life! For each complete block, you will typically need a specific number of flying geese units (the pattern will specify, but usually two pairs are used for a total of four, as implied by the previous step). Set your completed flying geese units aside for a moment. Now, focus on the smaller square components of the block. According to the pattern diagram and as often demonstrated in the accompanying video tutorial, you will pair the small print squares with the small background squares. Place them right sides together, aligning all edges carefully, and stitch them together with a consistent ¼-inch seam allowance.
Once stitched, press these square pairs open. Again, proper pressing is key to ensuring your blocks lie flat and your seams are neatly nested. Continue this process until all your small square pairs are stitched and pressed. These paired squares, along with your flying geese units, form the individual components of your Crab Claws block. Now comes the exciting part: laying out your block!
Refer closely to the diagram provided in your free pattern. This diagram is indispensable for correctly arranging your flying geese units and square pairs to form the iconic Crab Claws design. Pay attention to the orientation of your flying geese units—they create the “claws” effect when positioned correctly. Once you are satisfied with your layout, begin stitching the block units together, working row by row. This modular approach helps maintain accuracy. Stitch the units within each row together first, carefully matching all seams and using pins where necessary to prevent shifting. Always use that consistent ¼-inch seam allowance.
After completing each row, press the seams open or to one side, depending on what works best for reducing bulk and allowing seams to nest. Once all rows are assembled and pressed, it’s time to sew the rows to each other. Align your rows carefully, nesting the seams where they meet, and use plenty of pins to secure them before stitching. Sew the rows together, again maintaining your precise ¼-inch seam allowance. Finally, give your finished Crab Claws quilt block a good, final press. This not only flattens the block but also helps to “set” all the stitches, giving your block a crisp, professional appearance. Congratulations, you’ve just created a beautiful Crab Claws Quilt Block!
Tips for Quilting Success with the Crab Claws Block
To ensure your Crab Claws Quilt Blocks turn out beautifully, consider these helpful tips:
- Accurate Cutting is Paramount: The foundation of any successful quilt block is precise cutting. Use a sharp rotary cutter, a non-slip ruler, and a reliable cutting mat. Double-check your measurements before making any cuts.
- Consistent Seam Allowance: A perfect ¼-inch seam allowance is non-negotiable in quilting. Invest in a ¼-inch presser foot for your sewing machine, or mark a guide on your machine’s throat plate. Even a tiny deviation can throw off your block’s dimensions.
- Pressing, Not Ironing: When quilting, we “press” seams, rather than “ironing” them back and forth. Pressing involves lifting the iron and placing it down firmly, which prevents stretching and distorting your fabric. Press seams open or to one side consistently throughout your project.
- Chain Piecing: For efficiency, especially when making multiple blocks, consider chain piecing. This involves sewing multiple units in a continuous chain without cutting threads between them, saving time and thread.
- Fabric Selection: While only three fabrics are required, choose them thoughtfully. High-contrast fabrics will make your Crab Claws design pop, while a more subtle palette can create a soft, elegant look. Consider how your chosen fabrics will interact.
- Watch the Video: Carol Thelen’s video tutorial provides excellent visual guidance. Watching the process can clarify any steps and offer valuable insights into her techniques.
Unleash Your Creativity: Beyond the Block
Once you’ve mastered the Crab Claws Quilt Block, the possibilities are endless! Create a series of blocks to form a stunning full-sized quilt, perfect for snuggling on the sofa. Experiment with different color combinations – imagine a vibrant, rainbow-colored Crab Claws quilt, or a sophisticated two-tone design. These blocks also work wonderfully as individual elements for smaller projects, such as a stylish placemat, a cozy throw pillow cover, or even a charming tote bag. Let your imagination guide you and personalize your creations to reflect your unique style.
This project is more than just sewing fabric; it’s about creating something beautiful with your own hands, honing your skills, and enjoying the meditative process of quilting. With the free pattern and these detailed instructions, you have everything you need to successfully create the delightful Crab Claws Quilt Block. Get ready to transform your fabric stash into a work of art that will be cherished for years to come!
All image credit belongs to Carol Thelen via YouTube. Follow and subscribe to her channel for more inspiring quilting tutorials!