
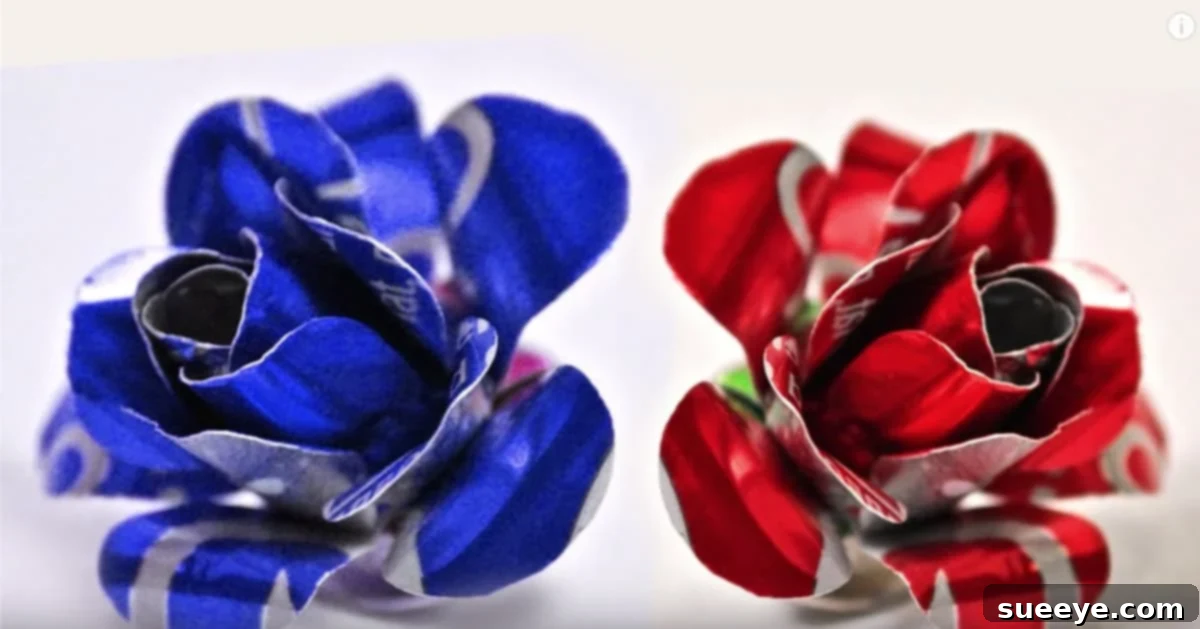
Transform Ordinary Cans into Exquisite Roses: The Ultimate DIY Upcycling Guide
In a world increasingly conscious of its environmental footprint, finding creative ways to reduce waste and embrace sustainability has become more important than ever. What if we told you that the discarded soda or beer can sitting in your recycling bin holds the potential to become a beautiful, lasting piece of art? Welcome to the wonderful world of aluminum can roses – a captivating DIY project that blends artistic expression with eco-consciousness.
This comprehensive guide will not only walk you through the simple yet rewarding process of crafting stunning roses from aluminum cans but will also inspire you with diverse ideas for personalization and display. Whether you’re a seasoned crafter or a complete beginner looking for a unique, eco-friendly hobby, transforming mundane cans into vibrant, metallic blossoms is an incredibly satisfying journey. Get ready to unleash your creativity, contribute to a greener planet, and perhaps even craft a memorable gift that will be cherished for years to come.
Why Upcycle Aluminum Cans? The Eco-Friendly & Creative Choice
Aluminum is one of the most recyclable materials on the planet, with nearly 75% of all aluminum ever produced still in use today. However, traditional recycling processes, while vital, still consume energy. Upcycling, on the other hand, takes materials and transforms them into something new and valuable, often reducing the need for new raw materials and further processing. Crafting roses from aluminum cans is a prime example of effective upcycling, offering numerous benefits:
- Environmental Impact: By diverting cans from landfills and giving them a new life, you actively reduce waste and conserve natural resources. This practice significantly lowers the demand for virgin aluminum production, which is an energy-intensive process.
- Energy Saving: Creating a new item from an existing one uses significantly less energy than manufacturing from scratch. Upcycling a can into art requires only your manual effort and a few tools, contrasting sharply with the immense energy needed to melt down and re-form aluminum.
- Cost-Effective: The primary material – empty aluminum cans – is essentially free! This craft requires minimal investment beyond basic tools you might already own or can acquire affordably, making it a budget-friendly hobby.
- Creative Expression: It’s an excellent outlet for creativity, allowing you to experiment with different can colors, shapes, and embellishments. Each can offers a unique palette and texture, leading to distinct and personalized creations.
- Unique Gifts & Decor: Handmade items carry a special charm and convey thoughtfulness. These metallic roses make incredibly unique gifts or distinctive decorations for your home, garden, or special events, standing out from mass-produced items.
- Skill Development: This project is a fantastic way to develop fine motor skills, patience, and problem-solving abilities. It encourages precision and careful handling, improving dexterity with each rose you craft.
Embracing this craft means you’re not just making a rose; you’re making a statement about sustainable living and the beauty that can be found in repurposed materials. Each rose you create is a small victory for the environment and a testament to human ingenuity, transforming everyday waste into extraordinary art.
Essential Tools and Materials for Your Aluminum Can Rose Project
Before you dive into the crafting process, ensure you have all the necessary items readily available. Most of these can be found around your home or at a local craft or hardware store, making this an accessible project for almost anyone. Prioritizing safety is crucial when working with metal, so always gather your protective gear first.
- Empty Aluminum Cans: Your beverage of choice! Soda cans (like Coke, Pepsi, Sprite), beer cans (Bud Light, Budweiser, Miller), or even aluminum coffee cans work perfectly. Ensure they are thoroughly rinsed with soap and water and dried completely to prevent stickiness or mold.
- Metal Scissors or Tin Snips: Heavy-duty scissors specifically designed for cutting metal are crucial for safety and ease. Regular craft scissors will dull quickly, struggle with the metal, and may not cut cleanly, increasing the risk of injury.
- Protective Gloves: Absolutely essential for protecting your hands from the surprisingly sharp edges created during the cutting and shaping process. Choose sturdy work gloves or thick gardening gloves.
- Safety Glasses: Recommended to protect your eyes from any small, flying metal fragments that might occur during cutting or shaping.
- Pliers: Needle-nose pliers or round-nose pliers are incredibly useful for intricate shaping of petals, curling edges, and securely handling wire if you choose to add stems.
- Strong Adhesive (Optional but Recommended): Super glue, E6000, or a hot glue gun can be used to secure parts of the rose, especially the base, to ensure it holds its shape. This is particularly helpful if you’re creating pieces that will be handled frequently.
- Floral Wire or Sturdy Craft Wire (Optional): For creating stems if you want your roses to stand upright in a vase or be arranged in a bouquet. Different gauges of wire can offer varying levels of support and flexibility.
- Awl or Small Nail (Optional): Useful for punching tiny, clean holes if you plan to string your roses together or attach them to other elements, as in our story below.
- Marker: A permanent marker can be helpful for drawing guidelines on the can before cutting, especially for beginners.
Always prioritize safety when working with aluminum cans. The edges can be surprisingly sharp and unforgiving, so proceed with caution, maintain focus, and wear your protective gear throughout the entire process to prevent cuts and scrapes.
Step-by-Step Guide: Crafting Your Dazzling Aluminum Can Rose
This detailed tutorial will guide you through each stage of transforming a simple can into an elegant rose. While the process is straightforward, a little patience, careful handling, and attention to detail will yield the most beautiful and durable results. Follow these steps for a successful crafting experience.
1. Prepare Your Can Safely
Begin by thoroughly rinsing your empty aluminum can with warm water and soap to remove any sticky residue from its contents. Allow it to air dry completely, both inside and out. This step is crucial for cleanliness and to prevent mold or odors. Once the can is fully dry, it’s time to don your protective gear. Put on your sturdy protective gloves and safety glasses. Remember, safety is paramount when working with metal, as edges can become unexpectedly sharp.
2. Remove the Top and Bottom of the Can
Using your metal scissors or tin snips, carefully cut around the top rim of the can, just below the opening. Aim for a clean, even cut. Then, repeat this precise process for the bottom of the can, cutting just above the base seam. You should now be left with a clean, open-ended cylindrical aluminum tube. Dispose of the removed top and bottom pieces safely, as their edges can be very sharp; place them immediately into a designated safe waste container.
3. Create a Flat Aluminum Sheet
With your aluminum cylinder ready, make a single vertical cut down its side, from one open end to the other. This cut will allow you to unroll and flatten the cylinder into a rectangular sheet of aluminum. Gently press it flat on a sturdy, protected surface (like a cutting mat or a piece of cardboard). You can use a ruler or the edge of a table to help crease and flatten it perfectly, removing any remaining curvature. Ensure the sheet is as flat as possible, as this will make the next cutting step much easier.
4. Begin the Spiral Cut
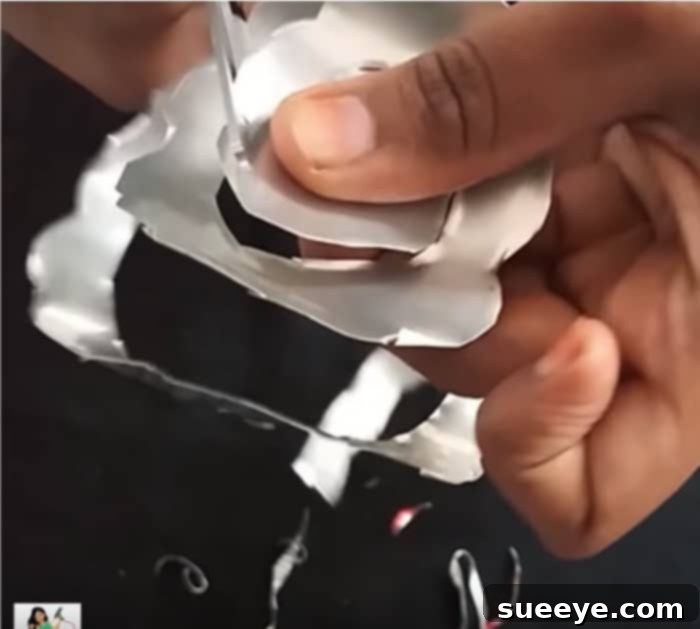
Now comes the creative and transformative part! Starting from one of the outer corners of your flat aluminum sheet, begin cutting a continuous spiral towards the center of the sheet. Aim for a consistent width for your strip, typically about 1/2 to 3/4 inch (1.2 to 2 cm) wide. Don’t worry if it’s not perfectly even; slight variations can actually add a natural, organic character to your finished rose. Continue cutting in a smooth, fluid spiral until you reach the very center of your sheet. At the center, leave a small circular tab, about the size of a dime or nickel – this will become the sturdy base or heart of your rose, providing stability.
5. Scallop and Shape the Edges
With your long, spiral strip created, it’s time to form the distinct shape of the petals. Carefully, and still wearing your protective gloves, use your scissors to snip small, rounded curves or “scallops” along one entire edge of your spiral strip. These scallops will form the outer, delicate edges of your rose petals, giving them a lifelike appearance. You can vary the size and depth of the scallops to create different petal effects – larger, shallower scallops for a more open rose, or smaller, deeper ones for a tighter bloom. This step adds crucial texture and realism to your metallic rose, transforming a simple strip into a potential flower.
6. Mold Your Rose into Form
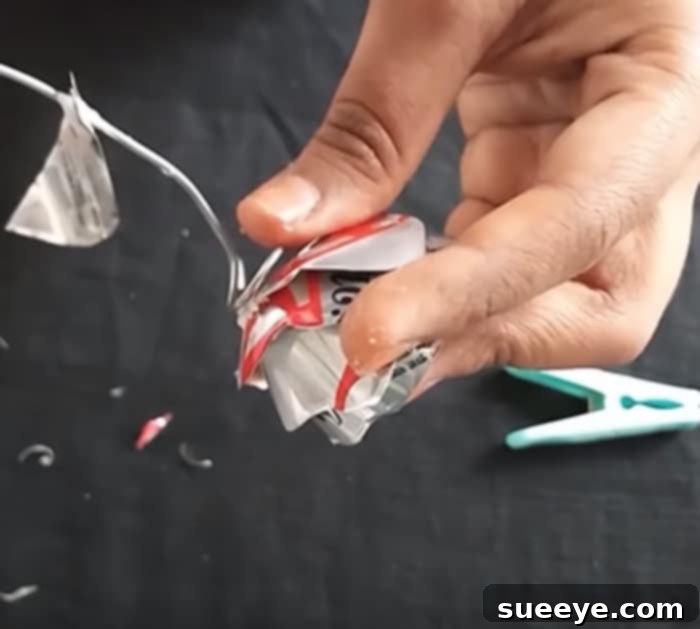
This is the magical moment where your rose truly begins to bloom! Take the small circular tab you intentionally left in the center of your spiral strip. This will serve as the very heart or core of your rose. Begin tightly rolling the spiral strip around this central tab, coiling it inwards. Start tightly to form a firm bud in the center, then gradually loosen the roll as you move towards the outer sections of the spiral strip. As you roll, gently shape and bend the scalloped edges outwards and slightly downwards, mimicking the natural unfurling of rose petals. Use your pliers to help manipulate the metal, ensuring a tight, secure center while allowing the outer petals to open up for a more voluminous, realistic look. The more you practice, the more intuitive this shaping process becomes.
7. Secure and Finish Your Rose
Once you’re satisfied with the shape, fullness, and overall appearance of your rose, you’ll need to secure it to ensure it holds its beautiful form. The central tab you started with should now be folded up snugly against the base of the rolled rose. Apply a dab of strong adhesive (like super glue or E6000) to hold these bottom layers securely together. If you’re planning to add a wire stem for display, carefully poke a small hole through the center base of the rose (using an awl or small nail) and thread your floral wire through it. Bend the wire at the top and bottom to secure it firmly in place, and you can add another small drop of glue for extra stability. Allow any applied glue to dry completely and cure according to the product’s instructions before extensively handling or displaying your stunning new aluminum can rose.
Personalizing Your Can Roses: Unleash Your Creativity
The true beauty and appeal of this craft lie in its incredible versatility and the endless possibilities for personalization. While a standard soda or beer can already yields a lovely metallic rose, there are countless ways to infuse your unique style and creativity into each creation, making every rose truly one-of-a-kind:
- Color Variations: Experiment with different brands of cans to achieve a vibrant spectrum of colors. A classic Coca-Cola can gives a bold red rose, Pepsi offers striking blues, Budweiser or Bud Light cans create distinct red or silvery-white tones, and Mountain Dew cans can produce vibrant green or sunny yellow blooms. Combining different colored cans within a single bouquet or arrangement can create a stunning visual impact, resembling a diverse garden.
- Size Matters: While most standard beverage cans are similar in size, leading to uniformly sized roses, you can explore other aluminum containers. Larger cans (like those for certain juices, sports drinks, or even some food items) can create bigger, more dramatic roses, perfect for statement pieces. Conversely, smaller energy drink cans or miniature soda cans might yield delicate, charming miniature versions, ideal for subtle accents.
- Embellishments: Elevate the beauty of your roses with simple embellishments. Consider adding a touch of fine glitter to the petal edges for a frosty, ethereal effect, or a light spray of clear lacquer to protect the finish and add a glossy shine. Small beads, faux dew drops, or even tiny rhinestones can be strategically glued onto the petals to catch the light and add an extra layer of charm and sophistication.
- Painting: For a completely different aesthetic, you can prime and paint your finished roses with acrylic or spray paints. This opens up an endless palette of colors beyond the original can designs. You can create roses that perfectly match any decor scheme, recreate specific flower colors, or even add metallic paints for a different kind of shimmer. Just ensure the surface is clean and primed for best paint adhesion.
- Leaf Accents: To give your roses a more botanical and complete appearance, cut small leaf shapes from green aluminum cans (such as Sprite, 7-Up, or Mountain Dew). Alternatively, use other metallic green materials. These leaves can then be carefully attached to the base of your rose or along the wire stem, adding a naturalistic touch and complementing the bloom.
Don’t be afraid to experiment with these ideas and develop your own unique twists! Each can holds a unique potential, and your personal touch will undoubtedly make every aluminum can rose a cherished piece of recycled art.
A Tale of Tailgates, Beer, and Unexpected Blooms: The Brother-in-Law’s Surprise
Sometimes, the most cherished DIY projects are born from a heartfelt desire to bring joy and laughter to others. That was certainly the case when I embarked on making a truly special and memorable gift for my brother-in-law. Known affectionately by all as the “King of The Tailgate Parties,” his passion for sports, the camaraderie of good company, and, of course, a cold, refreshing beer was absolutely legendary. I knew a generic, store-bought gift simply wouldn’t suffice; he deserved something as unique, spirited, and utterly unforgettable as his larger-than-life personality. That’s when the brilliant idea struck me like a bolt from the blue: beer can roses!
With a stack of gleaming Bud Light cans, I meticulously crafted several metallic roses, each one a testament to his favorite brew. I envisioned them as the perfect, unconventional accessory for his beloved truck, which was, in many ways, a true extension of his tailgate kingdom. But where exactly in his truck would these quirky blooms go? The answer came to me in a flash of inspiration: dangling proudly from his rearview mirror! This wouldn’t just be any ordinary air freshener or a predictable decoration; it would be a symbolic, shimmering crown for the King of the Tailgate, a quirky yet heartfelt testament to his favorite pastime and his festive spirit.
The excitement grew exponentially as I realized how perfectly these metallic beer roses would complement the amusing arsenal of themed gifts I’d already bestowed upon him over the years: a magnificent, custom-made Beer Knight Costume for Halloween festivities, a hilariously creative Beer Box Hat for sunny game days, and a cozy Crocheted Beer Hat for cooler evenings at the stadium. These new additions would undoubtedly complete the ensemble, adding an unexpected, metallic floral charm that I knew he would absolutely adore.
To make the gift even more special and truly memorable, I meticulously planned a grand surprise. Enlisting the covert help of my ever-resourceful sister, we waited for the opportune moment. After a long, satisfying day, when my brother-in-law had finally settled into a deep sleep, my sister stealthily retrieved his truck keys from his pocket. Under the hushed cloak of night, with suppressed giggles and tiptoed steps, we snuck out to his truck. There, hanging innocently from his rearview mirror, were his beloved fuzzy dice – a classic but undeniably predictable accessory. With expert precision and a touch of mischief, we swapped them out, replacing them with the string of shimmering Bud Light roses, each petal meticulously punched with a tiny hole and strung together like an elegant, yet rugged, garland of metallic blooms.
My sister returned the keys without a hitch, her mission accomplished, and the next morning, a palpable sense of anticipation filled the air throughout our home. After a leisurely breakfast, we covertly watched as he grabbed his lunch pail and headed out the door, completely oblivious to the metallic treasures awaiting him just outside. The moment he opened his truck door and stepped inside, there was a brief, pregnant pause, followed by a comical double-take. His eyes widened in surprise, a slow, infectious grin spread across his face, and he immediately knew exactly whose handiwork he was beholding!
He didn’t just smile; he burst out of the truck, a booming, joyful laugh echoing across the yard, shouting with unbridled delight, “Come gimme a big bear hug, you two beer fairies!” We ran out, embraced him in a joyous, family-style group hug, our hearts filled with laughter and the warmth of shared happiness. That unforgettable day, those humble DIY Coke Can (or rather, Beer Can) Roses transformed a simple morning into a cherished memory, proving once again that the most thoughtful and impactful gifts are often those crafted with love, a touch of ingenious creativity, and a whole lot of heart.
More Creative Ways to Display Your Aluminum Can Roses
Beyond rearview mirrors, these versatile metallic roses can add a unique and eco-conscious touch to countless settings. Their durability and distinctive appearance make them suitable for a wide range of decorative applications, both indoors and outdoors. Here are some inspiring ideas to spark your imagination for your next crafting adventure:
- Home Decor:
- Vases & Bouquets: Arrange several roses with wire stems in a decorative vase for an industrial-chic centerpiece that will never wilt. Mix and match different can colors for a dynamic display.
- Wall Art: Mount individual roses onto a canvas, a reclaimed wooden board, or a metal panel to create a unique 3D wall sculpture. You can paint the background or leave it natural for contrast.
- Picture Frames: Embellish plain picture frames or mirrors with small can roses, gluing them along the edges for a personalized and artistic touch.
- Candle Holders: Glue roses around the base of glass candle holders or hurricane lamps to add a metallic sparkle and a focal point to your table settings.
- Shelf Accents: Group a few roses on a bookshelf or mantelpiece to add an unexpected pop of color and texture.
- Garden & Outdoor Decor:
- Planter Accents: Tuck them into potted plants, window boxes, or garden beds for a whimsical, weather-resistant decoration that will withstand the elements.
- Wind Chimes: Combine roses with other metallic elements, beads, or small bells to create a unique, tinkling wind chime that will add soothing sounds to your outdoor space.
- Fairy Garden Elements: Incorporate smaller roses into a miniature fairy garden scene for an enchanting, durable touch.
- Gifts & Special Occasions:
- Gift Toppers: Replace traditional bows with a single, stunning can rose on wrapped presents for an eco-friendly and memorable finishing touch.
- Corsages/Boutonnieres: Create unique, long-lasting floral accessories for proms, weddings, or other parties that will stand out and serve as a lasting keepsake.
- Party Favors: Small roses can be given as memorable, handmade take-home gifts for guests at eco-themed parties or craft gatherings.
- Seasonal Decor: Craft red and green roses for Christmas ornaments, orange and black for Halloween accents, or pastel colors for Easter.
- Fashion & Accessories:
- Hair Clips: Attach smaller, flatter roses securely to hairpins or barrettes for a distinctive and edgy accessory.
- Brooches: Secure a pin back to a rose for a bold and unique fashion statement that will gather compliments.
The possibilities for these upcycled beauties are truly endless! Let your imagination be your guide in finding new and exciting ways to incorporate these durable, artistic metallic roses into your life and surroundings, spreading the message of creativity and sustainability.
Ready to Start Crafting? Watch the DIY Tutorial!
Now that you’re equipped with detailed instructions, essential safety tips, and a wealth of creative inspiration, it’s time to bring your own aluminum can roses to life. While written instructions are comprehensive, seeing the process in action can be incredibly helpful, especially for visual learners who benefit from watching each step demonstrated. For a comprehensive walkthrough and to observe these intricate steps being performed by an expert, we highly recommend watching the original tutorial video.
Learn how to make this soda can or beer can rose with this DIY tutorial video on YouTube:
[Please insert the YouTube video embed code or a direct link to the tutorial here to complete the article. For instance, you could use: `Watch the full DIY Can Rose Tutorial on YouTube`]
Embark on this rewarding upcycling journey and transform everyday waste into extraordinary, beautiful art. Not only will you create stunning decorations or thoughtful gifts, but you’ll also contribute positively to environmental conservation. Happy crafting, and enjoy the satisfaction of turning trash into treasure!