
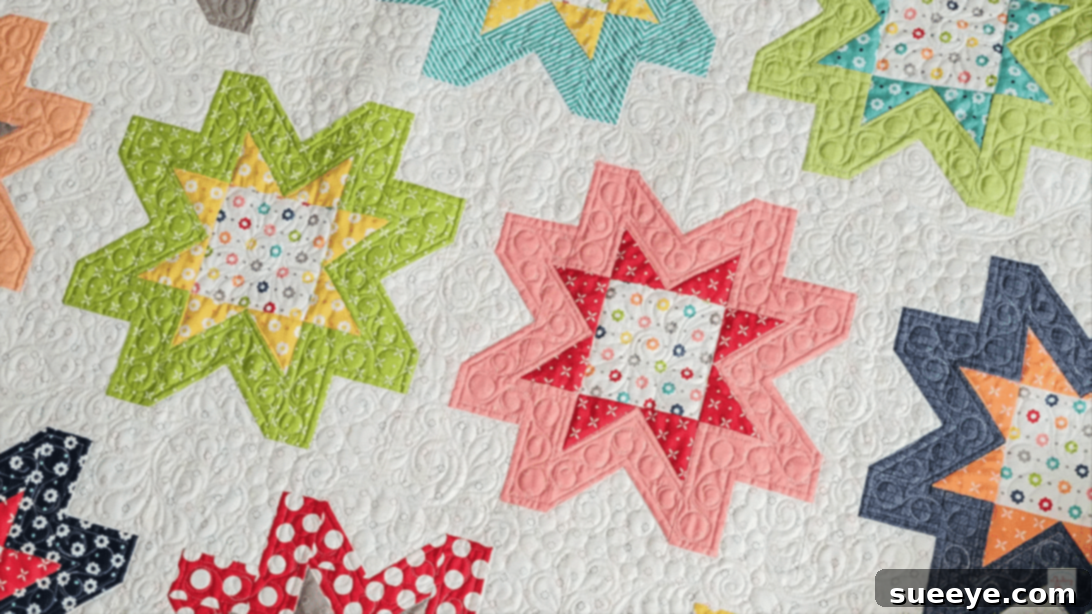
Welcome, quilting enthusiasts, to an inspiring journey into the world of fabric artistry! Today, we’re diving deep into a truly enchanting project: the Fresh Flowers Quilt. This captivating design, brought to life through a superb tutorial by A Quilting Life on YouTube, stands out as one of the most delightful and approachable quilt projects available. From the moment you witness its beauty, you’ll be eager to create your own version, perhaps using your cherished fabric prints and a palette of your favorite colors. Its charm lies not only in its stunning visual appeal but also in its surprisingly straightforward construction, making it an absolute joy to piece together.
Quilting is a timeless craft, offering both creative expression and the satisfaction of producing something beautiful and functional. The Fresh Flowers Quilt embodies this perfectly. It’s a project that promises not just a finished product, but a rewarding creative experience. Whether you’re a seasoned quilter looking for a refreshing new pattern or a complete novice eager to embark on your first major project, this tutorial offers clear, concise, and incredibly helpful guidance. The design itself is reminiscent of a vibrant garden, with carefully arranged fabric pieces blossoming into a stunning floral motif, making it an ideal gift or a cherished addition to your home decor.
RELATED: Discover another delightful project: How to Make Granny’s Pretty Sunflower Quilt.
One of the many appealing aspects of the Fresh Flowers Quilt is its beginner-friendly nature. The step-by-step instructions are meticulously crafted to ensure clarity and ease of understanding, guiding you through each stage of the process with confidence. Furthermore, this project is designed to be fat quarter-friendly, which is fantastic news for anyone with a stash of these convenient fabric bundles. Fat quarters are perfect for trying out new patterns without committing to large cuts of fabric, and they offer a wonderful opportunity to play with a variety of prints and textures. We highly recommend you embark on this quilting adventure; we guarantee you’ll be thrilled with the outcome. Dive into the detailed directions below, and for an even more immersive learning experience, make sure to watch the accompanying video tutorial from A Quilting Life.
Why the Fresh Flowers Quilt is Perfect for You
This exquisite Fresh Flowers Quilt pattern isn’t just another project; it’s an invitation to cultivate creativity and embrace the therapeutic art of quilting. Its elegant design belies its simplicity, making it accessible to quilters of all skill levels. For beginners, the logical progression of steps and the clear visual guidance provided by A Quilting Life’s tutorial make complex-looking blocks surprisingly manageable. You’ll learn fundamental quilting techniques such as accurate cutting, precise piecing, and effective pressing – skills that are invaluable for any future quilting endeavors.
Experienced quilters will also appreciate this pattern for its versatility and speed. If you’re looking for a quick yet impactful project, this quilt offers a refreshing break from more intricate designs, allowing you to focus on fabric selection and color placement. The modular nature of the star blocks means you can easily customize the size of your quilt, from a charming baby blanket to a generous king-sized masterpiece. Imagine the possibilities with seasonal fabrics – pastels for spring, vibrant hues for summer, earthy tones for autumn, or rich jewel tones for winter. The Fresh Flowers Quilt adapts beautifully to any aesthetic.
Beyond its technical merits, this quilt brings undeniable beauty into any home. The “fresh flowers” motif evokes feelings of warmth, comfort, and natural elegance. It can brighten a living room, add a cozy touch to a bedroom, or serve as a thoughtful, handmade gift for a loved one. Each stitch you make is a testament to your dedication and passion, creating a legacy piece that can be treasured for years to come.
Essential Materials for Your Fresh Flowers Quilt
Gathering your materials is the exciting first step in any quilting project. For the Fresh Flowers Quilt, the beauty lies in its fat quarter-friendly design, allowing for a diverse and vibrant array of fabrics. Quality materials not only make the quilting process smoother but also ensure the longevity and beauty of your finished quilt. Here’s a comprehensive list of what you’ll need, along with some insights into choosing the best options.
- 23 fat quarters, for the star blocks: These pre-cut fabric pieces (approximately 18×22 inches) are perfect for adding variety to your quilt. Select a mix of complementary patterns and solids, keeping in mind the overall color scheme you envision for your “flowers.” This is where your creativity truly shines!
- ½ yard of print fabric, for the star centers: This fabric will be the focal point of each star block, so choose something that stands out or beautifully contrasts with your fat quarters. A lighter or darker solid, or a subtle blender print, often works best to define the center.
- 3-1/8 yards of background print, including the sashing and inner border: The background fabric provides a visual breathing space, allowing your star blocks to pop. A subtle print or a solid in a neutral color (like cream, white, or light gray) is often ideal. Ensure it complements, rather than competes with, your chosen fat quarters.
- 1 yard of fabric, for the outer border: The outer border frames your quilt, giving it a polished and finished look. You can opt for a fabric that ties all your colors together, or a bold print that adds an extra layer of visual interest.
- ¾ yard of binding fabric: Binding is the final touch that encases the raw edges of your quilt. Choose a durable fabric that matches or contrasts nicely with your outer border and quilt top. Strips cut from this will create a strong, clean edge.
- 5 yards of backing fabric: The backing is the bottom layer of your quilt. While it won’t be visible from the front, it’s still an important aesthetic choice. You can use a single coordinating wide-back fabric or piece together several standard width fabrics to achieve the desired size.
- Marking pen, pencil, or chalk: Essential for marking cutting lines, stitching lines, and points on your fabric. Choose a tool that is easily removable or disappears over time.
- Ruler: A clear acrylic quilting ruler is indispensable for accurate cutting and measuring. A variety of sizes can be helpful, but a standard 6×24 inch ruler is a great starting point.
- Scissors or rotary cutter and a cutting mat: For precise and efficient fabric cutting, a rotary cutter with a self-healing cutting mat is highly recommended. Always use a sharp blade for clean cuts.
- Fabric pins: To hold fabric pieces together securely before stitching. Glass-head pins are popular as they can withstand iron heat.
- Needle and thread: High-quality thread that matches or blends with your fabrics will ensure strong, durable seams. A sharp needle appropriate for your fabric type is also crucial.
- Iron, for pressing: Proper pressing is key to flat seams and accurate block construction. A good steam iron will be your best friend.
- Sewing machine: A reliable sewing machine with a quarter-inch presser foot attachment will make piecing much faster and more accurate.
- Pattern (Click here to download the pattern): This will provide all the necessary cutting instructions and block assembly diagrams, serving as your ultimate guide.
Preparing Your Fabrics for Success
Before you even think about cutting, consider pre-washing your fabrics. While some quilters prefer not to, pre-washing helps to pre-shrink the fabric, remove excess dye, and ensure that your finished quilt will not experience any unexpected shrinkage or color bleeding after its first wash. If you choose to pre-wash, dry and iron all your fabrics smoothly to remove any wrinkles before cutting. This meticulous preparation sets the foundation for a professional-looking quilt.
How to Make the Fresh Flowers Quilt: A Detailed Step-by-Step Guide
Now that your materials are ready and your workspace is organized, it’s time to bring your Fresh Flowers Quilt to life! Follow these detailed instructions, referring to the pattern for precise measurements and diagrams, and enjoy the creative process.
Step 1: Cutting and Assembling the Inner Flying Geese Units
The “Flying Geese” unit is a classic quilting block that forms the dynamic points of your stars. Accuracy here is crucial for sharp points.
- Download and Review the Pattern: Begin by downloading the official Fresh Flowers Quilt pattern. This document is your most important resource, providing exact cutting dimensions for all fabric pieces and detailed diagrams for block assembly. Read through it entirely to familiarize yourself with the process.
- Cut Your Fabrics to Size: Using your rotary cutter, ruler, and cutting mat, carefully cut all your fabrics according to the pattern’s specifications. Precision in this step will save you frustration later on. For the inner flying geese units, you’ll be cutting print rectangles (your “geese”) and background squares (your “sky”).
- Prepare for Stitching: Take one print rectangle. This will be the body of your flying goose.
- Position the Squares: Place a background square on each end of the print rectangle, right sides together. Ensure the corners of the squares align perfectly with the corners of the rectangle.
- Mark and Stitch Diagonally: Using your marking tool, draw a diagonal line from one corner to the opposite corner on each square. This line will serve as your stitching guide. Carefully stitch directly on this marked diagonal line.
- Trim Excess Fabric: After stitching, trim off the excess fabric, leaving a ¼-inch seam allowance from your stitched line. This reduces bulk and prepares the unit for pressing.
- Press Open: Gently press the fabric open towards the darker fabric (the background square in most cases) using your iron. This creates a crisp, flat seam. Repeat these exact steps for all the pieces designated for your inner flying geese units. Consistency in pressing is key for perfectly flat blocks.
Step 2: Constructing Outer Flying Geese Units and Assembling Star Blocks
Building upon the foundation of your inner units, you’ll now create the outer components of your star blocks, bringing the vibrant “flower” shape into view.
- Create Outer Flying Geese: Using the same precise steps as outlined in Step 1, construct your outer flying geese units. For these, you will likely be using background rectangles and dark print squares, or whatever fabric combination the pattern designates for the outer sections of your star. Maintain the same attention to detail in marking, stitching, trimming, and pressing.
- Piece the Corner Units: The pattern will guide you in creating various corner units that will frame your flying geese. These might involve small squares or half-square triangles. Carefully piece these smaller components together, again ensuring accurate ¼-inch seams and pressing them open or to one side as indicated in the pattern.
- Arrange and Assemble Your Star Blocks: Now for the exciting part – arranging all your pieced units! Refer to your pattern’s block assembly diagram. Lay out all the inner flying geese, outer flying geese, star centers, and corner units on a flat surface. Take your time to ensure everything is oriented correctly and your fabric choices create the desired visual effect.
- Stitch Rows Together: Once you are satisfied with the arrangement, begin stitching the units together in rows. Pin each piece carefully before stitching to prevent shifting. Use a consistent ¼-inch seam allowance.
- Press Seams as You Go: After stitching each row, take it to your ironing board and press the seams. The pattern may instruct you to press seams open or to one side. Consistent pressing helps reduce bulk and keeps your block flat and square.
- Join the Rows: Finally, join your stitched rows together to form a complete star block. Again, pin carefully, especially where seams intersect, to ensure points align perfectly. Press the final seams. You will repeat this entire process for as many star blocks as your quilt pattern requires.
Step 3: Assembling the Quilt Top
Once all your individual star blocks are complete, the next exciting phase is to assemble them into the full quilt top.
- Arrange Blocks: Lay out all your completed star blocks on a design wall or a large flat surface. Experiment with different arrangements until you find the most pleasing layout. This is your chance to fine-tune the visual flow and ensure your “flowers” are beautifully distributed.
- Add Sashing (if applicable): The pattern may include sashing strips to separate the blocks, which can add visual structure and emphasis. Cut and sew these sashing strips between your blocks and rows, pressing seams as directed.
- Attach Borders: After the main block assembly, you’ll attach the inner and outer borders. Measure your quilt top carefully to ensure your borders are cut to the correct length. Pin them evenly to prevent waviness and stitch with your ¼-inch seam allowance. Press seams outward towards the border fabric. Borders help stabilize the quilt top and add a beautiful frame.
Step 4: Quilting and Finishing Your Fresh Flowers Quilt
With the quilt top complete, you’re on the home stretch! The final steps involve layering, quilting, and binding – transforming your pieced top into a cozy, durable quilt.
- Create the Quilt Sandwich: Lay your backing fabric wrong side up, secure it with tape, then place your batting smoothly on top, and finally, your quilt top right side up. Ensure all layers are flat and free of wrinkles.
- Baste the Layers: Basting holds these three layers together during the quilting process. You can use safety pins (pin basting), spray adhesive (spray basting), or hand-stitch long basting stitches (thread basting). Choose the method you prefer for even distribution and minimal shifting.
- Quilt Your Layers: Now, the quilting itself! This is where you stitch through all three layers to add texture, durability, and additional design elements. You can machine quilt using a walking foot for straight lines or free-motion quilting for more intricate designs. Hand quilting is also a beautiful, meditative option. Consider simple “stitch in the ditch” quilting along seam lines, or more elaborate motifs that complement your “fresh flowers.”
- Trim and Square Up: Once quilting is complete, trim the excess backing and batting, squaring up your quilt edges perfectly using your ruler and rotary cutter.
- Prepare and Attach Binding: Cut your binding fabric into strips as per the pattern’s instructions. Join these strips to create one long continuous piece. Fold and press the binding. Attach the binding to the front of your quilt, then bring it around to the back and hand-stitch or machine-stitch it in place for a neat, durable finish.
Tips for a Flawless Fresh Flowers Quilt
- Accurate ¼-Inch Seams: This is arguably the most critical skill in quilting. Use a dedicated ¼-inch presser foot or mark a guide on your machine’s throat plate. Practice on scraps until your seams are consistently perfect.
- Pressing, Not Ironing: When quilting, you “press” (lift and place the iron) rather than “iron” (slide the iron back and forth). This prevents stretching and distortion of your fabric.
- Sharp Tools Are Your Friends: Always use a sharp rotary cutter blade and new needles in your sewing machine. Dull tools lead to frayed edges and skipped stitches.
- Chain Piecing: For repetitive units like flying geese, use chain piecing. Stitch several units one after another without cutting the thread in between. This saves time and thread.
- Take Breaks: Quilting can be intense. Step away from your machine regularly to stretch, refresh your eyes, and come back with renewed focus.
- Embrace Imperfection: Especially for beginners, remember that handmade items have character. A small misaligned point or a slightly off-kilter seam tells a story of your creative journey.
Caring for Your Handmade Fresh Flowers Quilt
To ensure your beautiful Fresh Flowers Quilt remains a cherished item for years to come, proper care is essential. Generally, machine wash on a gentle cycle with cold water and a mild detergent. Tumble dry on low or air dry flat to prevent shrinkage and preserve the colors. Avoid harsh chemicals like bleach, which can damage fabric fibers and fade colors. With proper care, your quilt will continue to bring joy and comfort for generations.
You’ve now got all the knowledge and inspiration to create your very own Fresh Flowers Quilt. This project offers a wonderful blend of challenge and reward, culminating in a beautiful piece of textile art. Don’t hesitate to personalize it with your unique fabric choices, making each star block a reflection of your individual style.
* All these amazing images are thanks to A Quilting Life on YouTube. Visit her channel to see more videos like this, and to explore her other fantastic quilting tutorials and patterns!
Embark on Your Easy Fresh Flowers Quilt Tutorial Today!
What are you waiting for? Grab your fat quarters, fire up your sewing machine, and prepare to stitch a garden of fabric delights. The Fresh Flowers Quilt is more than just a pattern; it’s an opportunity to create something truly special, a testament to your craft, and a beautiful addition to any home. Happy quilting!