
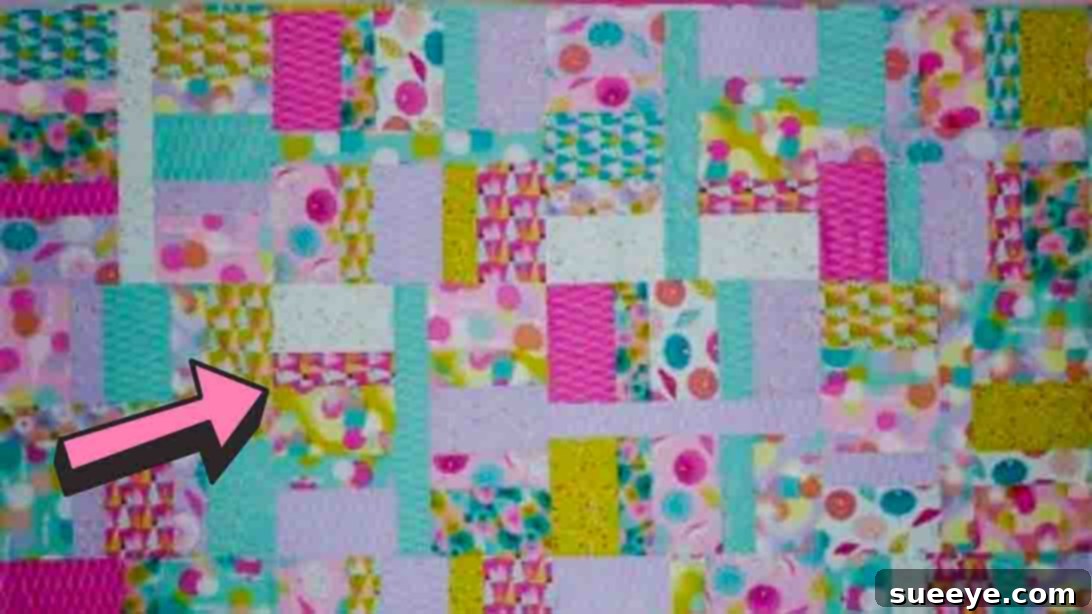
Wickedly Easy Quilt Pattern: Your Ultimate Free Beginner’s Guide to DIY Quilting
Embarking on the rewarding journey of quilting can seem daunting, but finding the right project makes all the difference. For those just starting out, free, beginner-friendly patterns are a true treasure. Among the myriad of resources available online, one particular design stands out as an absolute gem for new quilters: the “Wickedly Easy Quilt Pattern” by the talented Carol Thelen, generously shared on her YouTube channel. This pattern isn’t just simple; it’s a gateway to mastering fundamental quilting skills with delightful results, making it an ideal first project or a quick, satisfying make for seasoned quilters.
As a passionate quilter, especially when searching for accessible projects, I’ve found Carol’s “Wickedly Easy Quilt” to be an absolute game-changer. It lives up to its name, offering a surprisingly straightforward approach to creating a beautiful, personalized quilt. Whether you’re aiming to craft a thoughtful gift for a loved one or simply want to try your hand at a new hobby, this free quilt pattern is incredibly versatile. It’s designed to be adaptable for various sizes, ensuring you can tailor your creation to any need, from a cozy lap quilt to a larger throw. Dive into the world of quilting today with this engaging and remarkably easy project!
Why the “Wickedly Easy Quilt” is Perfect for Every Beginner
The “Wickedly Easy Quilt Pattern” distinguishes itself as a premier choice for novice quilters for several compelling reasons. Its design principles are centered around simplicity, yet the final product boasts a sophisticated aesthetic. Unlike patterns that demand intricate piecing or advanced techniques, this design focuses on foundational skills, allowing you to build confidence with each stitch.
- Simplicity in Design: The pattern utilizes simple strip piecing, which is much less intimidating than complex block construction. This approach minimizes cutting errors and makes assembly straightforward, ensuring a higher success rate for beginners.
- Quick Gratification: Due to its streamlined process, this quilt comes together relatively quickly, providing a wonderful sense of accomplishment that encourages further quilting adventures. You’ll see your project taking shape in no time.
- Builds Core Skills: You’ll practice essential quilting techniques such as accurate cutting with a rotary cutter, maintaining consistent seam allowances, and effective pressing – all crucial for future projects. These fundamental skills are transferable to any quilting design.
- Versatile for Gifting: The clean lines and adaptable design make it perfect for personalizing gifts. Choose fabrics that reflect the recipient’s taste, and you’ll have a cherished, handmade item in no time. It’s a gift that truly comes from the heart.
- Economical Use of Fabric: Often leveraging fat quarters, this pattern is also excellent for utilizing your fabric stash, making it a budget-friendly option. It’s a fantastic way to transform those beautiful fabric bundles you’ve been collecting.
Embracing this free quilt pattern means you’re not just making a quilt; you’re investing in your quilting education, gaining practical experience, and discovering the joy of creating something beautiful with your own hands. It truly is a gateway to the broader world of quilting, opening doors to endless creative possibilities.
Essential Materials for Your “Wickedly Easy” Quilt Project
Before you begin sewing, gathering all your materials and tools is paramount. The “Wickedly Easy Quilt Pattern” is designed to be accessible, often utilizing common quilting supplies. Here’s a detailed breakdown of what you’ll need, specifically for the popular Lap Size, along with general tools that will make your quilting journey smoother.
Lap Size Quilt Materials:
- 12 Fat Quarters: These pre-cut fabric pieces (typically 18″ x 22″ or 45 cm x 55 cm) are perfect for this pattern, offering a wonderful variety of prints and colors without needing to buy large quantities of fabric. They are the backbone of your quilt top design and allow for a diverse visual appeal.
- 1 Fat Eighth: A smaller pre-cut (typically 9″ x 22″ or 22 cm x 55 cm) that will be used for specific border elements, adding a subtle contrast or complementary touch to frame your main design.
- 1/2 Yard Binding Fabric: This fabric will encase the edges of your finished quilt, providing a clean, durable, and decorative finish. Choose a fabric that complements your quilt top and consider its longevity.
- 3 1/2 Yards Backing Fabric: This is the fabric that forms the back of your quilt. It’s often one continuous piece or several pieces sewn together to match the quilt top’s dimensions. Opt for a comfortable, durable, and perhaps even a visually appealing fabric, as the back of the quilt is also part of its charm.
- 58″ x 74″ Batting: Batting is the cozy filling in the middle of your quilt sandwich, providing warmth, loft, and defining the texture of your quilting stitches. This specific size is ideal for a lap quilt. Make sure to select a type of batting suitable for quilting (e.g., cotton, polyester, blend) based on your desired loft and washability.
- Free Pattern Download: Don’t forget to download the detailed PDF pattern for precise measurements, cutting instructions, and visual diagrams of block arrangement. This is your essential guide! Click here to access the free pattern.
Recommended Quilting Tools:
- Sewing Machine: A reliable sewing machine is essential for accurate and consistent seams. Ensure it’s in good working order and you have fresh needles.
- Rotary Cutter: For precise and efficient fabric cutting, especially with multiple layers. Invest in a sharp blade (45mm or 60mm are common) for clean cuts.
- Cutting Mat: Protects your work surface and provides a grid for accurate measurements with your rotary cutter. A self-healing mat is a wise investment.
- Acrylic Rulers: Various sizes (e.g., 6″ x 24″ for long strips, 4.5″ square for squaring up blocks) are invaluable for precise measuring and cutting. Clear rulers with clear markings are ideal.
- Fabric Scissors: Sharp scissors dedicated solely to fabric cutting will ensure clean edges and prevent fraying.
- Iron and Ironing Board: Crucial for pressing seams open or to one side, ensuring flat, accurate blocks and a smooth quilt top. A good steam iron is very helpful.
- Thread: High-quality polyester or cotton thread that matches or blends with your fabric colors. Choose a strong, low-lint thread for best results.
- Straight Pins or Fabric Clips: To hold fabric pieces together before sewing, ensuring they don’t shift. Clips are great for thicker seams or binding.
- Seam Ripper: Every quilter, regardless of experience, needs a good seam ripper for occasional mistakes. It’s a tool of learning!
Having these materials and tools ready will ensure a smooth and enjoyable quilting experience, allowing you to focus on the creative process of bringing your “Wickedly Easy Quilt” to life without interruptions.
Step-by-Step Directions to Create Your “Wickedly Easy Quilt”
Now that you have all your materials and tools assembled, it’s time to dive into the exciting process of creating your quilt. Follow these detailed steps carefully, referencing Carol Thelen’s video tutorial and the downloadable PDF pattern for visual guidance and specific diagrams. Precision at each stage will contribute to a beautifully finished quilt, making your efforts truly shine.
Step 1: Precision Cutting and Initial Strip Set Creation
Accuracy in cutting is the foundation of any successful quilting project. Take your time with this initial phase, as well-cut pieces will lead to perfectly aligned seams later on. Always use a sharp rotary blade and a steady hand.
- Prepare Your Fat Quarters: Lay out each of your 12 fat quarters smoothly, pressing them if necessary to remove any wrinkles. From each fat quarter, carefully cut the following using your rotary cutter and acrylic ruler:
- Three (3) strips measuring 4 1/2″ x 18″. These wider strips will form the primary design elements within your quilt blocks.
- Two (2) strips measuring 2 1/2″ x 18″. These narrower strips will act as sashing or accent strips, separating the wider sections.
- One (1) strip measuring 2 1/2″ x 16 1/2″. This piece will be used later for the assembly of individual quilt blocks.
- Prepare the Fat Eighth: From your single fat eighth, cut:
- Two (2) strips measuring 2 1/2″ x 18 1/2″. These are specifically designated for the top and bottom borders of your quilt, providing a clean frame.
- Two (2) squares measuring 2 1/2″ x 2 1/2″. These small squares will also be integrated into the border design, often acting as cornerstones.
- Binding Strips: From your chosen binding fabric, cut 2 1/4″ wide strips across the width of the fabric. You’ll need to join several of these strips end-to-end (typically with a diagonal seam) to create one continuous binding strip long enough to go around the entire perimeter of your quilt. The exact length will be determined by the final quilt size.
- Organize for Strip Sets: Now, you’ll begin assembling your “strip sets,” which are combinations of strips sewn together. Group your 18″ strips. For each strip set, you will need three (3) of the 4 1/2″ x 18″ strips and two (2) of the 2 1/2″ x 18″ strips. The goal is to create sets of five strips that will be sewn together.
- Sew Strip Sets: Using a consistent 1/4″ seam allowance (this is crucial for accuracy!), sew each group of five strips together along their long edges. Arrange them so that the narrower 2 1/2″ strips are positioned between the wider 4 1/2″ strips. Press your seams carefully – you can press them open or to one side (towards the darker fabric is often preferred), but be consistent throughout the project for a flat finish and to prevent bulk.
- Cross-Cut Strip Sets: Once your strip sets are sewn and pressed, you will cross-cut each composite strip set into smaller segments. From each completed strip set, cut:
- Two (2) 7 1/2″ segments. These will form the main parts of your quilt blocks.
- One (1) 2 1/2″ segment. This smaller segment may be used for other design elements or leftover.
- Assemble Individual Blocks: Now, you’ll start forming your main quilt blocks. Take one of the 2 1/2″ x 16 1/2″ strips you cut earlier. Sew this strip between two different 7 1/2″ strip segments, ensuring the orientation is correct according to the pattern. Ensure your seams are aligned and press them. These assembled units now form your individual quilt blocks. Repeat this process until all your blocks are assembled and ready for arrangement.
Step 2: Assembling the Quilt Center and Adding Borders
With your individual blocks pieced, the next step involves bringing them together to form the main body of your quilt, followed by adding the framing borders that give your quilt a polished look.
- Arrange Your Quilt Blocks: This is where your creativity comes into play! Lay out all your assembled blocks on a design wall, a large flat surface (like a clean floor), or even a bed. Experiment with different rotations and arrangements. Refer to the free pattern’s diagram for Carol Thelen’s suggested layout, or feel free to create your own unique design. Pay close attention to how colors and patterns interact to achieve your desired visual effect. Step back frequently to get a broader perspective.
- Join Blocks into Rows: Once you are completely satisfied with your arrangement, begin sewing the blocks together into horizontal rows. Work methodically, using a consistent 1/4″ seam allowance. Press seams carefully after joining each block. For easier matching later, consider alternating the direction of your pressed seams in adjacent rows (e.g., press seams to the left in row 1, to the right in row 2).
- Join Rows to Form Quilt Center: After all your rows are complete and pressed, join them vertically to create the complete quilt center. Pin carefully at the intersections where seams meet to ensure your points match up perfectly, creating sharp intersections and continuous lines across your quilt. Press the final quilt center thoroughly to remove any puckers and ensure it lies perfectly flat, ready for the next stage.
- Prepare and Attach Borders: Now, let’s frame your beautiful quilt top. You’ll use the remaining 2 1/2″ x 16 1/2″ block pieces (if any are left from Step 1, otherwise refer to the pattern for additional border cuts). Join these pieces as needed to create strips long enough for your quilt sides. It’s often recommended to measure your quilt center through the middle to get the accurate border length rather than relying solely on the pattern’s suggested length, then cut your border strips to match that measurement. Attach these border strips to the left and right sides of your quilt center first. Trim any excess border fabric. Then, repeat the process for the top and bottom borders, using the 2 1/2″ x 18 1/2″ strips and 2 1/2″ squares cut from the fat eighth, integrating these into the corner design if specified by the pattern. Attach these remaining strips, ensuring the corners are square and the borders lie flat. Press all border seams outwards towards the border fabric.
Step 3: Quilting and Binding – The Finishing Touches
With your quilt top fully assembled, the final crucial steps are quilting (layering and stitching) and binding (finishing the edges). These stages transform your pieced fabric into a cohesive, durable, and cozy quilt, bringing all your hard work to a beautiful conclusion.
- Create the Quilt Sandwich: This involves carefully layering your three main components:
- Backing: Lay your backing fabric (right side down) smoothly on a clean, flat surface. Secure it tightly with painter’s tape or clamps to prevent shifting during the basting process.
- Batting: Center your batting on top of the backing fabric. Ensure it is perfectly smooth and wrinkle-free. The batting should extend a few inches beyond the quilt top on all sides, providing ample room for quilting and trimming.
- Quilt Top: Carefully place your finished quilt top (right side up) on top of the batting, centering it as much as possible. Smooth it out thoroughly, ensuring there are no wrinkles or puckers.
- Basting: Secure these three layers together to prevent shifting and puckering during quilting. Proper basting is essential for a smooth, even quilt. Common basting methods include:
- Pin Basting: Use curved safety pins spaced approximately every 4-6 inches across the entire quilt. Ensure they go through all three layers.
- Spray Basting: Use a temporary fabric adhesive spray (specifically designed for quilting) to glue the layers together. This offers a smooth, pin-free surface.
- Thread Basting: Hand-stitch long, loose stitches in a grid pattern through all layers. This is a traditional method that works well for larger quilts.
- Quilting Your Layers: This is where you stitch through all three layers, holding them together permanently and adding texture and dimension. For beginners, simple straight-line quilting is often the easiest and most effective way to start:
- Stitch-in-the-Ditch: Stitch directly in the “ditches” or seams where your fabric pieces join. This method hides your stitching and outlines your piecing, making it a subtle choice.
- Straight-Line Quilting: Use your sewing machine’s walking foot (highly recommended for even feeding) and an acrylic ruler or the edge of your presser foot as a guide to stitch parallel lines across your quilt. This can be done diagonally, horizontally, or vertically, creating a modern and clean look.
Remember to start quilting from the center of the quilt and work outwards to prevent fabric distortion and puckering.
- Prepare the Binding: Take your 2 1/4″ wide binding strips. Join them end-to-end (typically with a 45-degree diagonal seam to reduce bulk) to create one continuous strip long enough to go around the entire perimeter of your quilt, plus about 10-12 inches extra for joining. Press the strip in half lengthwise, wrong sides together, to create a neat, folded binding.
- Attach the Binding to the Quilt:
- Align the raw edge of your folded binding with the raw edge of your quilt top. Start in the middle of one side, leaving an unsewn tail of about 8-10 inches at the beginning.
- Sew the binding to the quilt edge using a consistent 1/4″ seam allowance, carefully stopping and pivoting at the corners to create a mitered corner (refer to a binding tutorial for detailed corner instructions if unsure).
- Stop sewing about 10-12 inches from where you started. Trim your starting and ending binding tails so they overlap by approximately the width of your binding strip. Join these tails using a diagonal seam to create a continuous loop, ensuring a smooth, invisible join.
- Finish sewing the remaining binding to the quilt.
- Finish the Binding: Once the binding is sewn to the front of the quilt, flip the folded binding over to the back of the quilt. You can then hand-stitch the binding to the backing fabric for an invisible, traditional finish, or machine-stitch it for a quicker, more durable result. Ensure your stitches catch the backing fabric securely without showing through to the front of the quilt.
Tips for a Flawless “Wickedly Easy” Quilting Experience
To ensure your first (or next) “Wickedly Easy Quilt” project is a resounding success, keep these practical tips in mind. They apply to all quilting, but are especially helpful for those perfecting their craft and building confidence.
- Press, Don’t Iron: When joining fabric pieces, always “press” your seams, rather than “ironing” them. Pressing involves lifting and placing the iron directly onto the seam, which prevents stretching and distortion of your fabric. Ironing involves sliding the iron, which can pull your fabric out of shape, leading to wavy edges.
- Consistent Seam Allowance: A precise 1/4-inch seam allowance is critical in quilting. Use a quilting foot with a 1/4-inch guide on your sewing machine, or mark your machine bed with tape to ensure consistency. Inconsistent seams will lead to blocks that don’t fit together well, resulting in a distorted quilt.
- Trim Your Threads: After each seam, trim any loose threads close to the fabric. This prevents them from getting caught in subsequent seams, creating unnecessary bulk, or showing through lighter fabrics, which can be particularly noticeable.
- Square Up Your Blocks: Periodically, use a square ruler (e.g., a 4.5-inch square ruler) to check if your blocks are the correct dimensions and perfectly square. If they’re slightly off, gently trim them to size. This step is crucial for accurate quilt assembly and ensuring your rows and columns align beautifully.
- Pre-wash Your Fabrics (Optional but Recommended): Some quilters pre-wash their fabrics to prevent shrinkage and color bleeding, especially if using a mix of light and dark fabrics. If you choose not to pre-wash, it’s wise to test dark fabrics for colorfastness before integrating them into your quilt by dabbing with a wet cloth.
- Watch the Video Tutorial: Carol Thelen’s YouTube tutorial provides invaluable visual demonstrations of each step. Pause, rewind, and watch again as needed to clarify any instructions or techniques. It’s an excellent companion to the written pattern and can clear up any confusion.
- Enjoy the Process: Quilting is a journey, and every stitch is part of that journey. Don’t stress over perfection, especially as a beginner. Embrace any “design opportunities” (which is a quilter’s kind way of saying mistakes!), learn from them, and most importantly, enjoy the creative process of making something beautiful with your own hands. The joy of creation is paramount!
Wickedly Easy Free Quilt Pattern Tutorial Video
For an even clearer understanding and visual guidance through each step, Carol Thelen’s comprehensive video tutorial is an indispensable resource. Watch her demonstrate the cutting, piecing, and assembly techniques that make this quilt so wonderfully easy to create. It’s like having a personal instructor by your side, guiding you through every detail!
Click here to watch the “Wickedly Easy Quilt Pattern” Video Tutorial by Carol Thelen on YouTube!
Congratulations on taking the first step towards creating your very own “Wickedly Easy Quilt”! This free pattern is a testament to how simple and enjoyable quilting can be, even for absolute beginners. By following Carol Thelen’s clear instructions, utilizing the provided resources, and applying the tips for success, you’ll soon have a stunning, handmade quilt that you can proudly display, gift to a cherished loved one, or simply snuggle under on a cozy evening. Happy quilting, and may your journey be filled with creativity and joy!