
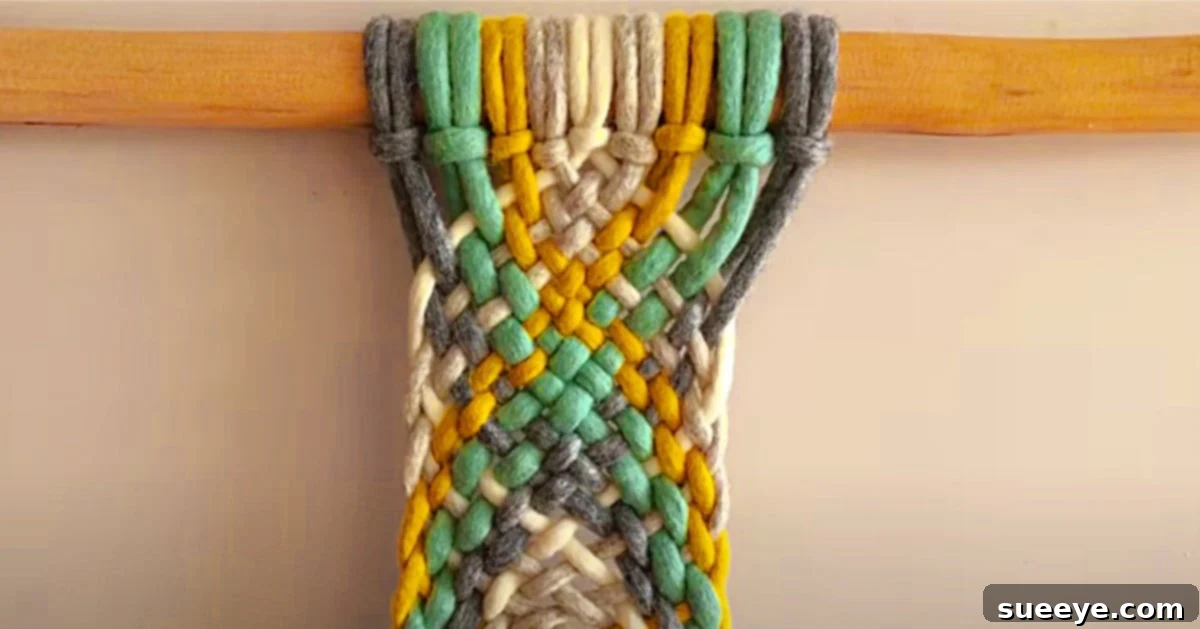
DIY Continuous Weave Macrame Wall Hanging: Elevate Your Home with Bohemian Charm
Macrame wall hangings are more than just a passing trend; they are timeless pieces of fiber art that effortlessly blend vintage charm with contemporary aesthetics. Originating from the skilled knotting techniques of ancient cultures, macrame has experienced a remarkable resurgence, captivating crafters and home decorators alike. Its inherent ability to introduce texture, warmth, and a unique personality into any room makes it a cherished element in modern interior design, especially for those seeking to infuse their spaces with a relaxed, bohemian vibe. This particular continuous weave macrame project offers an accessible entry point into the world of macrame, proving that even beginners can create stunning, intricate-looking pieces that appear professionally made.
I recently embarked on a mission to revitalize my screened-in porch, a beloved space that, despite its potential, suffered from a medley of mismatched furniture and a general lack of cohesive style. As I contemplated various decor solutions, my mind immediately gravitated towards macrame. Its miraculous ability to harmoniously bring together disparate elements and instantly brand a space as “Bohemian chic” seemed like the perfect remedy. I envisioned a large, flowing macrame piece that would act as a visual anchor, tying the entire area together with its organic texture and natural elegance. This inspiration led me down a YouTube rabbit hole, where I discovered an exceptional tutorial by Mary Maker Studio. Her video presented a continuous weave macrame project that looked not only incredibly easy to follow but also perfectly aligned with the rustic, earthy aesthetic I had in mind for my porch. It stood out as one of the clearest and most beginner-friendly tutorials I’d encountered, promising a fantastic result.
Armed with inspiration and a clear vision, my next stop was JoAnn’s Fabrics to gather all the necessary supplies. A pro tip for any avid crafter: always check your craft store’s app for coupons before you leave home! Those digital coupons can lead to significant savings, making your creative endeavors more budget-friendly. Leveraging online coupons at major craft retailers like JoAnn’s is an absolute game-changer; in the world of crafting, where more supplies often mean more possibilities, every dollar saved is a dollar earned for your next project. This simple habit ensures you get the best value, allowing you to indulge in a wider range of materials and projects without breaking the bank. With my coupons in hand and a shopping list ready, I was eager to begin this exciting DIY journey, anticipating the transformation of my porch into a true bohemian sanctuary.
Why Macrame? The Enduring Appeal of Fiber Art
Macrame offers much more than just decorative appeal; it provides an opportunity for mindful creation and the satisfaction of personal accomplishment. Its unique textural qualities add a layer of depth and visual interest that painted walls or framed art often cannot. From intricate wall hangings to functional plant hangers, macrame pieces introduce a tactile element into decor, inviting touch and adding warmth. The continuous weave technique, in particular, creates a flowing, organic pattern that can adapt to various lengths and widths, making it incredibly versatile for different spaces. This method is also highly forgiving, which is why it’s so ideal for those just starting out. The rhythm of knotting can be incredibly meditative, turning a simple craft project into a calming, enjoyable experience. Furthermore, crafting your own decor allows for unparalleled customization, ensuring your finished piece perfectly reflects your personal style and complements your existing home aesthetics.
Materials for Your Macrame Masterpiece
Gathering the right materials is the first concrete step towards bringing your macrame vision to life. For this continuous weave project, simplicity is key, but choosing quality materials will significantly impact the final look and durability of your wall hanging. Here’s a detailed breakdown of what you’ll need:
- Yarn: For this project, chunky style yarn is highly recommended. The thickness of chunky yarn makes the knots more prominent and the pattern more defined, which is especially beneficial for beginners as it’s easier to handle and visualize the progress. While the tutorial suggests five different colors, feel free to experiment with fewer or more, depending on your desired aesthetic. Natural fibers like cotton rope, jute, or even thick wool blends work wonderfully, offering a beautiful drape and texture. Consider your existing color scheme and the mood you wish to create in your space when selecting your hues. Earthy tones like creams, olives, and terracotta evoke a classic bohemian feel, while vibrant blues or greens can add a pop of modern color. Ensure you have enough length for each color; it’s always better to have too much than too little.
- Scissors: A good pair of sharp scissors is indispensable for any crafting project. You’ll need them for cleanly cutting your yarn strands to size and for trimming the fringe once your macrame piece is complete. Investing in a pair of fabric-specific scissors will make your cutting tasks much easier and more precise, leading to a neater finish.
- A Stick or Dowel: This will serve as the anchor for your entire macrame creation. You can opt for a naturally found branch, which adds an authentic, rustic touch, or a clean, wooden dowel from a craft store for a more polished look. The length of your stick will determine the width of your macrame wall hanging, so choose one that suits your intended space. Ensure the stick is sturdy enough to support the weight of the yarn and has a relatively straight form. If using a natural branch, you might want to gently clean it and ensure there are no sharp edges that could snag the yarn.
Before you begin, ensure your workspace is clear and comfortable. Having all your materials organized and within reach will make the crafting process much smoother and more enjoyable.
Directions: Crafting Your Continuous Weave Macrame
The beauty of the continuous weave macrame lies in its deceptively simple technique, yielding an intricate and stunning result. While the Mary Maker Studio tutorial provides excellent visual guidance, here’s an overview of the process to give you a clear understanding of what to expect:
Step 1: Preparing Your Yarn and Stick
Before you start knotting, you’ll need to prepare your yarn strands. The tutorial will guide you on the specific lengths required, but a general rule of thumb for macrame is to cut strands much longer than you anticipate the finished piece will be, as knotting consumes a significant amount of length. Fold each strand in half, creating a loop at the top. You will then attach these folded strands to your chosen stick or dowel using a simple yet fundamental macrame knot known as the Lark’s Head Knot. This creates the initial foundation from which your entire wall hanging will descend. Arrange your chosen colors in the sequence you desire, planning your pattern from the outset.
Step 2: Mastering the Continuous Weave Pattern
Once your yarn strands are securely attached to the stick, the real magic begins. The continuous weave pattern is typically built upon a series of repetitive, basic macrame knots, most commonly a variation of the square knot or half hitch knots. The genius of the continuous weave is how these foundational knots are strategically “laced, gathered, and intertwined” to flow into one another, creating an unbroken, intricate design. You’ll work in sections, building rows of knots that seem to merge seamlessly, creating a textured fabric that drapes beautifully. The Mary Maker Studio tutorial excels at breaking down these steps, demonstrating how to maintain tension, ensure evenness, and smoothly transition between sections to achieve that signature continuous look. Pay close attention to her technique for consistent knotting, which is crucial for a polished final product.
Step 3: Extending and Customizing Your Work of Art
The beauty of a continuous weave pattern is its adaptability. You will continue to repeat the established knotting sequence, building your macrame wall hanging row by intricate row, until it reaches your desired length. This allows for immense customization; whether you envision a short, wide piece to accent a specific nook or a grand, flowing statement piece for a large wall, the pattern can be extended to suit your needs. As you progress, step back periodically to assess the overall shape and density, making any minor adjustments to your tension if needed. This ensures a consistent and aesthetically pleasing outcome. The journey of watching the yarn transform into a complex, beautiful tapestry through your own hands is immensely rewarding.
Step 4: Finishing Touches
Once you’ve reached your desired length, the final step involves neatly trimming the bottom fringes. You can choose to cut them straight across for a modern finish, create a V-shape, or leave them asymmetrical for a more organic look. Some crafters even unravel the ends of the yarn strands slightly to create a softer, feathery fringe. Secure any loose ends, and your beautiful continuous weave macrame wall hanging is ready to be displayed!
Displaying and Caring for Your Macrame Art
This macrame wall hanging is truly a beautiful addition that will accent any room, regardless of your existing decor style. Its versatile design allows it to complement minimalist, industrial, traditional, or, of course, bohemian settings. Hang it in a living room to create a cozy focal point, above a bed for a dreamy headboard alternative, in a nursery for a soft and calming element, or as a statement piece in your home office. For a porch or outdoor space, ensure the yarn is suitable for environmental exposure or that the piece is adequately sheltered.
To keep your macrame looking its best, occasionally dust it gently with a soft brush or a lint roller. Avoid harsh chemicals or machine washing. If it needs a deeper clean, spot clean with a mild soap and cold water, then allow it to air dry completely. With proper care, your handmade macrame wall hanging will continue to bring beauty and texture to your home for years to come, serving as a constant reminder of your creative spirit and skill.
Embarking on a DIY macrame project like this continuous weave wall hanging is more than just making a decoration; it’s about creating something unique with your own hands, infusing your home with personal style, and enjoying the therapeutic process of crafting. So grab your yarn, find your stick, and let the knots tell your story. You’ll be amazed at what you can achieve!