
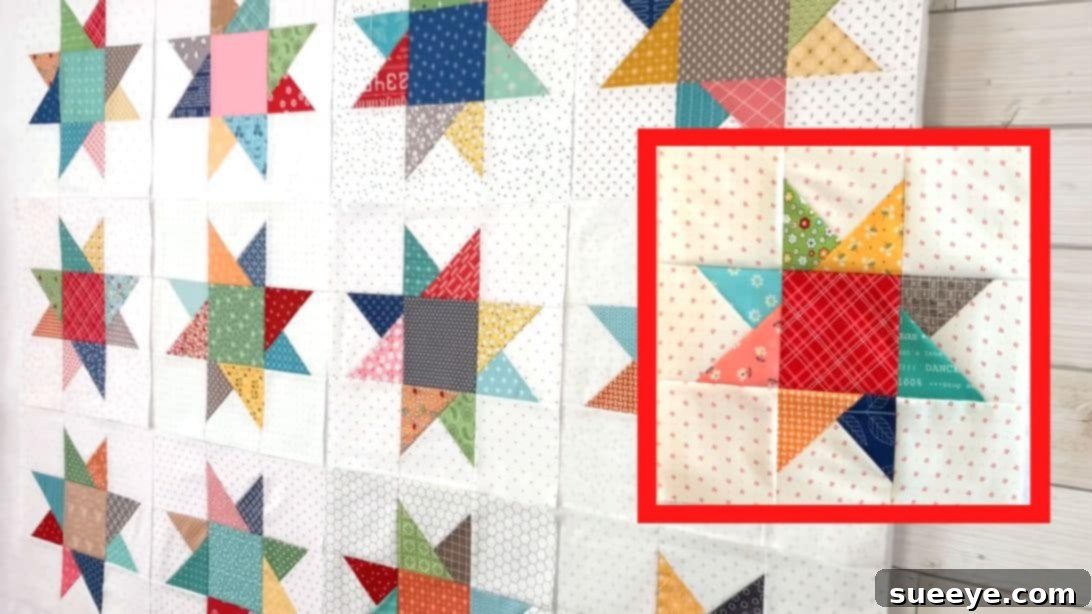
Are your fabric scrap bins overflowing? Do you dream of transforming those beloved remnants into something truly spectacular? Look no further! This comprehensive guide will walk you through creating the stunning Criss-Cross Star Quilt Block, a design that looks wonderfully intricate yet is surprisingly simple to master. Inspired by the captivating work of quilting expert Lori Holt, this 8-point star pattern is a fantastic way to utilize your scrap fabric collection and add a touch of handmade charm to any project. Whether you’re a seasoned quilter or just starting your journey, you’ll find this tutorial straightforward, rewarding, and incredibly fun. Prepare to fall in love with the magic of scrap quilting as we dive into crafting this beautiful 12-inch block.
Why the Criss-Cross Star Quilt Block is a Must-Try for Every Quilter
The Criss-Cross Star Quilt Block stands out for several compelling reasons, making it a favorite among quilters of all skill levels. Its design features an eye-catching 8-point star, created by clever fabric placement, with each point seemingly overlapping the next, all centered around a distinct square. This visual depth gives the block an advanced look, but its construction relies on fundamental quilting techniques, making it incredibly accessible even for beginners.
- Perfect for Fabric Scraps: This block is an absolute dream for stash-busting! The various components require relatively small fabric pieces, allowing you to breathe new life into those cherished scraps you’ve been saving. Mix and match different patterns and solids for a truly unique star.
- Beginner-Friendly Construction: Don’t let the intricate appearance fool you. The Criss-Cross Star block is built using simple half-square triangle (HST) units, which are then combined to form the star points. The steps are repetitive and easy to follow, making it an excellent project for honing your foundational quilting skills.
- Stunning Visual Impact: The clever arrangement of fabric creates a dynamic, multi-dimensional star that draws the eye. By choosing contrasting colors for your star points and background, you can make the design truly pop, creating a vibrant focal point in any quilt.
- Versatile Applications: Once you’ve mastered this block, the possibilities are endless. Use a single block as a charming hot pad or mini wall hanging, combine several for a striking table runner, or create a full quilt that showcases a constellation of criss-cross stars. It’s also perfect for embellishing bags, pillows, or even clothing.
- Rewarding and Quick to Make: The satisfaction of seeing this intricate star emerge from simple squares is immense. Plus, once you get into the rhythm, you’ll find these blocks come together relatively quickly, allowing you to build a collection of blocks for a larger project in no time.
Embrace the challenge, enjoy the process, and get ready to create something beautiful with this captivating quilt block!
Materials and Tools: What You’ll Need to Get Started
To successfully create a 12-inch Criss-Cross Star Quilt Block, precision in cutting and sewing is key. Here’s a detailed list of the materials and essential tools you’ll need to gather before you begin. Remember, fabric choices are where your creativity can truly shine, so don’t be afraid to experiment with colors and patterns!
Fabric Requirements for One 12-inch Block:
- Background Fabric: 8 pieces of 4 1/2″ x 4 1/2″ squares. This fabric will form the corners and outer edges of your star points, making the star stand out. Choose a lighter, solid, or subtly patterned fabric for the best contrast.
- Center Square Fabric: 1 piece of 4 1/2″ x 4 1/2″ square. This will be the focal point at the very center of your star. A vibrant solid or a striking print can work wonderfully here.
- Star Point Fabrics: 8 pieces of 3 1/2″ x 3 1/2″ squares. These are the fabrics that will create the dynamic 8 points of your star. Using different colors or complementary patterns for these squares will add visual interest and depth to your block. Consider a mix of brights, pastels, or even a rainbow effect for a truly unique look.
Essential Quilting Tools:
Having the right tools makes all the difference in achieving accurate and beautiful results. For the Criss-Cross Star Quilt Block, you’ll want to have the following on hand:
- Sewing Machine: A reliable machine capable of a consistent 1/4″ seam allowance is crucial. A walking foot can also be helpful, especially when working with multiple layers of fabric.
- Rotary Cutter, Mat, and Rulers: For precise fabric cutting, a rotary cutter, a self-healing mat, and at least one clear acrylic ruler (a 6.5″ x 12.5″ or a square ruler) are indispensable. Accuracy in cutting directly translates to accuracy in your finished block.
- Iron and Ironing Board: Proper pressing is just as important as sewing. An iron with a steam setting and a sturdy ironing board will help you achieve crisp, flat seams, which are vital for a professional-looking finish.
- Quilting Thread: A good quality 50wt cotton thread is ideal. Choose a color that blends with your fabrics or a neutral color like white or light gray.
- Fabric Scissors: For trimming threads and occasional fabric adjustments.
- Pins or Fabric Clips: To hold your fabric pieces together securely before sewing. Clover Wonder Clips or fine quilting pins work well.
- Seam Ripper: Every quilter needs one! It’s there to gracefully correct any stitches that might go astray.
- Marking Tool: A fabric-safe pen, pencil, or chalk marker for drawing diagonal lines.
With your materials pre-cut and your tools ready, you’re now perfectly prepared to embark on creating your stunning Criss-Cross Star Quilt Block!
Step-by-Step Instructions: Creating Your Criss-Cross Star Quilt Block
Follow these detailed steps carefully to construct your 12-inch Criss-Cross Star Quilt Block. Precision at each stage will ensure your star points align perfectly and your finished block is beautiful.
Step 1: Organize Your Fabric Pieces
Begin by setting aside your 4 1/2″ center square and four of your 4 1/2″ background squares. These pieces will be used later in the block assembly. The remaining four 4 1/2″ background squares and all eight 3 1/2″ colored squares for the star points will be used in the initial construction phases.
Step 2: Attach the First Set of Star Points
Take one 4 1/2″ background square and one 3 1/2″ colored square. Place the colored square right sides together onto one corner of the background square, aligning the raw edges precisely. Using a fabric marker or pencil, draw a diagonal line from one corner to the opposite corner of the colored square, across the outside edges. Sew directly on this drawn line. Repeat this process for the remaining three 4 1/2″ background squares, ensuring each has one colored square sewn diagonally on one corner. You should now have four units, each with a colored triangle attached to one corner.
Step 3: Trim and Press the First Star Point Units
Once you’ve sewn the diagonal lines on all four units, it’s time to trim and press. Carefully trim the excess fabric from the corner, leaving an approximate 1/4-inch seam allowance. This will reduce bulk and create a clean finish. After trimming, press the fabric open, guiding the seam allowance towards the newly formed colored triangle (the star point). Be gentle when pressing, as these edges are on the bias and can easily stretch and distort. Avoid working the iron back and forth too much; instead, press straight down.
Step 4: Attach the Second Set of Star Points
Now, take one of your partially completed units (from Step 3) and another 3 1/2″ colored square. Place the new colored square right side down onto the *opposite* corner of the unit, diagonal to the first colored triangle you attached. Again, align the raw edges carefully. Draw a diagonal line from corner to corner of this new colored square and sew directly on the line, just as you did in Step 2. Repeat this for all four units, adding a second colored triangle to the opposite corner of each. You will now have four units, each with two colored triangles forming a “V” shape in one corner of the larger background square.
Step 5: Final Trim and Press for Star Point Units
Similar to Step 3, carefully trim the excess fabric from the corner of each unit, leaving an approximate 1/4-inch seam allowance. Then, press the fabric open, directing the seam allowance towards the newly added colored triangle. Remember to press gently to maintain the integrity of the bias edges. At the end of this step, you will have four complete “star point” units, each with two colored triangles forming a distinctive V-shape against the background fabric. These units will become the corners of your quilt block.
Step 6: Arrange Your Quilt Block Components
Now it’s time to bring all your pieces together. Lay out your components on a flat surface, such as your design wall or ironing board, in a 3×3 grid. The layout should be as follows:
- Place one of your “star point” units (from Step 5) in each of the four corner positions (top-left, top-right, bottom-left, bottom-right). Ensure the V-shape triangles are oriented correctly to form the star points.
- Place the remaining four 4 1/2″ background squares (set aside in Step 1) in the middle positions of each outer row and column (top-middle, left-middle, right-middle, bottom-middle).
- Place your 4 1/2″ center square (set aside in Step 1) in the very middle of the grid.
Carefully examine the arrangement to ensure the star pattern is forming correctly and the colored points are facing the center. This step is crucial for visualizing the final block and correcting any misorientations before sewing.
Step 7: Assemble the Quilt Block
With your pieces perfectly arranged, it’s time to sew them into a complete block. We will assemble the block row by row, and then join the rows:
- Sew Rows: Starting with the top row, sew the three units together with a consistent 1/4-inch seam allowance. Then, do the same for the middle row and the bottom row. After sewing each row, press the seams. For the top and bottom rows, press seams outwards (towards the background squares). For the middle row, press seams inwards (towards the center square). This technique, known as “nesting seams,” helps the seams lock together when you join the rows, reducing bulk and improving alignment.
- Join Rows: Once your three rows are sewn and pressed, carefully align the top row with the middle row, pinning at the seam intersections to ensure they match perfectly. Sew these two rows together. Repeat this process to attach the bottom row to the combined top and middle rows.
- Final Pressing: After the entire block is sewn, give it a final press. You can press the final seams open or to one side, whichever you prefer for flatter results.
Congratulations! You have now completed your beautiful Criss-Cross Star Quilt Block, measuring a perfect 12 inches square. Take a moment to admire your handiwork!
Tips for a Flawless Criss-Cross Star Quilt Block
Achieving a perfectly pieced quilt block is incredibly satisfying. Here are some invaluable tips to help you ensure your Criss-Cross Star turns out beautifully every time:
- Accuracy is King: The most crucial aspect of quilting is precise cutting and sewing. Even a slight deviation from the 1/4-inch seam allowance can throw off your block size and alignment. Always double-check your measurements before cutting, and use a consistent 1/4-inch seam foot on your sewing machine if available.
- Pressing, Not Ironing: When working with quilt blocks, especially those with bias edges like our star points, it’s essential to “press” your seams rather than “iron” them. Pressing involves lifting and setting the iron down, which helps to flatten seams without distorting the fabric. Ironing, which involves sliding the iron back and forth, can stretch and warp your pieces.
- Starch for Stability: For fabrics that tend to stretch or fray easily, consider using a fabric starch or sizing before cutting. This adds a crispness that makes handling and cutting much easier, leading to more accurate results.
- Chain Piecing: To save time and thread when attaching your star point squares, use chain piecing. Sew one diagonal seam, then without cutting the thread, feed the next unit under the needle and sew its diagonal seam. Continue until all similar seams are sewn, then cut them apart.
- Nesting Seams: As mentioned in Step 7, pressing seams in opposite directions for adjacent rows (e.g., outward for row 1, inward for row 2) allows the seams to “nest” together. This helps in aligning your fabric pieces perfectly when joining rows, creating crisp points and intersections.
- Test Your Seam Allowance: Before starting your project, sew a few test strips of fabric together using your 1/4-inch seam. Measure the resulting strip to ensure your seam allowance is accurate. Adjust your needle position if necessary.
- Slow and Steady: Especially when sewing diagonal lines or joining small pieces, slow down your machine. This gives you greater control and helps prevent fabric shifting, resulting in more accurate seams.
- Trim Dog Ears: After pressing seams, you might notice small fabric triangles sticking out beyond your block edges. These are called “dog ears.” Trim them away carefully to reduce bulk and make it easier to join blocks later.
- Square Up Your Block: Once your block is fully assembled, use a square quilting ruler (e.g., 12.5″ square) to “square up” your block. This involves trimming a tiny bit off all four sides to ensure it is perfectly square and measures exactly 12 inches, making it easier to join with other blocks in a larger project.
Beyond the Block: Inspiring Project Ideas
Now that you’ve successfully created your beautiful Criss-Cross Star Quilt Block, what’s next? This versatile block can be the foundation for a multitude of creative projects. Here are some ideas to spark your imagination and put your new block to good use:
- Full Quilt Top: The most obvious choice! Create multiple Criss-Cross Star blocks and arrange them in a grid, perhaps alternating with plain squares or sashing, to construct a stunning quilt. Imagine a bed covered in a galaxy of these stars!
- Pillow Cover: One or two blocks can be combined to create a unique and personalized pillow cover. This is a fantastic way to add a handmade touch to your home decor or create a thoughtful gift.
- Table Runner or Placemats: Arrange three or five blocks in a row, with or without sashing, to make an elegant table runner. Alternatively, a single block makes a beautiful placemat or hot pad for your kitchen.
- Tote Bag Panel: Sew a Criss-Cross Star block onto the front of a simple tote bag. It adds a sophisticated, custom detail that will make your bag stand out.
- Wall Hanging: A single, perfectly executed Criss-Cross Star block can be quilted and bound to create a small, charming wall hanging. It’s a quick project that allows you to showcase your favorite fabrics.
- Quilted Coasters: Scale down the pattern (by reducing the initial square sizes) to create adorable quilted coasters. These make excellent housewarming gifts.
- Apparel Embellishment: Incorporate a smaller version of the block into a jacket, vest, or skirt for a unique, wearable art piece.
The Criss-Cross Star Quilt Block is more than just a pattern; it’s a gateway to endless creative possibilities. Let your imagination guide you, and enjoy the process of turning fabric into art!
Conclusion: Your Journey to Quilting Mastery Begins with a Star
We hope this comprehensive tutorial has empowered you to successfully create your very own Criss-Cross Star Quilt Block. This pattern is a testament to how simple geometric shapes, when combined thoughtfully, can result in a truly dazzling design. From transforming humble fabric scraps into an intricate 8-point star to mastering precise cutting and pressing techniques, you’ve gained valuable skills that will serve you well in all your future quilting endeavors.
The beauty of the Criss-Cross Star lies in its versatility and visual appeal, making it an excellent choice for a wide array of projects, from cozy quilts to decorative home accents. Each block you create carries a piece of your dedication and creativity, making it a truly personal work of art.
So, don’t let those fabric scraps gather dust! Dive into your stash, pick out some inspiring combinations, and start stitching. We encourage you to share your finished Criss-Cross Star Quilt Blocks and projects with fellow quilters. Happy quilting, and may your creative journey be filled with many more beautiful stars!