
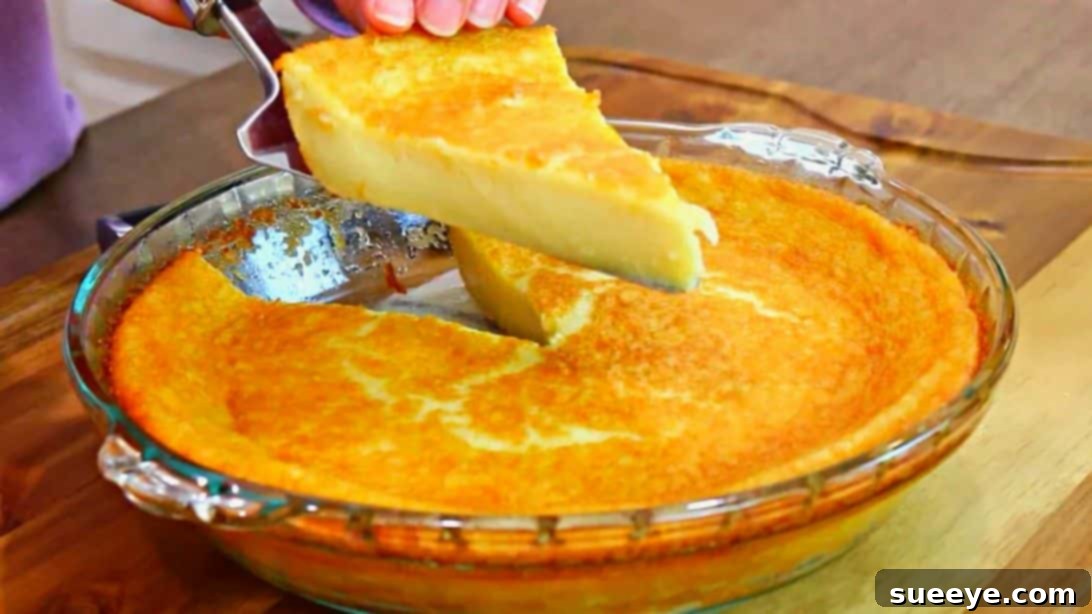
Are you a devoted fan of the creamy, luxurious filling of custard pie but often find yourself wishing you could skip the crust altogether? If the rich, velvety texture and sweet, comforting flavor of pure custard are what you truly crave, then prepare to discover your new favorite dessert! This incredible no-crust custard pie recipe, inspired by the fantastic content creator Lydia April on YouTube, allows you to indulge in all the delightful goodness of custard without any of the fuss or extra carbs of a traditional pie crust. It’s an unbelievably simple yet profoundly satisfying treat that delivers maximum flavor with minimal effort.
Imagine a dessert that’s effortlessly elegant, incredibly versatile, and surprisingly easy to make. This no-crust custard pie is precisely that. It has quickly become a beloved staple in many households, and once you try it, you’ll understand why. Requiring just seven common ingredients and straightforward steps, it’s perfect for both seasoned bakers and complete beginners. Whether you’re looking for a quick weeknight dessert or a crowd-pleasing dish for a special occasion, this recipe promises a delightful experience. Get ready to enjoy the ultimate custard indulgence, where every spoonful is pure, unadulterated bliss!
Why You’ll Fall in Love with This No-Crust Custard Pie
This isn’t just another dessert recipe; it’s a game-changer for anyone who adores custard. Here’s why this particular no-crust version is destined to become a staple in your culinary repertoire:
- Pure Custard Perfection: For those who consider the crust merely a barrier to the heavenly filling, this pie is a dream come true. You get to savor the uncompromised richness and silken texture of custard from the first bite to the last.
- Effortless Simplicity: Say goodbye to the complexities of pastry making. No chilling dough, no rolling, no crimping – just a simple batter that comes together in minutes. This dramatically cuts down on preparation time, making homemade pie accessible even on busy days.
- Minimal Ingredients, Maximum Flavor: You’ll be amazed at how such a profound depth of flavor can be achieved with just a handful of pantry staples. Eggs, sugar, vanilla, butter, flour, salt, and milk combine in perfect harmony to create a truly unforgettable dessert.
- Versatile for Any Occasion: Elegant enough for a dinner party yet comforting enough for a casual family meal, this pie fits seamlessly into any setting. Serve it warm for a cozy treat or chilled for a refreshing dessert.
- Naturally Gluten-Friendly Option: While the recipe uses all-purpose flour, it can easily be adapted for those with gluten sensitivities by substituting with a high-quality gluten-free all-purpose flour blend. This makes it a fantastic option for a wider range of dietary needs.
- Budget-Friendly Baking: With its reliance on inexpensive, everyday ingredients, this no-crust custard pie is a delicious way to enjoy a gourmet-tasting dessert without breaking the bank.
- Beginner-Friendly: If you’re new to baking, this recipe is an excellent starting point. The steps are intuitive, and the results are consistently impressive, building confidence in the kitchen.
Essential Ingredients for Your Custard Masterpiece
The beauty of this recipe lies in its simplicity and reliance on basic ingredients, most of which you likely already have on hand. Each component plays a crucial role in creating the perfect texture and flavor profile for your no-crust custard pie. Quality matters, so choose the freshest ingredients possible for the best results.
- 4 large eggs: Eggs are the structural backbone of custard, providing richness, binding, and helping the pie set into its desired firm yet creamy texture. Using large, fresh eggs ensures optimal results.
- 1 cup of granulated sugar: Sugar sweetens the custard and contributes to its overall luxurious mouthfeel. It also aids in creating that beautiful golden-brown top during baking.
- 2 teaspoons of vanilla bean paste or vanilla extract: Vanilla is the heart of custard flavor. Vanilla bean paste offers a more intense, pure vanilla flavor with visible specks, while high-quality vanilla extract provides a classic, comforting aroma and taste. Don’t skimp on the vanilla!
- ½ cup of unsalted butter, melted: Butter adds incredible richness and a smooth, velvety texture to the custard. Melting it ensures it incorporates seamlessly into the batter, distributing its flavor evenly.
- ½ cup of all-purpose flour: Flour acts as a gentle thickening agent, giving the custard just enough body to set without becoming rubbery. It’s essential for achieving that classic custard consistency. For a gluten-friendly version, a 1:1 gluten-free all-purpose flour blend can be used.
- A pinch of salt: Often overlooked, a small pinch of salt is vital. It balances the sweetness of the sugar and enhances all the other flavors, making the custard taste more complex and well-rounded.
- 2 cups of whole milk, warm: Milk is the primary liquid base for the custard. Using whole milk is highly recommended for the richest, creamiest texture. Warming the milk slightly beforehand helps it incorporate more smoothly into the egg mixture, preventing lumps and ensuring a perfectly smooth batter.
Crafting Your Irresistible No-Crust Custard Pie: Step-by-Step Guide
Follow these detailed steps carefully to ensure your no-crust custard pie turns out perfectly every time. Precision in baking often leads to the most delightful results!
Step 1: Prepare Your Baking Environment and Initial Mix
Begin by preheating your oven to 350°F (175°C). Accurate oven temperature is crucial for proper baking, so if you have an oven thermometer, now is a good time to use it. While the oven heats, prepare your pie dish. A 9-inch pie dish is ideal for this recipe. Thoroughly grease the dish with butter or a non-stick cooking spray, ensuring every crevice is coated. This prevents sticking and ensures your beautiful custard pie can be easily removed and served. Once greased, set it aside.
Next, grab a large mixing bowl – one that offers ample space for whisking and combining ingredients without spills. Crack the 4 large eggs into the bowl, then add the 1 cup of granulated sugar and the 2 teaspoons of vanilla bean paste or vanilla extract. This trio forms the sweet and aromatic base of your custard. Using an electric hand mixer or a stand mixer fitted with the whisk attachment, beat these ingredients together. Start on a low speed to combine, then increase to medium-high. Continue beating for about 3-5 minutes, or until the mixture becomes wonderfully creamy and noticeably puffy, and the eggs turn a beautiful light, pale yellow color. This aeration step is vital as it incorporates air, contributing to the light and airy texture of the final custard.
With the egg mixture light and fluffy, it’s time to introduce the remaining core ingredients. Gently pour in the ½ cup of melted unsalted butter. Add the ½ cup of all-purpose flour and the pinch of salt. Switch to a manual whisk or continue with your electric mixer on a low speed, whisking these new additions until they are just well combined. Be careful not to overmix at this stage; overmixing flour can develop gluten too much, potentially leading to a tougher texture. Mix only until no streaks of flour are visible and the batter is smooth.
Step 2: Incorporate Milk, Rest, Bake, and Serve
The final liquid component is the milk. Gently warm the 2 cups of whole milk until it is lukewarm – not hot, just warm to the touch. You can do this in a microwave or a small saucepan over low heat. Pour the warm milk slowly into the mixing bowl with the custard batter. Continue to whisk gently until all ingredients are thoroughly combined and the mixture is smooth and homogenous. The warm milk helps to temper the eggs, ensuring a silky-smooth custard without any scrambled egg texture.
Once the batter is mixed, allow it to rest for approximately 5 minutes. This brief resting period is important as it gives the flour a chance to fully hydrate, resulting in a more consistent and even texture, and also allows any small air bubbles introduced during mixing to dissipate, leading to a smoother custard.
After resting, carefully pour the prepared custard batter into your greased 9-inch pie dish. Transfer the dish to your preheated oven. Bake at 350°F (175°C) for about 45 to 55 minutes. Baking times can vary slightly depending on your oven, so keep an eye on it. The custard is ready when the top is beautifully golden brown, and the center appears mostly set with a slight jiggle (like firm gelatin) when gently shaken. An inserted knife or toothpick into the center should come out clean. Avoid overbaking, as this can lead to a dry or rubbery texture.
Once baked, carefully remove the pie from the oven. Allow it to cool on a wire rack for at least 30 minutes to an hour at room temperature. Custard sets further as it cools. You have the option to serve this delightful pie warm, offering a comforting and gooey experience, or you can let it cool completely in the refrigerator for several hours (or even overnight) before serving. Chilling the pie will result in a firmer, more classic custard texture that slices beautifully. Either way, it’s an absolute treat!
Tips for Achieving the Perfect No-Crust Custard Pie
While this recipe is incredibly forgiving, a few expert tips can elevate your baking experience and ensure a consistently perfect result:
- Room Temperature Eggs: Using room temperature eggs helps them incorporate more easily with sugar, creating a smoother, more voluminous batter. If you forget to take them out, place them in a bowl of warm water for 5-10 minutes.
- Don’t Overmix the Flour: Once the flour is added, mix only until just combined. Overmixing can develop the gluten in the flour, potentially leading to a tougher custard texture.
- Warm Milk, Not Hot: Ensure the milk is only lukewarm. If it’s too hot, it can scramble the eggs when added, resulting in a lumpy custard.
- Grease Your Dish Thoroughly: Even though there’s no crust, a well-greased pie dish is essential to prevent sticking and make serving easier.
- Check for Doneness Accurately: The center of the pie should have a slight wobble when gently shaken, similar to set gelatin. It will continue to set as it cools. An internal temperature of 175-180°F (79-82°C) is ideal for custards.
- Cool Completely: Resist the urge to cut into the pie immediately. Letting it cool, especially if chilling in the fridge, allows the custard to fully set and develop its firm, sliceable texture.
- Adjust Sweetness: While 1 cup of sugar is standard, you can slightly reduce or increase it by a tablespoon or two based on your personal preference.
Serving Suggestions and Flavor Variations
This No-Crust Custard Pie is delicious on its own, but it also serves as a fantastic canvas for various toppings and flavor enhancements. Get creative and customize it to your liking!
Delightful Toppings:
- Fresh Berries: A vibrant mix of strawberries, blueberries, raspberries, or sliced peaches adds a beautiful contrast in color and a refreshing tartness.
- Whipped Cream: A dollop of freshly whipped cream, perhaps lightly sweetened with a touch of vanilla, is a classic pairing that enhances the creaminess.
- Dusting of Spice: A light dusting of ground cinnamon or nutmeg just before serving adds an aromatic touch that complements the custard’s warmth.
- Chocolate Shavings: For chocolate lovers, a sprinkle of dark or milk chocolate shavings offers a luxurious indulgence.
- Caramel or Fruit Sauce: A drizzle of homemade caramel sauce or a simple berry coulis can elevate the presentation and flavor profile.
Exciting Flavor Variations:
- Lemon or Orange Zest: Add 1-2 teaspoons of finely grated lemon or orange zest to the batter along with the vanilla for a bright, citrusy lift.
- Almond Extract: Substitute half a teaspoon of vanilla extract with almond extract for a delicate, nutty flavor.
- Coconut Custard: Replace one cup of whole milk with full-fat canned coconut milk for a tropical twist. Ensure it’s well-shaken.
- Maple Pecan: Drizzle a little maple syrup into the batter and sprinkle chopped pecans on top before baking for a comforting, autumnal flavor.
- Nutmeg Before Baking: For a traditional touch, sprinkle a little freshly grated nutmeg over the top of the custard before it goes into the oven.
Storing Your Delicious No-Crust Custard Pie
Proper storage ensures your custard pie remains fresh and delicious for days, allowing you to enjoy its delightful flavors over time.
- Refrigeration is Key: Custard pies should always be stored in the refrigerator due to their egg and milk content. Cover the pie dish tightly with plastic wrap or aluminum foil to prevent it from absorbing odors from other foods and to keep it from drying out.
- Shelf Life: When stored correctly, your no-crust custard pie will remain fresh and delicious for up to 3-4 days in the refrigerator.
- Freezing (Not Recommended): While some baked goods freeze well, custard pies generally do not. Freezing and thawing can alter the texture of the custard, making it watery or grainy. It’s best enjoyed fresh within a few days.
- Serving Temperature: While it can be enjoyed warm, many find chilled custard pie to be the most refreshing and firm. If you prefer it warm after refrigeration, you can gently heat individual slices in the microwave for a short duration until slightly warm, being careful not to overheat and alter the texture.
Your New Favorite: Easy To Make No-Crust Custard Pie
This No-Crust Custard Pie is more than just a recipe; it’s an invitation to rediscover the simple pleasures of homemade baking. With its straightforward preparation and comforting flavors, it offers a perfect solution for satisfying your sweet tooth without the complexity often associated with traditional pies. Whether you’re making it for a special gathering or simply to treat yourself to a moment of pure culinary delight, this pie delivers on all fronts: ease, flavor, and satisfaction.
We extend our sincere gratitude to Lydia April via YouTube for sharing such an inspiring and wonderful recipe. Her creative approach has truly gifted us with a dessert that simplifies baking without compromising on taste. If you’ve loved making and tasting this delightful no-crust custard pie, we highly recommend visiting her YouTube channel. You’ll find many more innovative and delicious recipes waiting for you. Give her channel a visit, show some support, and subscribe to continue your culinary journey with more amazing ideas!