
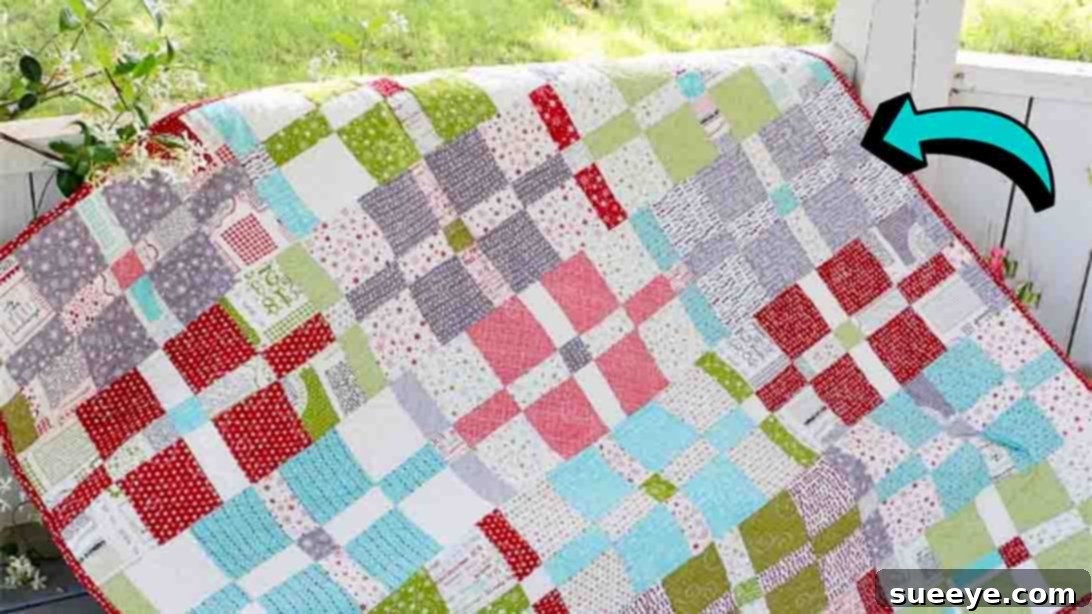
Are you searching for an engaging and rewarding quilting project that’s perfect for all skill levels? Look no further! This comprehensive guide introduces you to the delightful Layer Cake Crumble Quilt, a stunning design brought to you by the creative minds at Fat Quarter Shop. Whether you’re a beginner eager to dive into the world of quilting or a seasoned pro seeking a fun and fast project, this quilt pattern is an absolute joy to create. It’s not only incredibly beginner-friendly but also an ideal way to utilize those beautiful fabric layer cakes you’ve been saving!
Layer cakes, with their perfectly coordinated 10-inch squares, simplify the fabric selection process, making this project an accessible entry point for newcomers and a time-saver for experienced quilters. Imagine transforming a stack of pre-cut fabrics into a gorgeous, textured quilt that’s perfect for cozy nights, thoughtful handmade gifts, or simply adding a touch of warmth and charm to your home decor. This tutorial provides everything you need to know, from selecting your materials to assembling the final quilt top, ensuring a smooth and enjoyable crafting journey.
RELATED: Explore another charming Layer Cake Pattern: The Lazy Days Tutorial!
Even if you’ve pieced dozens of quilts, you’ll find the Layer Cake Crumble Quilt design refreshing and creatively satisfying. Its unique block construction creates a captivating visual texture reminiscent of scattered crumbs, giving it a playful yet sophisticated appeal. This project is not just about making a quilt; it’s about the joy of creation, the satisfaction of seeing fabric squares transform into a masterpiece, and the pride of gifting a handmade treasure. Follow along with our detailed instructions, and don’t forget to watch the accompanying video tutorial from Fat Quarter Shop for visual guidance on each step.
Why Choose the Layer Cake Crumble Quilt Project?
The Layer Cake Crumble Quilt stands out for several compelling reasons. Firstly, its reliance on pre-cut 10-inch fabric squares (layer cakes) eliminates the tedious and time-consuming task of cutting fabric from yardage. This means you can jump straight into the fun part – sewing! Layer cakes typically come with a curated selection of fabrics from a specific collection, ensuring all your prints and colors are harmoniously matched, which is a huge bonus, especially for those who find fabric coordination challenging.
Secondly, the design itself is forgiving and visually dynamic. The “crumble” effect adds depth and interest, making minor inconsistencies less noticeable and allowing your fabric choices to truly shine. It’s a fantastic pattern for showcasing a favorite fabric line or for combining a variety of prints from your stash. Lastly, its modular construction means you build the quilt block by block, making the process manageable and less intimidating than larger, more complex designs. You’ll gain confidence with each completed block, building momentum toward your beautiful finished quilt.
Essential Materials & Tools:
Before you begin your quilting adventure, gather all your materials and tools. Having everything organized and within reach will make your crafting experience much more enjoyable and efficient. Precision is key in quilting, so investing in good quality tools will pay off in the long run.
- 1 Layer Cake (or 36 10″ squares) – Fabric A: This is the heart of your quilt! A standard layer cake contains 42 squares, so you’ll have a few extras. For this pattern, you’ll need 18 light-colored squares and 18 dark-colored squares to create the contrasting “crumble” effect. If you’re not using a pre-cut layer cake, carefully select 36 different 10-inch squares from your stash, ensuring a good balance of light and dark values for visual impact.
- 5/8 Yard Binding Fabric – Fabric B: This fabric will be used for the finishing edge of your quilt. Choose a color that complements your main quilt fabrics, either a solid that ties everything together or a subtle print that adds another layer of interest.
- 3 1/2 Yards Backing Fabric: The backing fabric provides stability and a finished look to your quilt. Select a soft, durable fabric that will feel comfortable against the skin. This is also an opportunity to choose a fun print or a cozy flannel to make your quilt even more inviting.
- Quilt Batting (approximately 54″ x 64″): Although not listed in the original snippet, batting is crucial for a quilt! It provides warmth, loft, and helps to define the quilting stitches. Choose a batting type that suits your needs – cotton for a flat, natural feel; poly-blend for more loft; or wool for luxurious warmth.
- Coordinating Thread: High-quality thread that matches or blends with your fabrics is essential for strong, invisible seams.
- Basic Quilting Tools:
- Sewing Machine: A reliable machine with a 1/4-inch piecing foot is highly recommended for consistent seams.
- Rotary Cutter, Mat, and Rulers: For precise and efficient fabric cutting. A 24-inch ruler and a smaller square ruler (like 6.5″ or 8.5″) will be very helpful.
- Fabric Scissors: For trimming threads and other small cuts.
- Iron and Ironing Board: Crucial for pressing seams flat and accurately.
- Pins or Fabric Clips: To hold fabric pieces together before sewing.
- Seam Ripper: Every quilter needs one!
- Free Pattern: Don’t forget to download the official pattern for detailed visual guidance and measurements! (Click here for the free PDF pattern.)
Cutting Your Fabric: Precision is Key
Accurate cutting is the cornerstone of successful quilting. Take your time with this step, as well-cut pieces will lead to perfectly matched seams and a beautiful finished quilt.
- Binding Fabric (Fabric B): Cut your 5/8 yard binding fabric into six 2 1/2-inch x Width of Fabric (WOF) strips. These strips will later be sewn together end-to-end to create one long strip for your quilt binding. Remember, WOF typically refers to the selvage-to-selvage width of your fabric, usually around 42-44 inches.
- Layer Cake Squares (Fabric A): The 10-inch squares are already pre-cut, so no initial cutting is needed for these. However, you will be cutting these squares during the piecing process in Step 1 of the directions.
Tip for Cutting: Always use a sharp rotary blade for clean, precise cuts. Work on a self-healing mat and use an acrylic ruler to guide your cutter. Measure twice, cut once!
Directions: Step-by-Step Guide to Assemble Your Quilt
Now that your materials are ready, let’s dive into the exciting part: assembling your Layer Cake Crumble Quilt! We’ll break down each step to ensure clarity and success.
Step 1: Preparing the Initial Strip Sets
Begin by carefully dividing your 36 layer cake squares into two distinct piles: 18 light-colored squares and 18 dark-colored squares. This clear distinction is vital for achieving the contrasting “crumble” effect.
Next, take one dark square and one light square. Place them right sides together, ensuring all edges are perfectly aligned. Secure them with a few pins along the edges to prevent shifting during sewing. Using a 1/4-inch seam allowance, sew along both the right and left sides of the paired squares. The 1/4-inch seam is standard in quilting and contributes to accurate block construction. Be consistent with your seam allowance for the best results.
Repeat this process for all remaining light and dark squares, creating a total of 18 sewn pairs. Once all pairs are stitched, take one sewn pair and place your quilting ruler over it. Carefully cut through both layers at the four-inch mark from one edge, and then again at the six-inch mark. This will yield three distinct segments from each pair: a four-inch wide strip, a two-inch wide strip, and another four-inch wide strip. Rotate the piece 180 degrees, then repeat the cuts at the four-inch and six-inch marks. This precise cutting technique will create the base units for your “crumble.” Set these newly cut segments aside in organized stacks to maintain order and prevent confusion.
Quilting Tip: For efficiency, consider chain piecing. This involves feeding one pair of squares into your sewing machine, stitching the first side, then immediately feeding the next pair without cutting the thread in between. This saves time and thread. Once all pairs are sewn on one side, cut them apart and then repeat the process for the second side.
Step 2: Assembling the Partial Crumble Units
After cutting, it’s time to assemble the individual units that will form your blocks. Pressing your seams correctly is paramount in quilting, as it helps your blocks lie flat and fit together accurately. For these units, press the seams towards the darker fabric. This technique helps to “hide” the darker seam allowance under the darker fabric, preventing it from shadowing through lighter fabrics in your finished quilt.
Now, lay out your square and rectangle units according to the pattern (refer to the accompanying PDF pattern or the video tutorial for precise visual placement). Typically, this involves arranging the cut segments from Step 1 to form a small square unit. Carefully stitch these segments together with a consistent 1/4-inch seam allowance. Once stitched, press the new seams outwards, away from the center of the unit. This further reduces bulk where seams intersect later. From each of the original 18 sewn pairs, you will create two partial crumble units, resulting in a total of 36 such units.
Step 3: Crafting the Light and Dark Strip Components
This step involves creating the contrasting strip components that will intersperse with your crumble units to form the complete blocks.
First, for the light strips: take two of your previously cut light rectangles and one dark square. Arrange them side-by-side. Sew these three pieces together with a 1/4-inch seam allowance, carefully joining the rectangles to either side of the dark square. Once sewn, press the seams toward the center, meaning the seam allowances will point towards the dark square. You will make 18 of these light strip units.
Next, for the dark strips: take two of your dark rectangles and one light square. Similar to the previous step, arrange and sew these three pieces together using a 1/4-inch seam allowance. Again, press the seams toward the center, meaning the seam allowances will point towards the light square. You will also make 18 of these dark strip units.
Maintaining consistent seam allowances and pressing directions throughout these steps will ensure your blocks come together neatly and lay flat, which is crucial for a professional-looking quilt.
Step 4: Assembling the Quilt Blocks and Top
With all your individual units and strips prepared, it’s time to bring them together to form the complete quilt blocks and ultimately, the quilt top.
To assemble each block: take two of your “crumble units” (from Step 2) and one “light strip” unit (from Step 3). Arrange these three components side-by-side, with the light strip positioned between the two crumble units. Stitch them together using a 1/4-inch seam allowance. After sewing, press the seams towards the center strip. This pressing technique helps nest seams when you join blocks together, reducing bulk. You will create 18 of these finished quilt blocks.
Now, to form each row of your quilt: you will need to lay out three of your newly assembled blocks. For visual continuity and the overall design, ensure that you place the dark strips in between the blocks. This means your arrangement for a row will be: Quilt Block 1 – Dark Strip Unit – Quilt Block 2 – Dark Strip Unit – Quilt Block 3. Carefully sew these components together with a 1/4-inch seam allowance. Once a row is sewn, press the seams towards the dark strips. This again helps with seam nesting and a flatter finish. You will make a total of six such rows for your quilt top.
Finally, lay out your six completed rows in the desired order. Carefully sew these rows together, matching up your seams as precisely as possible. Pins are your best friend here! Pin at intersections to ensure points meet. After sewing all the rows together, give your finished quilt top a final press to ensure it lies perfectly flat. Congratulations, your Layer Cake Crumble Quilt top is complete!
Finishing Your Layer Cake Crumble Quilt: Beyond the Top
Once your beautiful quilt top is pieced together, there are three more essential steps to turn it into a complete, usable quilt: basting, quilting, and binding.
Basting: Preparing for Quilting
Basting is the process of temporarily holding the three layers of your quilt together: the quilt top, the batting, and the backing. This prevents shifting during the quilting process. There are several basting methods:
- Pin Basting: Use curved safety pins to secure the layers together, placing them approximately every 4-6 inches across the entire quilt.
- Spray Basting: Use a temporary fabric adhesive spray to glue the layers together. This provides a smooth, pin-free surface for quilting.
- Thread Basting: Hand-stitch long basting stitches through all layers.
Whichever method you choose, lay your backing fabric wrong side up, tape it securely to a clean floor or large table, then layer the batting smoothly on top, followed by your quilt top right side up. Ensure all layers are flat and wrinkle-free before basting.
Quilting: Adding Texture and Durability
Quilting is the process of stitching through all three layers of the quilt. This not only adds beautiful texture and design but also secures the batting, preventing it from shifting or bunching over time. You have many options for quilting:
- Straight-Line Quilting: Using your sewing machine and a walking foot, stitch straight lines across the quilt, either in a grid pattern, along existing seams (stitch-in-the-ditch), or in diagonal lines. This is a great option for beginners.
- Free-Motion Quilting: If you’re more adventurous, you can use a darning foot and drop your feed dogs to “draw” designs with your sewing machine.
- Hand Quilting: For a traditional touch, you can hand-stitch decorative patterns through your quilt.
Choose a quilting design that complements the “crumble” pattern and your fabric choices. Remember, the quilting density affects the drape and feel of the finished quilt. More quilting makes a stiffer quilt, while less makes it softer.
Binding: The Final Frame
Binding is the finishing edge that encases the raw edges of your quilt, providing durability and a polished look. You’ve already cut your binding strips in the initial steps.
- Prepare Binding: Sew your six 2 1/2-inch x WOF binding strips together end-to-end using diagonal seams to create one long continuous strip. Press the seams open, then press the entire strip in half lengthwise, wrong sides together.
- Attach to Quilt: Starting on one side of your quilt, align the raw edge of your folded binding strip with the raw edge of your quilt top. Sew with a 1/4-inch seam allowance, mitering the corners as you go.
- Finish Binding: Once sewn around the entire perimeter, fold the binding over to the back of the quilt. You can hand-stitch it down for an invisible finish or machine-stitch it for a quicker, more durable edge.
And there you have it! Your Layer Cake Crumble Quilt is now complete and ready to be loved. This pattern offers a fantastic opportunity to practice precision piecing, develop your quilting skills, and create a truly beautiful and functional piece of art.
Care Instructions for Your Handmade Quilt
To ensure your Layer Cake Crumble Quilt remains beautiful for years to come, proper care is essential. Generally, machine wash on a gentle cycle with cold water using a mild detergent. Tumble dry on low heat or, ideally, lay flat to dry to preserve the integrity of the stitches and fabric. Avoid harsh chemicals or bleach. The first wash will often give your quilt that lovely crinkled, heirloom look that quilters adore!
Layer Cake Crumble Quilt Tutorial: Your Next Creative Journey Awaits!
We hope this detailed tutorial empowers you to create your very own Layer Cake Crumble Quilt. This project is a wonderful way to express your creativity, learn new skills, and make something truly special. Remember, quilting is a journey, not a race. Enjoy each stitch, celebrate every milestone, and don’t be afraid to add your unique touch to the design.
For further visual guidance and expert tips, be sure to watch the full video tutorial from Fat Quarter Shop on YouTube. Happy quilting, and may your sewing machine hum with joy!