
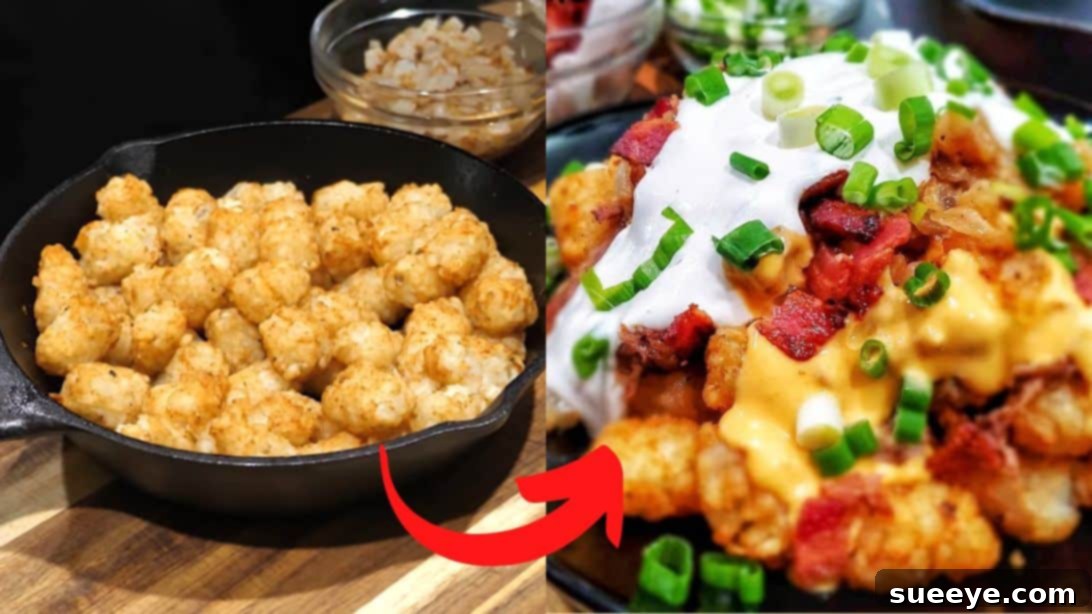
Crispy Loaded Tater Tots: The Ultimate Gourmet Upgrade
Few comfort foods evoke such a strong sense of nostalgia and pure delight as tater tots. These golden, crispy potato nuggets, whether deep-fried to perfection or baked to a crunchy finish, are a beloved snack on their own. But what if we told you that your favorite childhood treat could be transformed into an epic culinary experience? Prepare to elevate your tater tot game to an entirely new level with this incredible recipe for Crispy Loaded Tater Tots.
Imagine perfectly cooked, golden-brown tots generously topped with a symphony of flavors and textures: tangy sour cream, savory bacon bits, a gooey blanket of melted cheese, fresh green onions, and sweet, caramelized sautéed onions. This isn’t just a snack; it’s a hearty appetizer, a spectacular side dish, or even a decadent main course that promises to be a showstopper at any gathering. Inspired by the masterful techniques of Smokin’ & Grillin with AB, this recipe takes humble tater tots and turns them into an unforgettable feast. Get ready to impress your taste buds and your guests with this extraordinary creation that truly redefines what loaded tots can be.
Ingredients for Ultimate Loaded Tater Tots
Crafting the perfect batch of loaded tater tots starts with selecting fresh, high-quality ingredients. This combination strikes a balance between rich, savory flavors and bright, fresh accents, ensuring every bite is an explosion of taste.
- 1 Large Bag of Frozen Tater Tots: The foundation of our dish. Choose your favorite brand; variety doesn’t typically impact the final flavor significantly, but cooking instructions may vary slightly.
- 1 Large Onion (Diced): We’ll be sautéing this to a beautiful golden-brown, adding a sweet and savory depth that complements the richness of the other toppings.
- 2 Heaping Tablespoons of Ranch Dressing: This secret ingredient adds a creamy, tangy, and herbaceous kick to the sour cream mixture, enhancing its overall flavor profile.
- 2 to 4 Heaping Tablespoons of Sour Cream: Essential for that classic loaded potato texture and tangy counterpoint to the savory toppings. Adjust to your desired creaminess.
- 1 Cup of Shredded Monterey Jack Cheese (or a blend): Monterey Jack melts beautifully, creating a creamy, stretchy texture. Feel free to use a cheddar blend, a Mexican blend, or even pepper jack for a little heat.
- 5 to 6 Slices of Thick-Cut Bacon (Diced): Thick-cut bacon renders beautifully, yielding crispy bits and flavorful fat, both crucial for this recipe. If you prefer, turkey bacon can be used, though it won’t produce as much fat.
- 3 to 6 Green Onions or Chives (Chopped): These provide a fresh, pungent, and vibrant garnish, cutting through the richness and adding a pop of color.
- Optional Protein Topping of Your Choice: Consider shredded smoked brisket, pulled pork, grilled chicken, or seasoned ground beef for a heartier, meal-sized version of these loaded tots.
- Salt and Pepper to Taste: Basic seasonings to adjust and enhance the overall flavor profile of your finished dish.
For the Irresistible Homemade Cheese Sauce (Optional, but highly recommended):
While shredded cheese is fantastic, a creamy, velvety cheese sauce takes these loaded tots from great to absolutely legendary. This simple sauce adds an extra layer of decadence.
- 2 Tablespoons of All-Purpose Flour: Forms the base of our roux, thickening the sauce to a luxurious consistency.
- 2 Tablespoons of Butter or Reserved Bacon Fat: Using bacon fat from your cooked bacon will infuse the sauce with an incredible smoky, savory flavor. Butter works perfectly too for a classic approach.
- 1 Cup of Milk: Whole milk is recommended for a richer sauce, but 2% or skim milk can also be used.
- 1 to 1.5 Cups of Shredded Cheese (Cheddar, Monterey Jack, or a blend): The star of the sauce! A sharp cheddar or a smooth Monterey Jack works wonderfully.
- Creole Seasoning to Taste: Adds a fantastic savory kick and a hint of spice to the cheese sauce. Adjust to your preferred level of heat and flavor.
Step-by-Step Guide: Crafting Your Crispy Loaded Tater Tots
Follow these detailed steps to create a batch of loaded tater tots that will have everyone reaching for more. Each step is designed to build flavor and texture, leading to a truly extraordinary dish.
Step 1: Achieving Perfectly Crispy Tater Tots
The foundation of great loaded tots is, of course, perfectly crispy tater tots. You have several options for cooking, each yielding slightly different results. For the crispiest outcome, deep-frying is supreme, but oven baking or air frying also work wonderfully with less oil.
Oven Baking: Preheat your oven to the temperature specified on your tater tot package, typically around 400-425°F (200-220°C). Arrange the frozen tater tots in a single layer on a baking sheet. For extra crispiness, avoid overcrowding the pan and consider using a wire rack set over a baking sheet to allow air to circulate around all sides. Bake for the recommended time, usually 20-30 minutes, flipping halfway through, until they are golden brown and crunchy.
Deep Frying: Heat about 2-3 inches of vegetable oil in a heavy-bottomed pot or deep fryer to 350°F (175°C). Carefully add the frozen tater tots in batches, ensuring not to overcrowd the fryer, which can lower the oil temperature and result in greasy tots. Fry for 3-5 minutes, or until they are deeply golden and exceptionally crispy. Remove with a slotted spoon and place on a paper towel-lined plate to drain excess oil.
Air Frying: Preheat your air fryer to 375-400°F (190-200°C). Place a single layer of tater tots in the air fryer basket. Cook for 12-18 minutes, shaking the basket every 5 minutes, until they are golden and crispy.
Once cooked to your desired crispness, set the tater tots aside while you prepare the other toppings. If you’re using a skillet for assembly, you can return them to the skillet at this point, but they will be more prone to losing crispness if kept warm for too long.
Step 2: Rendering Crispy Bacon Bits
Crispy bacon is a non-negotiable topping for loaded tots. It adds a crucial layer of salty, smoky flavor and a delightful textural crunch.
Place a large skillet or frying pan over medium-high heat. Once the pan is hot, add your diced thick-cut bacon pieces. Cook, stirring occasionally, until the bacon is beautifully crispy and most of its fat has rendered out. This usually takes about 8-10 minutes. Using a slotted spoon, carefully remove the crispy bacon bits from the pan and transfer them to a plate lined with paper towels. This will help absorb any excess grease, ensuring your bacon remains perfectly crunchy. Crucially, reserve the rendered bacon fat in the pan – we’ll use it in the next step to impart incredible flavor to our onions.
Step 3: Sautéing Sweet and Savory Onions
The sautéed onions add a depth of flavor and sweetness that beautifully complements the savory bacon and cheese. Using the reserved bacon fat for this step is key to maximizing flavor.
With the reserved bacon grease still in the pan from Step 2, reduce the heat to medium. Add the diced onions to the pan. Sauté the onions, stirring frequently, for about 8-10 minutes, or until they become beautifully transparent and begin to soften. Avoid browning them too much at this stage; we’re aiming for translucent and sweet. Once they reach this stage, remove about half of the sautéed onions from the pan and set them aside. These will be part of the final layering process, offering a softer, sweeter texture.
Step 4: Preparing the Tangy Sour Cream & Ranch Mixture
This creamy, zesty topping is essential for balancing the richness of the other ingredients. The addition of ranch dressing elevates the flavor significantly.
In a medium-sized bowl, combine 3 heaping tablespoons of sour cream with 2 heaping tablespoons of ranch dressing. Use a whisk to thoroughly combine the ingredients until the mixture is smooth and evenly blended. Taste the mixture and adjust seasonings if needed; you might want a pinch of salt or pepper, or even a tiny splash of hot sauce for a kick. Next, finely chop a portion of your green onions or chives (about half, reserving the rest for garnish) and gently fold them into the sour cream mixture. This adds a fresh, oniony bite and a beautiful fleck of green.
Step 5: Caramelizing Remaining Onions for Extra Depth
To add another layer of flavor and texture, we’ll further cook the remaining onions in the pan until they achieve a lovely golden-brown caramelization.
Return the skillet with the remaining sautéed onions (from the end of Step 3) to medium-high heat. Continue to cook these onions, stirring frequently, for an additional 5-7 minutes. The goal here is to get them a little more browned and caramelized, developing a deeper, sweeter, and slightly nutty flavor profile. This contrast between the softer, translucent onions and the deeply caramelized ones will add fantastic complexity to your loaded tots. Once they are a rich golden-brown, set them aside.
Step 6: Crafting the Luxurious Homemade Cheese Sauce (Optional)
If you’re opting for the ultimate indulgence, this velvety cheese sauce is a game-changer. It’s surprisingly simple to make and adds a professional touch.
In a medium pot or saucepan, melt 2 tablespoons of butter (or reserved bacon fat for an even richer flavor) over medium heat. Once the butter is melted and slightly bubbling, sprinkle in 2 tablespoons of all-purpose flour. Immediately whisk continuously for about 1-2 minutes to create a smooth roux. This cooks out the raw flour taste. Gradually pour in 1 cup of milk, whisking constantly to prevent lumps. Continue to whisk until the sauce begins to thicken, which should take a few minutes. Once thickened to your desired consistency, reduce the heat to low and sprinkle in 1 to 1.5 cups of shredded cheese. Stir gently until the cheese is completely melted and incorporated, creating a smooth, creamy sauce. If the sauce becomes too thick, add a little more milk, one tablespoon at a time, until it reaches your preferred consistency. Finish by stirring in creole seasoning to taste, and a pinch of salt if needed. Taste and adjust seasonings. Keep warm over very low heat, stirring occasionally, until ready to assemble.
Step 7: Assembling and Serving Your Ultimate Loaded Tater Tots
Now for the grand finale! Bringing all the glorious components together to create your masterpiece.
If your tater tots have cooled, you can briefly return them to the oven or air fryer for a few minutes to re-crisp. Once hot and crispy, arrange the cooked tater tots on a large serving platter or in an oven-safe skillet if you want to melt the cheese directly on top. Evenly sprinkle a generous layer of shredded Monterey Jack cheese over the hot tater tots. The residual heat from the tots will begin to melt the cheese beautifully. Next, scatter the crispy bacon bits generously over the cheese. Drizzle the creamy sour cream and ranch mixture liberally over everything. If you made the homemade cheese sauce, now is the time to pour it luxuriously over the entire dish. Finally, sprinkle the remaining shredded cheese, the chopped fresh green onions, and both the sautéed and caramelized onions over the top. If using an optional protein topping like pulled pork or brisket, add it here. For an extra gooey finish, you can place the assembled tots under a broiler for 1-2 minutes, just until the cheese is bubbling and slightly golden. Serve immediately and watch them disappear!
Why You’ll Love These Crispy Loaded Tater Tots
These aren’t just any tater tots; they’re an experience. Here’s why this recipe deserves a spot in your culinary rotation:
- Unbeatable Flavor Profile: The combination of crispy potato, smoky bacon, sweet onions, tangy sour cream, and rich cheese creates a harmonious blend of tastes that is utterly addictive.
- Texture Heaven: From the crunchy exterior of the tots to the chewy bacon, the creamy sour cream, and the gooey melted cheese, every bite offers a delightful textural contrast.
- Crowd-Pleaser: Perfect for game day, parties, potlucks, or a fun family dinner. Loaded tater tots are universally loved and always disappear fast.
- Versatile & Customizable: Easily adapt the toppings to suit different preferences or dietary needs. The base recipe is a fantastic starting point for your creativity.
- Simple Yet Impressive: While the ingredient list might seem long, the steps are straightforward, making this a dish that’s easy enough for weeknights but impressive enough for guests.
Tips for Perfectly Crispy & Delicious Loaded Tater Tots
Achieving culinary perfection often comes down to a few key techniques. Follow these tips to ensure your loaded tater tots are nothing short of spectacular:
- Don’t Overcrowd the Pan (Tots): Whether baking, air frying, or deep frying, ensure your tater tots are in a single layer with enough space. Overcrowding leads to steaming, not crisping.
- Get Your Bacon Extra Crispy: Cook the bacon until it’s very crisp, as it will soften slightly when covered with other toppings. The crunch is essential!
- Utilize Bacon Fat: Don’t discard that precious bacon grease! It’s liquid gold for sautéing your onions and making the cheese sauce, infusing everything with incredible smoky flavor.
- Layer While Hot: Assemble your tots immediately after cooking them. The heat helps melt the shredded cheese and meld the flavors together.
- Fresh Green Onions are Key: The fresh, pungent bite of green onions or chives provides a necessary counterpoint to the richness of the cheese, bacon, and sour cream. Don’t skimp!
- Homemade Cheese Sauce Makes a Difference: While optional, taking the extra step to make the homemade cheese sauce truly elevates this dish, providing a silky, luxurious coating.
- Season as You Go: Taste your sour cream mixture and cheese sauce as you prepare them, adjusting salt and pepper to ensure optimal flavor.
Endless Customization Options for Your Loaded Tater Tots
One of the best things about this recipe is its adaptability. Feel free to get creative and customize your loaded tater tots with various toppings to suit your taste or what you have on hand.
- Proteins: Beyond bacon, consider shredded BBQ chicken or pulled pork, seasoned ground beef or turkey, grilled steak, or even vegetarian options like black beans or seasoned lentils.
- Cheeses: Experiment with different types of cheese! Sharp cheddar, pepper jack for a kick, smoked gouda for depth, or a creamy mozzarella can all work wonderfully. A blend of cheeses often offers the best flavor and melt.
- Vegetables: Add finely diced bell peppers (sautéed), roasted corn, jalapeño slices (fresh or pickled), avocado chunks, or even a sprinkle of fresh cilantro for a Tex-Mex twist.
- Sauces: Instead of or in addition to ranch, try a drizzle of sriracha mayo, a dollop of guacamole, a spoonful of salsa, or a smoky BBQ sauce.
- Spices: A dash of paprika, a pinch of cayenne pepper, or a sprinkle of garlic powder can enhance the overall flavor profile.
Serving Suggestions for Your Crispy Loaded Tater Tots
These loaded tater tots are incredibly versatile and can be served in many ways, making them perfect for almost any occasion.
- Game Day Appetizer: Arrange them on a large platter for guests to share while watching sports. They’re easy to pick up and universally loved.
- Party Centerpiece: Serve them as a star appetizer at your next gathering. Consider setting up a “tater tot bar” with various toppings for guests to customize their own.
- Hearty Side Dish: Pair them alongside grilled burgers, hot dogs, fried chicken, or even a simple grilled steak for a comforting and satisfying meal.
- Fun Family Dinner: When topped with an extra protein like chili or pulled pork, these can easily become a fun and complete meal for the whole family.
- Late-Night Snack: Treat yourself to a decadent late-night indulgence.
Make-Ahead and Storage Tips
While best served fresh, you can prepare some components in advance to make assembly quicker and easier:
- Bacon: Cook and crumble the bacon bits a day or two in advance. Store in an airtight container in the refrigerator.
- Onions: Sauté and caramelize the onions ahead of time. Store in a sealed container in the fridge for up to 3 days.
- Sour Cream Mixture: Prepare the sour cream and ranch mixture (without green onions) a day in advance. Stir in fresh green onions just before serving.
- Cheese Sauce: The homemade cheese sauce can be made a day in advance. Gently reheat it over low heat, whisking frequently, and add a splash of milk if it’s too thick.
Leftovers: If you happen to have any leftovers (which is rare!), store them in an airtight container in the refrigerator for up to 2-3 days. To reheat, spread them on a baking sheet and warm in a preheated oven at 350°F (175°C) for 10-15 minutes, or in an air fryer, until heated through and re-crisped. The toppings won’t be as fresh, but they’ll still be delicious.
Conclusion: Elevate Your Snack Game
From a simple frozen snack to a gourmet delight, these Crispy Loaded Tater Tots are a testament to how humble ingredients can be transformed into something truly spectacular. This recipe, inspired by culinary genius, offers an irresistible combination of textures and flavors – the satisfying crunch of golden tots, the salty crispness of bacon, the sweet depth of caramelized onions, and the creamy tang of sour cream and cheese. Whether you’re hosting a game day party, seeking a fun family dinner, or simply craving an indulgent treat, these loaded tater tots are guaranteed to be a hit. So, ditch the ordinary and embrace the extraordinary; get ready to create a dish that’s not just food, but a memorable experience. Your taste buds will thank you!