
Imagine those moments when a bigger screen is just what you need – whether you’re an artist striving to scale up a sketch, a cinephile dreaming of a home theater experience, or someone simply wanting to share photos on a larger display. The desire for projection is universal, yet the thought of acquiring a traditional projector often brings to mind hefty price tags and complex setups. Professional-grade digital projectors can indeed cost a significant sum, and even older slide projectors are now largely obsolete. But what if there was a simple, incredibly affordable way to bring your digital world to life on a grand scale?
Transform Your Smartphone into a Projector: The Ultimate DIY Guide
The good news is, you don’t need to break the bank or scour for outdated equipment. We’re here to show you how to harness the power of your everyday smartphone and, with just a few dollars and a little creativity, transform it into a functional and surprisingly effective projector. This ingenious do-it-yourself project offers an incredibly accessible solution for anyone looking to magnify images, create an instant home cinema, or even project art for tracing and design work. Forget complicated gadgets and expensive leases; your next big picture is just a handful of household items away.
Why Choose a DIY Smartphone Projector? Unlocking Affordable Big-Screen Fun
The appeal of creating your own smartphone projector extends far beyond its novelty. It’s a remarkably practical solution for a myriad of needs, offering benefits that expensive commercial projectors often can’t match in terms of accessibility and simplicity.
Budget-Friendly Entertainment and Utility
Perhaps the most compelling reason is the cost. In an age where electronic gadgets command premium prices, crafting your own projector for literally a couple of dollars is a game-changer. All you truly need is a magnifying glass and some tape – items you might already have lying around your home. This eliminates the financial barrier, making large-scale image projection available to everyone, regardless of their budget. Think of the movie nights, art projects, or presentations you can enhance without a significant investment.
Versatile Applications: From Art to Home Cinema
Whether you’re an aspiring artist needing to enlarge a reference image onto a canvas or wall, or you’re simply looking to transform your living room into a makeshift home cinema, this DIY projector is incredibly versatile. Share vacation photos with family and friends on a grand scale, enjoy your favorite streaming content in a unique way, or even use it for casual educational purposes. The possibilities are only limited by your imagination. It’s perfect for setting a mood at parties, displaying fun backdrops, or even creating unique decorative elements.
Simplicity and the Joy of Creation
This project isn’t just about the end result; it’s also about the process. It’s an exceptionally easy build, requiring no special skills or tools beyond basic crafting items. The satisfaction of creating something functional and fun with your own hands is immense. Plus, it’s a fantastic educational project for kids, teaching them basic optics and engineering principles in a hands-on way. You’ll be amazed at how quickly you can put it together – perhaps even with enough time left over to project a few cat videos for extra amusement!
Gather Your Essentials: What You’ll Need for Your DIY Projector
Before you begin your exciting journey into DIY projection, make sure you have the following simple materials at hand. Most of these are common household items, keeping your total cost incredibly low.
- A Sturdy Cardboard Box: This will form the body of your projector. A shoebox, a tissue box, or any similar-sized cardboard container will work perfectly. Ensure it has a lid or can be sealed to block out external light effectively. The darker the interior, the better your projection.
- A Magnifying Glass: This is the heart of your projector, acting as the lens. The larger the magnifying glass, the bigger and potentially brighter your projected image will be. A diameter of 3-5 inches (7-12 cm) is ideal.
- Duct Tape or Strong Adhesive: For securing the magnifying glass in place and sealing any light leaks in your box. Black tape is often preferred for its light-blocking properties.
- Utility Knife or Sharp Scissors: To cut a hole in the cardboard box for your magnifying glass. Adult supervision is recommended if children are involved.
- A Smartphone: Your image source! Any modern smartphone with a bright screen will work.
- Optional: Small Stand or Paper Clips: To prop up your phone inside the box. You can also craft a simple stand from cardboard scraps.
- Optional: Black Paint (Matte): For painting the inside of the box. This is highly recommended as it absorbs stray light, significantly improving image contrast and quality.
Step-by-Step Guide: Crafting Your Own Smartphone Projector
Step 1: Prepare Your Projector Box
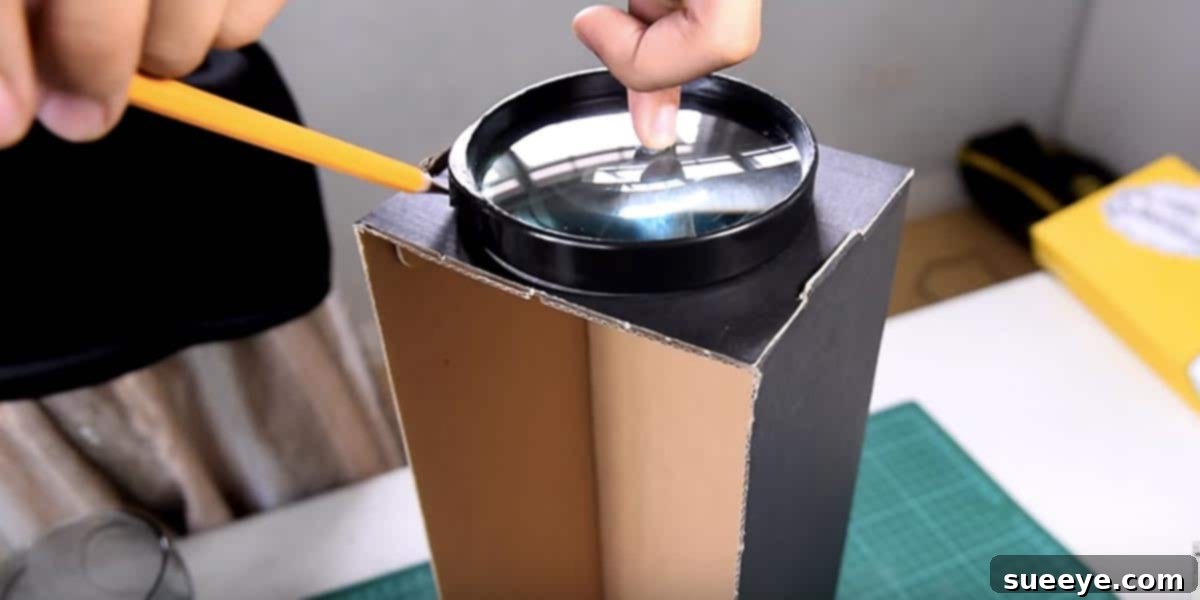
Begin by taking your chosen cardboard box. On one of the shorter sides, carefully trace the outline of your magnifying glass lens. Use your utility knife or sharp scissors to cut out this circle. Ensure the hole is slightly smaller than the magnifying glass frame so that the lens can be securely fitted from the inside of the box. If you have matte black paint, now is the ideal time to paint the entire interior of the box. This crucial step will prevent internal reflections and significantly enhance the contrast and clarity of your projected image.
Step 2: Integrate the Magnifying Glass
Once the paint (if used) is dry, insert the magnifying glass into the hole you’ve cut. Position it so the lens faces outwards, and the handle (if it has one) is either removed or rests neatly inside the box. Secure the magnifying glass firmly in place using duct tape or strong adhesive. Make sure there are no gaps around the edges where light could escape or enter, as this will degrade your projection quality.
Step 3: Create a Stable Phone Stand
Inside the box, you’ll need a way to prop up your smartphone. You can use a pre-made phone stand, bend a few paper clips into a suitable shape, or fashion a simple stand from leftover cardboard scraps. The key is to create a stable platform that will hold your phone upright and keep it from moving once positioned. This stand will be crucial for adjusting focus later on.
Step 4: Position Your Smartphone
Place your smartphone on the stand inside the box. The screen of your phone should face the magnifying glass, and crucially, the image on your phone needs to be upside down. This is because the magnifying glass will naturally flip the image during projection. Many phones have a screen rotation lock you’ll need to disable, or you can use a specific app (search for “upside down display” or “screen inverter”) to manually flip the display. Maximize your phone’s screen brightness and ensure the auto-lock feature is disabled to prevent the screen from turning off.
Step 5: Test and Refine Your Setup
Close the box securely, ensuring no light leaks from the lid or seams. Take your projector into a completely dark room and aim it at a plain, light-colored wall or screen. Adjust the distance of your phone from the magnifying glass by sliding the phone stand back and forth until the image on the wall comes into clear focus. This might require some trial and error, so be patient. Once focused, you’ll have your very own budget-friendly smartphone projector!
Maximizing Your Projection Experience: Tips for Success
Optimize Your Viewing Environment
For the best results, project onto a smooth, flat, white surface in a room that is as dark as possible. Any ambient light will significantly wash out your projected image. The darker the room, the crisper and more vibrant your projection will appear.
Adjusting for Clarity and Focus
The distance between your phone screen and the magnifying glass is paramount for achieving a sharp image. Experiment by gently sliding your phone stand inside the box. Small adjustments can make a big difference in focus. Also, the distance from the projector to the wall will affect the size of the image; closer for smaller, brighter images, further for larger, dimmer ones.
Managing Image Orientation
As mentioned, the magnifying glass naturally inverts the image. To correct this, you’ll need to flip your phone’s screen display. For videos and photos, most media players and gallery apps have a rotation option. For general screen mirroring, you might need a third-party app that allows you to invert your screen’s orientation. Search your phone’s app store for ‘screen rotation control’ or ‘upside down display.’
Boosting Brightness
Your smartphone’s screen brightness is the primary factor determining the luminosity of your projected image. Always set your phone’s display to its maximum brightness. Additionally, consider projecting in an even darker room or using a magnifying glass with a larger diameter and higher magnification for a potentially brighter output.
Creative Applications for Your DIY Smartphone Projector
Once you’ve mastered your DIY projector, a world of possibilities opens up:
- Instant Home Cinema: Perfect for movie nights, streaming your favorite shows, or watching YouTube videos on a grand scale without investing in an expensive home theater system.
- Art & Craft Assistant: Artists can project images onto canvases, walls, or paper for easy tracing, scaling up designs, or creating murals. It’s an invaluable tool for transferring sketches accurately.
- Fun & Educational Tool: Use it to display educational content for kids, project puzzles, or create interactive learning experiences.
- Party Decorations: Project festive images, subtle patterns, or dynamic backgrounds onto walls to enhance the ambiance of any gathering.
- Photo Sharing: Share your travel photos or family albums with everyone on a large screen, making the viewing experience more engaging and immersive.
Troubleshooting Common Issues with Your DIY Projector
Blurry Image
If your projected image appears blurry, the primary culprit is usually incorrect focusing. Adjust the distance of your phone inside the box relative to the magnifying glass. Slowly slide your phone forward or backward until the image on the wall sharpens. Ensure your phone screen is clean and free of smudges.
Dim Projection
A dim image often stems from insufficient screen brightness on your phone or too much ambient light in the room. Always set your phone to maximum brightness. Make sure your projection room is as dark as possible, eliminating all external light sources. A larger magnifying glass can also help gather and project more light.
Image Appears Small or Too Large
The size of your projected image is determined by two factors: the focal length of your magnifying glass and the distance between your projector and the wall. To make the image larger, move the projector further away from the wall. To make it smaller, move it closer. Remember that increasing the image size will generally reduce its brightness.
Beyond the Basics: Customization and Enhancements
While a simple shoebox projector is incredibly effective, there’s always room for improvement. Consider adding a small fan to your box for phone cooling during extended use, especially if your phone tends to overheat. You could also build a more sophisticated internal phone cradle for precise focus adjustments. Experiment with different types and sizes of magnifying glasses to find what works best for your specific needs. The core principle remains the same, but your creativity can take it further!
Creating your own smartphone projector is a testament to ingenuity and a brilliant way to unlock new possibilities with technology you already own. It’s an empowering, affordable, and incredibly fun project that delivers big-screen entertainment, artistic freedom, and practical utility right into your hands. So, grab those simple supplies, follow these easy steps, and prepare to see your digital world in a whole new, magnified light. Happy projecting!
Don’t let expensive equipment limit your creativity or entertainment. Dive into this DIY project today and discover how easy it is to bring your photos, videos, and artistic visions to life on a grand scale. Share your creations and experiences with us!