
Master the Art of the Linked Up Charm Pack Quilt: A Beginner’s Guide
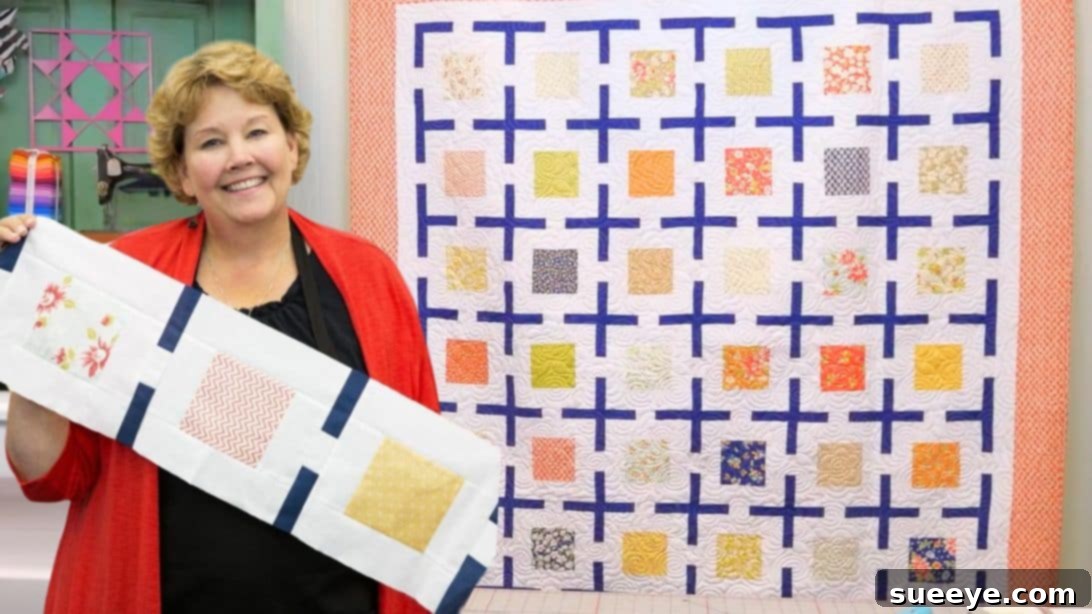
Are you searching for an engaging yet straightforward quilting project that yields spectacular results? Look no further than the captivating “Linked Up” quilt, a brilliant design brought to life by the renowned Missouri Star Quilt Company. This pattern, championed by quilting icon Jenny Doan, transforms simple 5-inch charm squares into an optical illusion, making your quilt top appear as if its elements are beautifully interlocked. Perfect for quilters of all skill levels, especially beginners, this project promises not only enjoyment but also a stunning finished piece that will impress. From a distance, the clever use of sashing creates a mesmerizing maze-like effect, adding an intriguing depth to your fabric choices.
Charm packs are a quilter’s best friend, offering convenience and variety in one neat bundle. If you’re new to the quilting world, a charm pack is a collection of precisely cut 5-inch fabric squares, typically containing 42 unique pieces. This specific project utilizes every square in the pack, making it an efficient and rewarding way to use these delightful fabric assortments. Get ready to dive into a fun, beginner-friendly sewing adventure that will leave you with a quilt you’ll cherish.
Why Choose the Linked Up Charm Pack Quilt?
The “Linked Up” quilt stands out for several compelling reasons. Its design, while appearing intricate, is surprisingly simple to construct, relying on repetitive blocks and strategic sashing placement. This makes it an ideal choice for:
- Beginner Quilters: The steps are easy to follow, focusing on accurate cutting, consistent seam allowances, and careful pressing – fundamental skills in quilting.
- Charm Pack Enthusiasts: It’s a fantastic way to utilize an entire charm pack, showcasing a cohesive collection of fabrics without needing to cut dozens of individual squares.
- Visually Striking Results: The interlocking, maze-like appearance is unique and eye-catching, making it a wonderful gift or a beautiful addition to your home decor.
- Quick & Satisfying Project: Because the main units are pre-cut, you can move directly into piecing, speeding up the process and providing a quicker sense of accomplishment.
The magic of the “Linked Up” design truly comes alive with contrasting fabrics. A light background fabric against your vibrant charm pack squares, coupled with a solid sashing fabric, will enhance the illusion of continuity and connection. This pattern isn’t just about sewing; it’s about creating art with fabric.
RELATED: If you love charm pack projects, explore the enchanting Forest Flutter Charm Pack Quilt Pattern. Or, for another quick and easy project with larger pre-cuts, check out this Quick and Easy Layer Cake Jolly Bar Quilt tutorial.
Gather Your Materials: What You’ll Need
Before you begin your quilting journey, ensure you have all the necessary supplies. Precision in cutting and a well-stocked sewing station will make the process smoother and more enjoyable.
- 1 Pack of 5″ Printed Squares: This is your charm pack, typically containing 42 squares. Choose a pack with colors and prints that you love and that complement each other.
- 3 1/2 Yards of Background Fabric: This fabric will border your charm squares and form part of your inner border. A solid light color (like white, cream, or light grey) is highly recommended to make your charm squares pop and enhance the “linked” effect.
- 1 Yard of Sashing Fabric: This fabric is crucial for creating the interlocking design. A contrasting solid color to your background fabric often works best to define the “links.”
- 1 1/4 Yards of Outer Border Fabric: This fabric will frame your entire quilt top, giving it a polished and finished look. You can choose a fabric that matches your sashing, complements your charm squares, or introduces a new coordinating color.
- 5 Yards of Backing Fabric: This will be the back of your quilt. Consider a coordinating print or a soft solid that will be comfortable against the skin.
- Coordinating Thread: High-quality polyester or cotton thread that blends with your fabrics.
- Quilting Essentials: Rotary cutter, self-healing mat, quilting ruler, sewing machine, iron and ironing board, pins, and scissors.
Step-by-Step Guide: Crafting Your Linked Up Quilt
Creating this quilt involves a series of straightforward steps, focusing on block assembly and strategic sashing. Take your time with each stage, ensuring accuracy for the best results.
Step 1: Constructing Your Individual Quilt Blocks
The foundation of your “Linked Up” quilt lies in these carefully constructed blocks, each featuring a charm square framed by background fabric.
- Begin by taking your background fabric. Cut it into 2 1/2″ wide strips. From each of these 2 1/2″ strips, cut multiple 5″ units. You will need two 5″ units per charm square.
- Select one 5″ printed square from your charm pack. Take two of the 2 1/2″ x 5″ background units you just cut. Place one background unit on each of two opposite sides of the charm square, aligning the raw edges.
- Sew these two background strips to the charm square using a precise 1/4″ seam allowance. After sewing, carefully press the seams open or towards the background fabric to reduce bulk and ensure flat blocks.
- Now, use one of the remaining 2 1/2″ background strips to measure the length of your newly assembled block (charm square + two attached background strips). This measurement will be slightly longer than 5 inches. Cut two pieces from the 2 1/2″ background strip using this exact measurement.
- Attach these two longer background strips to the remaining top and bottom sides of your block. Again, sew with a 1/4″ seam allowance and press the seams open.
- Inspect your finished block. It should now be a larger square, with the charm pack square perfectly centered within a frame of background fabric. If necessary, lightly trim the block to ensure it is perfectly square and consistent in size with your other blocks.
- Repeat this entire process for all 42 of your 5″ printed squares. Consider using chain piecing techniques to speed up the assembly of these identical blocks, sewing one after another without lifting your needle, then snipping them apart.
Step 2: Preparing the Unique Sashing Units
These specially constructed sashing units are key to achieving the distinctive “linked” appearance of your quilt.
- From your 2 1/2″ background strips (the same fabric used to border your charm squares), cut numerous 2 1/2″ by 1 1/2″ rectangles. These small background rectangles will act as the “connecting points” in your sashing.
- Next, take your sashing fabric (the contrasting color). Cut it into 1 1/2″ wide strips. From each of these 1 1/2″ strips, cut multiple 3 3/4″ units. You will need two 3 3/4″ sashing units for each small background rectangle.
- To form a complete sashing unit, place one of the 2 1/2″ by 1 1/2″ background rectangles between two of the 1 1/2″ by 3 3/4″ sashing units. The background rectangle should be centered.
- Sew these three pieces together with a 1/4″ seam allowance. Press the seams open or towards the darker sashing fabric to ensure a neat, flat strip. This will create a long, slender sashing strip with a short background piece in its center.
- Repeat this process until you have enough of these composite sashing units for all your horizontal and vertical sashing needs in the quilt top assembly.
Step 3: Attaching Sashing to Your Quilt Blocks
Now, it’s time to integrate the sashing into your individual quilt blocks, preparing them for row assembly.
- Take one of your completed quilt blocks from Step 1.
- Attach one of the sashing units (from Step 2) to one side of the square. Ensure the raw edges are aligned and sew using a 1/4″ seam allowance.
- Press the seam open or towards the sashing unit. Consistency in pressing will contribute to a flatter quilt top.
- Repeat this for all of your quilt blocks. Each block should now have a sashing strip attached to one side.
Step 4: Assembling Rows and the Quilt Top
This is where the “linked” pattern truly emerges. Pay close attention to the arrangement of your blocks and sashing to achieve the desired effect.
- Your quilt will consist of 7 rows, with each row containing 6 blocks. Lay out your blocks in rows on a design wall or on the floor to visualize the arrangement and ensure you like the flow of fabrics.
- When assembling each row, you will start with a sashing unit, then add a block, then another sashing unit, and so on, ending the row with a sashing unit. This means each row will alternate between sashing and blocks.
- Once you have all 7 rows constructed, it’s time to join them together with more sashing. The sashing strips used between rows are crucial for the “linked” illusion.
- For the horizontal sashing between your assembled rows, you will use the same sashing fabric, but the structure is slightly different. These horizontal sashing strips should be constructed so that the 2 1/2″ white (background) pieces are precisely centered on each block within the row below. This alignment is what creates the continuous “link” when viewed from a distance.
- The specific measurements for these horizontal sashing components are: 8″ for the colored sashing segments and 2 1/2″ for the white (background) segments, which should align perfectly with the white background of your blocks. The ending pieces for these horizontal sashing strips are 4 3/4″. Carefully measure and cut these, then sew them together to form long strips that will connect your rows.
- Sew your first row to your first horizontal sashing strip, aligning all seams carefully. Pin generously at seam intersections to ensure everything lines up.
- Continue by sewing the second row, then the next horizontal sashing strip, and so on, until all 7 rows are joined with the connecting sashing. Press all your horizontal seams open or to one side consistently.
Jenny Doan’s Inspiration: The Linked Up Quilt
The genius behind many beloved quilt patterns, including this “Linked Up” design, is often attributed to Jenny Doan of Missouri Star Quilt Company. Her approachable teaching style and innovative techniques have inspired countless quilters worldwide. Watching her tutorials provides invaluable visual guidance, particularly for understanding how the sashing pieces come together to create the intricate illusion. Her methods prioritize simplicity and fun, making complex-looking quilts accessible to everyone.
Beyond the Quilt Top: Finishing Your Masterpiece
Once your quilt top is beautifully pieced together, the journey isn’t over! The final steps involve adding borders, quilting, and binding to complete your “Linked Up” quilt.
- Adding Borders: First, attach the inner border using your background fabric (or a coordinating fabric if you prefer). Measure your quilt top accurately through the center, then cut and sew your inner border strips to fit. After that, add your outer border fabric, again measuring and cutting carefully. Borders not only frame your quilt but also help to square it up and provide stability.
- Layering (Quilt Sandwich): Prepare your quilt sandwich by laying your backing fabric face down, taping it securely to a clean floor or large table. Next, place your batting smoothly on top of the backing. Finally, center your finished quilt top face up over the batting. Smooth out any wrinkles.
- Basting: Secure all three layers together using safety pins, basting spray, or long hand stitches (thread basting). This prevents shifting during the quilting process.
- Quilting: This is where you stitch through all three layers to hold them together and add texture. You can opt for simple straight lines using a walking foot on your sewing machine, “stitch in the ditch” along your seams, or explore more elaborate free-motion quilting designs if you’re feeling adventurous.
- Binding: The final step is to create and attach the binding, which finishes the raw edges of your quilt. Cut 2 1/2″ wide strips from your binding fabric (this is usually 1 1/4 yards, as listed). Join them to create one long strip, press it in half lengthwise, and then machine sew it to the front of your quilt. Hand-stitch or machine stitch the binding to the back for a clean finish.
Tips for Quilting Success
- Accurate 1/4″ Seam Allowance: This is paramount in quilting. Invest in a 1/4″ presser foot if your machine doesn’t have one built-in. Small deviations can lead to significant problems when joining blocks and rows.
- Pressing is Key: Don’t underestimate the power of a good iron! Pressing seams flat after each step ensures your blocks and quilt top lie smoothly. Decide whether to press seams open or to one side (usually the darker fabric) and stick with it consistently.
- Chain Piecing: For repetitive tasks like making the charm pack blocks, chain piecing saves time and thread. Sew one piece, then immediately feed the next without cutting your thread, creating a “chain.”
- Square Up Your Blocks: After assembling your blocks, use a square ruler to trim them to their consistent finished size. This step, though often skipped, prevents wonky rows and ensures your quilt top comes together beautifully.
- Take Breaks: Quilting should be enjoyable, not stressful. If you feel frustrated, step away and come back with fresh eyes.
- Watch Tutorials: Visual learners will benefit immensely from watching video tutorials, especially from experts like Jenny Doan. They often share valuable tips and tricks that aren’t easily conveyed in text.
Embrace the Joy of Quilting
The “Linked Up” Charm Pack Quilt is more than just a sewing project; it’s an opportunity to create something truly beautiful and functional with your own hands. The satisfaction of transforming a stack of pre-cut squares into an intricate, comforting quilt is immense. Whether it’s a gift for a loved one or a cozy addition to your home, this quilt pattern offers a rewarding experience from start to finish.
We encourage you to embark on this creative journey. Don’t be afraid to experiment with fabric combinations, and most importantly, enjoy every stitch. Share your finished “Linked Up” quilts with fellow enthusiasts and inspire others with your handmade artistry!