
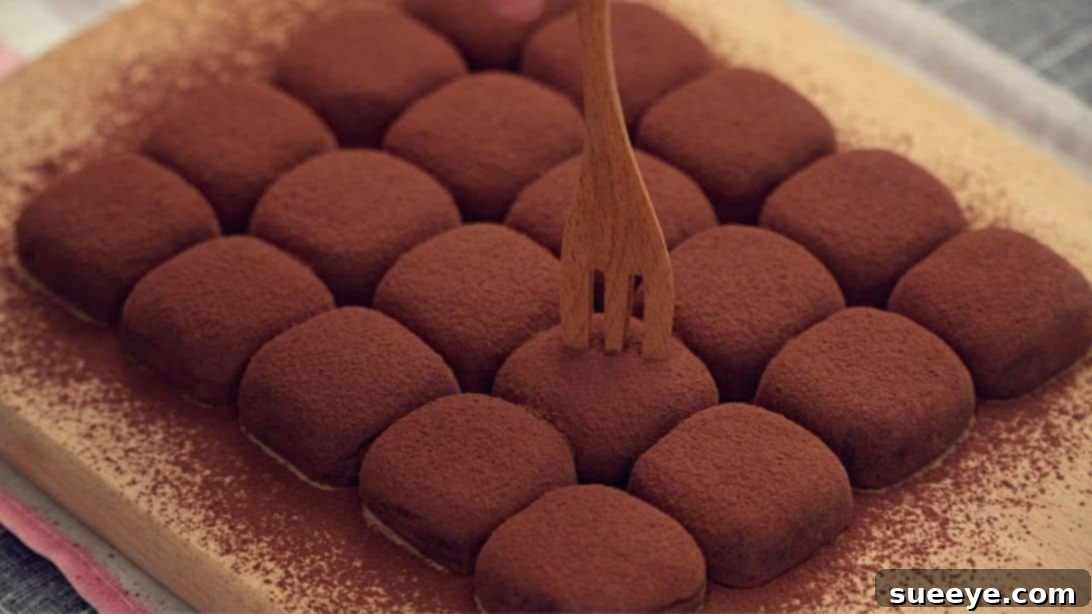
Craving a rich, indulgent dessert that’s surprisingly simple to prepare? Look no further! These exquisite two-ingredient chocolate truffles are the perfect solution for anyone seeking a decadent treat without the hassle of a complex recipe. Inspired by the brilliant creators at Nino’s Home on Youtube, this recipe delivers a sweet, intensely chocolatey flavor with a texture remarkably similar to luxurious chocolate fudge. Whether you’re a seasoned baker or a complete beginner, you’ll be amazed at how effortlessly you can create these sophisticated confections right in your own kitchen.
The beauty of this recipe lies in its minimalist approach. With just condensed milk and pure cocoa powder, you can transform humble pantry staples into an impressive dessert that’s ideal for gifting, impressing guests, or simply treating yourself. You can elevate these simple truffles with various additions, such as crunchy almond nuts folded into the mixture, or a colorful dusting of sprinkles for a festive touch. If your love for sweets runs deep, prepare to fall head over heels for this irresistibly yummy and incredibly straightforward recipe. Dive in to discover the full instructions below, or follow along with the video for a visual guide.
Essential Ingredients for Your 2-Ingredient Chocolate Truffles
The magic of this recipe truly begins with its incredibly short ingredient list. You only need two core components to achieve a luxurious, fudge-like chocolate truffle. However, the quality of these ingredients makes all the difference in the final taste and texture.
- 8.5 oz (approximately 240g) of Sweetened Condensed Milk: This ingredient is the backbone of our truffles, serving multiple crucial roles. It provides the essential sweetness, acts as a powerful binder to hold the truffles together, and contributes significantly to their creamy, rich texture. For the best results, opt for full-fat sweetened condensed milk, as it will yield a more decadent and velvety truffle. Avoid evaporated milk, as it has a different consistency and sugar content.
- 1 cup of Pure Unsweetened Cocoa Powder: This is where the intense chocolate flavor comes from. It’s vital to use pure unsweetened cocoa powder to control the sweetness and achieve a deep, authentic chocolate taste. Sugared cocoa powders or hot chocolate mixes will alter the balance and texture of the truffles. You can choose natural cocoa powder for a slightly fruitier, more acidic note, or Dutch-processed cocoa for a darker color and smoother, less bitter flavor. Both will work beautifully in this recipe, so pick your preference.
Essential Kitchen Equipment
While the ingredients list is minimal, having the right tools on hand will make the truffle-making process even smoother and more enjoyable. Gather these basic kitchen essentials before you begin:
- Heavy-Bottomed Pot: Crucial for heating the condensed milk evenly and preventing scorching.
- Silicone Spatula: Ideal for stirring the condensed milk and later for mixing in the cocoa powder, as it scrapes the sides of the pot/bowl effectively.
- Fine-Mesh Sifter: Essential for sifting the cocoa powder, which helps remove lumps and ensures a smooth, uniform truffle mixture.
- Heat-Proof Bowl (optional): If you prefer to transfer the hot condensed milk for mixing, a sturdy heat-proof bowl is useful.
- Plastic Wrap: Used to cover the truffle mixture during chilling, preventing a skin from forming and maintaining moisture.
- Baking Dish or Container: Any shallow, rectangular or square dish will work for chilling the mixture.
- Sharp Knife or Bench Scraper: For neatly cutting the chilled truffle mixture into even pieces.
- Serving Plate or Airtight Container: For presenting your finished truffles and for storage.
Step-by-Step Guide: Crafting Your Decadent Chocolate Truffles
Step 1: Gently Heat the Condensed Milk
Begin by pouring the entire 8.5 ounces of sweetened condensed milk into a clean, heavy-bottomed pot. Place the pot over medium-low heat. The initial stage involves continuously stirring the condensed milk for the first few minutes. This constant motion is crucial to prevent the milk from sticking to the bottom of the pot and scorching, which can impart an unpleasant burnt flavor to your truffles. As the milk heats, it will gradually thin out before starting to boil. Keep a close watch, as condensed milk can boil quite quickly due to its high sugar content. Do not leave it unattended during this phase! You’re looking for it to reach a gentle, light boil, where small bubbles begin to form around the edges and on the surface, accompanied by a light foamy appearance. This indicates it has reached the perfect temperature and consistency. Immediately remove the pot from the heat once you see these signs to prevent overcooking and burning. You can either proceed with mixing in the same pot or, for easier handling and slightly faster cooling, transfer the hot condensed milk into a separate heat-proof bowl.
Step 2: Smoothly Incorporate the Cocoa Powder
While the condensed milk is still hot, it’s time to introduce the star flavor: cocoa powder. The key to a smooth truffle mixture without any powdery lumps is to sift the cocoa powder. Sift the entire cup of pure cocoa powder into the hot condensed milk in three gradual batches. Cocoa powder has a tendency to clump together easily, especially when exposed to moisture, so separating it into smaller additions and sifting each time ensures a silky-smooth integration. After sifting each batch, use a sturdy silicone spatula to thoroughly mix it into the condensed milk. Fold and press until the cocoa powder is fully incorporated and the mixture becomes consistently thick and uniform. Continue this process until all three batches of cocoa powder have been added and mixed in, resulting in a dense, rich, and cohesive chocolate mass. The mixture should be very thick and hold its shape.
Step 3: Chill for Optimal Firmness
Once your chocolate mixture is thoroughly combined and boasts a thick consistency, prepare a baking dish or any suitable container by lining it with plastic wrap. Ensure the plastic wrap hangs over the edges; this will make it much easier to remove the firm mixture later. Transfer the entire chocolate mixture into the prepared dish. Using your silicone spatula or the back of a spoon, spread the mixture evenly across the bottom of the container. This ensures uniform chilling and makes for easier, consistent cutting later. Once spread, place another layer of plastic wrap directly on top of the chocolate mixture, pressing it gently to make contact with the surface. This crucial step prevents a dry skin from forming and locks in moisture. Place the covered dish into the refrigerator and allow it to chill for a minimum of 2 to 3 hours. For the best, firmest results, chilling for 4 hours or even overnight is ideal. Adequate chilling is essential for the mixture to firm up properly, making it easy to handle and shape into perfect truffles.
Step 4: Shape, Coat, and Enjoy Your Masterpiece
Once the chocolate mixture is thoroughly chilled and firm, it’s time for the fun part: shaping your truffles! Lightly sprinkle some pure cocoa powder onto a clean plate or your work surface; this will prevent the chocolate from sticking while you work. Carefully remove the firm chocolate block from the refrigerator. Using the excess plastic wrap as handles, lift the chocolate out of its container and place it onto your cocoa-dusted surface. Using a sharp knife or bench scraper, cut the chocolate block into even pieces. Aim for roughly 1-inch squares, as this size is ideal for rolling into truffles. You can also lightly sift a bit more cocoa powder onto the top of these cut pieces to further aid in non-sticking. Now, take each piece and gently roll it between your palms to form smooth, round spheres. While truffles are traditionally shaped into elegant circles, feel free to get creative and shape them as you desire – perhaps small logs or even mini pyramids! Once shaped, transfer your beautiful truffles to a serving plate. For a classic finish and to prevent sticking, give them a final light dusting of cocoa powder. Your luxurious homemade 2-ingredient chocolate truffles are now ready to be savored! Enjoy every rich, chocolatey bite.
Pro Tips for Perfect 2-Ingredient Chocolate Truffles
Achieving perfectly smooth and delicious truffles is easy, but a few professional tips can elevate your results:
- Quality Matters: Since there are only two ingredients, the quality of your condensed milk and cocoa powder significantly impacts the final flavor. Opt for reputable brands for the best taste.
- Don’t Overcook the Condensed Milk: Heating the condensed milk just until it gently bubbles is key. Overcooking can lead to a grainy texture or a tougher truffle. Remove it from heat as soon as it begins to foam lightly.
- Sift, Sift, Sift: Don’t skip sifting the cocoa powder in batches. This step is crucial for preventing lumps and achieving a uniformly smooth and silky truffle texture.
- Chill Thoroughly: Patience is a virtue here. Ensure the mixture is fully chilled and firm before attempting to cut and shape it. An under-chilled mixture will be sticky and difficult to work with.
- Keep Your Hands Cool: If your hands get warm while shaping, the chocolate can become melty and sticky. You can rinse your hands with cold water periodically or keep a bowl of ice water nearby to cool them down.
- Work Efficiently: Once the chocolate is out of the fridge, work relatively quickly to shape the truffles before they soften too much.
Variations and Customizations for Your Chocolate Truffles
While delicious in their pure form, these 2-ingredient truffles are also a fantastic canvas for creativity. Experiment with these ideas to personalize your batch:
- Flavor Infusions:
- Vanilla Extract: Add 1 teaspoon of vanilla extract with the cocoa powder for a classic flavor enhancement.
- Coffee Enhancement: A teaspoon of instant espresso powder or strong coffee extract can deepen the chocolate flavor beautifully.
- Citrus Zest: Grate in a teaspoon of orange or peppermint zest for a bright, aromatic twist.
- Spicy Kick: A pinch of cayenne pepper can add an exciting subtle heat.
- Liquor: A tablespoon of your favorite liqueur (like Kahlúa, rum, or Grand Marnier) can be added with the cocoa powder for an adult version.
- Exciting Coatings: Beyond cocoa powder, the possibilities are endless!
- Shredded Coconut: Toasted or untoasted, it adds wonderful texture and flavor.
- Chopped Nuts: Finely chopped almonds, pecans, walnuts, or pistachios offer a delightful crunch.
- Sprinkles: Perfect for a festive look, especially for celebrations.
- Melted Chocolate: Dip chilled truffles in tempered dark, milk, or white chocolate for an extra layer of indulgence.
- Powdered Sugar: For a delicate, less intense coating.
- Crushed Cookies: Graham cracker crumbs or crushed oreos make a fun coating.
- Internal Inclusions: Fold in small additions with the cocoa powder for texture and surprise.
- Mini chocolate chips
- Finely chopped dried fruit (cranberries, cherries)
- Toasted chopped nuts
Storage and Serving Suggestions
To ensure your homemade chocolate truffles remain fresh and delicious, proper storage is key:
- Storage: Store your truffles in an airtight container in the refrigerator for up to 1-2 weeks. This helps them maintain their firm texture and prevents them from melting.
- Serving Temperature: For the best flavor and texture, allow the truffles to sit at room temperature for about 10-15 minutes before serving. This softens them slightly, enhancing their creamy, melt-in-your-mouth quality.
- Freezing: These truffles freeze beautifully! Place them in a single layer on a parchment-lined tray until solid, then transfer them to a freezer-safe airtight container or bag. They can be frozen for up to 1-2 months. Thaw them in the refrigerator before bringing them to room temperature to serve.
- Serving Ideas:
- Pair them with a hot cup of coffee, tea, or a glass of red wine for a sophisticated dessert.
- Arrange them beautifully on a platter as part of a dessert spread for parties or gatherings.
- Package them in decorative boxes or bags for thoughtful homemade gifts during holidays or special occasions.
- Enjoy them as a luxurious after-dinner treat or a delightful pick-me-up any time of day.
Your Journey to Decadent 2-Ingredient Chocolate Truffles
In conclusion, these two-ingredient chocolate truffles are a testament to the fact that extraordinary desserts don’t always require an extensive list of ingredients or complicated techniques. With just condensed milk and pure cocoa powder, combined with a few simple steps, you can create a batch of incredibly rich, smooth, and utterly delicious chocolate truffles that will satisfy any sweet craving. Whether you stick to the classic cocoa powder coating or venture into exciting variations with nuts, sprinkles, or other flavorings, this recipe promises a delightful experience from start to finish. So, gather your ingredients, follow these easy instructions, and prepare to impress yourself and your loved ones with these remarkably simple yet profoundly decadent homemade chocolate truffles. Enjoy the sweet rewards of your culinary creativity!