
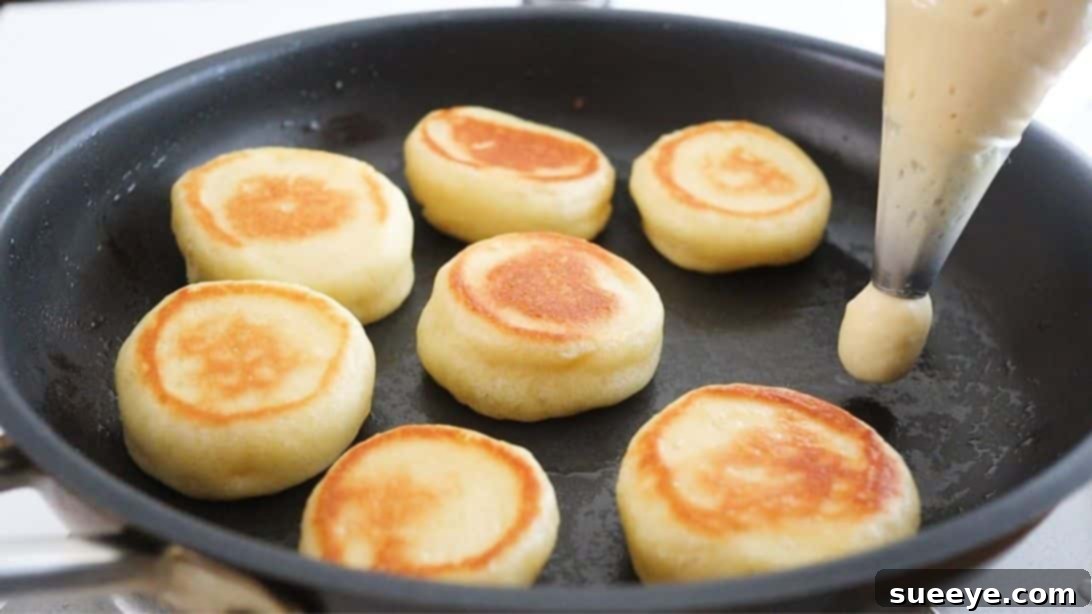
Effortless Pan-Fried Bread: Your Go-To Oven-Free & No-Knead Breakfast Solution
There’s an undeniable comfort that comes with freshly made bread, especially when it graces your breakfast table. The aroma alone is enough to brighten any morning. For many, the idea of baking bread at home is often overshadowed by the perceived complexity, the need for an oven, or the arduous process of kneading dough. If you’ve ever dreamt of enjoying warm, fluffy bread without the fuss, you’re in for a delightful surprise!
As a fellow bread enthusiast, I understand the craving for that perfect slice, often paired with various spreads, savory bacon, or tender ham. While my desire to bake at home was strong, my lack of an oven always seemed like an insurmountable hurdle. That was until I stumbled upon an incredible easy pan-fried bread recipe by Qiong Cooking on YouTube. This discovery was a game-changer, proving that truly amazing homemade bread is possible with just a pan!
I immediately tried this innovative recipe, and the results were nothing short of amazing. The bread turned out wonderfully soft on the inside with a perfectly golden exterior, making it an ideal companion for my morning coffee. What truly sets this recipe apart is its incredible simplicity. You only need 8 basic ingredients, and the entire process is surprisingly hands-off – no vigorous kneading required, and you barely even need to touch the dough! This makes it perfect for beginners or anyone looking for a quick and satisfying bread-making experience. I’m certain this recipe will become a regular staple in my kitchen, and it’s bound to become one in yours too.
Why This Pan-Fried Bread Recipe Is a Must-Try
- No Oven Required: Perfect for those without an oven, or when you want to avoid heating up your kitchen.
- No Kneading: A true blessing for busy individuals or anyone who finds kneading tedious.
- Minimal Ingredients: Just 8 common kitchen staples are all you need.
- Quick & Easy: The preparation is straightforward, and cooking time is minimal, making it ideal for a quick breakfast.
- Delicious Results: Enjoy a wonderfully soft interior and a slightly crisp, beautifully browned crust.
- Versatile: Serves as a perfect base for both sweet and savory toppings.
Ingredients for Your Easy Pan-Fried Bread
Gathering your ingredients is the first step to creating this delightful bread. The beauty of this recipe lies in its simplicity, utilizing common items you likely already have on hand. Each ingredient plays a crucial role in achieving the perfect texture and flavor for your homemade pan-fried bread.
- 1 large egg: Adds richness, helps bind the dough, and contributes to a softer texture.
- 2 tablespoons of cooking oil: Any neutral-flavored oil like vegetable or canola oil will work. It keeps the dough moist and helps achieve a tender crumb.
- 3 tablespoons of sugar: Provides a hint of sweetness, aids in yeast activation, and contributes to the beautiful golden-brown color during frying.
- 1 teaspoon of instant or dried yeast: The magic behind the rise! Ensure your yeast is fresh and active for best results.
- 0.84 cups of lukewarm milk/fresh milk (200 ml for exact measurement): Milk adds moisture and tenderness. Lukewarm temperature is crucial for activating the yeast effectively.
- 2 cups of all-purpose flour: The foundation of our bread. All-purpose flour is versatile and works perfectly for this recipe.
- 1/2 teaspoon of salt: Balances the flavors and strengthens the dough structure. Don’t skip it!
- Additional cooking oil (for frying): A good quality olive oil or your preferred cooking oil for drizzling into the pan.
Step-by-Step Guide to Pan-Frying Your Bread
Follow these simple steps to create delicious, homemade pan-fried bread. Remember, precision and patience are key, especially during the rising process.
Step 1: Combine Wet Ingredients and Yeast
In a spacious mixing bowl, gently crack in 1 large egg. Add 2 tablespoons of your chosen cooking oil, 3 tablespoons of sugar, and 1 teaspoon of instant or dried yeast. Pour in 0.84 cups (200 ml) of lukewarm milk. The lukewarm temperature is vital as it helps to activate the yeast without killing it. Whisk these ingredients together thoroughly until they are well combined and the sugar is mostly dissolved. This creates a fertile environment for your yeast to begin its work.
Step 2: Incorporate Dry Ingredients to Form Dough
To the wet mixture, add 2 cups of all-purpose flour and 1/2 teaspoon of salt. Using a silicone spatula or a sturdy wooden spoon, mix the ingredients from the center outwards, gradually incorporating the flour. Continue mixing until all the flour is hydrated and a soft, sticky dough forms. The beauty of this recipe is that it does not require vigorous kneading; simply mix until no dry streaks of flour remain. The dough will be quite loose and sticky, which is perfectly normal for a no-knead recipe.
Step 3: Allow the Dough to Rise
Once your dough is mixed, cover the bowl tightly with plastic wrap or a clean kitchen towel. Place it in a warm, draft-free spot and let it rise for approximately 1 hour, or until it has noticeably doubled in size. The rising time can vary depending on the ambient temperature. A warm kitchen will expedite the process, while a cooler environment might require a bit more time. This proofing stage is essential for developing the bread’s flavor and airy texture.
Step 4: Prepare Dough for Frying with a Piping Bag
After the dough has risen beautifully, gently stir it a few times with your silicone spatula to release some of the air. This step helps in achieving a consistent texture. Carefully transfer the sticky dough into a large piping bag. Using a piping bag makes it incredibly easy to portion out the dough neatly and avoid direct contact, maintaining the no-touch advantage of this recipe. If you don’t have a piping bag, a sturdy Ziploc bag with a corner snipped off can serve as an excellent alternative.
Step 5: Prepare Your Pan for Frying
Drizzle a generous amount of cooking oil (olive oil is recommended for its flavor, but any cooking oil works) into a non-stick pan. Using a silicone brush, spread the oil evenly across the entire surface of the pan. This ensures that the bread doesn’t stick and develops an even, golden crust.
Step 6: Portion and Cook the Dough
Heat the pan over low heat. Once the oil is warm, squeeze small, evenly sized balls of dough directly into the pan from your piping bag. Use a bread knife or kitchen shears to cleanly cut the dough from the bag after each portion. Remember to leave adequate space between each dough ball, as they will expand slightly while cooking. Cover the pan with a lid. Cooking over low heat with the lid on is crucial as it creates a steaming environment, allowing the bread to cook through evenly while achieving a soft texture and a crispy bottom.
Step 7: Flip and Cook the Second Side
Cook the bread for several minutes on the first side. You’ll know it’s time to flip when the bottom flattens, becomes firm, and turns a beautiful golden brown. Carefully use a spatula to flip each piece of bread. Continue cooking the other side with the lid on, ensuring even cooking and browning. This usually takes a similar amount of time to the first side. The bread should feel light and airy when done, with both sides perfectly golden.
Step 8: Serve and Enjoy
Once both sides are beautifully golden and cooked through, transfer the warm pan-fried bread pieces to a serving plate. They are best enjoyed immediately, straight from the pan. Serve them with your favorite spreads, a dollop of butter, or alongside your preferred breakfast meats. Enjoy the incredible taste of homemade bread that was so simple to make!
Tips for Perfect Pan-Fried Bread Every Time
- Yeast Activation: Ensure your milk is lukewarm, not hot. Hot milk will kill the yeast, and cold milk won’t activate it properly, leading to a dense loaf.
- Proofing Environment: A warm, draft-free spot is ideal for rising. If your kitchen is cold, you can slightly warm your oven (turn it on for a minute, then turn off) and let the dough rise inside with the door ajar.
- Don’t Overcrowd the Pan: Give the dough balls enough space to expand and cook evenly. Cook in batches if necessary.
- Low Heat is Key: Cooking on low heat ensures the bread cooks through without burning the exterior. The lid helps to trap steam, creating a soft interior.
- Non-Stick Pan: A good quality non-stick pan will make flipping much easier and prevent sticking.
- Serving Suggestions: While delicious on its own, try serving with honey, jam, Nutella, cinnamon sugar, or savory options like scrambled eggs, bacon, or a simple sprinkle of sea salt.
Variations and Flavor Enhancements
This basic pan-fried bread recipe is incredibly versatile, allowing you to experiment with different flavors to suit your palate. Here are a few ideas to get you started:
- Sweet Delights:
- Cinnamon Sugar: Before frying, lightly sprinkle the dough balls with cinnamon sugar for a sweet, aromatic treat.
- Fruit & Zest: Add a teaspoon of lemon or orange zest to the dough for a bright, citrusy note.
- Chocolate Chips: Fold in a small handful of mini chocolate chips into the dough before proofing for a delightful surprise.
- Savory Creations:
- Garlic & Herbs: Mix in 1/2 teaspoon of garlic powder and a pinch of dried Italian herbs (oregano, basil) into the dry ingredients for a savory bread.
- Cheese Infusion: Add a quarter cup of shredded cheddar or mozzarella cheese to the dough for a cheesy, comforting bread.
- Onion & Chives: Finely chopped chives or a tiny bit of dried onion flakes can add a lovely savory depth.
Troubleshooting Common Issues
- Dough Not Rising: The most common culprit is inactive yeast or milk that’s too hot or too cold. Ensure your yeast is fresh and your milk is at the correct lukewarm temperature. A warm rising environment also helps.
- Bread is Dense/Rubbery: This can happen if the yeast wasn’t properly activated or if the dough wasn’t allowed enough time to rise. Overmixing the dough can also lead to a tougher texture.
- Bread Not Browning Evenly: Ensure the oil is evenly spread in the pan and that your heat is consistent and low. Adjust the heat as needed and make sure the lid is on for consistent internal cooking.
Conclusion: Your New Favorite Oven-Free Bread Recipe!
Who knew making delicious, homemade bread could be this simple? This easy pan-fried bread recipe is truly a revelation, offering a practical and delightful solution for anyone craving fresh bread without the complexities of traditional baking. It’s perfect for those bustling mornings, a cozy weekend brunch, or whenever you desire the comforting taste of homemade goodness.
Bid farewell to the oven and the endless kneading! With just 8 simple ingredients and a few straightforward steps, you can create perfectly golden, fluffy bread right on your stovetop. This recipe isn’t just about making bread; it’s about making joy and comfort accessible to everyone, regardless of their baking experience or equipment. So go ahead, give this fantastic pan-fried bread a try, and prepare to be amazed by its simplicity and deliciousness. You might just find yourself making it every single week!
**Self-Correction/Review:**
1. **SEO friendly:**
* Added a `