
10 Ingenious Garden Hacks for a Thriving and Productive Vegetable Garden
Are you envisioning a lush, productive vegetable garden, brimming with fresh produce? Whether you’re a seasoned green thumb or just dipping your toes into the rewarding world of gardening, a few clever tricks can make all the difference. Cultivating a successful vegetable patch doesn’t have to be complicated or overly expensive. In fact, with some expert insights, you can significantly boost your garden’s health and yield while saving time, effort, and resources.
We’ve compiled an incredible list of 10 essential gardening hacks, inspired by the seasoned professionals at GrowVeg on YouTube. These invaluable tips are designed to simplify common gardening challenges, improve plant vitality, and ultimately lead to a more bountiful harvest. Get ready to transform your gardening approach with these ingenious solutions that promise super good results when followed diligently. Let’s dive into these game-changing strategies and share them with your fellow garden enthusiasts!
#1 Craft a Custom Measuring Stick from a Long-Handled Tool
Achieving optimal plant spacing is fundamental for healthy growth and maximum yields in your vegetable garden. While a tape measure is handy, constantly fumbling with it can be time-consuming and cumbersome. Here’s a brilliant hack: transform one of your existing long-handled garden tools, like a rake or hoe, into a permanent, convenient measuring stick.
To implement this, lay your chosen tool on a flat surface. Position a standard tape measure alongside its handle, ensuring it’s perfectly aligned from one end. Using a durable, permanent marker, carefully transfer common planting distances onto the handle. Think about spacings like 6 inches, 1 foot, 18 inches, or 2 feet – whatever distances you frequently use for your specific crops. Mark these clearly with lines and corresponding numbers. Once complete, you’ll have an always-ready measuring device integrated into a tool you already use. This simple modification ensures consistent spacing, allows for efficient planting, and helps prevent overcrowding, which can lead to poor air circulation, increased disease risk, and diminished harvests. It’s a small change that brings significant precision and convenience to your planting routine.
#2 Revitalize Old Plastic Plant Labels with Sandpaper
Gardeners accumulate numerous plastic plant labels over the years, often finding them illegible after just one season due to fading markers or persistent dirt. Instead of constantly buying new ones, which adds to plastic waste and your gardening budget, you can easily restore your old labels to a pristine, reusable state. This hack promotes sustainability and saves you money.
The trick is simple: grab a piece of fine-grit sandpaper. Gently rub the surface of the old plastic label where the previous writing or residue is. The abrasive action of the sandpaper will efficiently remove permanent marker ink, dirt, and any other stubborn stains, leaving a clean, smooth surface ready for new labeling. With this method, you can get several years, even decades, of use out of your plastic labels. It’s an incredibly straightforward yet effective way to maintain clear plant identification without contributing to unnecessary plastic consumption. Remember to use a new, waterproof garden marker for the best long-lasting results after rejuvenating your labels.
#3 Improvise a Cloche Using a Terracotta Pot
Young seedlings are incredibly vulnerable to unexpected dips in temperature, particularly light frosts that can occur in early spring or late autumn. A cloche, a bell-shaped covering, offers vital protection, but if you find yourself without one, a terracotta pot can be an excellent substitute. This hack is perfect for extending your growing season or protecting tender plants from sudden cold snaps.
When frosty conditions are anticipated, simply turn an appropriately sized terracotta pot upside down and gently place it over your precious seedlings. The terracotta material, being porous, provides a degree of insulation, acting like a warm jacket to shield the delicate plants from the cold. Its weight also prevents it from being easily blown away by wind. This makeshift cloche traps residual ground heat, offering crucial protection against light frost damage, and can also deter certain pests. Just remember to remove the pot once the danger of frost has passed and temperatures rise, allowing your seedlings access to sunlight and proper air circulation. It’s a natural, accessible, and highly effective way to safeguard your young plants.
#4 Combat Aphids Naturally with Sticky Tape
Aphids are a common garden pest that can quickly infest and weaken your plants by sucking out their sap. While chemical sprays are an option, many gardeners prefer organic and gentle methods, especially for edible crops. This simple yet highly effective hack allows you to manually remove aphids without any harsh substances, keeping your plants healthy and your harvest safe.
The method is incredibly easy: take a wide strip of strong adhesive tape, such as packing tape or duct tape, and wrap it around your hand with the sticky side facing outwards. Then, gently pat or dab the infested leaves and stems of your plants. The aphids will stick to the tape, allowing you to lift them cleanly away from the plant surface. This method is particularly effective for localized infestations and offers an immediate, satisfying way to reduce pest populations. It’s a non-toxic, eco-friendly approach that allows you to control pests physically, making your work much easier and your plants happier. Regularly inspecting your plants and using this method at the first sign of aphids can prevent them from becoming a widespread problem.
#5 Create DIY Water Reservoirs from Plastic Bottles
Consistent moisture is vital for healthy plant growth, especially during hot, dry spells or for plants in containers that tend to dry out quickly. This innovative hack utilizes recycled plastic bottles to create subterranean water reservoirs, providing a steady and efficient water supply directly to your plants’ roots, reducing water waste and the frequency of watering.
To make these reservoirs, start with clean plastic bottles. Drill several small holes into the bottle cap; these holes will control the slow release of water into the soil. Next, cut off the bottom of the bottle. Before planting your seedling or established plant, dig a hole in your pot or garden bed and sink the upturned bottle (cap-side down) into the ground, leaving about an inch of the bottle’s open end poking above the soil surface. Plant your vegetables as usual around the bottle. When it’s time to water, simply fill the exposed bottle opening with water. The water will slowly percolate out through the holes in the cap, delivering moisture directly to the root zone where it’s most needed. This deep watering encourages stronger root development and helps conserve water by minimizing surface evaporation. It’s an excellent way to keep your plants healthy and thriving with less effort.
#6 Reduce Water Waste by Reusing Kitchen Water
Every drop of water counts, especially in the garden. This eco-conscious hack encourages you to rethink what you consider “waste water” in your kitchen, transforming it into a valuable resource for your vegetable garden. By reusing water from cooking, you not only conserve a precious resource but also potentially provide your plants with beneficial trace nutrients.
The simplest way to implement this is by saving the water you use to boil vegetables like potatoes, pasta, or rice. This water often contains small amounts of nutrients that have leached out of the food during cooking. Once it has completely cooled down to room temperature – and critically, ensure it’s unsalted and free of grease or harsh detergents – you can use it to water your garden. Avoid using water that has had salt or strong cleaning agents, as these can be detrimental to plant health. This practice significantly reduces your household water bill and contributes to a more sustainable lifestyle. It’s a small but impactful change that supports both your garden’s health and the environment, proving that resourceful gardening can be truly rewarding.
#7 Give Hard-Coated Seeds a Head Start with Soaking
Many seeds, particularly larger ones like peas, sweet peas, beans, and corn, have naturally tough or hard outer coatings. This protective layer is designed to keep the embryo safe but can also delay germination significantly once planted, as it takes time for moisture to penetrate. This simple pre-treatment hack can dramatically speed up the germination process, leading to more uniform and successful sprouting.
For seeds with a hard coating, give them a head start by soaking them in lukewarm water overnight, typically for 8 to 12 hours. The warm water helps to soften the seed coat, allowing moisture to be absorbed more readily by the embryo inside. This process, known as imbibition, kickstarts the internal metabolic processes necessary for germination. After soaking, drain the water and plant the plumped-up seeds out as you normally would. You’ll likely observe much faster germination times and a higher percentage of successful sprouts. This technique is especially beneficial for gardeners eager to get their crops established quickly or those dealing with older seeds that might be a bit more hesitant to germinate. Always research specific soaking recommendations for different seed types, as some smaller or more delicate seeds may not require this treatment.
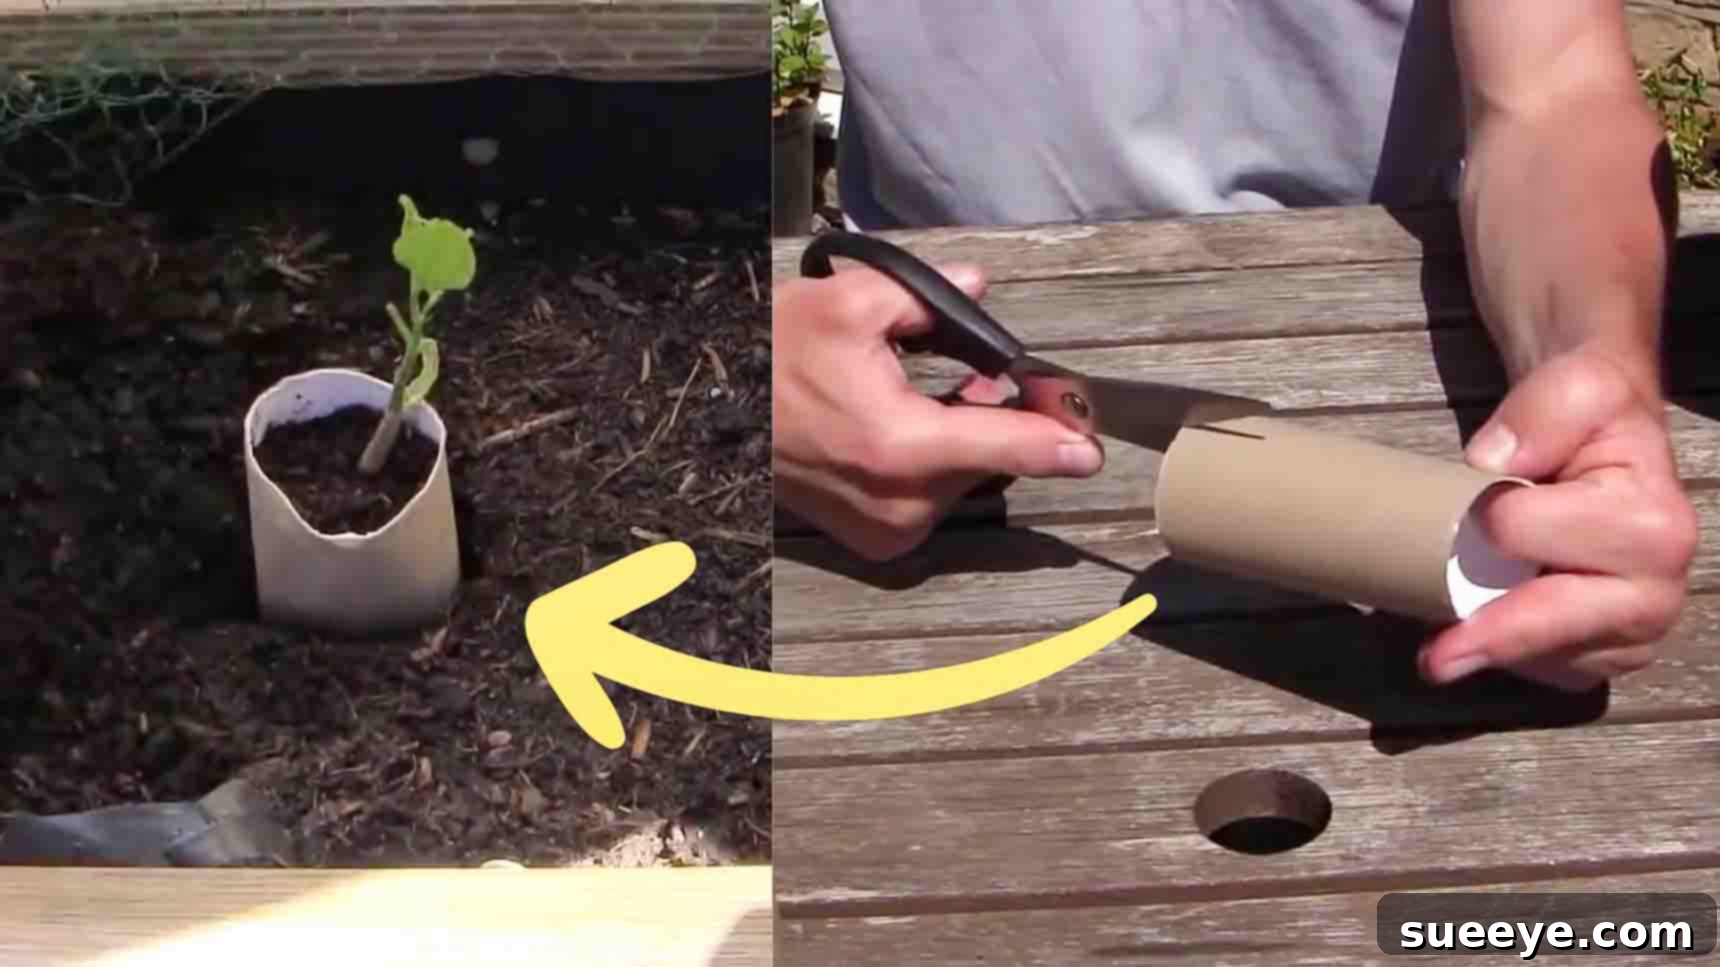
#8 Cultivate Seedlings in Biodegradable Cardboard Tube Planters
Certain vegetables, such as beans, peas, and cucumbers, are notorious for disliking root disturbance during transplanting. This “transplant shock” can set back their growth or even lead to plant loss. This ingenious hack provides a solution by allowing you to grow seedlings in biodegradable containers that can be planted directly into the ground, minimizing stress on delicate root systems.
Repurpose cardboard tubes from toilet paper or paper towels to create these planters. Take a tube and make three or four vertical cuts, about a third of the way along one end of the tube, to create flaps. Push these flaps inwards towards the center and press them firmly to interlock and form a stable bottom for your planter. Fill the tube with good quality potting soil and sow your seeds as usual. Once your seedlings are strong and ready for transplanting into the garden, simply plant the entire cardboard tube, with the seedling inside, directly into your prepared bed. The cardboard will naturally break down in the soil, allowing the roots to grow through without any disturbance. This method ensures that your sensitive plants experience minimal shock, leading to healthier, more robust growth from the outset. It’s a fantastic way to utilize recycled materials and give your garden the best possible start.
#9 Maximize Space with Vertical Garden Planters
If you have a small garden, a limited yard, or simply want to optimize every square inch of your growing area, thinking vertically is a game-changer. Vertical gardening allows you to cultivate a surprising amount of produce in a compact footprint, making it ideal for urban gardeners, balconies, or patios. It also adds an attractive architectural element to your outdoor space.
One popular and effective way to create vertical planters is by repurposing guttering. Start by acquiring lengths of standard rain guttering and cut them to your desired dimensions. Along the bottom length of each piece, drill several small drainage holes; this is crucial to prevent waterlogging and ensure healthy root development. Securely mount these guttering sections to a sunny wall or sturdy fence using appropriate brackets, ensuring they are level or slightly angled for uniform drainage. Once installed, fill them with a moisture-retentive growing medium. These vertical beds are perfectly suited for shallow-rooted plants like strawberries, a variety of salad greens (lettuce, spinach, arugula), herbs, and even some smaller flowering annuals. Vertical gardening not only saves space but can also make harvesting easier, improve air circulation around plants, and deter ground-dwelling pests. It’s a highly adaptable solution for any aspiring gardener looking to expand their growing potential.
#10 Utilize Garden Planning Software for Optimal Design
Even with the best hacks, a truly successful vegetable garden begins with intelligent planning. Garden planning software is an invaluable tool that takes the guesswork out of designing your garden, helping you optimize space, manage crop rotation, and ensure companion planting benefits. For both novice and experienced gardeners, this digital approach can lead to higher yields and fewer problems.
These software programs typically allow you to map out your garden beds, experiment with different plant layouts, and visualize your garden before you even break ground. Many offer features such as plant databases with specific growing requirements, companion planting suggestions (which plants benefit each other), and crop rotation guides to prevent soil depletion and disease buildup. Some advanced options even include tracking features for planting dates, harvest times, and watering schedules. By using garden planning software, you can make informed decisions about what to grow, where to place it for optimal sunlight and soil conditions, and how to succession plant for continuous harvests. It helps prevent common mistakes, ensures efficient use of your space, and empowers you to create a harmonious and productive garden ecosystem. Invest a little time in planning, and watch your vegetable garden flourish like never before.
Implementing these 10 ingenious garden hacks will undoubtedly elevate your vegetable gardening experience from good to absolutely fantastic. From simple DIY tools to smart resource management and strategic planning, each tip offers a practical solution to common gardening challenges. By embracing these expert-approved methods from GrowVeg, you’ll not only cultivate a healthier, more vibrant vegetable garden but also enjoy the process more, knowing you’re applying efficient and sustainable practices.
So, roll up your sleeves, pick your favorite hacks to start with, and watch your garden thrive. A bountiful harvest awaits! Don’t forget to share these valuable insights with your fellow gardening enthusiasts and perhaps even inspire a few new green thumbs along the way. Happy gardening!