
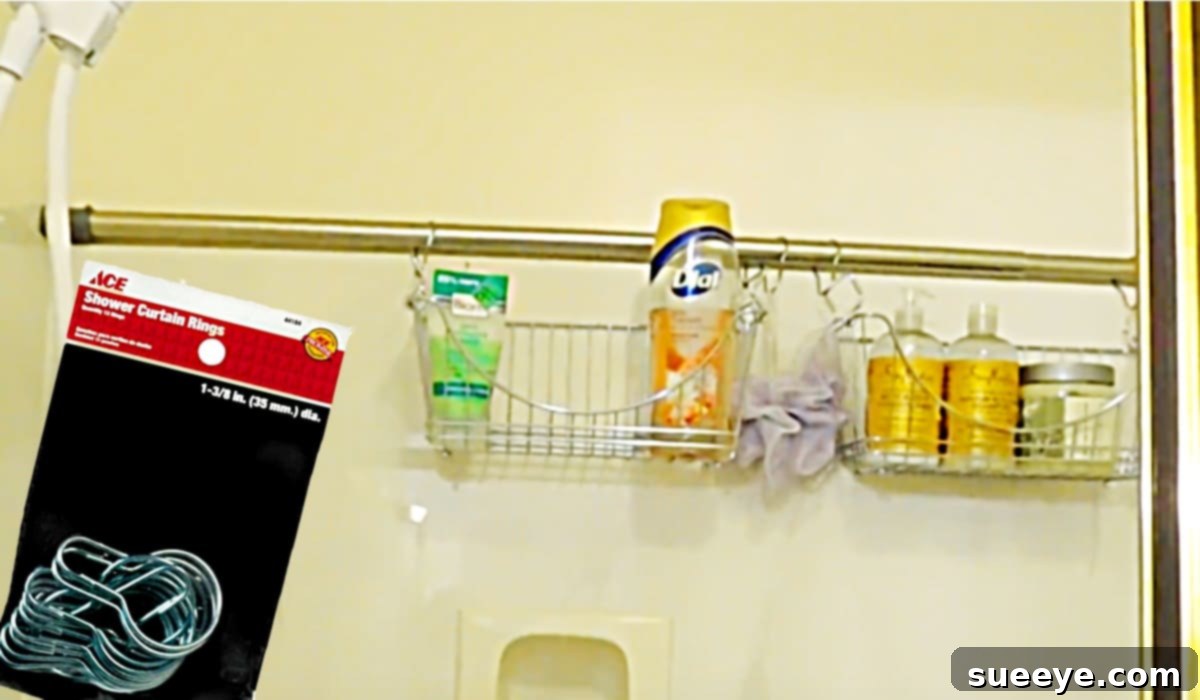
Master Your Shower Space: The Ultimate DIY Tension Rod Caddy Guide
Do you find yourself constantly battling for space in your shower? Are bottles of shampoo, conditioner, and body wash cluttering the edges of your tub or precariously balanced on narrow ledges? You’re not alone! A lack of adequate storage is a common frustration in many bathrooms, especially in smaller or prefabricated showers that offer minimal built-in shelving. But what if we told you there’s a remarkably simple, incredibly effective, and wonderfully affordable solution that you can implement in just minutes? Get ready to transform your shower experience from chaotic to organized with this ingenious DIY tension rod shower caddy.
Inspired by an brilliant and accessible video tutorial by T. Marie Life on YouTube, this project provides a customizable storage solution for even the most compact showers. Whether you have a tiny fiberglass unit, a tiled walk-in, or anything in between, this method is adaptable and requires no drilling or permanent alterations, making it perfect for renters and homeowners alike. Say goodbye to slippery soap dishes and overflowing tub edges, and hello to a tidy, functional, and aesthetically pleasing shower space.
Why Choose a DIY Shower Caddy? Unlock the Benefits of Smart Storage
Solving the Clutter Conundrum
The primary motivation for creating a DIY shower caddy is often to address the pervasive issue of clutter. Shower products can quickly accumulate, leading to an unsightly and often unsanitary environment. Bottles left on the tub rim can develop rings of grime, and wet sponges or loofahs can become breeding grounds for mold and mildew if not properly aired out. A well-designed caddy lifts these items off surfaces, allowing for better drainage and air circulation, thus promoting hygiene and extending the life of your shower accessories.
Cost-Effective Organization
Compared to many commercially available shower caddies, especially those designed for corner spaces or with multiple tiers, this DIY approach is incredibly budget-friendly. You can source all the necessary materials from local discount stores, dollar stores, or even big-box retailers, often for less than the cost of a single high-end shower organizer. This makes it an ideal project for anyone looking to improve their home on a shoestring budget without sacrificing functionality or style.
Customization at Your Fingertips
One of the greatest advantages of a DIY project is the ability to tailor it precisely to your needs. Store-bought caddies often come in fixed sizes and configurations, which might not perfectly suit your specific shower dimensions or the types of products you use. With this tension rod system, you choose the baskets, their number, and their placement. Need more space for tall shampoo bottles? Use deeper baskets. Want a dedicated spot for a child’s bath toys? Add an extra mesh basket. The possibilities for personalization are endless, ensuring your caddy works perfectly for you and your family.
Simple Installation, No Tools Required
Perhaps the most appealing aspect of this DIY shower caddy is its straightforward installation process. Forget about drills, anchors, or complicated mounting hardware. The entire setup relies on the simple mechanics of a tension rod, meaning anyone can assemble it regardless of their DIY skill level. This tool-free approach not only saves time but also prevents any damage to your shower walls, making it an excellent choice for those living in rented properties where permanent fixtures are often prohibited.
Gathering Your Essentials: Materials for Your DIY Shower Caddy Project
Before you embark on this rewarding project, take a moment to gather the few simple items you’ll need. These are readily available at most general merchandise stores, hardware stores, or even dollar stores, ensuring accessibility and affordability.
- A Pack of Shower Curtain Hooks: These are the unsung heroes of this project, acting as the connectors between your tension rod and your storage baskets. Look for sturdy plastic or metal hooks. Plastic ones are usually very inexpensive and won’t rust, while metal ones can offer a more refined aesthetic and potentially greater weight capacity. Consider hooks with a clasp or a more closed design to prevent baskets from easily coming off.
- A Tension Shower Curtain Rod: This is the backbone of your caddy. Choose a rod that is appropriate for the width of your shower area where you intend to install the caddy. Ensure it has a strong spring mechanism to hold securely against the walls. Many come with rubberized ends to prevent slipping and protect surfaces.
- Two or More Stacking Baskets: The number of baskets you choose will depend on your storage needs. Look for baskets that are lightweight, durable, and, crucially, have handles or edges that can hook onto the shower curtain hooks. Plastic mesh baskets are excellent as they allow water to drain easily and prevent mildew buildup. Wicker or fabric baskets are not recommended for wet environments. Consider different sizes to accommodate various items – deeper ones for bottles, shallower ones for soaps or razors.
Optional Additions: While not strictly necessary, you might also consider a few extra items to enhance your caddy. S-hooks can be handy for hanging loofahs, washcloths, or razors. Small zip ties could be used for extra security if you find your baskets are wobbly on the hooks. Decorative elements like colorful hooks or unique baskets can also add a personal touch to match your bathroom decor.
Step-by-Step Guide: Building Your Perfect Shower Storage Solution
Now that you have all your materials, let’s dive into the incredibly simple process of assembling your new shower caddy. You’ll be amazed at how quickly you can transform your cluttered shower into a beacon of organization.

Step 1: Securing Your Foundation: Installing the Tension Rod
The first and most crucial step is to install your tension rod. Begin by determining the ideal height for your caddy. Most people prefer it to be easily reachable without having to stoop down too much, typically somewhere around chest or eye level, or perhaps higher if you only intend to use it for occasional items. Ensure the area where the rod will make contact with the wall is clean and dry. This will help the rubberized ends grip better and prevent slipping.
Extend the tension rod by twisting it until it is slightly longer than the width of your shower space. Position one end against the wall, then push the other end firmly against the opposite wall, compressing the spring. Release the tension carefully, allowing the rod to wedge itself securely between the two surfaces. Give it a gentle tug to test its stability. It should feel firm and not show any signs of slipping. If it feels loose, twist to extend it a little more until it is snug.
Step 2: Attaching the Hooks: The Connecting Link
Once your tension rod is firmly in place, it’s time to add the shower curtain hooks. Simply thread the hooks onto the tension rod, just as you would with a regular shower curtain. The number of hooks you use will correspond to the number of baskets you plan to hang, plus any extra hooks for other accessories like loofahs or razors. You can space them out evenly or cluster them depending on your basket widths and desired arrangement. Ensure the open end of the hook (if it has one) is facing downwards for easier basket attachment.

Step 3: Integrating Your Baskets: Creating Storage Levels
With the hooks in place, the next step is to attach your chosen stacking baskets. Most baskets come with handles or cutouts that are perfect for hooking onto shower curtain rings. Simply hang each basket onto one or two of the hooks you’ve placed on the tension rod. You can arrange them side-by-side or even stack them vertically if your baskets are designed for that and your hooks are strong enough. Experiment with different configurations to find what works best for your items and optimizes the space. Ensure the baskets are securely attached and won’t easily fall off when filled.
Step 4: Personalizing and Loading Up
Finally, your DIY shower caddy is ready to be filled! Arrange your shampoos, conditioners, body washes, soaps, razors, and sponges into the baskets. Take advantage of the customizable nature of this setup. Place frequently used items in easily accessible baskets. You can dedicate specific baskets for different family members or for different product categories. For instance, one basket for hair care, another for body care, and a third for kids’ bath toys. Step back and admire your newly organized and clutter-free shower space!
Elevate Your Space: Advanced Customization and Styling Ideas
While the basic setup is incredibly functional, there are many ways to further customize and style your tension rod shower caddy to perfectly match your needs and bathroom aesthetic.
Beyond the Basics: Basket Types and Sizes
Don’t limit yourself to just two baskets! Consider using a variety of basket types and sizes. Clear plastic bins can help you quickly identify contents, while mesh bags (specifically designed for shower use) can be great for smaller items or kids’ toys that need to dry quickly. Some baskets come with suction cups on the back for extra stability against the shower wall, an excellent feature to prevent swinging. You can even find decorative wire baskets in various finishes if you prefer a more industrial or farmhouse look.
Adding Hooks and Hangers
Maximize your storage by incorporating additional S-hooks or clip-on hooks directly onto the tension rod. These are perfect for hanging loofahs, back brushes, washcloths, razors, or even small squeegees for quick shower cleaning. Some tension rods come with built-in hooks, providing even more functionality.
Aesthetic Touches: Matching Your Bathroom Decor
Your shower caddy doesn’t have to be purely functional; it can also be an extension of your bathroom’s style. Choose a tension rod in a finish that complements your existing fixtures (e.g., brushed nickel, oil-rubbed bronze, chrome). Select baskets that match your bathroom’s color scheme or add a pop of contrasting color. Even the shower curtain hooks can be chosen for their decorative appeal, available in various shapes, materials, and colors.
Zonal Organization
If multiple people use the same shower, consider creating “zones” within your caddy. Dedicate a specific basket or section for each person’s toiletries. This helps maintain individual organization and prevents mix-ups. You can even label baskets with waterproof markers for ultimate clarity.
Maintenance and Longevity: Keeping Your Caddy Pristine
To ensure your DIY shower caddy remains a functional and hygienic part of your bathroom for years to come, a little routine maintenance goes a long way.
Regular Cleaning Routine
Because the caddy is in a wet environment, it’s susceptible to soap scum, mildew, and hard water stains. Make it a habit to regularly wipe down the tension rod and baskets. For plastic baskets, a quick rinse and scrub with a shower cleaner or a mild soap solution once a week will keep them sparkling. For metal components, use appropriate cleaners that won’t cause corrosion. Ensuring good ventilation in your bathroom also helps prevent moisture buildup.
Checking for Stability
Over time, tension rods can sometimes loosen slightly due to vibrations or accidental bumps. Periodically check the tension rod by giving it a gentle tug. If it feels less secure, simply twist it to re-tighten it against the walls. This quick check will prevent any unexpected collapses and protect your items.
Addressing Weight Limits
While tension rods are surprisingly strong, they do have weight limitations. Avoid overloading your baskets with excessively heavy items like large bulk-sized liquid containers. Distribute the weight as evenly as possible across the rod and baskets. If you notice the rod bowing in the middle, it’s a sign that it might be carrying too much weight, or you might need a stronger, thicker tension rod designed for heavier loads.
Troubleshooting Common Issues
Even with a simple project, you might encounter a minor snag. Here are solutions to common issues you might face with your DIY shower caddy:
Tension Rod Slipping
If your tension rod keeps slipping, ensure the walls where it’s installed are completely clean and dry before installation; soap residue or grime can reduce friction. You can also try adding small, non-slip rubber pads or double-sided adhesive strips to the ends of the tension rod (between the rod and the wall) for extra grip. For very slick surfaces like certain types of tile, a tension rod with stronger, larger rubber feet might be necessary.
Baskets Not Hanging Evenly or Swinging
If your baskets are tilting or swinging excessively, first check that the hooks are evenly spaced and securely attached to the rod. If using two hooks per basket, ensure they are positioned symmetrically. For added stability, especially with lighter baskets, you can use small zip ties to secure the basket handles directly to the shower curtain hooks or even to the tension rod itself, effectively creating a more rigid connection.
Mold and Mildew Buildup
This is a common issue in any shower environment. Ensure your baskets have adequate drainage holes and are made of materials that dry quickly, like mesh or perforated plastic. Regularly empty the baskets, rinse them, and allow them to air dry. Improving overall bathroom ventilation by using an exhaust fan or opening a window after showering will also significantly reduce moisture and prevent mildew.
This DIY shower caddy project is not only incredibly easy and affordable but also highly effective at solving common shower storage dilemmas. It offers a unique blend of practicality, customization, and simplicity, making it an ideal weekend project for anyone looking to enhance their bathroom’s functionality and aesthetic. By following these straightforward steps and tips, you can transform your cluttered shower into a beautifully organized and stress-free space. So, gather your materials, follow T. Marie Life’s fantastic inspiration, and prepare to enjoy the immense satisfaction of a perfectly organized shower. Your soaps and shampoos (and your sanity) will thank you!