
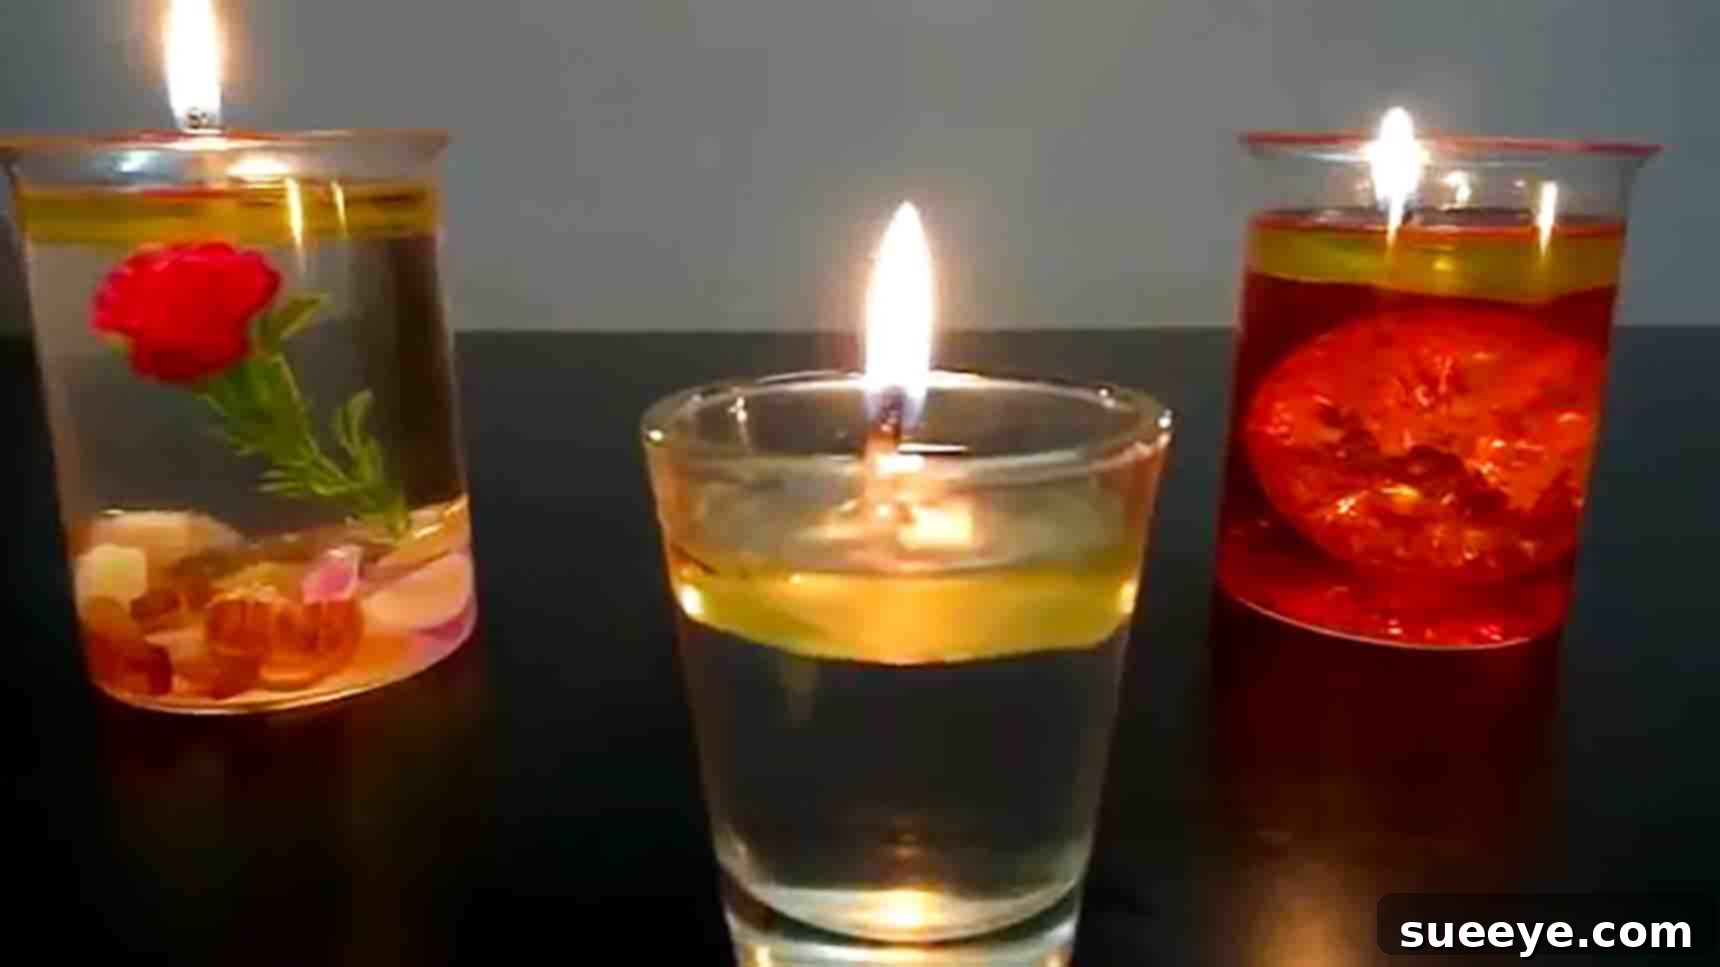
Imagine illuminating your home with candles you’ve crafted yourself, using just water and a few common household items! This incredible tutorial, inspired by the creative insights of LightninGirl on YouTube, will genuinely surprise you with its simplicity and stunning results. Forget complicated candle-making kits; with this guide, you can create a multitude of beautiful water candles that are not only functional but also incredibly decorative. Dive into the world of DIY crafting, express your creativity through unique designs, and craft these mesmerizing pieces with friends and family today. Our comprehensive, step-by-step instructions below will guide you through the entire process, ensuring a smooth and enjoyable crafting experience.
Craft Your Own Mesmerizing Water Candles: An Easy DIY Guide
Water candles, often referred to as oil and water candles, are a fascinating and surprisingly simple way to create ambient lighting. They leverage the principle that oil floats on water, allowing a small wick to draw fuel from the oil layer, creating a flame. This method is not only cost-effective but also incredibly versatile, offering endless possibilities for customization to match any decor or occasion. Whether you’re looking to add a touch of elegance to your dinner table, create a serene atmosphere, or prepare for unexpected power outages, these DIY water candles are an excellent solution. They are also a fantastic project for crafters of all skill levels, providing a rewarding experience with beautiful outcomes.
Why Choose DIY Water Candles? The Benefits of This Unique Craft
There are numerous compelling reasons to explore the craft of making your own water candles. Beyond the sheer satisfaction of creating something beautiful with your own hands, these candles offer practical advantages that traditional wax candles often can’t match.
Cost-Effective and Resourceful
- Affordable Materials: The primary components—water, cooking oil (or lamp oil), and a small piece of plastic and wick—are incredibly inexpensive and often readily available in most homes. This makes water candles a budget-friendly alternative to store-bought options.
- Utilize Recycled Items: Old glass jars, bottles, and even decorative vases can be repurposed as elegant candle holders, reducing waste and adding a unique charm to each creation.
Endless Customization and Design Potential
- Personalized Aesthetics: From adding food coloring to the water layer, incorporating pebbles, beads, sand, or even small flowers, the design possibilities are truly limitless. You can match your candles to any holiday theme, room decor, or personal preference.
- Creative Expression: Each water candle can be a miniature work of art, reflecting your personal style and creativity. Experiment with different textures, colors, and arrangements to create truly unique pieces.
Practical and Versatile Applications
- Emergency Lighting: In situations where electricity is unavailable, water candles provide a reliable and safe source of light. They are a practical addition to any emergency preparedness kit.
- Atmospheric Enhancer: Perfect for setting a mood, whether it’s a romantic dinner, a relaxing bath, or a cozy evening with a book. The gentle flicker of a water candle adds warmth and tranquility to any space.
- Unique Gifts: Handmade water candles make thoughtful and personal gifts for friends and family, showcasing your effort and creativity.
Essential Materials You’ll Need
Gathering your materials is the first exciting step in creating your custom water candles. Most of these items are easily found around your home or at a local craft store.
- Glass Jars of Different Sizes: Clear glass jars, vases, or even elegant bottles work best. Choose various sizes and and shapes to add visual interest to your collection. Ensure they are clean and dry.
- Water: Regular tap water is perfectly fine.
- Lamp Oil or Vegetable Oil: Lamp oil is designed specifically for candles and burns cleanly. Alternatively, common vegetable oils like canola oil, olive oil, or sunflower oil can be used. Olive oil tends to burn longer and with less smoke.
- Candlewick: You can purchase candlewick material from craft stores. Flat braided wicks are generally suitable for oil lamps.
- Scissors: For cutting the wick and plastic sheet.
- Transparent Plastic Sheet: A thin, rigid plastic sheet is ideal. This could be repurposed from plastic food containers, plastic folders, or even thick plastic packaging.
- Pebbles, Sand, or Beads (Optional): These are fantastic for adding weight, color, and texture to the bottom of your jars. Consider sea glass, decorative marbles, or aquarium gravel.
- Food Coloring (Optional): Use liquid food coloring to tint the water layer, adding a vibrant splash of color to your candles.
Step-by-Step Directions: Crafting Your Water Candles
Follow these detailed instructions carefully to bring your beautiful water candles to life. Each step is designed to be straightforward, ensuring a successful and enjoyable crafting experience.
Step 1: The Classic Water Candle Design
Let’s begin with a fundamental design that showcases the elegance of the water candle.
- Prepare Your Glass Jar: Select a clean glass jar of your desired size. Fill it with water, leaving approximately one-third of the jar empty from the rim. This space is crucial for the oil layer and to prevent spillage.
- Add Color (Optional): If you wish to add a splash of color, now is the time. Carefully add a few drops of liquid food coloring to the water. Stir gently to ensure an even distribution of color. The colored water will create a stunning visual effect beneath the clear oil layer.
- Pour the Oil Layer: Slowly and steadily pour your chosen lamp oil or vegetable oil on top of the water. The oil, being less dense than water, will naturally float and form a distinct layer. Aim for an oil layer of about 1/2 to 1 inch thick. This layer acts as the fuel for your candle.
- Craft the Wick Holder: Take your transparent plastic sheet. Using scissors, cut out a small circle. This circle should be slightly smaller than the inner circumference of your glass jar, allowing it to float freely without touching the sides. The size of this plastic disc is critical as it will support the wick.
- Prepare the Wick: Find the precise center of the plastic circle you just cut. Carefully make a small ‘X’ shape or a tiny slit in the center. This opening should be just large enough to snugly fit your candlewick.
- Insert and Trim the Wick: Thread a piece of candlewick through the ‘X’ slit. Ensure that only about 1/4 to 1/2 inch of the wick extends above the plastic disc, and a longer portion extends below, enough to dip well into the oil layer. Trim any excess wick below the plastic to prevent it from touching the water, as only the oil-saturated part will burn.
- Place the Wick Assembly: Gently and carefully place the plastic disc with the wick into the glass jar, ensuring it floats on top of the oil layer. The wick should be positioned vertically, with the bottom end submerged in the oil.
- Saturate and Light: Allow the candlewick several minutes (at least 5-10 minutes) to absorb sufficient oil. This saturation is key for a steady flame. Once the wick appears damp with oil, carefully light it. Watch as your beautiful water candle comes to life, casting a warm, inviting glow.
Step 2: Embracing Creativity with Decorative Elements
This next design encourages you to experiment with various decorative elements, transforming your water candles into stunning centerpieces.
- Fill the Jar with Water: As before, take another clean glass jar and fill it about two-thirds full with water, leaving ample space from the rim.
-
Introduce Your Decorations: This is where your creativity shines! Gently drop in decorative elements of your choice.
- Beads: Colorful glass beads, acrylic beads, or even pearl beads can add shimmer and depth.
- Pebbles/Gravel: Small, polished pebbles, river rocks, or aquarium gravel create a natural and earthy look.
- Sand: Layers of colored sand can create beautiful stratified patterns.
- Natural Elements: Consider adding small, artificial flowers (ensure they are non-flammable), fresh cranberries for a festive touch, or lemon slices for a refreshing aroma (these will float in the water).
Arrange them until you are completely satisfied with the visual appeal.
- Add the Oil Layer: Carefully pour enough lamp oil or vegetable oil on top of your decorated water layer. Again, aim for a clear oil layer of 1/2 to 1 inch. Ensure the oil doesn’t disturb your carefully arranged decorative elements too much.
- Insert the Wick Assembly: Create another plastic wick holder and wick as described in Step 1. Gently place this assembly onto the oil surface.
- Saturate and Ignite: Allow the wick to absorb oil for several minutes before lighting. Once ready, ignite the wick and admire your unique, decoratively enhanced water candle.
Unleash Your Creativity: More Design Ideas for Water Candles
The true beauty of DIY water candles lies in their adaptability. Don’t stop at the basic designs; let your imagination run wild with these inspiring ideas:
-
Seasonal Themes:
- Autumn: Use small pinecones, acorns, dried leaves, or cinnamon sticks at the bottom. Tint the water with orange or deep red food coloring.
- Winter/Holidays: Add cranberries, sprigs of rosemary or small artificial holly berries. Use silver or gold beads. White or blue food coloring in the water evokes a winter wonderland.
- Spring: Incorporate fresh flower petals (e.g., rose, tulip), small artificial blossoms, or green moss. Use pastel-colored water.
- Summer: Display seashells, sand, small colorful beach glass, or slices of citrus fruits (lemon, lime, orange). Bright blue or turquoise water creates a summery vibe.
- Themed Parties: Create candles that match your party theme, whether it’s a rustic outdoor gathering, an elegant dinner party, or a vibrant birthday celebration.
- Aromatherapy (with Caution): While essential oils are typically added to diffusers, some people add a drop or two to the oil layer for a subtle scent. However, exercise extreme caution and research thoroughly as not all essential oils are safe to heat directly, and some can be flammable. It’s generally safer to use a separate diffuser.
- Layered Looks: Experiment with different layers of sand or small stones for a captivating geological effect.
- Multiple Candles: Arrange several water candles of varying heights and designs together to create a stunning centerpiece display.
Safety First: Important Precautions for Water Candles
While water candles are generally safe and easy to make, it’s crucial to follow basic fire safety guidelines to prevent accidents.
- Never Leave Unattended: Like any open flame, never leave a burning water candle unattended. Always extinguish candles before leaving a room or going to sleep.
- Keep Away from Flammables: Place your water candles on a stable, heat-resistant surface, far away from curtains, papers, clothing, and any other combustible materials.
- Use Appropriate Oils: Stick to designated lamp oil or common vegetable oils. Never use highly volatile or flammable liquids like gasoline, kerosene, or paint thinners.
- Maintain Wick Length: Ensure the exposed wick above the plastic float is not excessively long (ideally 1/4 to 1/2 inch). A longer wick can produce a larger flame and more soot. Trim it if necessary.
- Ventilation: Ensure good ventilation in the area where candles are burning, especially if using vegetable oils which might produce more soot than lamp oil.
- Children and Pets: Keep burning candles out of reach of children and pets.
- Avoid Overfilling: Do not fill the jar to the very top. Leave enough space for the oil layer and to prevent spillage if the candle is accidentally bumped.
- Extinguishing: To extinguish, gently blow out the flame or carefully dip the wick into the oil with a non-flammable tool.
Troubleshooting Your Water Candles
Even with the simplest crafts, sometimes things don’t go exactly as planned. Here are some common issues and how to fix them:
-
Candle Won’t Light or Flame is Too Small:
- Wick Not Saturated: Ensure the wick has had enough time (at least 5-10 minutes) to fully absorb the oil.
- Wick Too Short: The exposed wick above the plastic float might be too short to sustain a flame. Gently pull a little more wick through the plastic.
- Wick Touching Water: If the bottom part of the wick is submerged in water instead of oil, it won’t burn. Adjust the wick or the oil level.
- Oil Type: Some oils burn better than others. Lamp oil is optimized for this purpose. If using vegetable oil, ensure it’s fresh.
-
Flame is Too Big or Smoky:
- Wick Too Long: The most common cause. Trim the exposed wick above the plastic float to about 1/4 inch.
- Poor Quality Oil: Some cheaper vegetable oils might produce more soot. Try a higher quality vegetable oil or lamp oil.
- Lack of Oxygen: Ensure the flame has adequate air circulation.
-
Plastic Disc Sinks:
- Wick Too Heavy: If the wick is too long and heavy below the plastic, it might pull the disc down. Trim the submerged part of the wick.
- Plastic Disc Too Small/Thin: Ensure the plastic disc is large enough to provide sufficient buoyancy and sturdy enough not to bend.
Conclusion: Light Up Your Life with DIY Water Candles
You’ve now mastered the art of creating stunning water candles! This simple yet ingenious craft offers an exciting way to add beauty, warmth, and a personal touch to any space. From cost-effective home decor to reliable emergency lighting, the versatility of these oil and water candles is truly remarkable. We hope this comprehensive tutorial has inspired you to explore your creativity and enjoy the process of making these unique floating lights. Gather your materials, invite some friends over, and embark on a delightful crafting journey. Light up your world, one homemade water candle at a time! Share your amazing creations with us and inspire others to discover the magic of DIY.