
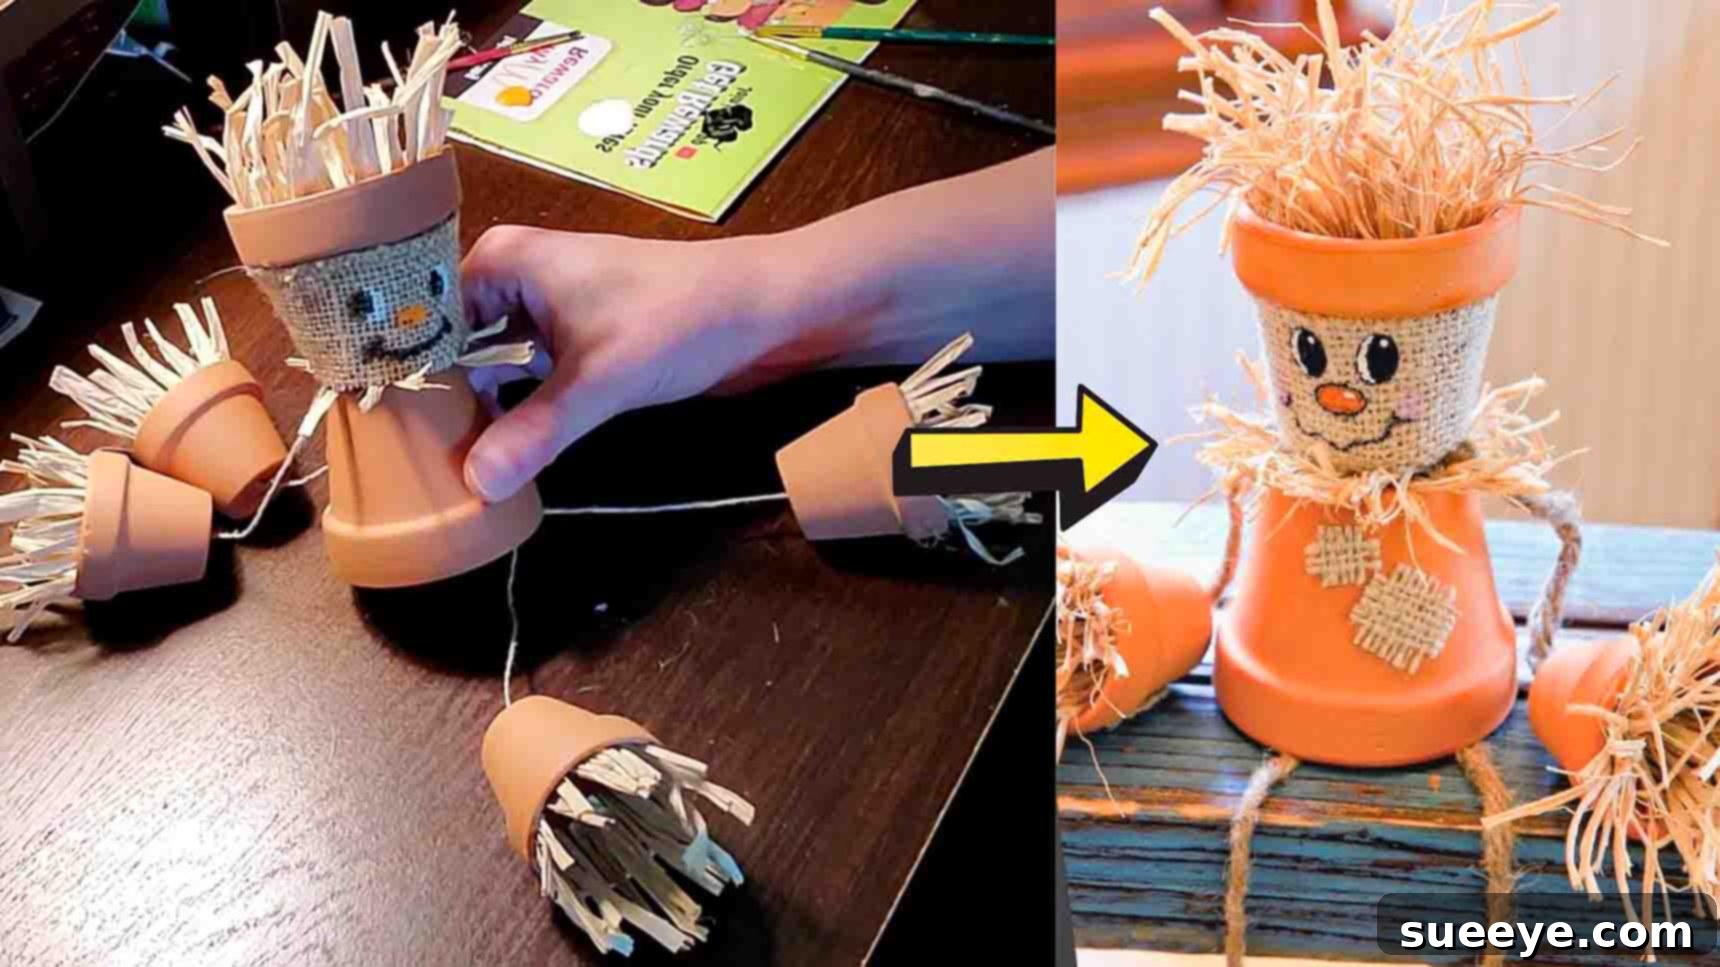
Welcome to the delightful world of DIY fall decorations! As autumn leaves begin to fall and the air turns crisp, there’s no better way to embrace the season than by adding charming, handmade touches to your home. This year, elevate your festive spirit with an adorable Terracotta Pot Scarecrow, a truly heartwarming addition to your seasonal decor. Inspired by the creative minds at the South Fayette Township Library on YouTube, this project is not only incredibly easy but also promises a fun and memorable crafting experience for all ages.
Imagine a quaint little scarecrow, crafted with simple materials, bringing a touch of rustic charm to your porch, mantelpiece, or garden. This versatile craft is perfect for anyone looking to add a personalized touch to their autumn displays without requiring advanced crafting skills. Whether you’re planning a cozy crafting session with family this weekend or looking for a unique gift idea, this terracotta pot scarecrow offers a rewarding and enjoyable project. It’s an excellent opportunity to bond with loved ones, unleash your creativity, and create lasting memories alongside a beautiful piece of decor. Let’s gather our materials and dive into crafting your very own fall masterpiece!
Materials You’ll Need to Craft Your Terracotta Pot Scarecrow
One of the best aspects of this DIY scarecrow project is its reliance on readily available and affordable materials. Most items can be found at your local craft store, hardware store, or even around your home. Here’s a detailed list of what you’ll need to bring your little scarecrow to life:
- Twine: A strong, natural fiber string. This will form the core structure of your scarecrow’s limbs and connect the pots. Opt for a medium-thickness twine that is easy to thread but durable enough to hold the pots securely.
- Raffia: Natural or colored raffia will be used to create the scarecrow’s characteristic straw ‘hair’ and add a rustic texture. You can find this in craft stores in various shades, though natural tan is classic for scarecrows.
- Beads: You’ll need two sizes:
- Large Bead: One large wooden or plastic bead for the scarecrow’s ‘neck’ or ‘collar’ area, threaded onto the twine between the head and body.
- Small Beads: Several smaller beads (at least four) to secure the ends of the twine for the arms and legs, preventing them from slipping through the pots.
- Burlap: A piece of natural, coarse fabric. This will be used to create the scarecrow’s ‘clothing’ or body covering, adding to its charming rustic appeal. A small remnant piece should be sufficient.
- Craft Paint: Acrylic craft paints in colors suitable for drawing a face (e.g., black, white, red, or brown). You might also want to add blush to the cheeks or details to the clothing.
- Hot Glue Gun and Glue Sticks: Essential for securely attaching various components, especially the burlap, raffia, and connecting the pot sections. Always exercise caution when using a hot glue gun.
- Terracotta Pots in 2 Sizes:
- Two Larger Pots: These will form the scarecrow’s head and body. Choose pots of the same size, ideally around 4-6 inches in diameter, ensuring they have drainage holes at the bottom.
- Four Smaller Pots: These will serve as the hands and feet of your scarecrow. Select pots that are proportionate to your larger pots, perhaps 2-3 inches in diameter.
Essential Tools:
- Scissors: For cutting twine, raffia, and burlap.
- Paint Brushes: Various sizes for painting the face and any other details.
- Pencil or Marker: To sketch the face before painting.
Optional Materials for Extra Charm and Customization: To truly make your scarecrow unique, consider adding:
- Small Buttons: For eyes or decorative accents on the burlap.
- Fabric Scraps: For patches on the burlap or a small scarf.
- Small Faux Flowers or Leaves: To adorn the scarecrow’s hat or body.
- Miniature Straw Hat: An iconic accessory for any scarecrow!
- Googly Eyes: For a playful, less traditional look.
- Permanent Markers: As an alternative to paint for drawing facial features.
Step-by-Step Guide: Crafting Your Terracotta Pot Scarecrow
Now that you have all your materials, it’s time to bring your festive scarecrow to life! Follow these detailed steps carefully for the best results. Remember to take your time and enjoy the creative process.
Step 1: Assembling the Scarecrow’s Head, Body, and Limbs
This initial stage focuses on building the foundational structure of your scarecrow using twine, beads, and the terracotta pots. Precision here ensures a sturdy and well-proportioned figure.
- Prepare the Twine for the Head and Body: Begin by cutting four generous pieces of twine, each approximately 24-30 inches long. You’ll want enough length to comfortably work with. Gather all four strands together and tie a single, secure knot at one end. This knot will eventually sit inside the head pot and provide a stopper.
- Create the Neck Area: Take your large bead and carefully thread all four strands of twine through its hole, pulling it down until it rests snugly against the knot you just tied. This bead acts as a neck separator and adds a decorative element.
- Attach the Head Pot: Next, thread all four twine strands through the top drainage hole of one of your larger terracotta pots (this will be the scarecrow’s head). Pull the pot down gently until the bead and knot are pulled into place inside the pot, securing the head. Make sure the pot is seated firmly.
- Separate for Arms: Now, separate two of the twine strands and set them aside. These two strands will later form one of the scarecrow’s arms. Keep the remaining two strands centered for the body.
- Attach the Body Pot: Take your second large terracotta pot (this will be the scarecrow’s body). Thread the two *centered* twine strands through the bottom drainage hole of this pot. Carefully slide the body pot up until it meets the head pot.
- Secure Head to Body: Once the head and body pots are aligned and touching, use your hot glue gun to apply a generous amount of hot glue around the rim where the two pots meet. Press them together firmly and hold until the glue sets, creating a strong bond. This connection is crucial for the scarecrow’s stability.
- Construct the Arms: Now, let’s create the arms. Take one of the smaller terracotta pots (for a hand). Thread one of the separated twine strands (from step 4) through the bottom drainage hole of this small pot. Thread a small bead onto the twine next, pulling it down to meet the pot. Finally, tie a secure knot to hold the bead and pot in place. Repeat this process for the other arm using the remaining separated twine strand and another small pot and bead.
- Create the Legs: For the legs, you’ll need two more pieces of twine (approximately 18-24 inches each) and the remaining two small pots and small beads. Repeat the exact same threading, beading, and knotting process you just did for the arms for each leg. Once complete, these will dangle freely from the bottom of the body pot.
Step 2: Decorating Your Scarecrow – Adding Charm and Character
With the basic structure assembled, it’s time for the fun part: adding the unique details that will give your scarecrow its personality and festive flair. This step involves decorating with raffia, burlap, and painting the face.
- Add Raffia ‘Hair’ or ‘Collar’:
- Cut several pieces of raffia into shorter, manageable lengths, typically about 4-6 inches long.
- Using your hot glue gun, carefully glue these raffia pieces around the rim of the top terracotta pot (the head). You can arrange them to look like wild straw hair, or more neatly as a rustic collar peeking out from beneath the head.
- Experiment with layering to create a fuller, more dynamic look. This adds instant texture and a classic scarecrow feel.
- Dress Your Scarecrow with Burlap ‘Clothing’:
- Measure: Take your burlap and measure it against the larger bottom terracotta pot (the body). You’ll need to measure both the circumference (all the way around the pot) and the height from the bottom of the pot up to just below the rim of the pot where it meets the head. Do not include the lip of the pot itself in your height measurement if you want a neat finish.
- Cut: Cut the burlap to your measured dimensions. It’s often better to cut slightly larger and trim later for a perfect fit.
- Glue: Apply hot glue sparingly but firmly around the body pot. Wrap the burlap around the pot, ensuring the flat, smooth part of the fabric is positioned clearly at the front. The seam where the two ends of the burlap meet should be discreetly placed at the back of the scarecrow. Press firmly until the glue is dry. This burlap wrap gives your scarecrow a rustic, garment-like appearance.
- Tip: If you want to add patches, glue them onto the burlap before wrapping it around the pot.
- Paint the Scarecrow’s Face:
- This is where your scarecrow truly comes alive! Using your craft paints and brushes, carefully paint a charming face onto the top terracotta pot.
- Eyes: You can paint simple dots for eyes, or go for more elaborate almond shapes with pupils. Black or white paint works well for the base.
- Nose: A small triangle or a simple dab of paint makes an effective nose.
- Mouth: Scarecrow mouths are typically stitched smiles. You can paint a curved line with small vertical dashes to mimic stitching. A touch of red or pink for cheeks adds a friendly flush.
- Customization: Don’t be afraid to experiment! Give your scarecrow a mischievous grin, a surprised expression, or a sweet, welcoming smile. You could even use permanent markers for finer details or glue on googly eyes for a whimsical touch.
DIY Terracotta Pot Scarecrow: Your Perfect Autumn Decoration Tutorial
Bringing Your Scarecrow to Life: Tips for Customization and Display
Congratulations, you’ve successfully crafted your adorable terracotta pot scarecrow! Now that the main construction and decoration are complete, it’s time to consider how to personalize it further and display it to maximize its charm.
Endless Customization Ideas:
The beauty of DIY crafts lies in the ability to make them truly your own. Don’t stop at the basic steps; unleash your creativity! Here are some ideas to make your scarecrow unique:
- Hats Off to You: A miniature straw hat is a classic scarecrow accessory. You can find these at craft stores or even make one from felt or more raffia. Hot glue it securely to the top of the head pot.
- Fashion Forward: Add a tiny fabric scarf made from plaid flannel or burlap scraps around its neck. A small bow tie could also add a touch of whimsy.
- Button Up: Sew or glue small buttons onto the burlap clothing to mimic a shirt or overalls.
- Accessorize: Give your scarecrow a tiny stick broom, a miniature pumpkin, or a few faux autumn leaves glued to its hands for extra seasonal flair.
- Weathered Look: For an aged, rustic appearance, you can lightly distress the pots with sandpaper or use watered-down brown paint to give them a “dirty” look before adding other details.
- Theme It Up: Tailor your scarecrow’s colors and accessories to match a specific fall theme, such as harvest festival, Halloween, or Thanksgiving.
Where to Display Your Charming Creation:
Once your scarecrow is complete and thoroughly dried, it’s ready to find its perfect spot to greet guests and admire the autumn season:
- Indoor Delight: Place it on your mantelpiece, a bookshelf, a windowsill, or as a centerpiece on your dining table. Its compact size makes it ideal for indoor display, adding a cozy, rustic touch to any room.
- Welcoming Porch Decor: Position it among pumpkins, gourds, and cornstalks on your front porch to create a warm and inviting entrance for visitors.
- Garden Companion: While terracotta pots can be susceptible to harsh weather, your scarecrow can certainly adorn a sheltered spot in your garden, nestled among fall flowers or vegetable patches, if properly protected.
- Group Display: Consider making a few scarecrows in different sizes or with varied facial expressions to create a charming scarecrow family scene!
Care and Maintenance Tips:
To ensure your terracotta pot scarecrow brings joy throughout the entire fall season and for years to come, consider these simple care tips:
- Protect from Elements: If displaying outdoors, especially in areas prone to rain or heavy dew, consider applying a clear, waterproof sealant (available at craft or hardware stores) to the painted pots and any exposed burlap. This will help prevent paint from running and materials from deteriorating.
- Sheltered Spot: Even with sealant, an outdoor scarecrow will last longer in a covered area like a porch or under an overhang.
- Storage: When the season ends, gently clean your scarecrow with a soft, dry cloth. Store it in a dry, cool place, preferably wrapped in tissue paper or bubble wrap, to protect it until next autumn.
Embrace the Spirit of Fall with Your Handmade Scarecrow
Creating this DIY terracotta pot scarecrow is more than just a craft project; it’s an invitation to immerse yourself in the joyful spirit of autumn. It offers a wonderful opportunity for creative expression, family bonding, and the satisfaction of making something beautiful with your own hands. Each scarecrow will have its own unique personality, reflecting the care and imagination you pour into it.
So, why wait? Gather your materials today and embark on this rewarding journey of crafting your perfect fall decoration. Whether it’s a friendly face greeting guests at your door or a whimsical addition to your indoor autumn display, your handmade terracotta pot scarecrow is sure to bring smiles and warm, festive cheer to your home. Share your creations with friends and family, and let your unique scarecrow inspire others to embrace the wonderful world of DIY fall decor. Happy crafting!