
No-Bake Soft and Fluffy Milk Butter Bread: Your Easiest Stovetop Recipe
Imagine sinking your teeth into a piece of warm, incredibly soft, and wonderfully fluffy bread, freshly made right in your own kitchen. Now, imagine achieving this without ever needing to turn on your oven. Sound like a dream? Not anymore! This phenomenal no-bake milk butter bread recipe, inspired by the culinary expertise of Qiong Cooking, brings that dream to life. It’s an absolute game-changer for anyone who loves homemade bread but is intimidated by traditional baking methods, lacks an oven, or simply wants a quicker, simpler alternative.
This recipe transforms a few basic pantry staples into a delicious, tender loaf that boasts a heavenly texture. It’s so easy, in fact, that even a complete beginner can achieve bakery-quality results. With just seven simple ingredients and your stovetop, you’ll create a bread that’s not only delightful to eat but also incredibly satisfying to make. Get ready to impress yourself and your loved ones with this foolproof method for creating extraordinary bread without the hassle of an oven.
Essential Ingredients for Your Stovetop Milk Butter Bread
One of the beauties of this recipe lies in its simplicity. You won’t need a lengthy shopping list or exotic components. Each ingredient plays a crucial role in developing the signature soft, fluffy texture and rich flavor of this milk butter bread. Ensure all ingredients are fresh and measured accurately for the best results.
- 2 cups of All-Purpose Flour or Wheat Flour: Flour provides the structure for our bread. All-purpose flour yields a classic soft texture, while wheat flour can be used for a slightly denser, healthier loaf with a nuttier flavor. Ensure your flour is fresh for optimal gluten development.
- 1/2 cup plus 1/3 cup of Milk (approximately 200 ml): Milk contributes to the bread’s tenderness, adds richness, and helps create a soft crumb. The exact amount is crucial for the dough’s consistency; too much, and it’s sticky; too little, and it’s dry. Whole milk is recommended for the best flavor and texture.
- 3 tablespoons of Granulated Sugar: Sugar serves multiple purposes: it feeds the yeast, aiding in the rising process, and also contributes to the bread’s delightful golden-brown exterior and subtle sweetness.
- 1 teaspoon of Instant Yeast: Instant yeast is a magic ingredient that allows our dough to rise without needing to be proofed beforehand. Make sure your yeast is active and fresh for successful leavening.
- 1/2 teaspoon of Salt: Salt is vital for enhancing the bread’s flavor profile. It also helps control the yeast’s activity, preventing it from rising too quickly and contributing to the dough’s strength.
- 2 tablespoons of Unsalted Butter: Unsalted butter is incorporated into the dough to add richness, moisture, and contribute to the bread’s characteristic soft, melt-in-your-mouth texture. Using unsalted butter gives you control over the overall saltiness of the bread.
- Sesame Seeds (for garnish): While optional, sesame seeds add a lovely nutty flavor, a pleasant crunch, and an appealing visual finish to your bread. They are sprinkled on the pan before cooking.
Step-by-Step Guide to Crafting Your No-Bake Milk Butter Bread
Follow these detailed instructions carefully to ensure a perfect loaf every time. Precision and patience are key to achieving the desired soft and fluffy result.
Step 1: Activate the Yeast Mixture
Begin by preparing your wet ingredients. In a large mixing bowl, combine the milk, 3 tablespoons of sugar, and 1 teaspoon of instant yeast. It’s important that the milk is lukewarm (around 105-115°F or 40-46°C) – not too hot, which can kill the yeast, and not too cold, which will slow down its activation. Whisk the mixture gently until the sugar dissolves completely and the yeast begins to dissolve. Let this mixture sit for 5-10 minutes. You should see a slight foam or bubbling on the surface, indicating that your yeast is active and ready to work its magic.
Step 2: Form the Initial Dough and First Rest
To the activated yeast mixture, add 2 cups of all-purpose flour and 1/2 teaspoon of salt. Using a sturdy spoon or spatula, mix these ingredients together until a shaggy, cohesive dough begins to form. Once the dough comes together, turn it out onto a lightly floured work surface. Knead the dough for about 2-3 minutes until it’s somewhat smooth but still a bit sticky. Form the dough into a ball and place it back into the bowl. Cover the bowl tightly with cling wrap or a clean kitchen towel. Allow the dough to rest in a warm place for 20 minutes. This short rest allows the flour to fully hydrate, making the dough easier to work with in the next step.
Step 3: Incorporate the Butter and Develop Gluten
After the initial rest, transfer the dough back to your lightly floured work surface. Gently flatten the dough with your hands to create a disk. Place the 2 tablespoons of unsalted butter, softened to room temperature, directly in the center of the flattened dough. Begin kneading the butter into the dough. This process might seem messy at first, as the butter will make the dough very sticky and slippery. Persist with the kneading, folding the dough over itself and pressing the butter in. As you continue to knead (for about 8-10 minutes), the butter will fully incorporate, and the dough will transform into a smooth, elastic, and non-sticky consistency. You can perform the “windowpane test” – stretch a small piece of dough; if you can stretch it thin enough to see light through it without tearing, your gluten is well-developed.
Step 4: The Second Rise for Optimal Fluffiness
Once the dough is smooth and elastic, form it into a neat ball. Place it back into the clean bowl, cover it again with cling wrap or a towel, and let it rise in a warm, draft-free environment for 1 hour. During this crucial step, the yeast will feast on the sugars and produce carbon dioxide, causing the dough to double in size. A warm spot, such as a slightly warmed oven (turned off!) or near a sunny window, is ideal. Properly proofed dough will feel light and airy when gently poked.
Step 5: Degas and Divide the Dough
After the dough has doubled in size, gently punch it down to release the trapped air (degassing). This step ensures a fine, even crumb in the final bread. Transfer the degassed dough onto your work surface. Lightly flatten it with your hands to form a thick rectangle or circle. Using a dough scraper or a knife, divide the dough into 8 equal parts. Ensuring uniform size for each piece will help them cook evenly on the stovetop.
Step 6: Shape the Bread Rolls
Take one portion of the dough. Gently stretch and fold the edges inward towards the center, then pinch the seams together to form a smooth, taut ball. This technique creates surface tension, which helps the rolls maintain their shape and develop a beautiful round appearance during cooking. Repeat this shaping process with the remaining seven dough portions, placing them aside on your work surface as you go.
Step 7: First Stovetop Cook
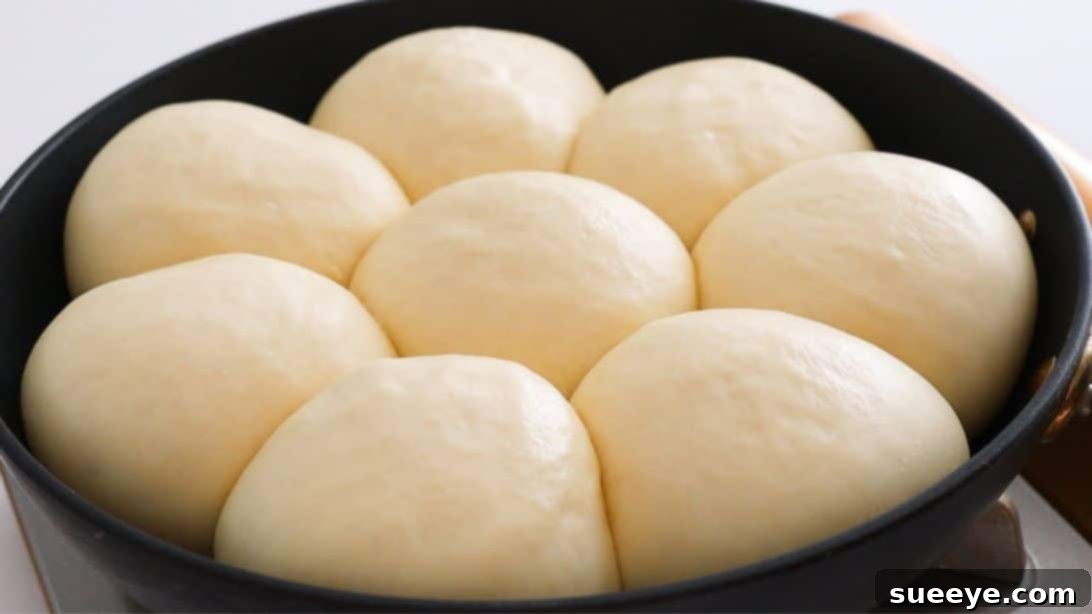
Select a large, heavy-bottomed non-stick pan with a tight-fitting lid. Lightly grease the pan with a small amount of unsalted butter to prevent sticking and add flavor. Sprinkle a generous amount of sesame seeds evenly over the greased bottom of the pan. Carefully arrange the dough balls in the pan, ensuring they are not too crowded and have a little space to expand. Place the pan over very low heat. This low and slow cooking is key to allowing the bread to cook through without burning. Cover the pan with its lid and cook for 10 minutes. The lid traps steam, helping the bread cook evenly and remain moist.
Step 8: Flip, Second Cook, and Serve
After 10 minutes, carefully lift the lid. The tops of the bread rolls should appear set, and the bottoms should be golden brown. Gently brush the tops of the rolls with a little more melted unsalted butter for extra flavor and a beautiful sheen. To flip the bread, place a large plate or cutting board over the pan, invert the pan onto the plate (the cooked side will now be facing up), then carefully slide the bread back into the pan, uncooked side down. Cover the pan again with the lid and cook for another 10 minutes on low heat. Once fully cooked, the bread will be golden brown on both sides. Transfer the cooked milk butter bread to a wire rack and let it cool for a few minutes before serving. Enjoy this incredibly soft, fluffy, and delicious homemade bread!
Why Choose Stovetop Bread? The Benefits of No-Bake Baking
Opting for a stovetop bread recipe like this milk butter bread offers numerous advantages over traditional oven baking, making it an appealing choice for many home cooks:
- No Oven Required: This is the most obvious benefit. If you don’t have an oven, it’s out of order, or you’re cooking in a small space like an RV or dorm, this recipe opens up the world of fresh bread to you.
- Energy Efficiency: Using your stovetop often consumes less energy than heating a large oven, which can be a boon for your utility bills and the environment, especially during hot summer months when you want to avoid heating up your kitchen.
- Beginner-Friendly: The stovetop method simplifies the baking process. Without the complexities of oven temperatures and preheating, it’s a more forgiving and less intimidating entry point into bread making.
- Unique Texture: Stovetop bread often develops a distinct texture – incredibly soft and moist on the inside, with a slightly crispier, chewy crust from direct contact with the pan. This texture is uniquely delicious and different from oven-baked loaves.
- Quicker Process: While there are rising times involved, the cooking phase itself is much faster than waiting for an oven to preheat and then baking for 30-40 minutes. This makes homemade bread more accessible on a whim.
- Consistent Results: With careful heat management on a stovetop, you can achieve wonderfully consistent results, as the heat is directly applied to the cooking surface.
Tips for Achieving Perfect No-Bake Milk Butter Bread Every Time
While this recipe is incredibly forgiving, a few expert tips can elevate your bread-making experience and guarantee a consistently perfect result:
- Mind the Milk Temperature: Ensure your milk is lukewarm, not hot or cold. Yeast thrives in a specific temperature range. Too hot will kill it, too cold will slow it down considerably.
- Don’t Skimp on Kneading: The kneading stages are crucial for developing gluten, which gives bread its structure and elasticity. Even when incorporating butter, keep kneading until the dough is smooth and passes the windowpane test. A well-kneaded dough leads to a fluffier bread.
- Allow for Proper Rising: Patience during the rising times is paramount. Don’t rush these steps. A warm, draft-free environment encourages optimal yeast activity. If your kitchen is cool, you can place the bowl in a slightly warmed (but turned off!) oven.
- Low and Slow Heat: The key to stovetop baking is maintaining very low heat. If the heat is too high, the outside will burn before the inside is cooked through. A heavy-bottomed pan helps distribute heat evenly.
- Use a Tight-Fitting Lid: The lid traps steam, creating a mini-oven effect that cooks the bread evenly and keeps it moist. Avoid lifting the lid too often during the initial cooking phase.
- Grease and Garnish Generously: Don’t be shy with buttering the pan. This prevents sticking and contributes to the lovely golden crust. Sesame seeds add both flavor and visual appeal.
- Cool on a Rack: Once cooked, transfer the bread to a wire rack to cool slightly. This prevents the bottom from becoming soggy from trapped steam and allows the internal structure to set properly.
Delicious Variations and Serving Suggestions
This basic milk butter bread recipe is fantastic on its own, but it also serves as a wonderful canvas for culinary creativity. Here are some ideas to customize and enjoy your stovetop masterpiece:
- Herb & Garlic: Before the second cook, sprinkle the tops with a mix of dried herbs (like oregano, basil, or rosemary) and a touch of garlic powder for a savory twist.
- Cheesy Goodness: Incorporate finely shredded cheese (cheddar, mozzarella, or a blend) into the dough during the last few minutes of kneading, or sprinkle it on top before the first cook.
- Sweet Delights: For a sweeter bread, you can add a tablespoon or two of cinnamon sugar to the dough, or swirl in a thin layer of jam or chocolate spread when shaping the individual rolls.
- Spice it Up: A pinch of chili flakes or black pepper can add a subtle kick if you prefer a savory profile.
- Breakfast Bliss: Serve warm slices with your favorite jam, honey, or a generous spread of butter. It’s also perfect alongside scrambled eggs or a fruit salad.
- Savory Side: This bread pairs wonderfully with soups, stews, or as a side for any main course. Use it to sop up delicious sauces!
- Mini Sandwiches: Slice the rolls horizontally and fill them with deli meats, cheese, or fresh vegetables for delightful mini sandwiches.
Common Troubleshooting for Stovetop Bread
Even with a simple recipe, minor issues can arise. Here’s how to troubleshoot common problems you might encounter:
- Bread is Dense or Didn’t Rise:
- Cause: Inactive yeast, milk too hot/cold, not enough kneading, or dough not given enough time to rise.
- Solution: Always check yeast expiry dates. Ensure milk is lukewarm. Knead thoroughly to develop gluten. Allow full rising times in a warm place.
- Bread is Burnt on the Bottom:
- Cause: Heat too high.
- Solution: Ensure your stovetop is on the absolute lowest setting. Use a heavy-bottomed pan for better heat distribution. You might also try using a heat diffuser.
- Bread is Undercooked in the Middle:
- Cause: Heat too high (leading to burnt exterior, undercooked interior) or not enough cooking time.
- Solution: Lower the heat and extend cooking time slightly if necessary. The bread should feel light and sound hollow when tapped, and a skewer inserted should come out clean.
- Dough is Too Sticky to Handle:
- Cause: Too much liquid or not enough kneading after adding butter.
- Solution: Lightly flour your hands and work surface. Continue kneading; it will become less sticky as gluten develops. If truly excessively sticky, add a tiny bit more flour (1 tablespoon at a time).
Storage Suggestions
To keep your no-bake milk butter bread fresh and delicious, store it in an airtight container at room temperature for up to 2-3 days. For longer storage, you can freeze individual rolls or the entire loaf (once completely cooled) in a freezer-safe bag for up to 1 month. Thaw at room temperature and gently warm if desired before serving.
This no-bake milk butter bread recipe is a testament to the fact that you don’t need fancy equipment or complex techniques to create truly delicious homemade bread. Its simplicity, combined with the incredibly soft and fluffy texture, makes it a must-try for any bread lover. So, gather your ingredients, fire up your stovetop, and prepare to embark on a delightful baking adventure that will yield impressive results with minimal effort. Happy baking!