
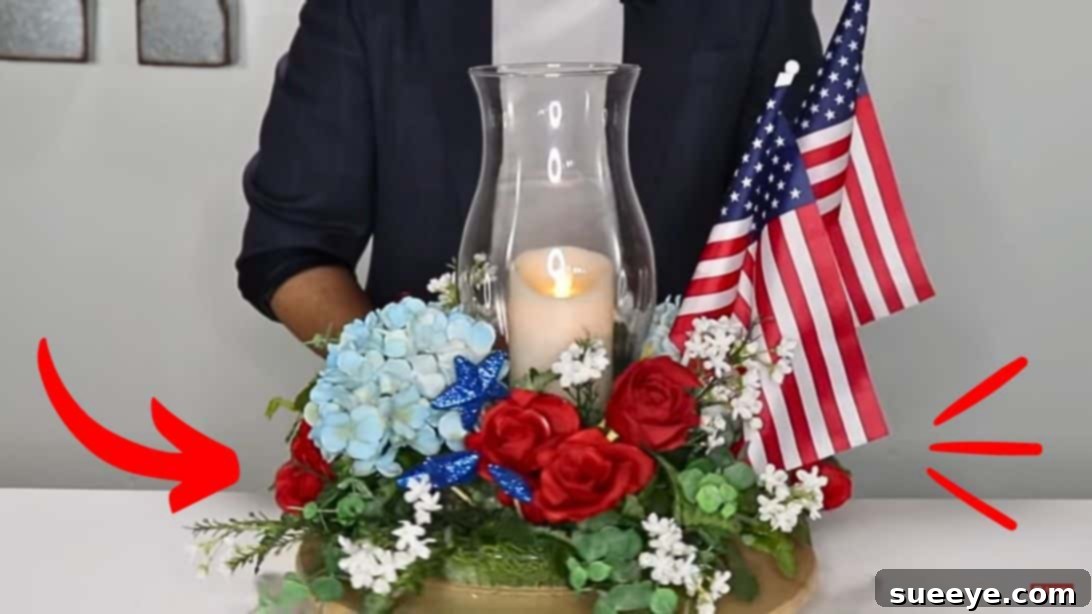
As the Fourth of July approaches, the air buzzes with anticipation for celebrations, fireworks, and patriotic displays. What better way to immerse your home in the spirit of independence than with a stunning, handcrafted decoration? This year, ditch generic store-bought items and create a truly memorable focal point for your summer gatherings: a gorgeous DIY Patriotic Summer Centerpiece. Inspired by the brilliant creativity of Ramon – at HOME, this project transforms simple materials into an elegant and festive arrangement perfect for your dining table, mantelpiece, or outdoor patio.
This isn’t just any floral display; it’s a vibrant ode to summer and patriotism, featuring the lush beauty of hydrangeas, the classic elegance of roses, and a carefully selected blend of greeneries. The best part? Despite its luxurious appearance, this project is remarkably budget-friendly, with many of the essential decorative elements readily available at your local dollar store. You’ll be amazed at how easily you can achieve a high-end look without breaking the bank. Get ready to impress your guests and infuse your space with a touch of DIY charm and national pride. Follow our detailed guide to bring this exquisite summer centerpiece to life in your own home.
Materials for Your Patriotic Floral Masterpiece
Gathering your materials is the first exciting step in any DIY project. For this stunning patriotic centerpiece, we’ve focused on accessibility and affordability, ensuring you can find most items without a hefty price tag. Remember, creativity knows no bounds, so feel free to adapt these suggestions to your personal style and what’s available in your area.
- Blue Hydrangeas: These magnificent blooms form the core of our “blue” patriotic theme. Look for fresh, vibrant bunches to ensure longevity and visual impact.
- Decorative Stars (Dollar Store): An assortment of red, white, and blue stars will add that quintessential Fourth of July sparkle. Opt for lightweight foam or plastic stars that can be easily attached to skewers.
- Two Small Flags (Dollar Store): Miniature American flags are perfect for anchoring the patriotic theme. Choose flags with sturdy poles that can be extended if needed.
- Wooden Skewers: Essential for attaching stars and extending flower stems if necessary. A pack of standard bamboo skewers will be more than enough.
- One Dozen Red Roses: Symbolizing love and passion, red roses bring a classic elegance and deep color to your arrangement, completing the red, white, and blue palette.
- Half a Dozen Baby’s Breath: These delicate white filler flowers add texture, volume, and a touch of ethereal beauty, softening the overall look.
- Wire Cutters: Indispensable for trimming floral stems, wires, and even skewers to achieve the perfect length and fit within your arrangement.
- Hurricane Glass Candle Holder: This elegant piece will serve as the central anchor for your LED candle, providing warmth and a focal point. Choose one with a stable base.
- LED Operated Candle: For safety and convenience, an LED candle offers a realistic flickering glow without the fire hazard of an open flame, making your centerpiece safe for any surface.
- Two Blocks of Floral Foam: These provide the essential base for securing your flowers and greenery, holding them firmly in place and supplying moisture if using fresh flowers.
- Decorative Moss: Used to conceal the floral foam and create a more natural, polished finish, adding an earthy texture to your display.
- Display Tray (Dollar Store): A sturdy, attractive tray will serve as the foundation for your entire centerpiece, providing stability and allowing for easy movement. Look for one that complements your existing decor.
- Four Types of Greeneries: Variety is key! Select a mix of textures and shades of green to create a lush, full base. Options include eucalyptus, leatherleaf fern, ruscus, or even artificial ivy.
Pro Tip: If sourcing blue hydrangeas proves challenging, don’t despair! White hydrangeas can be beautifully spray-painted blue using floral-safe paint, offering a fantastic alternative to achieve the desired patriotic hue.
Crafting Your Beautiful DIY Patriotic Centerpiece
Now that you have all your materials, let’s dive into the creative process of assembling this stunning patriotic centerpiece. Take your time with each step, enjoying the transformation of simple components into a festive work of art. Precision and balance are key to achieving a professional-looking result, but don’t be afraid to let your personal flair shine through!
Step 1: Preparing Your Foundation – Tray, Foam, and Moss
Begin by setting up the base of your centerpiece. Take your chosen display tray – this will be the sturdy foundation for your entire arrangement. Place the two blocks of floral foam securely onto the tray. If your foam blocks are larger than your tray, you might need to trim them slightly to fit. The goal is to create a solid, stable base for your floral elements. Next, take your decorative moss and carefully fill in all the visible gaps around the sides of the foam. This step is crucial for concealing the foam and creating a natural, polished look. The moss not only adds aesthetic appeal but also helps to hold the foam in place. Once the foam is covered, gently press the hurricane glass candle holder into the center of the foam, just enough to create a visible indentation. This mark will serve as a guide for where your candle holder will ultimately sit, ensuring it’s perfectly centered once you start adding the greenery and flowers. Remove the hurricane for now, as we’ll reinsert it later.
Step 2: Building the Greenery Base for a Balanced Arrangement
With your foam base prepared, it’s time to establish the lush greenery that will provide structure and volume to your centerpiece. Start by taking two of your selected greenery pieces and insert them into the foam on opposite sides – for example, one on the far left and one on the far right. Then, repeat this with two more pieces, placing them on the top and bottom (front and back) of your foam. The key here is to maintain symmetry, ensuring that the same type and length of greenery are placed directly opposite each other. This initial symmetrical placement is vital for achieving a balanced and harmonious arrangement. Continue filling the sides of the foam by inserting various greenery stems around the circle, working your way inwards towards the marked center where the hurricane will sit. Use all four types of your selected greeneries, distributing them evenly to create a rich tapestry of textures and shades. If any stems are too long or too bushy, use your wire cutters to trim them to the appropriate size. Aim to fully cover the floral foam with greenery, creating a dense, verdant base that will beautifully support your flowers and patriotic accents.
Step 3: Introducing the Flowers and the Radiant Glow
Now for the main event – adding the vibrant flowers and the comforting glow of the candle! Carefully place your LED-operated candle inside the hurricane glass holder, then gently position the hurricane and candle into the center indentation you created in the floral foam. Ensure it sits securely and is upright. Next, begin incorporating your magnificent blue hydrangeas. Place two hydrangea heads on opposite sides of the centerpiece, creating a striking visual balance. These large blooms will immediately draw the eye and establish a strong color presence. Following the hydrangeas, group your dozen red roses into clusters of three. Strategically insert these rose clusters into the front and back of the arrangement, then add additional groups to the sides. The goal is to distribute the roses evenly, ensuring a lush and balanced display of red throughout the centerpiece. Continuously step back and view your arrangement from all angles to confirm symmetry and balance. Finally, take your delicate baby’s breath. Insert small sprigs of baby’s breath around the hydrangeas and roses, filling in any remaining gaps and adding a soft, airy texture. If any pieces are too long, use your wire cutters to trim them to a suitable length, allowing them to complement the main flowers without overshadowing them.
Step 4: Adding Patriotic Stars for a Festive Touch
Now it’s time to infuse your centerpiece with unmistakable patriotic flair using your decorative stars. Take your wooden skewers and break them in half – this will provide shorter, more manageable poles for your stars. Carefully poke one end of a skewer into the back of each star, ensuring it’s secure. You might want to use a dab of hot glue for extra stability, especially if your stars are thin. Begin by inserting three red stars onto the front side of your centerpiece, spacing them out for visual impact. Next, place three blue stars on the back side, mirroring the front. To complete the star arrangement, add three white stars to one of the sides, creating a dynamic visual flow of colors. Feel free to adjust the height of the skewers to make some stars stand taller than others, adding depth and interest to your display. This strategic placement of stars ensures that the patriotic theme is visible from all angles, making your centerpiece truly celebratory.
Step 5: Incorporating the Flags for a Grand Finale
The final touch for your patriotic masterpiece involves adding the miniature American flags. Often, the poles on dollar store flags can be a bit short for a centerpiece of this scale. To give your flags the necessary height and prominence, take another wooden skewer and securely tape it to the existing pole of one of your flags. Use strong floral tape or even clear packing tape for a firm attachment. Repeat this process for the second flag. Once both flags have extended poles, carefully insert them into the floral foam on the same side of the centerpiece. Position them so they stand tall and proudly, perhaps slightly staggered in height for a more dynamic look. The flags serve as a powerful symbol, tying all the elements together and creating an undeniable patriotic statement. Ensure they are firmly anchored in the foam so they don’t tip over. With your flags in place, your DIY Patriotic Summer Centerpiece is complete and ready to grace your home!
Beyond the Basics: Tips for Customizing and Enjoying Your DIY Centerpiece
Congratulations! You’ve successfully crafted a beautiful and patriotic centerpiece. But the journey doesn’t end there. Here are some additional tips to help you customize your creation, ensure its longevity, and get the most enjoyment out of your stunning DIY project.
Customization Ideas for Your Unique Style
While the red, white, and blue theme is perfect for the Fourth of July, this centerpiece design is incredibly versatile. Consider these ideas to make it uniquely yours:
- Seasonal Themes: Swap out the patriotic stars and flags for different decorative elements. Think mini pumpkins and autumn leaves for Thanksgiving, faux snow and pinecones for Christmas, or pastel eggs and bunnies for Easter.
- Color Palettes: Experiment with different flower colors to match any occasion or room decor. A monochromatic scheme (all whites and greens), a vibrant spring mix, or rich jewel tones can completely transform the look.
- Flower Choices: Don’t limit yourself to hydrangeas and roses. Lilies, peonies, sunflowers, tulips, or even an assortment of wildflowers can be used. Just ensure they have sturdy stems or use floral wire to support weaker ones.
- Container Variations: If a tray isn’t your preference, consider using a vintage wooden crate, a large ceramic bowl, or even a tiered serving platter for a different aesthetic.
- Lighting Alternatives: Instead of an LED candle, you could incorporate battery-operated fairy lights woven through the greenery for a magical, subtle glow.
Making Your Centerpiece Last Longer
To ensure your fresh flowers stay vibrant for as long as possible:
- Hydrate the Foam: If using fresh flowers, saturate your floral foam with water before arranging. You can also add floral food to the water.
- Regular Watering: Keep the floral foam consistently moist by carefully adding water every day or two. Pour slowly to allow the foam to absorb it.
- Keep Cool: Place your centerpiece in a cool spot, away from direct sunlight, heat vents, or ripening fruit, which can shorten flower life.
- Mist Lightly: A light misting of water on the leaves (avoiding the petals of delicate flowers) can help keep the greenery fresh.
Where to Display Your Masterpiece
This versatile centerpiece isn’t just for the dining table! Here are a few ideal spots:
- Dining Table: The classic choice, perfect for family dinners and festive gatherings.
- Coffee Table: A beautiful focal point for your living room, inviting conversation.
- Entryway Console: Welcome guests with a burst of patriotic cheer as they step into your home.
- Outdoor Patio Table: Ideal for summer barbecues, just ensure it’s protected from strong winds or extreme weather.
- Fireplace Mantel: Create an elegant display that draws the eye and anchors the room.
Crafting this DIY patriotic summer centerpiece is more than just a project; it’s an opportunity to infuse your home with personal charm and celebrate the joy of the season. By following these steps and adding your unique touch, you’ll create a conversation-starting decoration that embodies the spirit of summer and patriotism. So, gather your materials, unleash your creativity, and get ready to enjoy a truly special Fourth of July!