
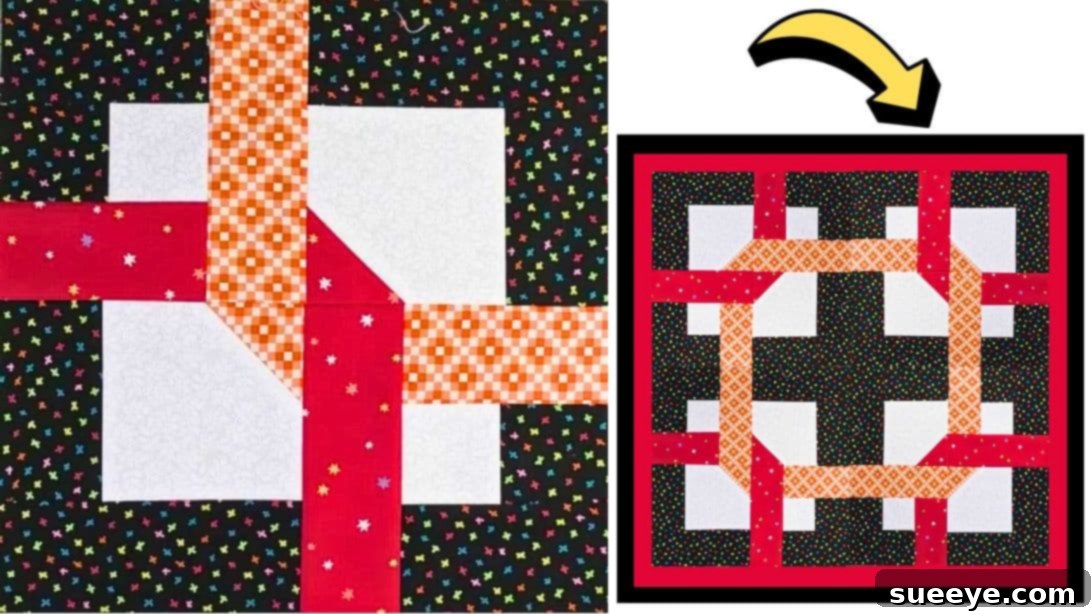
Master the Loop the Loop Jelly Roll Quilt Block: A Beginner-Friendly Tutorial
For many quilters, the discovery of a new quilt block brings immense joy, and some patterns quickly become cherished favorites. Among the vast array of designs available, the “Loop the Loop” quilt block stands out for its undeniable charm and intriguing visual appeal. This particular block, beautifully demonstrated by Carol Thelen on YouTube, offers a delightful quilting experience that is both rewarding and accessible, especially for those new to the craft. What makes this pattern truly special is its clever construction, resulting in a dynamic design that seems to weave and flow, creating a captivating texture and depth.
Beyond its aesthetic qualities, the Loop the Loop block is incredibly practical. It’s an excellent choice for utilizing those pre-cut fabric bundles known as jelly rolls, making fabric selection and cutting a breeze. If you’re just starting your quilting journey, this block provides a fantastic opportunity to practice fundamental skills such such as accurate cutting, precise seam allowances, and careful pressing – all crucial elements for successful quilting. Even seasoned quilters will appreciate its straightforward assembly and the quick satisfaction it brings. This weekend, why not embark on a creative adventure and learn how to piece together your very own Loop the Loop quilt block? You’ll be amazed at how quickly you can achieve stunning results.
Why the Loop the Loop Quilt Block is a Must-Try
The “Loop the Loop” quilt block offers a unique blend of simplicity and sophistication, making it a beloved pattern in the quilting community. Its distinctive design creates a sense of continuous motion, drawing the eye across the quilt with elegant curves and intersecting lines. This visual flow is not only pleasing but also provides a versatile foundation for various quilt projects, from cozy throws to intricate bedspreads.
Perfect for Beginners and Skill Builders
If you’re new to quilting, the Loop the Loop block is an ideal starting point. It introduces essential techniques in a manageable way:
- Accurate Cutting: Mastering the use of a rotary cutter and ruler is paramount, and this block provides ample practice.
- Precise Piecing: Learning to sew a consistent quarter-inch seam allowance is critical for blocks to fit together perfectly.
- Careful Pressing: Understanding how and when to press seams open or to the side is key to achieving flat, professional-looking blocks.
- “Snowballing” Corners: This technique, used to create the diagonal accents, is a valuable skill that opens up many design possibilities.
Each step builds confidence, allowing you to gradually develop the precision needed for more complex patterns. The immediate gratification of seeing the block come together motivates continued learning.
Embrace the Ease of Jelly Rolls
One of the most appealing aspects of this quilt block is its compatibility with jelly rolls. These convenient pre-cut fabric bundles typically contain 40 strips of fabric, each 2.5 inches wide by 42 inches long, often from a coordinated fabric collection. Using jelly rolls for your Loop the Loop block offers several advantages:
- Effortless Fabric Coordination: The strips are already color-matched, eliminating the guesswork of choosing harmonious fabrics.
- Reduced Cutting Time: A significant portion of the initial cutting is already done for you, allowing you to jump straight into piecing.
- Variety of Prints: Jelly rolls provide a diverse range of prints and textures within a consistent color palette, adding richness to your quilt.
This feature makes the Loop the Loop block a quick and enjoyable project, perfect for a weekend retreat or a productive afternoon of sewing.
Gathering Your Quilting Supplies for the Loop the Loop Block
Before you begin piecing your beautiful Loop the Loop quilt block, it’s essential to gather all the necessary materials and tools. Having everything organized and ready will ensure a smooth and enjoyable crafting experience. This block specifically benefits from a thoughtful selection of fabrics to highlight its unique design.
Materials You’ll Need:
- Dark Print Fabric: This will serve as a prominent element in your block, often providing the visual anchor. Choose a print that you love and that complements your overall color scheme.
- Dark Accent Fabric: A solid or subtle print that contrasts with the light accent and background, adding depth and definition to the “loops.”
- Light Accent Fabric: This fabric will highlight the “loop” effect. A lighter solid or tone-on-tone print works wonderfully, providing a bright contrast.
- Background Fabric: A neutral solid or a very subtle blender print is ideal here, allowing the main elements of the block to stand out without competing for attention.
- Marking Pen, Pencil, or Chalk: Essential for drawing diagonal lines on your fabric squares, which will guide your stitching. Choose a tool that is easily removable or disappears over time.
- Quilting Ruler: A clear, sturdy ruler (e.g., 6″ x 24″ or a square ruler) is crucial for accurate measuring and cutting.
- Scissors or Rotary Cutter and a Cutting Mat: A sharp rotary cutter paired with a self-healing cutting mat is highly recommended for precision and efficiency in cutting fabric strips and squares. Quality quilting scissors are also useful for trimming threads.
- Needle and Thread: All-purpose polyester thread in a neutral color (like white, cream, or light grey) that blends with your fabrics is usually best. Ensure your needle is sharp and suitable for quilting cotton.
- Sewing Machine: A reliable sewing machine with a quarter-inch foot (if available) will greatly aid in maintaining consistent seam allowances.
- Pattern: Make sure to download and print the pattern provided by Carol Thelen. This will include specific cutting dimensions and a layout diagram vital for assembly.
Step-by-Step Guide to Crafting Your Loop the Loop Quilt Block
Now that you have all your materials ready, let’s dive into the exciting process of creating the Loop the Loop quilt block. Remember, precision in cutting and sewing is key to a beautiful finished product. Take your time with each step, and don’t hesitate to refer back to Carol Thelen’s video for visual guidance if needed.
Step 1: Preparing Your Fabric & Initial Piecing
Begin by selecting your chosen fabrics. The beauty of this block often lies in the contrast and interplay between the different prints and solids. Once you’ve made your selections, meticulously cut them to the sizes specified in the pattern. Accuracy here is paramount, as it will affect how well your block comes together. Group your cut fabric pieces into designated patches, typically labeled A, B, and C, for easy organization throughout the piecing process.
Focusing on Patch C, identify two background squares and two dark print squares. Take one background square and one dark print square, making sure they are of contrasting colors for visual impact. Place them right sides together. Stitch these two squares along one edge, using a consistent ¼-inch seam allowance. After stitching, press the seam open. This technique helps to reduce bulk and ensures your block lies flat, contributing to a smoother overall finish. Repeat this process with the remaining background and dark print squares from Patch C. You will now have two identical pieced units.
Next, take one dark rectangle from Patch A. Position this rectangle on top of one of your newly pieced squares, ensuring the raw edges align perfectly. Stitch these pieces together, again maintaining that precise ¼-inch seam allowance. Once stitched, carefully press the seam open to prepare for the next stage. This initial piecing forms the foundational elements of your Loop the Loop block, setting the stage for its unique design to emerge.
Step 2: Building the Block’s Unique Elements
With your initial units pieced, it’s time to introduce the accent fabrics that define the “loop” characteristic of this block. Take one of your accent rectangles and position it at the bottom of the pieced square unit you just created in Step 1. Stitch it securely with a ¼-inch seam, then press it open. This process ensures a clean finish and readies the unit for further additions.
Next, take two larger accent rectangles. These will be attached to the sides of your growing unit. Carefully align one larger accent rectangle to one side of the unit, stitch it down, and press the seam open. Repeat this for the other side with the second larger accent rectangle. Ensure all seams are pressed flat to avoid bulk and achieve a smooth surface. Once these accent rectangles are attached, set aside this partially completed unit; it will form a key component of your final block assembly.
Now, shift your attention to the remaining large rectangles and squares that comprise the rest of the block. You will be using a technique often referred to as “snowballing” or “cornering.” Take an accent square and place it on top of any corner of a large background square, aligning the raw edges. Using your marking tool, draw a diagonal line from one corner of the small accent square to the opposite corner. This line will serve as your stitching guide. Carefully stitch directly on this marked diagonal line. After stitching, trim off the excess fabric ¼ inch away from your stitching line. This leaves a ¼-inch seam allowance on the sewn corner. Press the accent fabric open, revealing a beautifully neat diagonal corner. Repeat this process for all corners where accent squares are to be attached, as indicated by the pattern. This technique creates the illusion of a floating corner and adds a wonderful dimension to your quilt block.
Step 3: Assembling the Full Quilt Block
With all your individual units prepared, the exciting part of assembling the complete Loop the Loop quilt block begins. This stage requires careful attention to the layout diagram provided in Carol Thelen’s pattern, or by referring to her video tutorial for visual clarity. The key is to arrange your pieced units in the correct orientation to form the distinctive “looping” pattern.
Start by sewing the remaining rectangles one at a time onto the sides of the large square units. Ensure you are attaching them to the sides opposite the accent corner you created in the previous step, as demonstrated in the video. Stitch each rectangle with a precise ¼-inch seam allowance, and then press the seams open after each addition. This meticulous pressing helps the block lie flat and ensures accuracy as you combine more pieces. Continue this process until all the individual components for your block are ready to be joined into rows.
Now, it’s time to assemble the blocks together, creating rows as per the pattern’s diagram. Typically, quilt blocks are assembled in three horizontal rows, which are then stitched together. First, sew the units that make up the top row together, aligning edges carefully and using your consistent ¼-inch seam. Once the top row is complete, press all the seams open to reduce bulk. Repeat this exact process for the middle and bottom rows, ensuring each row’s seams are pressed open. This step is crucial for achieving a flat block that will fit seamlessly with others in a larger quilt.
Finally, with all three rows pieced and pressed, it’s time to stitch the rows to each other. Carefully align the top row with the middle row, pinning generously to prevent shifting. Stitch them together, ensuring your seams match up as precisely as possible – this is where careful pressing earlier truly pays off. Press the final seam open. Then, attach the bottom row to the combined top and middle rows. Again, pin, stitch, and press the seam open. Once these final seams are pressed, you will have completed your stunning Loop the Loop quilt block. Take a moment to admire your work – the intricate design, the interplay of colors, and the satisfaction of a beautifully pieced block.
All these images are credited to Carol Thelen via YouTube. We highly recommend visiting her channel and subscribing for more inspiring quilting tutorials!
Tips for Quilting Success with the Loop the Loop Block
Creating a beautiful quilt block like the Loop the Loop is a rewarding experience, and a few key practices can elevate your results:
- Precision is Key: Invest time in accurate cutting. Even a slight discrepancy can throw off your entire block. Use a sharp rotary cutter and a reliable ruler.
- Consistent Seam Allowance: Strive for a perfect ¼-inch seam. If your machine’s ¼-inch foot helps, use it! Practice on scraps to ensure consistency.
- Press, Don’t Iron: When pressing seams, lift and place your iron rather than sliding it. This prevents stretching and distortion of your fabric. Press seams open to reduce bulk.
- Refer to the Pattern: Always keep the pattern’s diagrams handy. Visualizing the layout before sewing helps prevent mistakes.
- Take Your Time: Quilting is an art form. There’s no need to rush. Enjoy the process of creating something beautiful with your hands.
Conclusion: Your Beautiful Loop the Loop Quilt Block Awaits
The “Loop the Loop” jelly roll quilt block, as taught by the talented Carol Thelen, is truly a fantastic project for quilters of all skill levels. Its engaging pattern, combined with the convenience of using jelly rolls, makes for an enjoyable and satisfying sewing experience. Whether you’re a beginner looking to hone your foundational quilting techniques or an experienced crafter seeking a quick yet captivating design, this block delivers.
By following these detailed steps, you’ve not only created a beautiful individual block but also mastered key piecing methods that will serve you well in countless future quilting endeavors. The satisfaction of seeing your fabric pieces transform into such an intricate and charming design is what makes quilting such a beloved hobby. Don’t stop here! Consider making several more Loop the Loop blocks to assemble into a stunning quilt top, or experiment with different fabric combinations to explore endless variations of this delightful pattern.
We encourage you to visit Carol Thelen’s YouTube channel for her invaluable video tutorial and to explore her other creative projects. Happy quilting, and may your sewing machine hum with joy!