
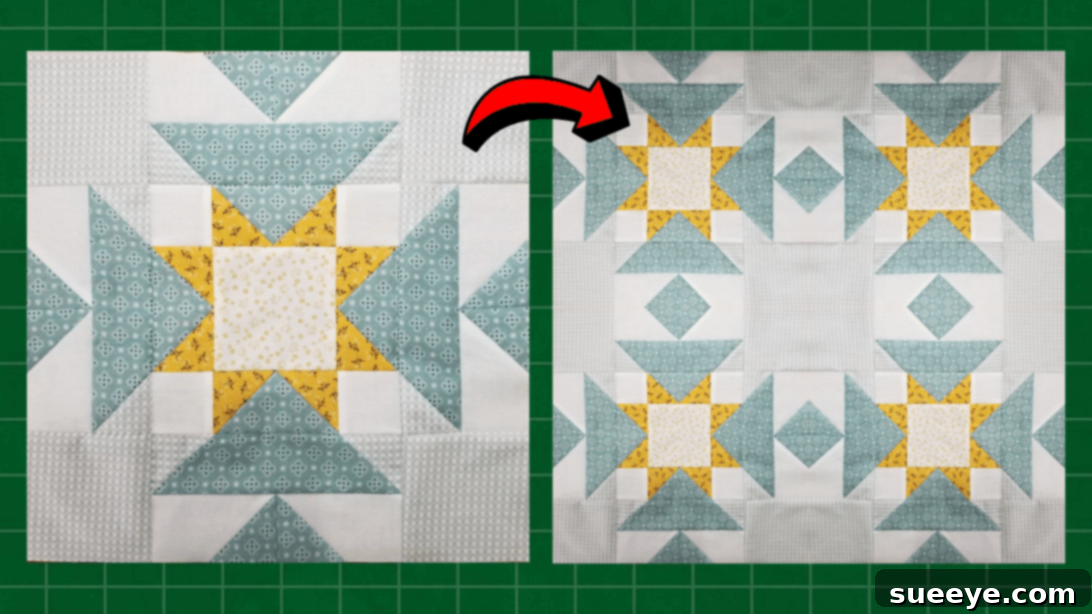
Embarking on a quilting journey is a deeply satisfying experience, and mastering foundational quilt blocks lays the groundwork for creating stunning textile art. Once you’ve confidently created a basic star quilt block, you’re ready to elevate your skills and explore more intricate designs. The “Crow’s Foot Quilt Block” is an excellent next step, offering a rewarding challenge that results in a visually dynamic and captivating pattern. This advanced beginner or intermediate-level block, beautifully demonstrated by Sunrise Quilt Studio on YouTube, is perfect for those looking to expand their quilting repertoire beyond the basics.
The Crow’s Foot block might appear complex at first glance, but with clear instructions and a methodical approach, even a dedicated beginner can achieve remarkable results. Its unique design features striking directional elements that resemble the splayed toes of a bird, creating a sense of movement and depth within your quilt project. This tutorial will guide you through each step, ensuring you develop precision and confidence with every stitch. Prepare to immerse yourself in a creative process that, while requiring a bit more time and attention than simpler blocks, promises an incredibly satisfying outcome.
One of the most exciting aspects of quilting is the endless possibility of color and fabric combinations. For this Crow’s Foot quilt block, you have complete creative freedom. Whether you prefer vibrant, contrasting prints, a harmonious blend of pastels, or a sophisticated monochromatic palette, the choice is yours. Feel free to use fabrics from your stash, experiment with different textures, or select a completely new collection that inspires you. No matter your selection, the inherent beauty of the Crow’s Foot design ensures your finished block will be a true masterpiece, ready to be incorporated into a larger quilt, a decorative pillow, or a unique wall hanging.
RELATED TUTORIAL: Mastering the Easy Hunter’s Star Quilt Block
Essential Materials for Your Crow’s Foot Quilt Block:
Before diving into the exciting process of stitching your Crow’s Foot quilt block, gathering all the necessary materials is crucial for a smooth and enjoyable experience. The beauty of this block truly shines through thoughtful fabric choices and precise cutting. Here’s a detailed list of what you’ll need:
- Accent Fabric (e.g., Green): This fabric will define the distinctive “arrows” or points of the crow’s foot design, giving it its characteristic shape. Choose a color that contrasts beautifully with your background fabric to make these elements pop.
- Inner Point Fabric (e.g., Yellow): Used for the inner points of the block, this fabric will provide an additional layer of color and dimension, creating visual interest. Consider how it complements both the accent and background fabrics.
- Corner Fabric (e.g., Gray): This fabric will form the outer corners of your block, framing the central design. A neutral color often works well here, allowing the more vibrant elements to stand out, but you can also choose a bold color for a dramatic effect.
- Center Fabric: The heart of your quilt block! Select a fabric that you love, as it will draw the eye to the very center of your creation. This can be a print, a solid, or a textured fabric that adds character.
- Background Fabric: Essential for making your design elements truly shine. A light or neutral background will make your colored pieces stand out sharply, while a darker background can create a more dramatic, jewel-toned effect. Ensure it contrasts enough with your main design elements.
- Marking Tool (Pen, Pencil, or Chalk): Precision is key in quilting. A fabric-specific marking pen (disappearing or washable), a sharp pencil, or tailor’s chalk will be indispensable for accurately drawing lines for stitching and cutting.
- Quilter’s Ruler: A good quality acrylic quilter’s ruler (preferably 6″ x 24″ or a square ruler) is vital for accurate cutting. Look for one with clear markings and a non-slip grip.
- Cutting Tools (Scissors or Rotary Cutter and Mat): For crisp, clean cuts, a rotary cutter and a self-healing cutting mat are highly recommended. If using scissors, ensure they are sharp and dedicated to fabric only.
- Fabric Pins or Clips: To hold your fabric pieces securely in place before and during stitching, a good supply of fine, sharp fabric pins or wonder clips will be invaluable.
- Matching Thread: Choose a high-quality 100% cotton thread that matches your dominant fabric colors or a neutral color like white or gray that blends well with all your fabrics.
- Iron and Ironing Board: Proper pressing at each stage is non-negotiable for flat seams and accurate block construction. A good steam iron is your best friend in achieving a professional finish.
- Sewing Machine: A reliable sewing machine with a ¼-inch quilting foot (or an accurate ¼-inch seam allowance guide) will significantly speed up and improve the precision of your stitching.
- Crow’s Foot Quilt Block Pattern: This tutorial relies on specific measurements and cutting instructions. Click here to download the detailed pattern from Sunrise Quilt Studio. Having the pattern printed and handy will make following along much easier.
Crafting Your Crow’s Foot Quilt Block: A Step-by-Step Guide
Step 1: Preparation and Initial Flying Geese Construction
The journey to creating a stunning Crow’s Foot quilt block begins with meticulous preparation. Your accuracy in these initial stages will significantly impact the final appearance of your block, so take your time and enjoy the process of bringing your fabric to life.
- Download and Review the Pattern: Begin by downloading the official Crow’s Foot Quilt Block pattern from Sunrise Quilt Studio. Print it out and carefully read through all instructions, paying close attention to the cutting dimensions for each fabric piece. Understanding the layout before you start cutting will prevent errors.
- Precision Fabric Cutting: Using your rotary cutter, cutting mat, and quilter’s ruler, cut all your fabric pieces according to the pattern’s specifications. This step is paramount for a perfectly pieced block. Ensure your cuts are straight and precise; even a slight deviation can throw off your block’s dimensions later on.
- Marking for Diagonal Stitching: Locate your small print squares (typically the ‘E’ squares, as referenced in the pattern). On the wrong side of each of these squares, use your chosen marking tool (fabric pen, pencil, or chalk) to draw a diagonal line from one corner to the opposite corner. This line will serve as your guide for accurate diagonal stitching in the next step.
- Constructing the First Flying Geese Units: These units form critical components of your block’s central star.
- Take one ‘B’ rectangle (often for the center star’s body) and one ‘E’ square (the smaller print square you just marked).
- Align the ‘E’ square with the ‘B’ rectangle, right sides together, ensuring one corner of the square meets the edge of the rectangle. The drawn diagonal line on the ‘E’ square should extend from the inner corner towards the outer edge of the rectangle.
- Pin the pieces securely to prevent shifting.
- Stitch directly along the diagonal line you drew. Maintain a consistent ¼-inch seam allowance from your drawn line for future trimming, or simply stitch on the line if the pattern specifies that. Consistency here is vital.
By carefully completing these initial steps, you’re setting yourself up for success. The precision of your cutting and stitching now will pay dividends as your Crow’s Foot block begins to take shape.
Step 2: Completing Flying Geese and Assembling the Center Star
With your first diagonal stitch complete, it’s time to refine your flying geese units and begin forming the captivating center of your Crow’s Foot quilt block. Precision in trimming and pressing is vital here, as these smaller units build into the larger design.
- Trim and Press the First Square:
- After stitching, carefully cut away the excess fabric beyond your stitched line, leaving a ¼-inch seam allowance. This ensures a clean finish and reduces bulk.
- Open the fabric and press the seam open or to one side (away from the square, towards the rectangle body of the geese unit). Use a hot iron with steam for crisp, flat seams. Pressing correctly is crucial for accurate block assembly; it sets your stitches and prevents distorting the fabric.
- Attach the Second Square to Form Flying Geese:
- Now, take another ‘E’ square (marked diagonally) and align it with the opposite end of the same ‘B’ rectangle, right sides together. Ensure it’s mirrored from the first square, so when complete, it forms a perfect ‘V’ shape (the classic flying geese unit).
- Stitch diagonally along the marked line, just as you did before.
- Trim away the excess fabric, again leaving a ¼-inch seam allowance, and press the unit flat. You should now have one complete flying geese unit.
- Repeat for All Flying Geese Units: Follow the same process to create a total of four identical flying geese units. Each unit should be consistent in size and shape for a cohesive central star.
- Adding Background Squares to Two Flying Geese Units:
- Take two of your completed flying geese units.
- Referencing your pattern, you’ll likely attach a background or contrasting ‘white’ square (or ‘F’ square) to each end of these two specific flying geese units. This typically involves placing the square right sides together at the end of the ‘V’ shape, stitching, trimming, and pressing. These modified flying geese units will form the horizontal arms of your central star.
- Assembling the Center Star:
- Lay out your pieces: your central ‘A’ square, the two standard flying geese units (for the vertical arms), and the two modified flying geese units with squares on their ends (for the horizontal arms).
- Carefully stitch the flying geese units to all four sides of the central ‘A’ square, right sides together. Pin meticulously to ensure points align perfectly.
- As you sew each side, stop, press the seam, and then attach the next unit. Pressing as you go helps keep everything flat and accurate, minimizing bulk at the intersections. The goal is to create a crisp, symmetrical star radiating from the center.
You’ve now successfully pieced together the intricate core of your Crow’s Foot block! Take a moment to admire your progress and ensure all points are sharp and seams are flat.
Step 3: Constructing the Arrow Units (Crow’s Feet)
The distinctive “crow’s feet” elements are what truly give this quilt block its name and unique character. This step involves creating triangle-in-a-square units with careful alignment and precise trimming. The pattern likely refers to these as ‘H’ rectangles and ‘D’ squares.
- Prepare ‘H’ Rectangles and ‘D’ Squares: Gather your ‘H’ rectangles and ‘D’ squares. These will form the arrow-like points that radiate outwards from your central star. Ensure your ‘D’ squares are also marked diagonally on the wrong side, similar to how you marked the ‘E’ squares.
- Divide into Two Sets for Mirroring: The key to symmetrical arrow units is creating mirrored pairs. Divide your ‘H’ rectangles and ‘D’ squares into two equal sets. This is crucial because the diagonal placement of the ‘D’ squares will be opposite in each set.
- First Set Assembly:
- Take a rectangle from the first set and place a ‘D’ square on one end, right sides together.
- Align the square so its diagonal line runs from the outer corner (towards the edge of the block) to the inner corner (towards the center of the rectangle). This is often where the ‘arrow’ point will form.
- Stitch precisely along this diagonal line.
- After stitching, trim off the excess fabric, leaving a ¼-inch seam allowance. This ensures the unit will lay flat and align correctly when assembled.
- Press the seam open or towards the rectangle body for a neat finish. Repeat this process for all pieces in your first set.
- Second Set Assembly (Mirrored):
- For the second set, place the ‘D’ squares on the opposite end of the ‘H’ rectangles compared to the first set. This creates the mirrored effect needed for the block’s symmetry.
- Stitch along the diagonal line, trim the excess with a ¼-inch seam allowance, and press. You should now have two distinct groups of units that are mirror images of each other.
- Joining Mirrored Units to Form Triangles:
- Now, take one unit from your first set and one from your second (mirrored) set.
- Align them with right sides together, matching the raw edges. When you bring them together, the diagonal seams you just created should meet perfectly, forming a clean triangular shape in the middle. Pin carefully at this intersection.
- Stitch these two units together along their shorter side, using your accurate ¼-inch seam allowance.
- Press the final seam open or to one side. You will now have completed the distinctive ‘crow’s foot’ sections, which will frame your central star.
These units are perhaps the most defining feature of the block, so take extra care with your matching and pressing. You’re building truly unique elements now!
Step 4: Creating Corner Units and Final Block Assembly
The final components of your Crow’s Foot quilt block are the corner units, which neatly complete the square shape, and then the exciting process of bringing all your meticulously crafted sections together.
- Constructing the Corner Units:
- Gather your ‘C’ and ‘G’ fabrics. The ‘C’ fabric is typically a square, and ‘G’ fabric is a rectangle (often a background fabric).
- Place one ‘C’ square on both sides of a ‘G’ rectangle, right sides together, similar to how you created the flying geese or arrow units. You will be stitching diagonally from corner to corner of the ‘C’ square onto the ‘G’ rectangle.
- Stitch along the diagonal line, then trim off the excess fabric with a ¼-inch seam allowance.
- Press the seams open or towards the ‘G’ rectangle. This process will create a unit that visually complements the main ‘crow’s foot’ arrows, often appearing as a small triangle-in-a-square element. Repeat to create the required number of corner units (typically four).
- Assembling the Block – Section by Section:
- Now comes the satisfying part of seeing your block come to life! Lay out all your completed components on a flat surface, following the overall design shown in the downloaded pattern. You should have:
- Your central star unit (from Step 2).
- Your four ‘crow’s foot’ arrow units (from Step 3).
- Your four corner units (from this step).
- The pattern will typically show a 9-patch grid layout. Arrange your central star in the middle, surrounded by the arrow units, and then the corner units filling the outer corners.
- First, stitch the pieces within each row together. For instance, in the top row, sew a corner unit to an arrow unit, and then that combined unit to another corner unit. Pin carefully at all intersections to ensure points match up precisely.
- Press the seams after completing each row. You might press seams in opposite directions for adjacent rows to allow for “nesting” seams, which helps create perfect point alignment when you join the rows.
- Now comes the satisfying part of seeing your block come to life! Lay out all your completed components on a flat surface, following the overall design shown in the downloaded pattern. You should have:
- Joining the Rows:
- Once your three rows are sewn and pressed, align the rows, right sides together. Pin extensively, especially where seams meet, nesting them to ensure smooth transitions and sharp points.
- Carefully stitch the rows together, maintaining your consistent ¼-inch seam allowance.
- After stitching, give your entire Crow’s Foot quilt block a final, thorough press. Press from the front to ensure it lies perfectly flat, steam it gently, and trim any stray threads.
Congratulations! You have successfully completed your beautiful Crow’s Foot Quilt Block. Take pride in your work; this block demonstrates a significant step forward in your quilting skills.
*All image credit belongs to Sunrise Quilt Studio via YouTube. Be sure to follow and subscribe to their channel for more inspiring quilting tutorials and tips!