
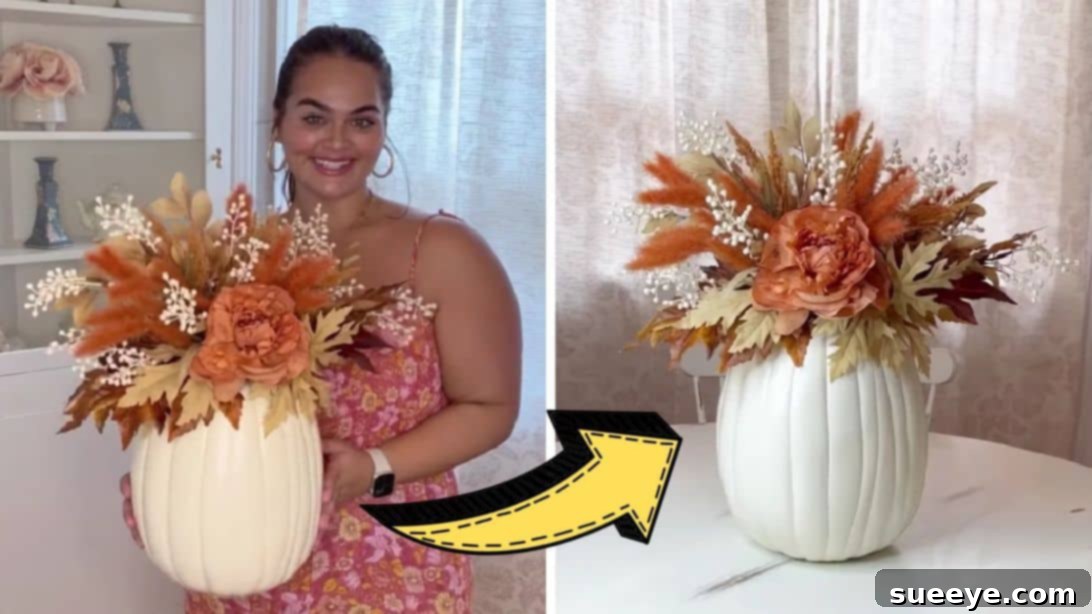
Crafting the Perfect Autumn Glow: Your Guide to a Stunning DIY Fall Pumpkin Centerpiece
As the leaves begin to turn and the air grows crisp, there’s an undeniable charm that autumn brings. This season invites warmth, comfort, and beautiful decorations that transform our homes into cozy havens. One of the most enchanting ways to capture the essence of fall is through a captivating centerpiece. While the market offers a myriad of choices, nothing quite compares to the personal touch of a handmade creation. The quest for the perfect, eye-catching centerpiece can be a delightful journey, especially when you discover a project that perfectly blends elegance with simplicity. We recently stumbled upon an absolutely delightful DIY Fall centerpiece idea by jordenkhall3 on TikTok, and it’s quickly become a favorite.
This project is not just a craft; it’s an experience. Its appeal lies in its remarkable ease of execution, making it accessible to crafters of all skill levels. What truly sets it apart, however, is the expansive room it offers for personalization. From selecting the perfect pumpkin and its hue to choosing the floral arrangements and other delightful embellishments, every step allows for your unique creative flair to shine. Imagine a centerpiece that not only reflects the beauty of the season but also your individual style and taste. The results are truly stunning – so beautiful in person that you’ll likely be inspired to create more than just one. These charming creations are guaranteed to impress family and guests, adding a memorable touch to your fall gatherings. If you’re still contemplating your autumn decor, this DIY pumpkin centerpiece is a must-consider.
@jordenkhall3 The prettiest kitchen table centerpiece for Fall 🎃🍂😍 #falldecorating #falldecorideas #falldecordiy #falldecor #pumpkindecor #fallcenterpiece #decorateforfall #diyfalldecor #diyfalldecorations
♬ august – Taylor Swift
Why Choose a DIY Fall Pumpkin Centerpiece?
There’s an undeniable allure to crafting your own seasonal decor, especially when it comes to fall centerpieces. Opting for a DIY approach offers numerous advantages over purchasing ready-made decorations. Firstly, it’s incredibly cost-effective. Many of the materials can be sourced affordably from craft stores, dollar stores, or even from your own backyard. Secondly, a handmade centerpiece possesses a unique charm that store-bought items often lack. It reflects your personality, your taste, and the effort you put into making your home special. Thirdly, the process itself can be incredibly therapeutic and enjoyable. It’s a wonderful way to unwind, tap into your creativity, and create something beautiful with your own hands. This specific DIY pumpkin centerpiece project stands out because it combines these benefits with a stunning, elegant result that will elevate any table setting.
Materials: Gathering Your Autumn Treasures
Before you embark on this creative journey, gathering all your materials is key. The beauty of this project lies in its flexibility, allowing for various choices that cater to your personal aesthetic. Here’s what you’ll need:
- Pumpkin: You can choose a real pumpkin for a truly authentic touch (though it will be temporary), or an artificial craft pumpkin for longevity. Artificial pumpkins come in various sizes and textures, offering durability for years of enjoyment. Consider a medium-sized pumpkin that will fit well on your table without overwhelming it.
- Paint (White or Any Color You Prefer): Acrylic or chalk paint works wonderfully for pumpkins. White offers a classic, elegant, and versatile base, but don’t limit yourself! Consider muted pastels, metallics like gold or copper, or even deep jewel tones like forest green or navy for a modern twist. Matte finishes often provide a sophisticated look.
- Cutter/Craft Knife: A sharp utility knife or a specialized pumpkin carving tool will be necessary for safely and effectively cutting into the pumpkin. Always exercise caution when using sharp objects.
- Scissors/Wire Cutters: For trimming the stems of your artificial flowers and leaves. Wire cutters are essential if your floral stems contain wire.
- Plastic Cup: This serves as a liner inside your pumpkin, allowing you to easily arrange your florals and even add water if you choose to use fresh flowers (though artificial flowers are recommended for this lasting centerpiece). Choose a cup that fits snugly inside your pumpkin’s opening.
- Floral Foam Block or Similar: Floral foam provides a stable base for your flower arrangement, holding stems firmly in place. You can also use crumpled newspaper or even sand for stability, but foam offers the best grip for artificial stems.
- Artificial Long-Stem Flowers and Leaves: This is where your creativity truly blossoms! Look for a variety of fall-themed artificial flowers such as hydrangeas, sunflowers, dahlias, or mums. Incorporate different textures with autumn leaves, berries, and small branches. Think about a cohesive color palette – warm oranges, deep reds, golden yellows, rich browns, and creams work beautifully for fall. The “long-stem” aspect is crucial as it gives you flexibility in cutting them to your desired length.
Optional Materials for Enhanced Beauty:
- Fairy Lights: Battery-operated fairy lights can add a magical, warm glow to your centerpiece, especially enchanting in the evenings.
- Ribbons or Twine: To wrap around the pumpkin stem or base for an added decorative touch.
- Natural Embellishments: Pinecones, acorns, small gourds, or cinnamon sticks can be nestled among the flowers for extra texture and an authentic fall feel.
- Glitter or Metallic Paint Pens: For subtle shimmering accents on your pumpkin or flowers.
Directions: Crafting Your Autumn Masterpiece
Creating this stunning fall pumpkin centerpiece is a straightforward and enjoyable process. Follow these detailed steps to bring your vision to life:
Step 1: Preparing Your Pumpkin – The Foundation of Your Centerpiece
The first step involves transforming your pumpkin into the perfect vessel for your floral arrangement. If you’re using a real pumpkin, ensure it’s clean and dry. For artificial pumpkins, a quick wipe down is usually sufficient.
Begin by applying paint to your pumpkin. For a truly opaque and even finish, especially with lighter colors like white, multiple coats will be necessary. Apply the first coat thoroughly, ensuring full coverage. Allow this layer to dry completely before attempting a second coat. Drying times can vary based on the paint type and ambient humidity, so be patient. Once the first coat is dry to the touch, apply a second, and if needed, a third coat, until you achieve the desired depth of color and an unblemished finish. Allow the pumpkin to dry completely between coats and before proceeding to the next step. This can take several hours, or even overnight, for the paint to fully cure.
Next, carefully cut a small hole at the top of your pumpkin. If your pumpkin has a stem, gently pop it off first. The hole needs to be large enough to accommodate your plastic cup. Start with a smaller incision and gradually widen it, using your craft knife, until the plastic cup fits snugly inside. The goal is a secure fit that prevents the cup from wiggling or falling through. If you are using an artificial pumpkin, the cutting process will be easier, but always use a stable surface and cut away from your body for safety.
Step 2: Arranging Your Florals – Bringing Life to Your Centerpiece
With your pumpkin perfectly prepped, it’s time for the exciting part: arranging your beautiful artificial flowers and leaves. This is where your centerpiece truly comes to life, reflecting the vibrant colors and textures of autumn.
Once the pumpkin is dry and the hole is cut, place the plastic cup firmly inside the hole. Ensure it sits securely at the bottom of the pumpkin. Next, insert your floral foam block into the plastic cup. If the foam block is too large, you can easily trim it down with your craft knife to fit perfectly. The foam provides an excellent anchor for your flower stems, allowing for precise placement and stability.
Now, begin sticking the artificial long-stem flowers and leaves into the floral foam. Don’t be afraid to experiment with different lengths and angles. A good technique is to start with your larger, focal flowers, placing them centrally or where you want the main visual impact. Then, gradually fill in around them with smaller flowers, berries, and leaves. Before inserting each stem, hold it up to the pumpkin to gauge the desired length, then use your scissors or wire cutters to trim off any excess stem. This gives you complete control over the height and drape of your arrangement.
Consider creating varying heights and textures to add depth and interest. Some flowers can stand tall, while others cascade slightly over the pumpkin’s edge. Mix different types of leaves – some with smooth edges, others with serrated, in various shades of green, orange, and red. If you’ve chosen to add fairy lights, gently weave them throughout the arrangement, ensuring the battery pack is hidden within the cup or behind a larger leaf. The soft glow of the lights will add an ethereal quality to your fall display, especially enchanting during evening gatherings.
Step back frequently to assess your arrangement from different angles. This allows you to make adjustments and ensure balance and harmony. There’s no right or wrong way to arrange; let your intuition guide you to create a display that you find beautiful and inviting. The joy is in the creative process and seeing your personalized vision unfold.
Personalization Tips and Creative Variations
The true beauty of this DIY project lies in its adaptability. Here are some ideas to make your fall centerpiece truly unique:
- Pumpkin Palette: Instead of white, consider painting your pumpkin in shades of sage green, blush pink, or even a metallic gold for a glamorous touch. Ombre effects or stenciled patterns can also add intricate details.
- Floral Freedom: Experiment with different types of artificial flowers. While traditional fall blooms are lovely, you could opt for more unique botanical choices, or even incorporate dried flowers for a rustic, everlasting appeal.
- Natural Accents: Gather elements from nature! Small pinecones, acorns, dried berries, twigs, or even cinnamon sticks can be tucked into your arrangement to enhance the autumnal feel and add delightful aromas.
- Textural Play: Combine different textures in your arrangement. Think soft cotton bolls, fuzzy lamb’s ear leaves, or spiky thistle for visual and tactile interest.
- Lighting Effects: Beyond fairy lights, consider placing small LED candles (battery-operated for safety) around the base of your centerpiece for an extra warm glow.
- Base Enhancements: Place your finished pumpkin centerpiece on a wooden slice, a woven placemat, or a mirrored tray to create a more elaborate display.
Maintenance and Enjoyment: Keeping Your Centerpiece Beautiful
One of the many benefits of using artificial flowers for this DIY pumpkin centerpiece is its longevity and low maintenance. Unlike fresh flowers that require daily water changes and wilting concerns, your artificial arrangement will remain vibrant and beautiful throughout the entire fall season, and even for years to come with proper care.
To keep your centerpiece looking its best, simply dust the flowers and leaves periodically with a soft brush or a can of compressed air. This prevents dust buildup that can dull their appearance. If you used an artificial pumpkin, the entire piece can be easily stored in a box in a cool, dry place once the season is over, ready to be displayed again next year. This makes your DIY creation a sustainable and recurring part of your autumn decor.
Embrace the Spirit of Fall
Creating your own DIY fall pumpkin centerpiece is more than just a craft project; it’s an opportunity to infuse your home with the warmth and beauty of the autumn season. It’s a chance to express your creativity, save money, and create a truly unique focal point that will charm everyone who gathers around your table. The simple elegance of this project, as inspired by jordenkhall3 on TikTok, demonstrates that stunning decor doesn’t have to be complicated or expensive. It’s about taking a few materials, adding a dash of imagination, and creating something truly special.
So, gather your supplies, put on some cozy autumn music, and enjoy the delightful process of crafting. You’ll be amazed at the beautiful, personalized fall pumpkin centerpiece you can create. Don’t hesitate to experiment with colors, textures, and additional embellishments to make it truly yours. Happy crafting, and happy fall!
*Thanks to jordenkhall3 via TikTok for all the images and inspiration used here. If you love this project, then you’ll surely love her other videos too, so give her account a visit and follow for more creative ideas!