
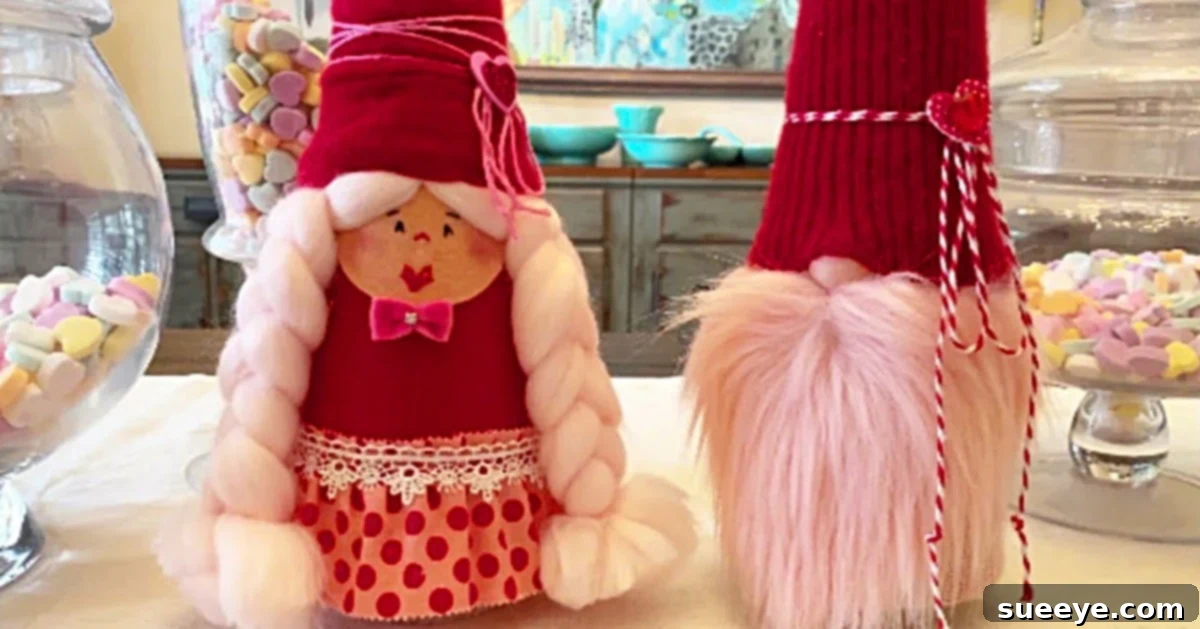
DIY Valentine’s Day Gnomes: Crafting Adorable Home Decor
Valentine’s Day is a time for spreading love, and what better way to add a touch of handcrafted charm to your home than with delightful Valentine’s Day gnomes? These whimsical figures, rooted in folklore and beloved for their quirky appeal, make perfect festive decorations. If you’ve never ventured into the world of gnome crafting, you’re in for a treat! This comprehensive guide will walk you through the process of creating your very own adorable Valentine’s Day gnomes, transforming simple materials into heartwarming decorations that are sure to bring a smile to everyone’s face. The beauty of this project lies in its simplicity and the endless possibilities for personalization, making it an ideal activity for crafters of all skill levels, from beginners to seasoned DIY enthusiasts. Imagine a whole family of these charming gnomes adorning your mantelpiece or greeting guests at your entryway – they’re incredibly fun to make, surprisingly easy, and each one turns out uniquely cute.
Why Choose DIY Valentine’s Day Gnomes?
Gnomes, with their long beards, tall hats, and often rosy cheeks, have captured hearts globally. Originally Scandinavian mythological creatures known as “tomte” or “nisser,” they are typically associated with protection, good luck, and a connection to the earth. Adapting these lovable figures for Valentine’s Day means infusing them with themes of love, friendship, and affection, using traditional Valentine’s colors like reds, pinks, and whites. Crafting your own gnomes offers several benefits:
- Personalized Decor: Unlike store-bought decorations, handmade gnomes reflect your unique style and taste. You can choose fabrics, colors, and embellishments that perfectly match your home’s aesthetic or your Valentine’s Day theme.
- Engaging Craft Project: This DIY project is not only rewarding but also incredibly engaging. It’s a wonderful way to unwind, tap into your creativity, and enjoy the satisfaction of making something beautiful with your own hands.
- Family-Friendly Fun: Crafting gnomes can be a fantastic activity to share with family and friends. Children especially love helping with design choices, gluing, and decorating, making it a memorable holiday bonding experience. It provides a structured, creative outlet that can keep everyone happily occupied.
- Sustainable Crafting: Many of the materials used can be upcycled from old sweaters or fabric scraps, promoting an eco-friendly approach to holiday decorating.
Embarking on this crafting adventure promises not just a beautiful end product but also a joyful and fulfilling creative journey. Let’s gather our supplies and begin bringing these charming Valentine’s Day gnomes to life!
Gather Your Crafting Essentials: Materials Needed
Before you dive into the fun of crafting, it’s crucial to have all your materials organized. While specific items are listed below, remember that creativity knows no bounds. Feel free to substitute colors, textures, and embellishments to truly make these gnomes your own. The beauty of DIY lies in personalization!
- Cardboard Cone: One 17-inch cone, readily available at craft stores like Michael’s. This forms the foundational body of your gnome, providing a sturdy and ideal shape.
- Pink Sweater Sleeve: The sleeve from an old pink sweater. This will serve as the cozy body covering for your gnome, adding a soft, textured look. Look for sweaters with interesting knits or patterns for added character.
- Red Sweater Scrap: A piece of red sweater fabric, perfect for crafting the gnome’s iconic pointed hat. The stretchiness of sweater material makes it easy to work with for hat construction.
- Pom-Pom: One small pom-pom to adorn the very top of the gnome’s hat, adding a playful and classic gnome touch. Choose a color that complements your hat fabric.
- Felt Fabric: A small piece of felt in your chosen color for the gnome’s face. Light colors like peach, cream, or a very light pink work best to highlight facial features.
- Embroidery Floss: Black and red embroidery floss to meticulously create the gnome’s facial features, such as eyes and a charming mouth or rosy cheeks.
- Cosmetic Brush: A soft cosmetic brush can be useful for applying blush to the gnome’s cheeks, giving it a healthy, cheerful glow.
- Cotton Swab: Handy for precise application of glue or for dabbing on a tiny bit of color.
- Fusible Interfacing: A small piece of fusible interfacing can be used to give the felt face more body and prevent fraying, though it’s optional for this project.
- Valentine-Themed Jellyroll Strip Fabric: A strip of fabric with Valentine’s Day patterns or colors. This can be used for decorative accents, such as a collar or trim.
- Red Felt Square: A small square of red felt, ideal for cutting out a heart shape to adorn the gnome’s body, symbolizing love.
- Index Card: One 4×6-inch index card. This can be used as a template for shapes, or for small, sturdy components.
- Glue Spreader Stick: A small stick or craft spatula for evenly spreading glue, ensuring neat and clean application.
- Pink String: Some decorative pink string, available at dollar stores or craft supply shops, for tying bows or adding decorative wraps.
- Valentine Decoration: A small embellishment to trim the hat, such as a mini heart button, a tiny glitter sticker, or a small fabric appliqué.
- White Lace or Trim: Approximately 3/4 yard of white lace or decorative trim to create a beautiful ruffle or collar around the gnome’s neck area.
- Small Pink Bow: A pre-made small pink bow to add an extra touch of sweetness, perhaps to the hat or the gnome’s body.
- Pink Yarn: Yarn Bee Yarn in Showstopper Pink from Hobby Lobby is recommended, or any soft pink yarn of your choice for creating the gnome’s hair or beard. The texture and thickness of the yarn will significantly impact the gnome’s appearance.
- Sewing Machine (Optional but recommended): While many steps can be done with glue, a sewing machine provides more durability, especially for securing the sweater sleeve.
- Thread: Matching thread for your chosen fabrics, if you opt to sew.
- Iron: Useful for pressing fusible interfacing or smoothing out fabric wrinkles.
- Hot Glue Gun: An essential tool for quick and strong adhesion, especially for attaching elements like the face, hair, and hat. Always use with caution.
- Tacky Glue: A good all-purpose craft glue for felt and fabric, offering a strong bond and allowing for slight repositioning before it dries.
- Scissors: Sharp fabric scissors are a must for clean cuts.
- Needle: A hand-sewing needle for embroidery and any small hand stitches.
Remember, this list is a guideline. Feel empowered to let your imagination guide your material choices. For example, instead of a pink sweater, you could use a white one for a more classic look, or even a patterned fabric for a unique twist. The possibilities are endless!
Step-by-Step Guide: Crafting Your Adorable Valentine’s Gnome
Step 1: Preparing the Gnome’s Body Base
Begin by taking your 17-inch cardboard cone. This cone will serve as the sturdy foundation for your gnome’s body. Carefully slip the cone into the sleeve of your old pink sweater. Ensure that the sweater sleeve fits snugly around the cone, stretching it gently if necessary to achieve a smooth, taut surface. The bottom edge of the sweater sleeve should extend a little beyond the base of the cone, allowing for a neat finish. Position the cone so that the sweater fabric is evenly distributed, creating a pleasing silhouette for your gnome’s body.
Step 2: Securing the Sweater Casing and Adding a Heartfelt Touch
Once the sweater sleeve is perfectly positioned on the cone, it’s time to secure it. You have two primary options here: sewing or gluing. For a more durable finish, especially if you plan to keep your gnome for many seasons or if children will be handling it, use your sewing machine to stitch the sweater fabric securely to the base of the cone and potentially along the top edge if desired. If you prefer a no-sew method, a hot glue gun or a strong fabric adhesive like Tacky Glue will work perfectly. Apply glue generously to the inside edge of the sweater fabric at the base of the cone and press it firmly against the cardboard. You can also add a line of glue along the top opening of the sleeve to hold it in place. After the body is secured, take your red felt square. Draw a heart shape onto the felt and carefully cut it out. This heart will be a charming Valentine’s accent. Using Tacky Glue or hot glue, attach the felt heart to the front center of your gnome’s sweater-covered body, positioning it nicely for maximum visual impact.
Step 3: Bringing Your Gnome’s Face to Life
The face is where your gnome truly gains its personality. From your chosen felt fabric for the face, cut out a small, round piece. The size should be proportional to your gnome’s body, typically a few inches in diameter. On this felt circle, gently sketch out the gnome’s features using a pencil or a fine-tipped fabric marker. You might draw two small dots for eyes, a gentle curve for a mouth, and perhaps some light lines for rosy cheeks. Once you are satisfied with your drawing, it’s time to bring these features to life with embroidery. Using black embroidery floss, carefully stitch over the lines for the eyes. For the mouth, use red embroidery floss to create a subtle, happy smile or a small ‘O’ shape. For rosy cheeks, you can either use a tiny amount of red floss in a small circle of French knots, or for a softer look, gently dab a bit of blush with a cosmetic brush and cotton swab onto the felt. Take your time with this step, as the expression on the face will define your gnome’s character.
Step 4: Assembling the Gnome’s Face, Ruffle, and Hair
With the face complete, it’s time to integrate it into the gnome’s body. Apply a generous amount of hot glue or Tacky Glue to the back of your embroidered felt face, particularly around the edges. Carefully position the face onto the upper front portion of your gnome’s sweater body, just below where the hat will eventually sit. Press firmly until the glue sets. Next, take your 3/4 yard of white lace or trim. You can gather this lace to create a lovely ruffle. Apply a line of hot glue around the ‘neck’ area of your gnome, just below the face, and carefully attach the gathered lace, creating a charming collar or ruffle effect. This adds a touch of elegance and helps define the head from the body. Finally, it’s time for the hair. Cut multiple strands of your chosen pink yarn, each about 8-10 inches long. You will need enough strands to create a full beard or hair for your gnome. Gather these strands together and secure them in the middle with a small piece of string or an elastic band. This bundle will form the gnome’s beard/hair. Apply a line of hot glue to the top of the gnome’s body, just below the face and over the ruffle, and securely attach the yarn bundle, fanning it out to create a full, flowing beard or hair. If you are making a girl gnome, you might position the yarn slightly differently for braids.
Step 5: Styling the Hair and Adorning the Hat
Now for the finishing touches! If your gnome has a long yarn beard or hair, consider braiding it. Divide the yarn into three sections and create a neat braid, securing the end with a small piece of string or a tiny elastic band. This adds character and keeps the yarn tidy. Next, it’s time for the hat. Take your red sweater scrap and shape it into a cone for the gnome’s hat. You might want to measure the circumference of the top of your gnome’s head (where the hat will sit) to ensure a good fit. Sew or glue the edges of the red sweater scrap together to form a cone. Place the hat onto your gnome’s head, ensuring it covers the top edge of the body and the hair attachment point. Once positioned, secure the hat to the gnome’s body using hot glue, running a bead of glue along the inside brim of the hat and pressing it firmly onto the sweater body. To add more decorative flair, take your pink string and wrap it around the base of the hat about three times, creating a charming band. Tie a neat bow with the string at the front or side of the hat. To secure the string and add another element of decoration, you can use a small Valentine decoration sticker (like a tiny heart or a “love” sticker) or a small pink bow over the knot of the string. Finally, don’t forget to attach the pom-pom to the very tip of the hat with a dab of hot glue. This completes the classic gnome look.
Personalize Your Gnome: Tips for Customization
The beauty of DIY projects is the freedom to personalize. While this tutorial provides a fantastic foundation, don’t hesitate to infuse your own creativity:
- Color Palettes: Experiment with different color combinations. Instead of pink and red, consider lavender and white, or even a rainbow of pastels for a whimsical touch.
- Fabric Choices: Use faux fur for a fluffier beard, or patterned cotton for the body. Velveteen or plaid can also offer unique textures and visual interest.
- Embellishments: Adorn hats with tiny bells, glitter, sequins, or miniature faux flowers. Add glasses made from wire for a scholarly gnome, or a tiny tool belt for a working gnome.
- Gender Expression: Give your gnome a long beard for a traditional look, or braids for a girl gnome. Add tiny earrings or a delicate flower crown.
- Themes: Beyond Valentine’s Day, these gnomes can be adapted for any holiday or season – green and gold for St. Patrick’s Day, pastels for Easter, or traditional reds and greens for Christmas.
Each gnome you create will be a testament to your personal style and imagination, making them truly special decorative pieces.
Making Crafting a Family Affair: Fun for All Ages
These Valentine’s Day gnomes are not just incredibly cute; they’re also a fantastic project to engage the whole family. Holidays can sometimes lead to boredom or restless energy, and having a creative project ready can be a lifesaver for parents. I’ve found that keeping boxes of different craft supplies on hand, ready to be pulled out, can transform a chaotic afternoon into a focused, creative session. Simply set out the materials, gather everyone around the table, and watch their individual creative spirits come alive.
From choosing fabric colors to decorating hats, children can participate in almost every step with proper supervision (especially with hot glue guns). This fosters their fine motor skills, encourages decision-making, and provides a tangible sense of accomplishment. The shared experience of crafting together creates lasting memories and unique handmade decorations that will be cherished for years to come. The DIY Valentine’s Day Gnome is a perennial favorite in our household – it’s a project that genuinely appeals to everyone, from the youngest crafter to the oldest.
Conclusion: Your Handmade Valentine’s Day Masterpiece
Congratulations! You’ve successfully crafted an adorable Valentine’s Day gnome, a charming testament to your creativity and skill. These handmade gnomes are more than just decorations; they embody the spirit of love and home, adding a unique and personal touch to your Valentine’s celebrations. Whether you make a single gnome or an entire whimsical family, each one will carry a piece of your artistic flair.
So, gather your materials, follow these steps, and prepare to bring a little bit of folklore-inspired love into your home this Valentine’s Day. Enjoy the process of creation, the joy of personalization, and the delight of sharing your charming gnomes with those you love. Happy crafting!