
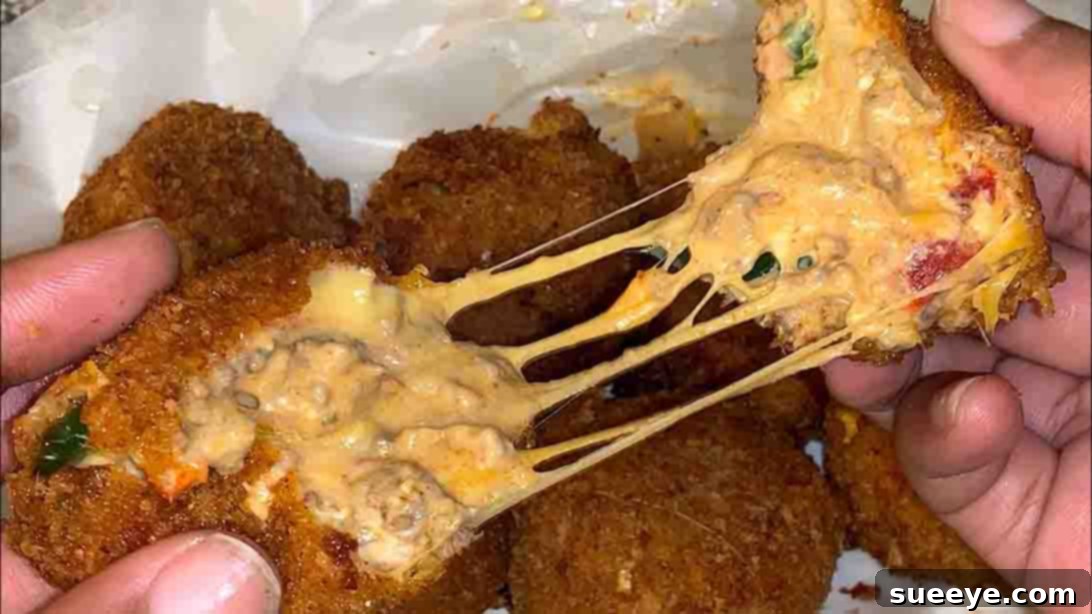
Crispy Deep-Fried Rotel Dip Balls: Your New Favorite Game Day Appetizer
Get ready to elevate your snack game with these irresistible Deep-Fried Rotel Dip Balls! Inspired by the fantastic recipe from Cookin’ Wit Lyssa, these cheesy, savory bites are an absolute game-changer for any gathering. Whether you’re hosting a game day party, planning an outdoor get-together, or simply craving a delicious treat, these Rotel dip balls are guaranteed to be a crowd-pleaser. They combine the classic comfort of Rotel dip with a delightful crispy exterior, offering a unique and exciting twist on a beloved favorite.
Imagine perfectly seasoned ground beef, rich cream cheese, and sharp cheddar, all melded with the zesty kick of Rotel tomatoes and green chilies, then rolled into a ball, coated in a crispy breading, and deep-fried to golden perfection. This recipe isn’t just easy to follow; it’s also a fantastic make-ahead option, perfect for those busy days when your kitchen space is at a premium. If you’re a true cheese lover and an appetizer enthusiast, prepare to fall in love with this spectacular creation. Let’s dive in and discover how to make these incredible deep-fried Rotel dip balls!
RELATED: Delicious Jalapeno Popper Bites and Cheese Balls
Why You’ll Love These Deep-Fried Rotel Dip Balls
There are countless reasons why these deep-fried Rotel dip balls deserve a spot on your menu. First and foremost, they are incredibly flavorful. The combination of savory ground beef, three types of cheese, and the vibrant taste of Rotel creates a truly satisfying experience with every bite. The crispy, golden-brown crust offers a fantastic textural contrast to the gooey, melt-in-your-mouth interior. Beyond their incredible taste, these appetizers are remarkably versatile. They’re perfect for casual get-togethers, holiday parties, or as a fun addition to a family meal. Plus, the convenience of a make-ahead recipe means less stress on party day. You can prepare the mixture and form the balls in advance, freezing them until you’re ready to fry, making entertaining a breeze.
Ingredients:
To create these mouth-watering Rotel dip balls, you’ll need a selection of simple yet powerful ingredients:
- 1 lb Ground Beef: Lean ground beef is recommended to reduce excess grease, providing a hearty base for the dip.
- 1 – 10 oz Can of Rotel (Diced Tomatoes & Green Chilies): The star ingredient, offering a perfect blend of tangy tomatoes and a mild spicy kick.
- 1 Block (8 oz) Cream Cheese, diced: Adds incredible creaminess and binds the ingredients together, making the balls rich and smooth.
- 1 – 8 oz Velveeta Cheese, diced: Known for its superior meltability, Velveeta ensures a wonderfully smooth and gooey texture inside the balls.
- 8 oz Shredded Cheddar Cheese: Provides that classic cheesy flavor and contributes to the overall melt.
- White Onions, chopped (optional): Freshly chopped white onions add a pungent aroma and a subtle sweetness when sautéed.
- Jalapeno, chopped (optional): For those who love an extra layer of heat and fresh, vibrant flavor. Remove seeds for less spice.
- 1 Packet Taco Seasoning: Infuses the ground beef with classic Tex-Mex flavors, perfectly complementing the Rotel.
- 2 Large Eggs: Essential for the breading process, helping the flour and breadcrumbs adhere to the balls.
- All-Purpose Flour: The first layer in the breading, creating a dry surface for the egg wash.
- Breadcrumbs: The final coating, giving these balls their signature crispy texture. Panko breadcrumbs can be used for extra crispiness.
- Cooking Oil: For deep-frying (e.g., vegetable, canola, or peanut oil).
- Optional Seasonings for Flour: Chili powder and Cajun seasoning to enhance the flavor of the coating.
Directions:
Follow these detailed steps to create your perfect batch of crispy deep-fried Rotel dip balls.
Step 1: Prepare the Savory Beef & Cheese Mixture
Begin by heating a little bit of your preferred cooking oil in a large skillet over medium-high heat. Add the chopped white onion (if using) and sauté until it becomes softened and translucent, usually about 3-5 minutes. Next, add the ground beef to the skillet. Break up the meat with a spoon as it cooks, stirring occasionally, until it is thoroughly browned. This ensures all the beef is cooked evenly. Once cooked, it’s crucial to drain any excess grease from the pan to prevent the mixture from becoming too oily. After draining, season the cooked ground beef generously with one packet of taco seasoning. Stir it in well, ensuring the seasoning is evenly distributed throughout the meat for maximum flavor. This step is key to building the savory foundation of your dip balls.
Once the ground beef is seasoned, transfer it to a large, microwave-safe bowl. Add the diced cream cheese, diced Velveeta, the 8 ounces of shredded cheddar cheese, the chopped jalapeños (if using), and the entire can of Rotel (undrained, as the liquid adds flavor and moisture). Place the bowl in the microwave and heat for about 1 to 2 minutes, or until the cheeses begin to melt and soften. This initial heating helps the ingredients combine more easily. After microwaving, remove the bowl and stir everything together thoroughly until all the cheeses are completely melted and the mixture is well combined and smooth. The goal is a uniform, creamy consistency. Finally, cover the bowl and refrigerate the mixture for at least 30 minutes. This chilling time is essential as it allows the mixture to firm up, making it much easier to roll into perfect balls without falling apart.
Step 2: Form the Balls and Prepare for Freezing
After the Rotel mixture has been sufficiently chilled and firmed up in the refrigerator, it’s time to form your dip balls. Take a small portion of the mixture – about 1 to 1.5 tablespoons for each ball, depending on your desired size – and gently roll it between your palms to form a compact, smooth sphere. Place the formed ball into a casserole dish or onto a baking sheet lined with parchment paper. Continue this process, taking care to make each ball relatively uniform in size, until all of the Rotel mixture has been used. This step requires a bit of patience, but the firm, chilled mixture will make it much easier to handle. Once all the balls are formed, place the dish or baking sheet into the freezer for about one hour. Freezing them solid is a critical step; it helps the balls hold their shape perfectly during the breading process and prevents them from disintegrating when they hit the hot oil during frying. This also ensures a crispy exterior and a molten, cheesy interior.
While the Rotel dip balls are firming up in the freezer, prepare your breading station. You’ll need three separate shallow bowls or dishes. In the first bowl, beat two large eggs until the yolks and whites are fully combined; this will serve as your egg wash. In the second bowl, pour a generous amount of all-purpose flour. To add an extra layer of flavor to your coating, season the flour with a pinch of chili powder and a dash of Cajun seasoning, then mix well. In the third bowl, place your breadcrumbs. Using seasoned flour adds a wonderful depth of flavor to the final crispy crust, making these dip balls even more irresistible.
Step 3: Breading and Deep-Frying to Golden Perfection
Once your Rotel dip balls are firm from the freezer and your breading station is ready, you can begin the coating process. Take one frozen ball and gently roll it first into the seasoned flour, ensuring it’s completely coated. Tap off any excess flour. Next, dip the floured ball into the beaten eggs, letting any excess egg drip off. Finally, roll the egg-coated ball thoroughly in the breadcrumbs, pressing lightly to ensure an even and complete coating. The breadcrumbs should adhere well, creating a uniform crust. Repeat this breading process with all of your cheese balls. After they are all breaded, it’s a good idea to store them back in the fridge for another 15-30 minutes while you prepare your frying oil. This helps the coating set and adhere even better, preventing it from flaking off during frying.
Now, it’s time for the final, exciting step: frying! In a deep pot or Dutch oven, pour enough cooking oil to submerge the dip balls. Heat the oil to approximately 350-375°F (175-190°C). If you don’t have a thermometer, you can test if the oil is ready by dropping a tiny pinch of breadcrumbs; if they sizzle immediately and float, the oil is hot enough. Carefully and gently drop a few breaded cheese balls into the hot oil, making sure not to overcrowd the pot. Overcrowding can lower the oil temperature and result in greasy, less crispy balls. Deep-fry them for about 45 seconds to 1 minute, or until they achieve a beautiful golden-brown color and a perfectly crispy exterior. The inside should be molten and gooey by this point. Using a slotted spoon, carefully remove the fried balls from the oil and transfer them to a plate lined with paper towels to drain any excess oil. Repeat with the remaining balls, working in batches as needed. Serve immediately and enjoy the burst of flavor and crunch!
Tips for Success and Perfect Deep-Fried Rotel Dip Balls
- Chill Thoroughly: Do not skip the chilling and freezing steps. This is paramount for the balls to hold their shape and for the coating to adhere properly.
- Maintain Oil Temperature: Use a kitchen thermometer to ensure your oil stays between 350-375°F (175-190°C). Too low, and the balls will absorb too much oil; too high, and the outside will burn before the inside is properly hot and gooey.
- Don’t Overcrowd the Pot: Fry in small batches to maintain consistent oil temperature and allow even cooking and crisping.
- Season the Breading: Adding chili powder and Cajun seasoning to your flour mixture significantly enhances the overall flavor profile of the crust.
- Handle Gently: Once breaded, handle the balls with care to avoid dislodging the coating.
- Use Good Quality Ingredients: Fresh ground beef and quality cheeses will make a noticeable difference in the final taste.
Delicious Variations and Customizations
While the classic recipe is phenomenal, don’t hesitate to experiment with these Rotel dip balls:
- Spice It Up: For more heat, add an extra jalapeño, a pinch of cayenne pepper, or a dash of hot sauce to the beef mixture. You could also use a hot variety of Rotel.
- Meat Alternatives: Swap ground beef for spicy ground sausage, ground turkey, or even shredded chicken for a different flavor profile.
- Cheese Variations: Experiment with different types of shredded cheese, such as Pepper Jack for an extra kick, Colby Jack for mildness, or Monterey Jack for meltiness.
- Dipping Sauces: Serve with a side of ranch dressing, sriracha mayo, salsa, or even a creamy avocado dip for extra indulgence.
- Baked Option: While designed for deep-frying, you can try baking them. Place breaded balls on a greased baking sheet and bake at 400°F (200°C) for 15-20 minutes, flipping halfway, until golden and crispy. They might not be as crispy as fried, but it’s a healthier alternative.
- Miniature Size: Make them smaller for bite-sized appetizers, adjusting frying time accordingly.
Serving Suggestions for Your Rotel Dip Balls
These versatile appetizers are perfect for a variety of occasions:
- Game Day Extravaganza: The ultimate snack for watching sports, serving alongside other favorites like wings, sliders, and chips.
- Party Appetizer: A guaranteed hit at any party, whether it’s a birthday, holiday gathering, or casual get-together. Arrange them beautifully on a platter with dipping sauces.
- Outdoor Events: Ideal for BBQs, picnics, or tailgating events. Their portable nature makes them easy to enjoy on the go.
- Family Snack: A fun and delicious treat for family movie night or an afternoon snack that everyone will love.
Storage and Reheating
If you have any leftovers (which is rare!), store them in an airtight container in the refrigerator for up to 3-4 days. To reheat and maintain their crispiness, it’s best to warm them in an oven or an air fryer. Place them on a baking sheet in a preheated oven at 350°F (175°C) for 10-15 minutes, or in an air fryer at 325°F (160°C) for 5-8 minutes, until heated through and crispy again. Microwaving is not recommended as it will make them soft.
Conclusion: The Ultimate Cheesy, Crispy Bite
These deep-fried Rotel dip balls are more than just an appetizer; they are a celebration of flavor, texture, and good times. With their rich, cheesy interior, perfectly seasoned beef, and unbelievably crispy coating, they are destined to become a beloved staple in your recipe collection. Whether you’re a seasoned cook or just starting in the kitchen, this recipe provides clear steps to achieve a truly impressive result. So, gather your ingredients, follow Lyssa’s fantastic lead, and prepare to delight your taste buds and impress your guests with these unforgettable Rotel dip balls. Give them a try – you won’t regret it!