
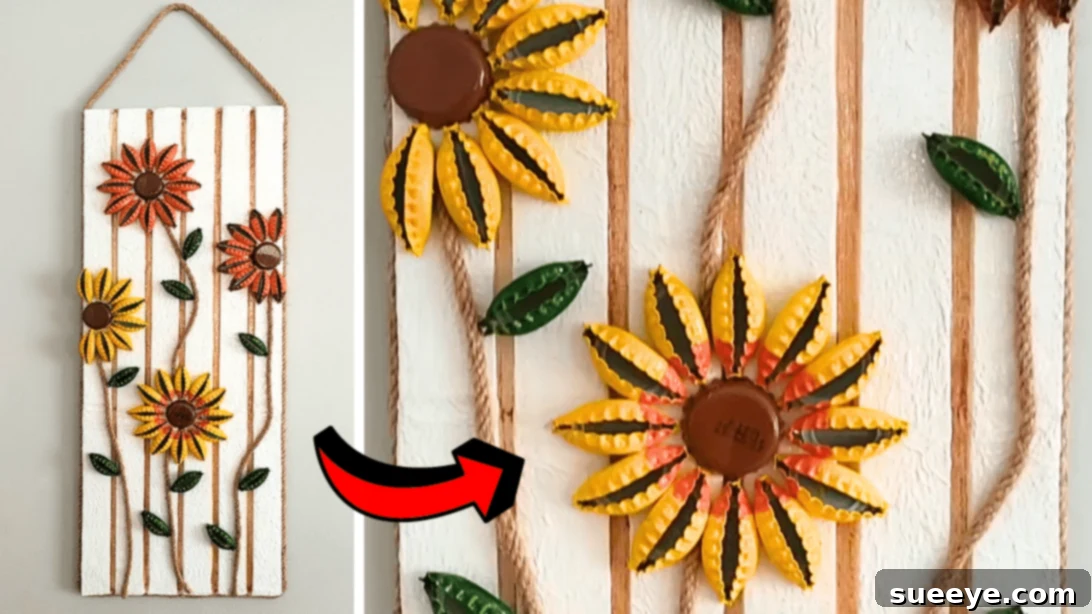
In a world increasingly conscious of waste and sustainability, the art of repurposing old items into beautiful new creations has gained immense popularity. Not only does upcycling allow us to craft unique and personalized decor pieces for our homes, but it also plays a crucial role in reducing landfill waste and embracing a more eco-friendly lifestyle. There’s a profound satisfaction that comes from transforming forgotten “trash” into cherished “treasure,” breathing new life into objects that might otherwise be discarded. Among the myriad of materials perfect for such projects, items like tires, glass bottles, paper tube rolls, and especially bottle caps stand out for their versatility and availability.
RELATED: DIY Bottle Cap Sunflower Art Tutorial
Bottle caps, often overlooked, are incredibly easy and fun to work with, making them an ideal medium for crafters of all skill levels. Their small size and sturdy nature open up a world of creative possibilities, from charming wind chimes that add a whimsical touch to your garden, to intricate wall hangings that become a focal point in any room. The potential for innovation is truly limitless. If you’re looking for an inspiring project that combines sustainability with stunning aesthetics, you’re in the right place. We’re thrilled to share a fantastic decor idea demonstrated by Bir Parça Kağıt on YouTube, guiding you through the creation of a beautiful DIY Bottle Cap Wall Hanging. This project is not only visually appealing but also surprisingly simple to achieve, making it perfect for a rewarding afternoon of crafting.
Essential Materials for Your DIY Bottle Cap Wall Hanging Decor:
Before diving into the creative process, ensure you have all the necessary supplies gathered. Most of these items are readily available at craft stores or even around your home, highlighting the accessible nature of this upcycling project.
- Sturdy Cardboard: This will form the robust base of your wall hanging. Look for packaging cardboard that is relatively thick.
- Sharp Scissors: Essential for precise cutting of the cardboard and other materials.
- Craft Cutter or Utility Knife: For cleaner, straighter cuts on cardboard, especially for longer strips. Always use with a cutting mat and caution.
- Assorted Bottle Caps: The stars of the show! Collect a variety of metal or plastic bottle caps; the more, the merrier, for a diverse look.
- Acrylic Paint: A range of colors for painting your base and bottle caps. Consider vibrant hues for flowers and natural tones for stems and leaves.
- Craft Glue (PVA Glue): For adhering paper towels to the cardboard base and for general crafting.
- Hot Glue Gun and Glue Sticks: Provides a strong, fast-drying bond, essential for attaching bottle caps and jute rope securely.
- Jute Rope: Used for creating the flower stems and the main hanging loop.
- Paper Towels or Tissue Paper: To create a textured, durable surface on the cardboard base.
- Paintbrush Set: Various sizes for painting larger areas and adding fine details.
- Clear Spray Paint (Optional): A sealant that provides a glossy finish and protects your finished piece from dust and moisture, enhancing its longevity.
Step-by-Step Guide to Crafting Your Bottle Cap Wall Hanging Decor:
Creating this stunning wall decor is a rewarding process that transforms simple materials into a true work of art. Follow these detailed steps to bring your vision to life, just like the inspiring project from Bir Parça Kağıt.
Step 1: Preparing and Fortifying the Cardboard Base
The foundation of your wall hanging needs to be both sturdy and aesthetically pleasing. Begin by carefully cutting your cardboard. You will need six individual strips, each measuring approximately 1 inch wide by 20 inches long. These strips will add dimension and structure to your design. Next, cut one larger rectangular piece, measuring around 20 inches by 8 inches. This rectangle will serve as the main backdrop for your bottle cap arrangement. Once all pieces are cut, take the six 1×20 inch strips and meticulously glue them onto the 20×8 inch rectangular base. Ensure they are spaced evenly across the surface to create a balanced and appealing grid-like pattern. Allow the glue to dry completely; patience here is key to a strong foundation.
After the glue has thoroughly dried, prepare a mixture of craft glue and a small amount of water. This creates a diluted adhesive that’s perfect for decoupaging. Using a paintbrush, generously brush this mixture over the entire cardboard base. Immediately after, carefully place pieces of paper towel or tissue paper over the wet surface. Gently brush the paper towel down, ensuring it’s fully saturated with the glue mixture and completely adhered to the cardboard, smoothing out any air bubbles or wrinkles as you go. This process, similar to papier-mâché, adds texture, strengthens the cardboard, and creates an excellent, uniform surface for painting. Continue this process until the entire base, including the edges and even the back if desired for a polished look, is covered. Let this entire assembly dry completely and thoroughly; this might take several hours or even overnight, depending on the humidity and the amount of glue used. A fully dry base ensures no warping and a perfect canvas for your artistic endeavors.
Step 2: Crafting and Arranging Your Vibrant Bottle Cap Flowers
With your base prepped, it’s time to infuse it with color and creativity. Start by painting your cardboard base using acrylic paints. You can choose a solid color, create a gradient, or mimic a natural backdrop like a sky or a garden—let your imagination guide you, drawing inspiration from the video if needed. While the base dries, prepare your bottle caps. Sort your collection; some caps will remain whole to act as the centers of your flowers, providing a distinct, rounded shape. For the petals, gently pinch the remaining bottle caps in half. This creates a lovely, curved petal shape that adds dimension to your floral designs.
Once you have your whole and folded caps ready, it’s time to paint them. Paint the whole caps a rich brown or any color you envision for the flower centers. For the folded caps, experiment with vibrant shades: bright yellow, warm orange, and lush green. These colors will form the petals and leaves, bringing your botanical vision to life. Allow all painted caps to dry thoroughly to prevent smudging. Now, the exciting part: assembling your flowers. Using a hot glue gun for its quick and strong bond, attach the whole, painted caps to your base wherever you wish to position your flower centers. Once the centers are secure, carefully arrange and glue the folded caps around each center, forming the beautiful petals. You can layer them slightly for more depth. Don’t stop there! With a fine brush, add more intricate details to your painted caps, such as darker lines for definition, lighter highlights, or even small dots to mimic pollen, making your flowers truly unique and lifelike. This attention to detail elevates the entire piece.
Step 3: Assembling Stems, Leaves, and the Hanging Mechanism
Now that your vibrant bottle cap flowers are taking shape, it’s time to connect them and prepare your piece for display. Using your hot glue gun, carefully attach lengths of jute rope to visually connect your flowers. These ropes will serve as organic-looking stems, adding a natural flow to your arrangement. Don’t aim for perfect straight lines; slightly curved or whimsical stems can enhance the natural, garden-like aesthetic. Next, take some of your green folded bottle caps and strategically glue them along the jute rope stems to represent leaves. Vary their placement and angle to create a more realistic and dynamic look. Just as with the petals, consider adding small painted details to these green “leaves” to give them more character and depth.
Finally, to make your beautiful creation a functional wall hanging, you’ll need to add a hanging mechanism. Cut a long, sturdy piece of jute rope. This length should be sufficient to create a secure loop for hanging. Take both ends of this long rope and hot glue them firmly to the bottom edge of your cardboard base, ensuring they meet precisely in the center. Once secured at the bottom, carefully adhere the rope upwards along the sides of the base, guiding it towards the top. Leave a generous loop of rope loose at the very top—this loop will be what you use to hang your decor on a wall. Ensure the glued points are very strong, as they will bear the weight of the entire piece. For an added touch of elegance and durability, you have the option to spray the entire finished piece with a clear spray paint. This not only gives it a beautiful glossy finish but also provides a protective layer against dust, moisture, and UV rays, preserving your artwork for years to come. Once everything is dry and secure, your magnificent upcycled bottle cap wall hanging is ready to adorn any space you choose, bringing a touch of handmade charm and sustainable beauty to your home!
*All image credit belongs to Bir Parça Kağıt via YouTube. Follow and subscribe to her channel for more inspiring DIY projects and creative ideas!
Embrace Creativity with This Easy DIY Wall Hanging Decor Idea Using Bottle Caps
This bottle cap wall hanging project is a wonderful testament to how readily available materials can be transformed into stunning home decor. It’s an accessible craft for anyone looking to add a personal touch to their living space while also contributing to environmental conservation through upcycling. The beauty of this project lies not only in its eco-friendliness but also in its immense potential for customization. You can choose any color scheme to match your existing decor, experiment with different flower patterns, or even incorporate other small recycled elements to make your piece truly one-of-a-kind. Imagine a vibrant array of bottle cap flowers bringing a permanent bloom to your walls, a constant reminder of creativity and sustainability.
Whether you’re an experienced crafter or a beginner looking for an engaging new project, this DIY bottle cap wall hanging offers a rewarding experience. It’s a fantastic way to spend an afternoon, resulting in a charming piece of art that you can proudly display or even gift to a loved one. So, start collecting those bottle caps, gather your materials, and prepare to unleash your inner artist. You’ll be amazed at what beautiful treasures you can create from what others might consider trash!