
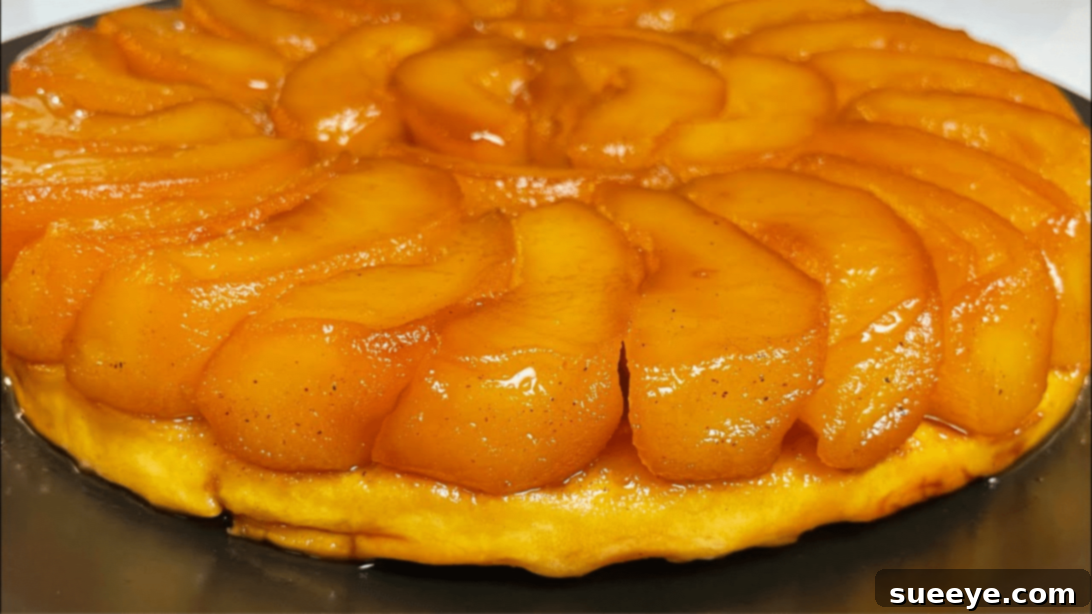
Prepare to impress your guests and delight your family with this exquisite classic apple tart recipe. Inspired by Eva Mazi’s delightful creation, this tart isn’t just a dessert; it’s a testament to simple elegance, combining the comforting flavors of caramelized apples with a flaky, golden puff pastry crust. Perfect for any gathering, from intimate family dinners to festive celebrations, its heavenly taste and surprisingly straightforward preparation make it an instant favorite. With just a few staple ingredients, you’re on your way to baking a masterpiece that will surely become the talk of the town.
Ingredients for Your Culinary Masterpiece:
Crafting this incredible apple tart requires a selection of fresh, high-quality ingredients. Each component plays a vital role in achieving the perfect balance of sweetness, texture, and aroma.
- For the luscious caramel base: 1/2 cup of granulated sugar. This will transform into the rich, amber foundation that truly elevates the tart’s flavor profile.
- For the sweetened apple filling: 3/4 cup of granulated sugar. This amount provides the ideal sweetness to balance the tartness of the apples.
- For richness and flavor: 2/3 cup of unsalted butter. Butter adds depth, moisture, and a luxurious mouthfeel to the apple filling.
- To aid in cooking the apples: 5.3 oz (approximately 2/3 cup) of water. This helps to gently simmer the apples, ensuring they become tender without turning to mush.
- The warm spice touch: 1 teaspoon of ground cinnamon. Cinnamon is the quintessential spice for apples, adding an inviting aroma and a warm, comforting flavor.
- Aromatic essence: 2 teaspoons of pure vanilla extract. Vanilla enhances the overall sweetness and provides a subtle, sophisticated note.
- The star of the show: 8 or 9 medium-sized apples, preferably Braeburn apples. Braeburns are ideal due to their firm texture, excellent flavor, and ability to hold their shape beautifully during baking. Other great choices include Honeycrisp, Gala, or Granny Smith (for a tarter profile).
- The perfect, flaky crust: One sheet of store-bought puff pastry. Opt for a high-quality all-butter puff pastry for the best flavor and flakiness. This convenient shortcut saves time without compromising on taste or texture.
Step-by-Step Guide to Baking Your Classic Apple Tart:
Embark on this delightful baking journey with clear, detailed instructions designed to guide you from start to finish. Each step is crucial in building the layers of flavor and texture that make this apple tart so extraordinary.
Step 1: Creating the Golden Caramel Foundation
The journey to a truly unforgettable apple tart begins with the rich, golden caramel base. Carefully measure out 1/2 cup of granulated sugar and add it to a heavy-bottomed saucepan. It’s crucial to use a pan with good heat distribution to prevent uneven cooking. Place the pan over medium heat. Initially, resist the urge to stir. Allow the sugar to melt slowly, starting at the edges. As it begins to liquefy and turn a pale amber, you can gently swirl the pan to encourage even melting. Continue cooking, keeping a watchful eye, as sugar can burn quickly. The transformation from white granules to a deep, lustrous amber syrup typically takes about 5 to 7 minutes. This deep amber color indicates a perfectly caramelized sugar, offering a complex, slightly bitter-sweet flavor that will beautifully complement the apples. Continuous, gentle swirling is advised once it’s mostly melted to ensure uniformity and prevent any parts from overcooking and burning, which would result in a harsh, acrid taste. Once achieved, immediately remove it from the heat to prevent it from getting too dark.
Step 2: Preparing the Caramelized Pan
Once your exquisite caramel syrup is ready, immediately and carefully drizzle it onto the bottom of a 9-inch flat-sided cake pan. Work swiftly but cautiously, as the caramel will begin to set as it cools. Gently tilt and rotate the pan to evenly spread the hot caramel syrup across the entire base. Ensure an even layer, as this will be the beautiful top of your tart once inverted. Set the pan aside to allow the caramel to cool and harden, forming a glossy, sweet, and slightly chewy crust at the bottom of the pan.
Step 3: Preparing the Apples
The apples are the heart of this tart, so proper preparation is key. Begin by peeling all 8 or 9 apples thoroughly. Once peeled, core each apple to remove the seeds and fibrous center. Then, slice each apple into quarters. Aim for uniform quarters so they cook evenly and can be arranged neatly later. Place all the apple quarters into a large mixing bowl; this makes them easy to add to the simmering liquid in the next step.
Step 4: Simmering the Flavorful Apple Mixture
In a separate, medium-sized pot, combine 2/3 cup of unsalted butter, 3/4 cup of granulated sugar, and 5.3 oz of water. Add 2 teaspoons of vanilla extract to this mixture. Place the pot over medium heat and stir occasionally until the butter is completely melted and the sugar has dissolved. Bring this aromatic liquid to a gentle boil. This simmering liquid will infuse the apples with rich flavor and begin to soften them.
Step 5: Cooking the Apples to Perfection
Once the butter, sugar, water, and vanilla mixture is boiling, carefully add the peeled and quartered apple slices to the pot. Sprinkle 1 teaspoon of ground cinnamon over the apples, ensuring it’s distributed throughout. Gently mix the apples into the liquid, making sure all pieces are coated. Reduce the heat slightly and let the apples simmer for approximately 10 minutes. The goal here is to partially cook them until they are tender enough to be easily pierced with a knife, but still firm enough to hold their shape during baking. You should be able to poke the center of an apple slice smoothly with a knife without it falling apart. Overcooking at this stage will result in mushy apples. Once they reach this desired “al dente” consistency, carefully remove the apples from the pot using a slotted spoon, allowing any excess liquid to drain back into the pot. Set the cooked apple quarters aside in a bowl.
Step 6: Arranging the Apples for a Stunning Presentation
Now comes the artistic part that truly makes this tart visually appealing. Take the slightly cooled caramel-lined pan. Begin arranging the cooked apple quarters very tightly in a concentric circle around the pan. Start from the outer edge and work your way inward, overlapping the slices slightly to create a beautiful, petal-like pattern. It’s crucial to pack them as snugly as possible to ensure there are no large gaps. This tight arrangement will not only look stunning when the tart is inverted but also help the tart hold its shape. Gently press the arranged apples with your hands to further compact them and ensure a firm, even layer. The goal is to create a solid foundation of apples that will be the top layer of your finished tart.
Step 7: Preparing the Puff Pastry Crust
Unroll your sheet of puff pastry onto a piece of parchment paper or a lightly floured surface. Ensure it is flat and smooth. Take another pan, ideally the same 9-inch size as your cake pan, and place it upside down in the center of the puff pastry. Using the pan as a guide, carefully trace a perfect circle around its base with a sharp knife. Cut out the circle, removing any excess pastry. This ensures your pastry crust will fit perfectly over the apples. Before placing it, take a fork and gently poke holes all over the surface of the puff pastry circle. These small perforations are essential; they allow steam to escape during baking, preventing the pastry from puffing up excessively and creating a beautifully flaky, even crust.
Step 8: Assembling the Tart
Carefully lift the prepared puff pastry circle and gently lay it on top of the arranged apples in the cake pan. Ensure it covers all the apples evenly. Gently press the edges of the puff pastry down, tucking them around the circumference and pressing them lightly toward the apples. This helps to seal the apples underneath and creates a neat border for the tart, preventing any caramel from bubbling over excessively during baking and ensuring a clean, professional finish.
Step 9: Baking and Serving Your Golden Creation
Preheat your oven to 356°F (180°C). Once preheated, carefully place the assembled apple tart into the hot oven. Bake for approximately 35 minutes. Keep an eye on the pastry; it should turn a beautiful golden brown and appear flaky. The caramel underneath may bubble up slightly, which is perfectly normal. After 35 minutes, or once the pastry is golden and puffed, carefully remove the tart from the oven. This is a crucial step: let the tart cool at room temperature for at least 1 hour, or even slightly longer. This cooling period is vital as it allows the hot caramel to set properly. Attempting to remove the tart while the caramel is still liquid can lead to a messy situation and the apples sticking to the pan. Once sufficiently cooled, place a large serving platter upside down over the tart pan. With a firm grip on both the platter and the pan, swiftly and confidently flip them over. The tart should release cleanly onto the platter, revealing a stunning caramelized apple top. Serve your magnificent classic apple tart warm, perhaps accompanied by a dollop of cool crème fraîche or a scoop of creamy vanilla ice cream. The combination of warm, spiced apples, rich caramel, and flaky pastry with a cool, creamy topping is absolutely divine and makes for an unforgettable dessert experience.
Easy Classic Apple Tart Recipe: A Timeless Dessert
This easy classic apple tart recipe, with its inviting aroma and irresistible taste, is more than just a dessert—it’s a celebration of simple ingredients transformed into something extraordinary. The deep, rich caramel base, tender, cinnamon-spiced apples, and the crisp, buttery puff pastry combine to create a symphony of flavors and textures that will captivate anyone who tries it. Whether you’re a seasoned baker or just starting out, this recipe provides clear, achievable steps to produce a show-stopping dessert that promises rave reviews. Embrace the joy of baking and create this timeless classic; it’s a sweet indulgence that speaks volumes of homemade goodness and culinary passion. Enjoy every golden, flaky, and caramelized bite!