
Effortless Homemade Soft & Fluffy No-Knead Bread: Your Easiest Baking Adventure Yet!
There’s an undeniable magic to homemade bread—the way its inviting aroma fills your kitchen, the satisfying crunch of its crust, and the soft, tender crumb within. It’s a universal comfort food that elevates any meal and brings a unique warmth to the home. However, for many aspiring bakers, the traditional process of bread making, particularly the intensive kneading, can seem daunting. Often requiring a stand mixer or a significant arm workout, kneading is a barrier that keeps countless individuals from experiencing the joy of baking their own loaves.
But what if we told you there’s a way to achieve that perfect, bakery-quality loaf without all the strenuous effort? Welcome to the wonderful world of **no-knead bread**! This revolutionary method simplifies the baking process, proving that you don’t need to be a seasoned baker or own fancy equipment to produce truly exceptional results. We are thrilled to share an incredibly delicious and unbelievably easy recipe for **soft and fluffy no-knead bread**, inspired by the fantastic creations from Ellen’s Kitchen on YouTube. This recipe is a game-changer, designed to make homemade bread accessible and enjoyable for everyone, transforming your perception of baking.
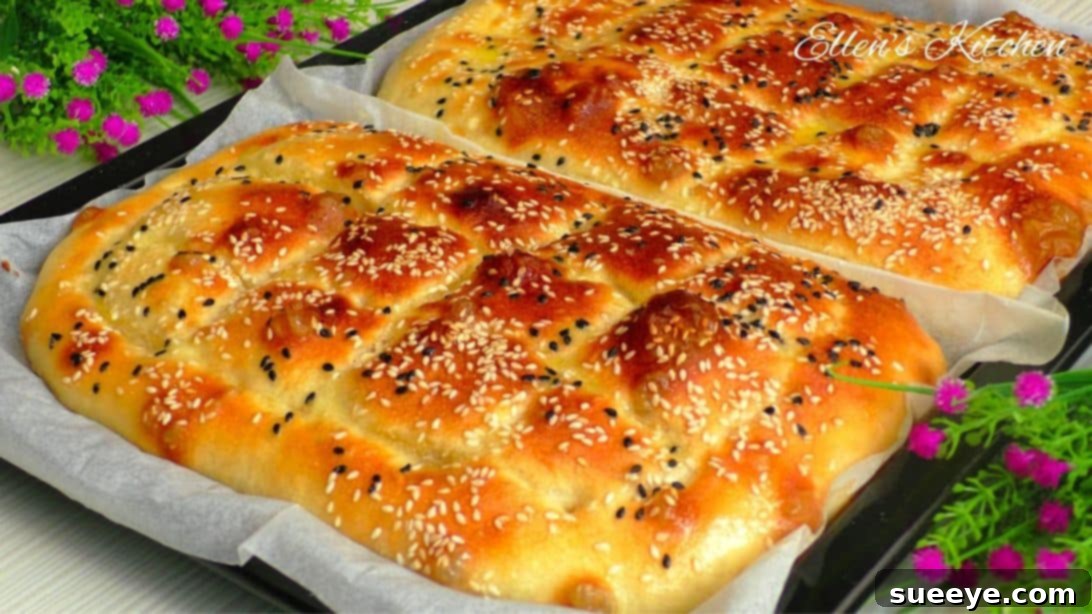
Imagine pulling two beautifully golden-brown loaves from your oven, each boasting a wonderfully crisp exterior and an interior so soft and airy it practically melts in your mouth. This recipe delivers exactly that, promising perfect results every time with minimal hands-on time. Beyond its simplicity, this no-knead bread offers incredible versatility. While it’s absolutely delightful on its own, it also serves as the ideal canvas for your creative additions. Whether you envision a savory loaf studded with herbs and cheese, or a subtly sweet version, customizing your bread is effortless. So, prepare to ditch the heavy lifting, gather your simple ingredients, and embark on a baking journey that will not only fill your home with irresistible scents but also your heart with pride. Let’s dive into the full instructions and bake some happiness!
Essential Ingredients for Your No-Knead Masterpiece
One of the many charms of this no-knead bread recipe is its reliance on fundamental pantry staples. High-quality ingredients, even in their simplicity, can significantly impact the final flavor and texture of your bread. Ensure your yeast is fresh and active, and measure your flour accurately for consistent, successful results.
Main Dough Ingredients:
- 2 cups of warm water: This is the lifeblood for your yeast. The ideal temperature is crucial – aim for comfortably warm, between 105-115°F (40-46°C). Water that is too hot can kill the yeast, while water that is too cold will inhibit its activation.
- 1 teaspoon of salt: More than just a flavor enhancer, salt plays a vital role in regulating yeast activity and strengthening the dough’s gluten structure, contributing to a better texture.
- 1 tablespoon of granulated sugar: While optional, sugar acts as a quick energy source for the yeast, aiding in its initial activation and contributing to a beautiful golden-brown crust during baking.
- 1 tablespoon of active dry yeast: The star ingredient that gives your bread its rise and signature fluffy texture. Ensure your yeast is fresh for optimal leavening power.
- 3 cups of all-purpose flour: The primary structural component of your bread. For the most accurate measurement, especially in baking, weighing your flour (approximately 360-390 grams) is recommended, but volumetric measuring with a light hand is also acceptable.
For the Decorative Garnish & Finish:
This unique garnish is what gives Ellen’s Kitchen bread its distinctive, professional bakery appearance and contributes to a delightful crust texture. While optional, it’s highly recommended for that extra touch of visual appeal and flavor.
- 1.5 tablespoons of all-purpose flour: Forms the thick base of our special garnish paste.
- 4 teaspoons of cold water: Initially mixed with the flour to create a smooth, lump-free preliminary paste.
- 3 and 1/3 tablespoons of hot water: Added to the cold mixture to activate and thin the paste, making it spreadable and effective.
- 1 large egg yolk: When combined with the flour paste, the egg yolk adds a rich golden color and a beautiful sheen to the crust.
- Sesame seeds: Sprinkled generously on top, sesame seeds provide a nutty flavor, a pleasant crunch, and an iconic visual appeal. Feel free to experiment with other seeds like poppy seeds, nigella seeds, or even a sprinkle of flaky sea salt for variation.
- Unsalted butter (optional, for finishing): Brushed over the hot loaves immediately after baking, melted butter enhances the flavor, adds a lustrous shine, and contributes to an even softer crust.
Step-by-Step Instructions: Baking Your Perfect No-Knead Bread
Embark on your journey to baking the perfect soft and fluffy no-knead bread by following these detailed instructions. Each step is designed to be straightforward, ensuring a successful and rewarding baking experience from start to finish. Precision and patience are your best allies in yeast baking!
Step 1: Activating the Yeast – The Heart of Your Loaf
Begin by selecting a generously sized mixing bowl, one that will accommodate the dough’s expansion. Pour in the 2 cups of warm water. The water temperature is paramount for successful yeast activation; it should feel pleasantly warm to your wrist, akin to a baby’s bath, ideally between 105-115°F (40-46°C). Water that’s too hot will kill the yeast, while water that’s too cold will prevent it from becoming active. Add the 1 teaspoon of salt and the 1 tablespoon of sugar. Finally, evenly sprinkle the 1 tablespoon of active dry yeast over the water’s surface. Stir all these ingredients gently with a spoon or whisk until the salt and sugar have dissolved completely. Allow this mixture to rest undisturbed for 5 to 10 minutes. You’ll know your yeast is alive and well when a noticeable foamy or frothy layer appears on the surface, indicating active fermentation.
Step 2: Forming the Dough – Effortless Mixing, Maximum Potential
Once your yeast mixture is bubbling vigorously, it’s time to introduce the flour. Gradually add the 3 cups of all-purpose flour into the wet ingredients, incorporating it in small batches. Use a sturdy wooden spoon or a spatula to mix after each addition. The goal here is gentle incorporation, not vigorous kneading. Continue mixing until all the flour is fully moistened and a thick, incredibly sticky, and somewhat shaggy dough forms. Don’t be alarmed by its stickiness – this is a characteristic of high-hydration no-knead doughs and is essential for its light, airy texture. Avoid the temptation to add more flour at this stage, as it can lead to a denser loaf. Once mixed, cover the bowl tightly with a clean kitchen towel or plastic wrap. Place the bowl in a warm, draft-free spot in your kitchen and let the dough rise for at least 40 minutes. This crucial first proof allows the yeast to work, developing flavor and the airy structure we desire.
Step 3: Gentle Shaping – Preparing for the Final Rise
After the first proof, your dough should have expanded significantly and developed a beautiful airy texture. Lightly flour your work surface – a clean countertop or a large wooden cutting board will suffice. Gently scrape or pour the sticky dough from the bowl onto the floured surface. Sprinkle a modest amount of additional flour on top of the dough to prevent it from sticking to your hands. With very gentle hands, carefully form the dough into a loose ball. Remember to handle it delicately to preserve the precious air pockets that have formed. Using a dough scraper or a sharp knife, divide the dough into two equal portions. Take each portion and, with a light touch, gently shape it into a long, oval-shaped loaf. Then, use the palms of your hands to carefully flatten each oval slightly, aiming for a rustic, elongated form that will fit comfortably on your baking sheet.
Step 4: Second Proof – Building Lightness and Volume
Prepare a large baking tray by lining it completely with a sheet of parchment paper. This step is vital for preventing the dough from sticking and ensures effortless removal after baking, making cleanup a breeze. Carefully transfer one of your gently shaped dough pieces onto the lined baking tray. Gently flatten it a bit more with your hands to spread it evenly and achieve your desired loaf shape, ensuring it has adequate space to expand. Repeat this process with the second dough piece, placing it on the same tray, leaving ample room between the loaves if they are on one tray, or using a second lined tray. Cover the dough again with a clean kitchen cloth and allow it to rest for an additional 20 to 30 minutes. This second proof, or final rise, allows the dough to relax further and accumulate more air, contributing to an even lighter and softer crumb once baked. During this time, it’s also perfect to begin preheating your oven.
Step 5: Crafting the Garnish Mixture – For That Perfect Finish
While your dough is undergoing its second rise, prepare the special garnish mixture that will give your bread its signature appearance and enhanced crust. In a separate small mixing bowl, combine the 1.5 tablespoons of all-purpose flour with the 4 teaspoons of cold water. Whisk this mixture thoroughly until it forms a smooth, thin paste, ensuring there are no lumps. The cold water helps to prevent the flour from clumping. Next, gradually add the 3 and 1/3 tablespoons of hot water to this paste, whisking continuously until the mixture achieves a smooth, slightly thickened consistency. Finally, carefully incorporate the single egg yolk into this paste, mixing until it is fully integrated and the entire mixture is uniform in color and texture. This unique flour-and-egg-yolk wash is the secret to a beautifully golden, slightly crisp, and artfully decorated crust.
Step 6: Applying Garnish & Scoring – The Artistic Touch
Once the dough has completed its second proof, it’s ready for the artistic embellishments. Using a pastry brush, gently and evenly brush the prepared garnish mixture over the entire top surface of each dough piece. Be generous with the application, ensuring good coverage, but avoid saturating the dough. Next, to create the distinctive pattern, use your hands or a flat-edged tool (like a bench scraper, a spatula, or even a ruler) to gently create an oval border around the periphery of each loaf by lightly pressing into the dough – do not cut all the way through. Within this oval border, gently press to form several distinct square pieces, effectively dividing the loaf into appealing sections. This scoring not only adds a lovely visual pattern but also helps the bread expand evenly in the oven and facilitates easy slicing after baking. To complete the look, generously sprinkle sesame seeds (or your chosen alternative, such as poppy seeds, caraway seeds, or even a mixture of herbs) over the top of each loaf. This adds texture, a delightful nutty flavor, and an inviting aroma.
Step 7: The Bake – Achieving Golden Perfection with Steam
Preheat your oven to a high temperature of 482 degrees F (250 degrees C). This initial high heat is crucial for achieving a powerful “oven spring”—the rapid expansion of the dough during the first few minutes of baking—and contributing to that desirable crisp crust. For an even more professional-quality crust, place an oven-safe baking sheet or shallow pan, filled with about a cup of hot water, on the very bottom rack of your oven while it preheats. This creates steam, which keeps the crust soft and pliable during the initial baking phase, allowing the bread to expand fully before the crust sets, resulting in a lighter crumb and a beautiful exterior. Once the oven is thoroughly preheated and steaming, carefully transfer your baking tray with the garnished dough into the oven. Bake for approximately 15 minutes. Keep a close watch on your loaves; they should develop a gorgeous golden-brown color. Baking times can vary slightly depending on your specific oven, so always trust your visual cues.
Step 8: The Finishing Touch & Cooling – Ready to Savor
Once your bread has reached that perfect golden hue and sounds hollow when gently tapped on the bottom (a reliable indicator that it’s fully baked through), carefully remove the baking tray from the oven. For an extra layer of rich flavor, a beautiful sheen, and an even softer crust, immediately brush the top of the hot loaves with a thin, even layer of melted unsalted butter (if using). This simple step elevates the sensory experience of your homemade bread. Transfer the freshly baked bread onto a wire cooling rack to cool completely. While the temptation to slice into a warm loaf is incredibly strong, allowing the bread to cool thoroughly is vital. This cooling process allows the internal structure of the bread to set properly, prevents it from becoming gummy, and ensures the crust remains wonderfully crisp. Once cooled to room temperature, slice and relish every delightful bite of your effortlessly perfect homemade masterpiece!
Expert Tips & Tricks for Perfect No-Knead Bread
Mastering no-knead bread is incredibly satisfying, and with these additional insights and troubleshooting tips, you can elevate your baking to new heights and ensure consistent success every time:
- Always Check Your Yeast: An inactive yeast can ruin your entire batch. If your yeast mixture in Step 1 doesn’t show significant frothing and bubbling after 5-10 minutes, your yeast might be old or the water temperature was incorrect. It’s best to start over with fresh yeast.
- Measure Flour Accurately: While the recipe provides cup measurements, for ultimate precision, weighing your flour (3 cups is roughly 360-390g, depending on how packed it is) is always recommended. Too much flour will result in a dry, dense loaf, while too little will make it too sticky and difficult to handle.
- Embrace the Dough’s Stickiness: No-knead doughs are typically much wetter and stickier than traditional kneaded doughs. This high hydration is what contributes to their signature airy, open crumb. Resist the urge to add excessive amounts of extra flour during mixing or shaping, as this will lead to a denser texture. A lightly floured surface and hands are usually sufficient.
- Ensure a Consistent Oven Temperature: An accurately preheated oven is critical for bread baking. Consider using an oven thermometer to verify that your oven reaches and maintains the specified temperature of 482°F (250°C) before placing the bread inside.
- The Power of Steam: The hot water in the oven is not just a suggestion; it’s a key technique. The steam it generates keeps the crust soft and flexible during the initial intense heat, allowing the dough to achieve maximum “oven spring” (the final burst of rising) before the crust hardens. This results in a lighter, more open crumb and a beautifully crisp crust.
- How to Tell When Bread Is Done: Beyond the golden-brown color and the hollow sound when tapped on the bottom, the most reliable way to check for doneness is with an instant-read thermometer. The internal temperature of a fully baked loaf should register between 200-210°F (93-99°C).
- Cooling is Non-Negotiable: As tempting as it is to slice into warm bread, allowing it to cool completely on a wire rack is essential. This process, known as “carry-over baking,” allows the internal structure to set, prevents a gummy texture, and ensures the crust maintains its crispness. Patience here truly pays off!
Creative Variations & Customizations for Your Loaf
This soft and fluffy no-knead bread recipe is a fantastic foundation, but one of the greatest joys of baking at home is the freedom to customize. Feel free to unleash your creativity and tailor your loaves to your personal taste. Here are some inspiring ideas to get you started:
- Herbed Bread: Infuse your bread with aromatic flavors by adding 1 to 2 tablespoons of dried herbs such as rosemary, thyme, oregano, or a blend of Italian herbs to the flour mixture in Step 2. For fresh herbs, finely chop them and gently fold them in during the shaping stage.
- Cheesy Delight: For a savory treat, incorporate 1/2 to 1 cup of your favorite shredded cheese (cheddar, mozzarella, Parmesan, or a blend) into the dough during the final stages of mixing in Step 2. The cheese will melt beautifully, creating pockets of rich flavor.
- Garlic & Herb Fusion: Combine the best of both worlds by adding a teaspoon of garlic powder (or 1-2 tablespoons of finely minced fresh garlic) along with your chosen dried herbs to the dough.
- Mediterranean Medley: Introduce a burst of Mediterranean flavor by folding in 1/2 cup of chopped Kalamata or green olives and 1/4 cup of well-drained sun-dried tomatoes (chopped) during the gentle shaping process in Step 3.
- Sweet Cinnamon Swirl: For a delightful dessert or breakfast bread, gently roll out the dough slightly thinner in Step 3 after dividing it. Sprinkle generously with a mixture of cinnamon and sugar (you can also add a touch of brown sugar), then roll the dough up loosely before the second proof.
- Seed & Grain Boost: Beyond the classic sesame seeds, get adventurous with your toppings and mix-ins. Consider poppy seeds, flax seeds, sunflower seeds, pumpkin seeds, or even a savory “everything bagel” seasoning blend. You can sprinkle them on top as directed or gently fold a few tablespoons into the dough.
- Alternative Flours: While all-purpose flour works wonderfully, you can experiment with different flours for varied textures and flavors. Try substituting up to 1 cup of the all-purpose flour with whole wheat flour for a nuttier flavor and denser crumb, or use bread flour for an even chewier texture. Remember that different flours absorb water differently, so you might need to slightly adjust the amount of water.
Serving Suggestions & Storage Tips
Once your incredibly soft and fluffy no-knead bread emerges from the oven and has cooled, it’s ready to be enjoyed in countless ways. Here are some ideas for serving and ensuring your delicious creation stays fresh.
- Serving Suggestions: This versatile bread is exceptional served simply warm with a generous slather of butter. It makes a perfect accompaniment to hearty soups, stews, and chilis, or as a flavorful side for any pasta dish. Use it as a robust base for your favorite sandwiches, or simply tear off chunks to dip in high-quality olive oil and balsamic vinegar. It’s also fantastic toasted and served with jams, honey, or avocado for breakfast.
- Storage Tips: To maintain its freshness and delightful texture, store leftover bread at room temperature. The best method is to keep it in an airtight bread box, a large freezer-safe zip-top bag with all the air pressed out, or wrapped securely in foil, then in plastic wrap. It will remain wonderfully fresh for approximately 3-4 days. For longer preservation, slicing the bread before freezing is highly recommended. Place the slices in a freezer-safe bag, ensuring as much air is removed as possible, and freeze for up to 2-3 months. You can then toast individual slices directly from the freezer for a quick, warm, and convenient treat.
Your Journey to Perfect Homemade Bread Starts Here!
Baking homemade bread, often perceived as a complex and time-consuming endeavor, is now more accessible than ever before. This incredibly simple yet profoundly satisfying no-knead bread recipe, inspired by the culinary expertise of Ellen’s Kitchen, completely redefines what’s possible in your own kitchen. It triumphantly proves that you don’t need specialized equipment, extensive experience, or hours of arduous labor to create loaves that are not only deliciously soft and fluffy but also visually stunning.
Gone are the days of dreading the kneading process. With this recipe, you’ll discover the immense joy of effortlessly producing warm, crusty bread that fills your home with an irresistible aroma and your table with wholesome goodness. Each bite is a testament to the simplicity and magic of this method, offering a texture and flavor profile that rivals traditional loaves.
So, whether you’re a seasoned baker looking for an easier, more efficient approach, or a complete novice taking your very first steps into the rewarding world of bread making, this no-knead recipe is your perfect starting point. It’s an invitation to experiment, customize with your favorite flavors, and most importantly, to savor the incredible satisfaction of creating something truly wonderful with your own hands. Give it a try, share your delightful creations with loved ones, and enjoy every single, effortlessly perfect bite of your homemade soft and fluffy no-knead bread!